
Table of Contents >> Show >> Hide
- Why Art Deco Cedar Chests Are Worth Restoring
- Start With a Slow Assessment
- Safety First: The Chest Must Be Safe Before It Is Pretty
- Tools and Supplies for Chipped Veneer Repair
- Step 1: Clean Before You Repair
- Step 2: Stabilize Loose Veneer
- Step 3: Prepare the Chipped Area
- Step 4: Choose and Cut the Replacement Veneer
- Step 5: Glue and Clamp the Patch
- Step 6: Blend the Color
- Step 7: Restore the Finish Without Over-Restoring
- Step 8: Refresh the Cedar Interior
- Common Mistakes to Avoid
- Real Restoration Experience: Lessons From Chipped Veneer Cedar Chests
- Conclusion
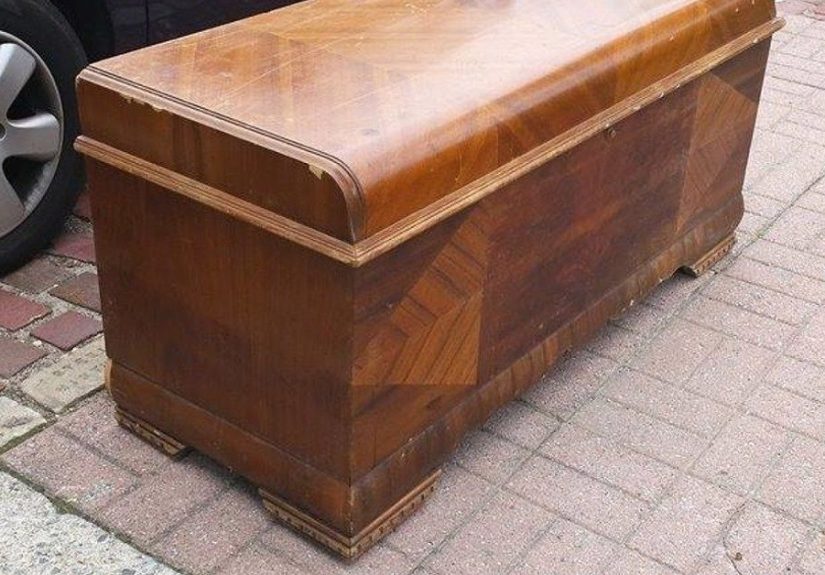
An Art Deco cedar chest is not just a storage box with dramatic eyebrows. It is a little time capsule: geometric lines, warm wood tones, hidden cedar fragrance, and enough vintage charm to make a plain bedroom bench feel underdressed. But when the veneer is chipped, lifting, cracked, or missing in awkward little bites along the edges, the whole piece can start to look less “Roaring Twenties elegance” and more “garage sale with emotional baggage.”
The good news: a chipped veneer Art Deco cedar chest can often be restored beautifully without erasing its age, character, or original design. The secret is restraint. You are not trying to turn a historic chest into a shiny plastic piano. You are trying to stabilize the veneer, blend the repair, revive the cedar interior, and protect the finish so the chest can keep doing what cedar chests do best: storing blankets, preserving memories, and making guests ask, “Where did you find that?”
This guide walks through a practical, careful approach to restoring chipped veneer on an Art Deco cedar chest, including assessment, cleaning, veneer patching, color matching, finishing, safety checks, and real-world lessons learned from hands-on restoration projects.
Why Art Deco Cedar Chests Are Worth Restoring
Art Deco furniture became popular in the 1920s and 1930s, a period known for bold geometry, streamlined profiles, decorative veneers, and dramatic contrast. Instead of heavy Victorian carving, Art Deco leaned into shape, rhythm, symmetry, and material. A cedar chest from this era may feature waterfall edges, bookmatched veneer, walnut or mahogany tones, stepped bases, chrome or brass hardware, and clean lines that still feel surprisingly modern.
Many vintage cedar chests were built as hope chests, blanket chests, or bedroom storage pieces. Their interiors were often lined with aromatic cedar, which naturally gives off a pleasant scent and helps create a fresh storage environment. Over time, however, the exterior veneer can chip from impact, moisture, heat, careless moving, or decades of being bumped by vacuum cleaners with no respect for history.
Restoring one is usually worth the effort because veneer damage is often cosmetic rather than fatal. A missing corner, loose strip, or chipped edge can be repaired with patience, matching veneer, adhesive, careful sanding, and finish blending. The result is not always invisible under a magnifying glass, but it can be visually harmonious. In restoration, “harmonious” is often better than “perfect,” because perfect repairs sometimes look suspiciously new.
Start With a Slow Assessment
Before grabbing sandpaper like a person with a caffeine problem, inspect the chest carefully. A proper assessment saves time, prevents accidental damage, and helps you choose the right repair method.
Check the veneer damage
Look for chips, missing patches, lifting seams, blisters, cracks, and dark water stains. Press gently around damaged areas. If the veneer flexes, clicks, or moves, it needs to be reglued before cosmetic work begins. If the substrate underneath is crumbly, uneven, or gouged, it must be leveled first so the replacement veneer has a stable surface.
Identify the finish
Older cedar chests may have shellac, lacquer, varnish, or a later polyurethane coating. A hidden spot test can help. Alcohol softens shellac; lacquer thinner softens lacquer; mineral spirits may clean grime without stripping many cured finishes. Always test in an inconspicuous area before committing to any cleaner or solvent.
Look at the design pattern
Art Deco veneer is often directional. Grain may run horizontally across the front, curve over a waterfall edge, or mirror itself in a bookmatched pattern. Matching the direction matters. A patch with the wrong grain angle can shout “I was repaired!” from across the room like a tiny wooden megaphone.
Safety First: The Chest Must Be Safe Before It Is Pretty
Some vintage cedar chests, especially older Lane and Virginia Maid models, have been subject to serious safety warnings because certain old latches can automatically lock when the lid closes. If the chest has an old locking mechanism, inspect it before using the piece in a home. Remove unsafe auto-locking hardware or replace it with safe hardware according to current guidance. A restored chest should never be able to trap a child inside.
Also consider finish safety. If the chest has old paint, unknown coatings, or suspicious layers added before 1978, treat lead exposure as a possibility. Do not dry-sand old painted surfaces without testing. Use lead-safe practices, proper containment, and certified help when needed. For stained or clear-coated veneer, wear eye protection, gloves when using solvents, and a good dust mask or respirator while sanding. Work in a ventilated space and keep flames away from flammable products.
Tools and Supplies for Chipped Veneer Repair
You do not need a museum lab to restore a chipped veneer Art Deco cedar chest, but you do need the right basic supplies. Gather these before you begin:
- Sharp utility knife or veneer saw
- Small chisels
- Matching wood veneer
- Wood glue, hide glue, or veneer adhesive
- Clamps, painter’s tape, and flat cauls
- Wax paper to prevent glue from sticking to cauls
- Sandpaper in grits from 180 to 320
- Mineral spirits for cleaning and color previewing
- Wood stain, dye, toner, or touch-up markers
- Shellac, lacquer, wipe-on varnish, or compatible topcoat
- Paste wax for final sheen adjustment
The most important tool is not on the list: patience. Veneer repair punishes rushing. If you try to patch, stain, seal, and celebrate in one afternoon, the chest will remember your arrogance.
Step 1: Clean Before You Repair
Start with dry cleaning. Dust the chest with a soft cloth or natural-bristle brush. Use a vacuum with a screen or cloth over the nozzle if loose veneer fragments are present. You do not want to accidentally inhale a 1930s walnut chip into the vacuum and spend the afternoon searching the dust bin like an archaeologist.
Next, clean the surface gently. Mineral spirits on a soft cloth can remove waxy grime and reveal the true color of the finish without immediately stripping it. Avoid soaking the veneer. Too much liquid can loosen glue and create new problems. If the existing finish is mostly intact, conservation cleaning may be better than full stripping. Original finish carries age, warmth, and value; once removed, it cannot be put back in the same way.
Step 2: Stabilize Loose Veneer
Loose veneer must be secured before missing chips are patched. Lift the loose edge only as much as necessary. Remove dust and loose glue if accessible. A thin blade, small brush, or syringe can help work adhesive under the veneer. Press the veneer flat with a caul, using wax paper between the repair and the caul so you do not glue your clamp block to the chest. That is not restoration. That is furniture wearing a hat.
Clamp evenly and avoid crushing the veneer. For curved Art Deco waterfall edges, use a flexible caul or shaped block that follows the curve. Painter’s tape can help hold small repairs, but tape alone may not provide enough pressure for larger lifted areas. Let the adhesive cure fully before trimming or sanding.
Step 3: Prepare the Chipped Area
For missing veneer, create a clean patch area. Ragged chips are hard to match, so many restorers square off or straighten the damaged section with a sharp knife or chisel. This sounds scary, because you are technically cutting the furniture to fix the furniture, but a clean shape is much easier to patch than a jagged crater.
Work slowly and remove only what is necessary. If the substrate below is uneven, level it with a thin wood shim, compatible filler, or carefully applied patching material. The goal is a flat base. Veneer is thin, and it will telegraph lumps, dips, and glue blobs like gossip in a small town.
Step 4: Choose and Cut the Replacement Veneer
Select veneer that matches the species, grain direction, color family, and thickness as closely as possible. Walnut is common on many Art Deco cedar chests, but mahogany, maple, cedar, and mixed decorative veneers may also appear. If an exact species match is impossible, prioritize grain and color behavior. A near match that stains well is better than a technically correct species that looks like it arrived from a different zip code.
Lay paper over the missing area and trace a template, or place veneer directly over the repair and mark it carefully. Cut slightly oversized, then sneak up on the fit with a sharp blade. A tight fit matters, but do not force the patch. If it buckles, the repair will fail or sit proud of the surface.
Step 5: Glue and Clamp the Patch
Apply a thin, even layer of adhesive to the substrate or patch, depending on your chosen glue system. Too much glue creates squeeze-out and prevents the patch from sitting flat. Place the veneer patch, align the grain, cover it with wax paper, add a flat caul, and clamp gently but firmly.
For tiny chips on edges, painter’s tape stretched tightly over the patch can sometimes act as a clamp. For larger areas, use blocks and clamps. If the damaged section is on a curved waterfall edge, take extra care to shape the pressure so the patch follows the curve.
After the glue cures, trim excess veneer with a sharp blade. Sand lightly with 220-grit paper, staying local to the patch. Do not aggressively sand surrounding veneer. Vintage veneer can be thin, and sanding through it creates a bigger restoration project with a much worse attitude.
Step 6: Blend the Color
Color matching is where the repair becomes art. First, wipe the patch with mineral spirits to preview how it may look under finish. If it appears too light, use dye, stain, toner, or touch-up markers in thin layers. Build color slowly. It is easier to add warmth than to remove a dark blotch.
Observe the surrounding wood. Is it amber? Brown? Red? Slightly smoky? Art Deco furniture often has rich contrast, so the patch may need more than one color. A base stain can establish warmth, while fine graining lines added with a touch-up marker can mimic the original veneer. Use a soft cloth or small artist brush to feather edges.
Do not judge the color until a sealer is applied. Raw stained wood and sealed wood can look dramatically different. A thin coat of shellac is often useful as a barrier and color preview, especially when layering touch-up work.
Step 7: Restore the Finish Without Over-Restoring
If the original finish is mostly intact, avoid stripping the whole chest. Clean, touch up, seal, and add a compatible topcoat only where needed. If the finish is badly alligatored, flaking, water-damaged, or previously ruined by heavy coatings, a more complete refinish may be justified.
Choose the sheen carefully. Most vintage cedar chests look best with satin or soft gloss, not a thick, mirror-bright plastic shine. Several thin coats are usually better than one heavy coat. Between coats, sand very lightly with fine paper or synthetic abrasive pads. The goal is smooth protection, not a finish so thick it looks like the chest was dipped in candy.
Step 8: Refresh the Cedar Interior
The interior of a cedar chest is often unfinished, and that is part of its charm. If the cedar scent has faded, lightly sanding the interior with fine sandpaper can expose fresh cedar fibers and revive the aroma. Vacuum the dust thoroughly afterward. Avoid coating the inside with polyurethane or heavy finish because that can seal in the cedar and reduce the scent.
If the inside smells musty, air it out first. Use sunlight carefully and briefly, avoiding long exposure that can dry or warp wood. Baking soda in an open container, activated charcoal, or gentle ventilation can help reduce odors. Do not perfume the interior aggressively. Cedar should smell like cedar, not like a candle aisle had a wrestling match with a lumberyard.
Common Mistakes to Avoid
Sanding through the veneer
This is the classic heartbreak. Veneer is thin, especially on later furniture. Sand by hand around repairs and stop as soon as the surface is level.
Using filler where veneer is missing
Wood filler can work for tiny edge nicks, but large missing veneer areas usually look better with real veneer patches. Filler rarely mimics grain convincingly unless it is part of a painted finish.
Ignoring the latch
A cedar chest restoration is incomplete if the lid or lock is unsafe. Hardware safety matters as much as appearance.
Making the repair too perfect
A vintage chest should still look vintage. Blend the repair into the existing finish rather than refinishing everything into a showroom glare.
Real Restoration Experience: Lessons From Chipped Veneer Cedar Chests
The first thing you learn when restoring a chipped veneer Art Deco cedar chest is that every chip has a backstory. A missing corner near the base usually means the chest was dragged instead of lifted. A lifted strip along the lid often points to moisture or heat. A dark ring on top suggests a plant, a glass, or someone’s optimistic belief that “just for a minute” is a waterproof strategy. Reading the damage helps you repair the cause, not just the symptom.
One practical lesson is to save every loose veneer fragment you find. Even a tiny piece can be useful for color matching. If the original chip is intact, regluing it is often better than cutting a new patch. Original veneer already has the right grain, oxidation, finish residue, and aging. It is the restoration equivalent of finding the missing puzzle piece under the sofa cushion.
Another lesson is that color matching should happen in daylight and indoor light. A patch can look perfect by the workshop window and then turn orange under warm bedroom lighting. Always check the repair in the room where the chest will live. Art Deco pieces often rely on strong visual flow, so even a small mismatch on a front panel can be noticeable.
Clamping is also more creative than beginners expect. Flat repairs are simple, but waterfall edges and rounded corners require shaped pressure. A piece of cork, dense foam, or a shaped scrap block can help distribute pressure without denting the veneer. Wax paper is non-negotiable. Forget it once, and you will remember forever while prying a caul off your beautiful repair and whispering words not approved for polite company.
The cedar interior deserves a gentle hand. Many people want to oil it heavily, but light sanding is often enough to revive the scent. If oil is used, it should be done sparingly and only with products intended for cedar. Too much oil can stain stored linens or create a heavy smell. Clean, dry, lightly refreshed cedar is usually better than an interior that smells like a forest tried too hard.
Perhaps the biggest experience-based lesson is knowing when to stop. After repairing one chip, you will notice another scratch. After fixing the scratch, you will see a dull spot. After polishing the dull spot, you may begin negotiating with yourself about refinishing the entire chest at midnight. Do not let the project turn into a perfection spiral. A restored Art Deco cedar chest should look cared for, not factory-new. Small marks are part of its history. The goal is to make the piece stable, safe, attractive, and useful again.
A well-restored cedar chest becomes more than furniture. It becomes a functional heirloom. It can sit at the foot of a bed, hold quilts, store seasonal linens, or serve as a quiet focal point in a hallway. When the chipped veneer is repaired and the finish glows again, the chest regains its dignity. It stops looking forgotten and starts looking intentional.
Conclusion
Restoring a chipped veneer Art Deco cedar chest is a rewarding project because the transformation is visible, practical, and deeply satisfying. The process requires careful cleaning, stable veneer repair, thoughtful patching, patient color blending, and a finish that respects the age of the piece. It also requires safety awareness, especially with old locks, old finishes, dust, and solvents.
The best restorations do not erase the past. They edit the damage, preserve the character, and give the furniture a stronger future. With a careful approach, your cedar chest can move from “poor thing” to “family treasure” without losing the vintage personality that made it worth saving in the first place.


