
Table of Contents >> Show >> Hide
- Why Chalkboard Herb Plant Markers Are So Popular
- Think Like a Gardener Before You Think Like a Crafter
- Best Materials for Chalkboard Herb Plant Markers
- How to Make Chalkboard Herb Plant Markers
- Design Ideas That Actually Look Good
- How to Make Them Last Longer
- Common Mistakes to Avoid
- Real-Life Experiences Gardeners Often Have with Chalkboard Herb Plant Markers
- Final Thoughts
There are two kinds of herb gardeners in this world: the organized legends who label every pot the second it hits the windowsill, and the brave souls who stare at two green seedlings and whisper, “One of you is basil… probably.” Chalkboard herb plant markers exist to save both groups. They are practical, charming, budget-friendly, and just crafty enough to make you feel like the kind of person who owns matching watering cans and knows where the twine is at all times.
More importantly, these little markers do real work. Herb gardens often include plants with similar-looking leaves when they are young, and once you start mixing basil, thyme, oregano, parsley, cilantro, mint, and chives in a tight space, memory gets unreliable fast. A well-made marker helps you stay organized, avoid harvesting the wrong herb, keep containers tidy, and give your kitchen garden that polished “yes, I absolutely have my life together” look. Even if you absolutely do not.
Why Chalkboard Herb Plant Markers Are So Popular
Chalkboard herb plant markers hit a sweet spot between function and style. Plastic nursery tags work, sure, but they are not exactly the fashion icons of the garden world. Chalkboard-style markers look softer, more intentional, and far more at home next to terracotta pots, galvanized planters, or a sunny kitchen shelf full of fresh herbs.
They are also flexible. If you switch out herbs seasonally, reuse pots, or like to reorganize containers every few months, a chalkboard surface gives you the freedom to relabel without starting from scratch. That is especially helpful for small-space gardeners who use containers year-round and rotate plants depending on the season, light, or how ambitious they felt at the garden center.
Another reason these markers work so well is that herb gardening is often personal. Some people grow a classic culinary lineup. Others build a tea garden with mint, lemon balm, chamomile, and lavender. Some go all in on Mediterranean herbs, while others grow whatever survives a chaotic watering schedule and an enthusiastic cat. Chalkboard herb plant markers make even a tiny herb collection feel customized.
Think Like a Gardener Before You Think Like a Crafter
Before you grab paint and wooden stakes, it helps to remember what herbs actually need. Most culinary herbs prefer at least six hours of sun, well-drained soil, and containers or beds that do not stay soggy. Many popular herbs such as basil, thyme, rosemary, oregano, and lavender also do best when they are not babied with overly rich, constantly wet soil. Herbs may be fragrant divas, but many are surprisingly unimpressed by too much fuss.
That matters because your plant markers should match the conditions of your herb garden. If your herbs live on an indoor windowsill, chalkboard markers can be cute and low-maintenance. If they sit on an uncovered patio through rain, sun, and summer heat, your markers need to be tougher. In other words, the marker is part décor, part garden tool, and it needs to dress for the weather.
It also helps to group herbs with similar watering needs. Mediterranean herbs usually like drier conditions, while others such as parsley, cilantro, or chives may appreciate a bit more consistent moisture. Clear labels make it easier to keep track of what is planted where, especially when you have several containers clustered together. Without labels, every pot starts looking like a leafy guessing game.
Best Materials for Chalkboard Herb Plant Markers
If you want markers that look good and last longer than one dramatic rainstorm, material choice matters. Wood is the classic option because it is easy to cut, paint, and personalize. Craft sticks, wooden garden stakes, thin wood discs, and small scrap pieces all work beautifully. Bamboo skewers and dowels are also useful when you want something slim for smaller pots.
Metal can be even more durable, especially for outdoor gardens. If you love the chalkboard look but need serious staying power, you can combine a dark painted tag face with a sturdy metal or wire stem. Clay, canning jar lids, and small plaques are also popular if you want something a little more decorative.
For the chalkboard finish itself, read the product label instead of trusting craft optimism. Some true chalkboard paints are intended for indoor use, which means they are better for indoor herb gardens, covered porches, and decorative pot displays than fully exposed garden beds. If your markers will live outside, choose a base material that handles moisture well, and treat the finished piece as something you may need to refresh over time.
Here is a simple materials list that works for most DIY versions:
- Wooden craft sticks, mini plaques, or garden stakes
- Fine-grit sandpaper
- Chalkboard paint or matte black craft paint
- Small foam brush or paintbrush
- White chalk marker, chalk pencil, or paint pen
- Bamboo skewer, dowel, floral wire, or stake backing
- Strong glue for assembly if needed
- Outdoor-safe sealant for the non-writing areas if the markers will be used outdoors
How to Make Chalkboard Herb Plant Markers
1. Pick the shape and size
Decide whether you want a classic stake, a mini hanging sign, a spoon-shaped label, or a tiny plaque on a stem. For countertop herb pots, smaller is better. Nobody wants a giant sign towering over a basil plant like it is running for office.
2. Prep the surface
Sand rough wood lightly so the paint goes on smoothly. Wipe off dust before painting. If you are using repurposed materials, make sure they are clean and fully dry.
3. Paint the marker face
Apply two thin coats of chalkboard paint or matte black paint, letting each coat dry completely. Thin coats usually look better than one thick, gloopy layer. This is a plant marker, not a frosting project.
4. Cure or dry fully
Do not rush this step. A marker that feels dry on top may still be soft underneath. Let the painted face fully dry so your lettering stays crisp and the surface holds up better over time.
5. Add the plant name
Write the herb name in a clean, readable style. Go for simple and legible over fancy and mysterious. “Thyme” should not look like “Time,” unless your garden is also an existential art piece. Chalk markers usually give brighter, cleaner lettering than old-school chalk, and paint pens are better if you want a more permanent label.
6. Attach the stem or stake
If your marker face is separate from the stake, glue it securely to a bamboo skewer, wooden dowel, or wire stem. Let the adhesive cure completely before placing it in soil.
7. Protect wisely
If the marker will be used outdoors, consider sealing the back, edges, and stem. Be careful with the writing surface: if you seal over a true chalkboard area, you may lose the erasable feature that makes chalkboard markers fun in the first place. For outdoor beds, many gardeners end up using a permanent paint pen on a dark background instead of relying on a reusable chalk surface.
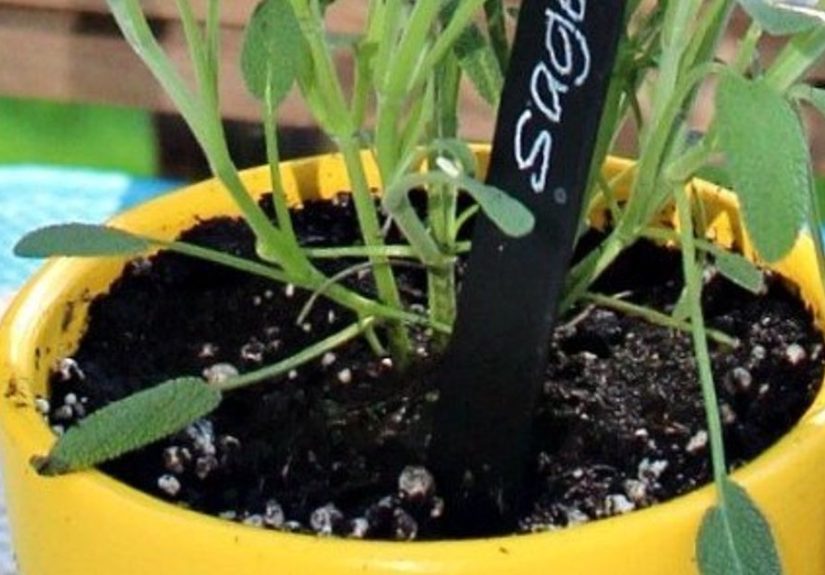
Design Ideas That Actually Look Good
Mini farmhouse signs
Use small rectangular wood pieces, a black painted face, and white block lettering. These look especially good in galvanized herb tubs, raised planters, or rustic kitchen décor.
Round wood disc markers
These feel a little more handcrafted and less store-bought. Pair them with jute, a bamboo stake, or a natural wood edge for a cozy cottage-garden vibe.
Canning jar lid markers
If you like upcycled projects, canning jar lids make unexpectedly cute herb markers. They have a built-in decorative feel and can be attached to wire stems for height and visibility.
Minimal modern labels
Prefer clean lines? Use narrow black stakes with small white all-caps lettering. They disappear visually from a distance but look crisp up close. This style works beautifully with modern ceramic pots and indoor kitchen herb gardens.
Vintage-style herb markers
If you love old garden aesthetics, you can create dark marker faces on slim stakes and use embossed labels or permanent marker accents. This blends the organized look of traditional plant labeling with the softer charm of a handmade herb garden.
How to Make Them Last Longer
This is where the fantasy meets the weather report. Chalkboard herb plant markers can absolutely be functional, but durability depends on how and where you use them.
For indoor use, they are easy. Keep them dry, wipe them clean gently, and rewrite names as needed. A sunny kitchen, utility room window, or enclosed sunroom is basically the spa version of life for a chalkboard marker.
For outdoor use, you need to be more strategic. Start with a solid base material. Avoid flimsy cardboard-like craft blanks for containers that get watered often. Choose wood thick enough not to warp immediately, or combine decorative marker faces with more durable stems. Use dark paint pens if you want high contrast that lasts longer through watering. If you are decorating lids, plaques, or wood pieces, outdoor sealants can help protect painted surfaces and edges, but repeated exposure to rain and irrigation will still wear things down over time.
If you want truly weatherproof labels for a permanent outdoor herb bed, a chalkboard-inspired look may be better than a literal chalkboard surface. In other words, paint the tag dark, write with a permanent paint marker, and enjoy the look without expecting infinite erasability. That gives you the style of chalkboard herb plant markers with far less heartbreak after the first storm.
Common Mistakes to Avoid
Making the marker too small
Tiny labels may look adorable, but if you cannot read “oregano” without squinting like a detective in a crime drama, size up.
Using indoor-only finishes in exposed beds
Always check whether the finish is designed for indoor or outdoor use. A marker on a kitchen shelf and a marker in a rain-soaked patio container are living very different lives.
Writing in fancy script
Your marker is not a wedding invitation. Prioritize readability, especially for herbs with longer names like rosemary, lemon balm, or flat-leaf parsley.
Ignoring the watering pattern
If you place markers where water constantly hits them, fading happens faster. Position them slightly off the main watering path when possible.
Forgetting the practical details
Add more than just the herb name if it helps. You can include the variety, planting date, or whether the herb likes drier soil. That little extra information becomes surprisingly useful later.
Real-Life Experiences Gardeners Often Have with Chalkboard Herb Plant Markers
One of the most relatable experiences with chalkboard herb plant markers is how confident people feel on day one. The pots are lined up. The lettering is neat. The basil is thriving. The mint is pretending to be innocent. Everything looks like a magazine spread. Then real life begins. Someone waters enthusiastically. A summer breeze knocks a marker sideways. The cilantro bolts. Suddenly the marker project stops being a cute craft and starts revealing whether it was actually built for garden life.
Many gardeners discover very quickly that indoor and outdoor marker experiences are not the same thing. Indoors, chalkboard herb plant markers can feel delightfully low-maintenance. They stay clean longer, the lettering remains sharp, and you can relabel with almost no drama. On a kitchen windowsill, these markers often become part of the décor as much as the garden itself. They make even a small collection of herbs feel intentional and stylish, especially when paired with matching pots or a tray.
Outdoors, the experience becomes more educational. People often learn that a marker can look fabulous on Saturday and slightly haunted by Wednesday if it is hit with direct sun, overhead watering, and a surprise rainstorm. That does not mean the project failed. It just means the garden gave feedback. A lot of herb gardeners end up adjusting their method after the first round. They switch from soft chalk to chalk marker, from chalk marker to paint pen, or from bare wood to a sealed, darker base. That little process of trial and improvement is incredibly common.
Another real experience is how useful labels become once herbs mature. At first, labeling seems mostly decorative. Then the plants fill out, leaves overlap, and suddenly the marker becomes the only thing standing between “fresh oregano for pasta” and “why does this taste suspiciously like thyme?” For beginner gardeners especially, markers remove hesitation. You harvest more confidently when you know exactly what you planted.
Gardeners also talk about how these markers make herb care more mindful. When each pot is labeled, it becomes easier to notice patterns. The rosemary in the driest corner is happy. The parsley near the edge dries out faster. The mint is, of course, plotting territorial expansion. Labels help people connect names, care habits, and growth patterns, which is one of the biggest reasons small herb gardens become so enjoyable.
Then there is the emotional side. Handmade herb markers have a way of making a garden feel personal. They are small, but they signal attention. People remember making them with kids, using leftover craft supplies, or repainting them at the start of spring as a tiny seasonal ritual. Even when the lettering fades, the project still feels worthwhile because it added character to the space.
In the end, the common experience is not perfection. It is refinement. Gardeners try a version, see what lasts, tweak the materials, and make a better set next time. Chalkboard herb plant markers are part garden tool, part home décor, and part experiment. And honestly, that mix is exactly what makes them so appealing.
Final Thoughts
Chalkboard herb plant markers are one of those rare DIY ideas that are both charming and genuinely useful. They help organize your herbs, dress up containers, and add a handmade touch to indoor and outdoor spaces. The trick is matching the design to the environment. For a kitchen windowsill or covered porch, a true chalkboard finish can be cute and flexible. For exposed outdoor containers or garden beds, a chalkboard-style look with more permanent lettering may be the smarter move.
Either way, the appeal is the same: better labels, better organization, and fewer moments of staring at a mystery herb like it owes you an explanation. That alone makes the project worth it.


