Table of Contents >> Show >> Hide
- Why a 3D Printed 16mm Movie Camera Is Such a Big Deal
- The Core Challenge: Moving Film One Frame at a Time
- The Shutter: The Unsung Hero of the Camera
- Why 16mm Film Still Has Filmmakers Hooked
- Where 3D Printing Fits Into Camera Building
- Important Design Problems in a 3D Printed 16mm Camera
- How It Compares to Classic 16mm Cameras
- Practical Uses for a DIY 16mm Film Camera
- What the Future Could Look Like
- Experience Section: What It Feels Like to Work With a 3D Printed 16mm Movie Camera
- Conclusion
There are DIY projects, and then there are projects that look at a century of precision cinema engineering and say, “Cute. Let’s try that with a desktop 3D printer.” A 3D printed 16mm movie camera belongs firmly in the second category. It is ambitious, slightly ridiculous, deeply charming, and exactly the kind of invention that makes film lovers and hardware tinkerers lean forward in their chairs.
At first glance, the idea sounds simple: make a camera body, pull 16mm film past a lens, expose one frame at a time, and enjoy the magic. In reality, a motion-picture film camera is a miniature choreography of transport, timing, optics, light control, registration, and mechanical repeatability. Every frame must land in nearly the same place. The shutter must open and close at the right moment. The film must move without scratches, jams, wobble, or accidental modern-art disasters. And the whole thing must be light-tight, because film treats stray light the way cats treat open boxes: it gets everywhere.
The recent excitement around a 3D printed 16mm movie camera proves something important: analog cinema is not dead, and neither is the hacker spirit. The camera may be made with modern tools, stepper motors, code, and plastic parts, but the soul of the project is gloriously old-school. It connects the age of Kodak, Bolex, ARRI, and Super 16 with the age of Arduino, Raspberry Pi, CAD files, and late-night printer calibration.
Why a 3D Printed 16mm Movie Camera Is Such a Big Deal
To understand why this project matters, it helps to understand what 16mm film represents. Introduced by Kodak in the 1920s, 16mm became a more accessible alternative to 35mm. It was smaller, safer, lighter, and cheaper to shoot. Over time, it found a home in education, documentaries, news, industrial films, experimental cinema, television, music videos, and independent features.
Unlike digital video, 16mm film is a physical medium. Each frame is a tiny photograph exposed onto a strip of film. At 24 frames per second, the camera is not merely taking pictures; it is performing a high-speed mechanical ballet. The film advances, stops, is exposed, then advances again. Do that smoothly enough and the audience sees motion. Do it poorly and the footage looks like it was filmed during a mild earthquake.
Traditional 16mm cameras solved this with beautifully engineered claw mechanisms, gears, pressure plates, rotating shutters, and tightly machined components. A Bolex or ARRI camera is not just a box with a lens; it is a precision instrument. Recreating that with 3D printed parts is difficult because consumer-level plastic printing does not naturally offer the same stiffness, smoothness, or dimensional stability as machined metal. Plastic can warp. Holes can shrink. Surfaces can create friction. Tolerances can wander away like interns after lunch.
That is why a working 3D printed 16mm movie camera is impressive. It is not simply a novelty shell around a digital sensor. It actually has to move real film. It has to respect the rules of cinema mechanics while using tools that were never originally meant for building motion-picture cameras.
The Core Challenge: Moving Film One Frame at a Time
The most important job inside a 16mm movie camera is film transport. In a classic camera, a claw grabs a perforation in the film, pulls it down exactly one frame, then retracts while the shutter opens. The film must pause during exposure. If it moves while the shutter is open, the result is blur. If the frame does not land in the same position each time, the image jumps.
A 3D printed design can approach this problem differently. Instead of copying a traditional claw mechanism, a modern builder can use stepper motors to advance the film. Stepper motors are useful because they move in controlled increments. Pair them with a microcontroller, drivers, and careful timing, and they can turn film transport into a programmable system rather than a purely mechanical one.
In the widely discussed Henry Kidman-style approach, the camera relies on electronically controlled motion rather than a complex clockwork movement. The film transport and shutter can be synchronized through software. This does not make the project easy, but it changes the battlefield. Instead of machining tiny metal claws and gear trains, the builder can iterate through code, printed parts, motor timing, and alignment tests.
The benefit is accessibility. A filmmaker with CAD skills, a printer, basic electronics knowledge, and heroic patience can attempt something that previously belonged mostly to factories, repair shops, and camera engineers with jewelers’ tools. The downside is that every shortcut creates a new problem. A 3D printed sprocket, for example, may not be perfectly round or perfectly flat. Even tiny deformation can lead to frame wobble.
The Shutter: The Unsung Hero of the Camera
When people talk about cameras, they usually talk about lenses, film stocks, and image quality. The shutter gets less glamour, which is unfair. In a motion-picture camera, the shutter is the bouncer at the nightclub of light. It decides exactly when photons are allowed in and when they must stay outside in the cold.
Most motion-picture film cameras use a rotating shutter. While the shutter is closed, the film advances to the next frame. While it is open, the frame is exposed. The timing must be consistent. At 24 frames per second, a common shutter angle such as 180 degrees gives an exposure time around 1/48 of a second. That exposure rhythm is part of the classic cinematic look.
In a 3D printed 16mm movie camera, the shutter can be driven by another stepper motor or a precisely controlled mechanical linkage. This is where the design becomes more than a box. The shutter must sync with the film advance. If the shutter opens too early, the moving film smears. If it opens too late, exposure becomes inconsistent. If it leaks light, every frame gets an unwanted ghost.
This is also where modern electronics become wonderfully useful. Microcontrollers can coordinate motors with repeatable timing. Sensors can help detect position. Software can make changes without reprinting the entire camera. In older cameras, timing was baked into metal. In a 3D printed camera, timing can be tuned, tested, and updated.
Why 16mm Film Still Has Filmmakers Hooked
There is a reason people still chase the 16mm look. It is not just nostalgia, although nostalgia certainly brought snacks. 16mm has texture. Grain is visible but beautiful. Highlights behave differently from many digital sensors. Colors feel organic. Skin tones can look alive in a way that is hard to fake without making the image look like it is wearing a cheap Halloween costume labeled “Vintage Cinema.”
16mm also changes how filmmakers work. Film costs money every second it runs, so crews tend to rehearse. Shots become intentional. The camera is not left rolling forever while everyone hopes something useful happens. This limitation can be frustrating, but it can also sharpen creativity. When you only have a few minutes of film, suddenly every frame matters.
Modern Kodak motion-picture stocks such as color negative, black-and-white negative, reversal, and daylight-balanced options keep 16mm practical for artists who want a real analog workflow. Meanwhile, labs and scanning services turn exposed film into high-resolution digital files for editing. The result is a hybrid process: analog capture, digital post-production, and a final image that carries the fingerprints of both worlds.
Where 3D Printing Fits Into Camera Building
3D printing has already changed still photography. Open-source and small-batch cameras now exist for 35mm, medium format, large format, instant film, pinhole photography, and custom lens experiments. Some are simple light-tight boxes. Others are modular systems with interchangeable backs, grips, mounts, and accessories. The appeal is obvious: a camera can become a design file, not just a discontinued object on an auction site.
For motion-picture cameras, the challenge is much higher. A still camera may only need to expose one frame at a time. A movie camera needs to do that 24 times per second, smoothly and repeatedly. That is why a 3D printed 16mm movie camera feels like a leap forward. It brings the open-source maker mindset into a format where mechanical complexity usually scares people away.
Printing a camera body also makes experimentation faster. Need a better grip? Print one. Need to adjust a film path? Redesign the guide. Want a different lens mount? Modify the front plate. In traditional manufacturing, those changes can require expensive tooling. With 3D printing, they require design work, filament, and the emotional strength to hear your printer make suspicious noises at 2 a.m.
Important Design Problems in a 3D Printed 16mm Camera
1. Light Leaks
Film is brutally honest about light leaks. A gap that looks harmless on the workbench may create streaks, fogging, or mysterious glowing shapes on the final scan. A printed camera must use overlapping seams, matte black interiors, careful door seals, and sometimes foam or felt barriers. The inside should absorb light rather than bounce it around like a disco ball.
2. Flange Focal Distance
Flange focal distance is the exact distance from the lens mount to the film plane. If it is wrong, the lens will not focus accurately. This is especially important when using real photographic or cinema lenses. A tiny measurement error can make infinity focus impossible or shift the entire focus scale. In a 3D printed camera, this means the lens mount and film gate area must be rigid and carefully calibrated.
3. Film Registration
Registration means each frame sits in the same position during exposure. Poor registration creates jitter. Traditional cameras use precision pins, claws, pressure plates, and carefully cut gates. A printed design may need software-assisted stabilization, improved sprockets, better film guides, or mechanical registration aids. If the camera includes a visible alignment mark or notch, post-processing software can use it to stabilize scanned frames.
4. Film Scratches
Film is delicate. Any rough edge along the film path can scratch the emulsion. Printed plastic must be sanded, polished, coated, or designed so film only contacts smooth, safe surfaces. Rollers, guides, and gates need special care. A camera that works mechanically but scratches every shot is not a camera; it is a tiny sadness factory.
5. Consistent Speed
Motion-picture footage depends on consistent frame rate. If the transport speed varies, movement can look uneven. Stepper motors can help, but motor control must be smooth and synchronized. Power supply stability, motor torque, friction, and firmware all matter. The camera is not only mechanical; it is electromechanical.
How It Compares to Classic 16mm Cameras
A 3D printed 16mm movie camera is not likely to replace an ARRI 416, an ARRIFLEX 16SR3, an Aaton XTR, or a well-maintained Bolex for professional production. Those cameras were engineered through decades of cinema experience and built with durable materials. They have proven magazines, viewfinders, motors, registration systems, service histories, and compatibility with professional accessories.
But replacement is not the point. The point is access, experimentation, and learning. A 3D printed camera can show how film transport works. It can invite new builders into analog cinema. It can make people think differently about camera design. It can also become a platform for unusual ideas: custom frame rates, experimental shutters, odd lens mounts, hybrid scanning workflows, educational kits, or artistic cameras that would never make sense as mass-market products.
Classic cameras are masterpieces of mature engineering. A 3D printed 16mm camera is a prototype culture object. One is a violin from a master workshop; the other is a homemade synthesizer that occasionally catches fire but makes sounds nobody has heard before. Both have value.
Practical Uses for a DIY 16mm Film Camera
The first use is education. Students can learn how motion-picture cameras actually work by building one. Film transport, shutter timing, focal distance, exposure, scanning, and stabilization become real concepts, not textbook diagrams. A transparent or partially exposed demonstration model could be especially useful in film schools or maker spaces.
The second use is experimental filmmaking. A DIY camera does not need to behave like a commercial camera. It can be intentionally imperfect. Frame wobble, unusual shutter patterns, hand-tuned exposure, and custom optics can become part of the visual language. Some filmmakers spend money trying to make digital footage look less perfect. A homemade film camera arrives with personality already installed.
The third use is preservation of analog skills. As film cameras age, repair knowledge becomes increasingly valuable. A printable camera project encourages people to understand mechanisms rather than treat cameras as sealed magic boxes. That knowledge can help keep older equipment alive, too.
The fourth use is pure joy. Not every creative project needs a business plan. Sometimes the point is to build something because it should not be easy, because it teaches you ten new skills, and because the first successful roll of film feels like discovering fire with better contrast.
What the Future Could Look Like
A mature open-source 3D printed 16mm movie camera could become a community project. Designers could contribute better film gates, improved motor mounts, refined shutters, lens adapters, loading systems, firmware, viewfinder options, and scan-stabilization tools. One person might solve the sprocket. Another might improve the magazine. Another might design a quiet enclosure. Over time, the camera could become less of a one-off miracle and more of a repeatable platform.
There are still major barriers. Film is expensive. Processing and scanning require labs or specialized equipment. 3D printed parts vary depending on printer quality, material, settings, and environment. Builders need patience. The camera may require many test rolls before it becomes dependable. But those barriers are not stop signs; they are design briefs.
The most exciting possibility is not that everyone will suddenly shoot 16mm on homemade cameras. The exciting possibility is that filmmaking tools become more understandable, more repairable, and more personal. A camera built from files, motors, plastic, code, and stubborn curiosity reminds us that cinema technology is not only something we buy. It is something we can study, modify, and reimagine.
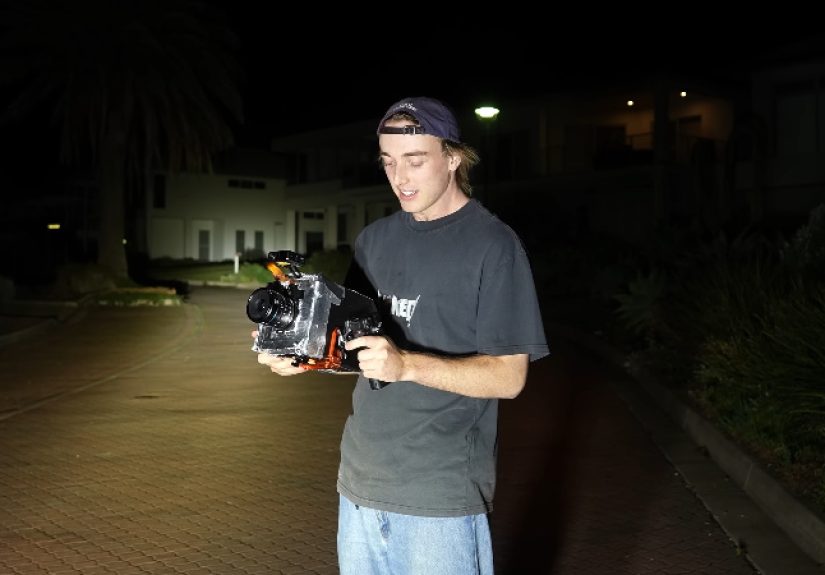
Experience Section: What It Feels Like to Work With a 3D Printed 16mm Movie Camera
Working with a 3D printed 16mm movie camera is less like using a modern mirrorless camera and more like adopting a mechanical raccoon. It is clever, unpredictable, fascinating, and occasionally determined to ruin your afternoon. But when it works, it feels magical in a way that polished consumer technology rarely does.
The first experience is preparation. You do not simply grab the camera and run outside. You check the battery. You inspect the film path. You clean the gate. You confirm that the pressure plate is seated. You look for dust, hair, plastic crumbs, and any tiny villain that might scratch the film. You test the motor advance without film. You listen for strange sounds. If something clicks when it should hum, you stop and investigate. This ritual slows you down, but it also makes you more aware of the image-making process.
Loading film is its own adventure. In a polished commercial camera, loading may be guided by decades of design refinement. In a DIY printed camera, loading can feel like solving a puzzle designed by a brilliant person who drinks too much coffee. The film must travel correctly from feed to take-up. It must engage the sprocket or transport system. It must sit flat at the gate. Too much tension can strain the motor; too little tension can cause uneven movement. You learn quickly that film is not a passive strip. It has curl, stiffness, memory, and attitude.
Then comes the first test. You point the lens at something ordinary: a window, a hand, a street corner, a friend pretending not to be excited. You press the trigger. The motors move. The shutter spins. The camera makes a sound that is not quite like any classic 16mm camera, but close enough to wake up the romantic part of your brain. You are not watching an image on a screen. You are trusting that light is landing on film inside a small printed box. That trust is terrifying and wonderful.
Waiting for processing teaches patience. Digital footage gives instant feedback. Film gives suspense. Did the camera expose correctly? Was the film stable? Did the gate leak light? Did the sprocket wobble? Did your focus miss by a tragic millimeter? When the scan finally arrives, the first playback is a tiny premiere. Even flawed footage feels alive. Grain dances. Highlights bloom. Colors carry a softness that does not feel manufactured. If the frame jitters, you diagnose. If the image is sharp, you celebrate. If a mysterious streak appears, you begin the ancient filmmaker ritual known as “blaming the gate.”
The greatest experience is learning through failure. A 3D printed 16mm camera teaches by refusing to hide its problems. Frame instability points you toward transport design. Soft focus points you toward flange distance. Fogging points you toward sealing. Scratches point you toward surface finishing. Every defect is annoying, but it is also information. The camera becomes a conversation between design and reality.
For creators, that experience can be addictive. You start with the goal of shooting a few seconds of film. Soon you are redesigning parts, testing materials, adjusting motor timing, comparing lenses, and thinking about how a better magazine might work. The project expands because the camera is not only a tool; it is a teacher. It teaches cinema, engineering, patience, optics, electronics, and humility. Mostly humility.
That is why a 3D printed 16mm movie camera is more than a maker headline. It is a reminder that cinema is physical. Before an image becomes a file, it can be chemistry, light, plastic, friction, rotation, and timing. It can be a machine you built yourself, with imperfections you understand and beauty you earned one frame at a time.
Conclusion
A 3D printed 16mm movie camera is the perfect collision of old and new: analog film, digital design, printed plastic, motor control, and cinematic obsession. It does not make 16mm effortless, and it does not eliminate the need for careful engineering. In fact, it proves the opposite. Motion-picture cameras are difficult because film is demanding. Every frame asks for precision.
Yet that difficulty is exactly what makes the project inspiring. It shows that filmmakers and makers can still rethink tools that once seemed locked inside factory walls. With 3D printing, affordable electronics, and enough determination, a 16mm camera can become a hands-on experiment rather than a museum object. The result may not be perfect, but perfection is not always the point. Sometimes the point is a strip of film, a homemade machine, and the thrill of seeing real images appear from something you built yourself.