Table of Contents >> Show >> Hide
- What you’ll learn
- Why cloud photo backup matters (and what it’s not)
- Way #1: Turn on automatic backup in Google Photos or iCloud Photos
- Way #2: Enable “Camera Upload” in OneDrive for a second copy
- Way #3: Use Dropbox Camera Uploads for set-it-and-forget-it syncing
- Way #4: Amazon Photos Auto-Save (especially if you’re a Prime member)
- Way #5: Back up your computer photo folders with a desktop sync app
- Way #6: Protect everything (including photos) with full-device cloud backup
- Way #7: Make an “escape hatch” archive so you’re never locked in
- Common mistakes to avoid
- A quick checklist you can finish in 10 minutes
- Real-world experiences: what actually happens when you do this
Your camera roll is basically your life’s highlight reel: birthdays, vacations, receipts you swear you’ll expense, and 47 blurry photos of your dog
because “this one really captures his essence.” The only problem? Phones get lost, laptops die dramatic deaths, and external drives enjoy vanishing
right when you need them.
The fix is simple: save your photos to the cloud. Not in a “tech wizard” waymore in a “flip a couple switches and let your future self send you a
thank-you note” way. Below are seven easy methods (with real settings and examples) to get your photos safely uploaded, organized, and accessible.
Why cloud photo backup matters (and what it’s not)
“The cloud” is just someone else’s computerbut (ideally) a very reliable someone, with redundant storage, security teams, and fewer crumbs in the
keyboard than the average home laptop. Cloud storage gives you:
- Automatic protection: photos upload in the background while you live your life.
- Access anywhere: phone, tablet, laptop, web browseryour memories follow you around.
- Sharing without chaos: albums, shared libraries, links, and family access (minus the group text meltdown).
Cloud “sync” vs. cloud “backup” (the difference that matters)
Sync keeps files the same everywhere. That’s convenientuntil it isn’t. If you delete a photo on one device, sync may delete it in the cloud too.
Backup is about recovery: you can get your photos back even after a mistake, a lost device, or a “whoops, I selected the whole folder” moment.
The best strategy is layered: one easy auto-upload method plus at least one additional copy (another service or a device backup). Think “seatbelt and
airbag,” not “seatbelt and wishful thinking.”
Quick storage reality check
Many popular services offer a small free tier, then charge monthly/yearly once your library grows. That’s normalphotos and especially videos are
storage-hungry. The goal isn’t to avoid paying forever; it’s to avoid losing irreplaceable photos because you didn’t flip one setting.
Way #1: Turn on automatic backup in Google Photos or iCloud Photos
This is the easiest on-ramp because it uses the photo ecosystem you probably already live in. If you’re on Android (or you use Google services),
Google Photos is the obvious starting point. If you’re deep in Apple land (iPhone + Mac), iCloud Photos is the “it just works” option.
Google Photos: choose your backup quality on purpose
Google Photos typically offers backup quality options like Original quality (full resolution, counts toward account storage) and a
space-saving option (often called Storage saver) that reduces file size. If you print large photos, archive RAW files, or just hate
compression, pick Original. If you mainly share and view on screens, the space-saving option can stretch your storage further.
- Best for: Android users, cross-platform households, heavy search/organization fans.
- Do this today: Open Google Photos → Settings → Backup → turn it on, then pick your backup quality.
- Pro tip: Back up on Wi-Fi if you’re worried about cellular data. (Your phone bill shouldn’t have jump-scare plot twists.)
iCloud Photos: optimize device storage without losing originals
iCloud Photos can store full-resolution originals in iCloud while keeping smaller, device-optimized versions on your iPhone/iPad to save space. That
means you can free up local storage without sacrificing the originals in the cloud.
- Best for: iPhone/iPad/Mac households, people who want a single unified Photos library.
- Do this today: Settings → your name → iCloud → Photos → turn on iCloud Photos, then choose “Optimize iPhone Storage” if you’re tight on space.
- Pro tip: Keep your phone plugged in on Wi-Fi overnight during the first big upload. Let it work while you sleep like a polite robot.
Why this method works
You’re turning your phone into a photo fountain that pours directly into the cloud. Once it’s on, the system handles new pictures automatically
including those “I’ll back this up later” photos that mysteriously become “I forgot forever.”
Way #2: Enable “Camera Upload” in OneDrive for a second copy
OneDrive is a strong option if you already use Microsoft 365, Windows, or want a clean “files + photos” setup. The standout move here is creating a
second automatic cloud copyeven if you primarily use Google Photos or iCloud Photos.
How to set it up (the simple version)
- Install and open the OneDrive app on your phone.
- Turn on Camera Upload (sometimes labeled “Camera backup”).
- Confirm you’re uploading to the correct account (personal vs. work/school).
OneDrive’s “one account at a time” gotcha
Some OneDrive camera backup features work with one account at a time. That’s not a dealbreakerit just means you should double-check you’re backing
up to the account you actually plan to keep long-term.
Why this method works
Redundancy is the name of the game. If you ever get locked out of one service, hit a storage cap, or accidentally delete something, you have another
cloud copy sitting calmly in the wings like an understudy who knows all the lines.
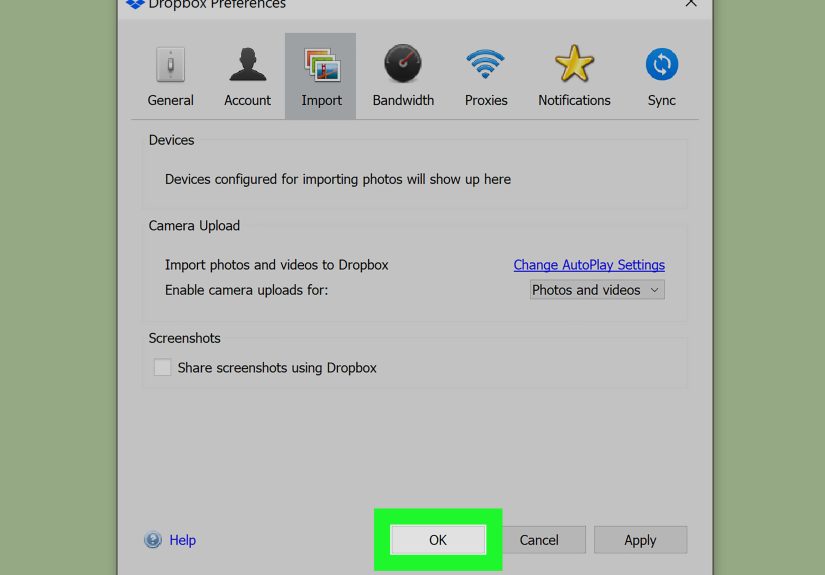
Way #3: Use Dropbox Camera Uploads for set-it-and-forget-it syncing
Dropbox is a classic “works everywhere” cloud option. Its photo workflow is straightforward: enable camera uploads, and your phone automatically
sends photos/videos into a dedicated folder in Dropbox.
Set up Dropbox Camera Uploads
- On mobile: Turn on Camera Uploads in the Dropbox app so new photos upload automatically.
- From a camera/SD card: Dropbox can also handle imports when you connect a device to a computer and use its camera uploads feature.
Two ways Dropbox shines
- Simple file handling: Photos are just files in folderseasy to download, move, and organize.
- Cross-platform sanity: Works well across iPhone, Android, Windows, and Mac without making it weird.
Why this method works
Dropbox is less about fancy photo features and more about reliability: your images become accessible, shareable files that show up everywhere you use
Dropbox. If you like control and folder organization, this one feels natural.
Way #4: Amazon Photos Auto-Save (especially if you’re a Prime member)
Amazon Photos is surprisingly useful, particularly if you’re already paying for Amazon Prime. The key feature is Auto-Save, which
uploads photos automatically from your phone.
How to enable Auto-Save
- Install and open the Amazon Photos app.
- Go to Settings (often via a profile/menu icon).
- Find Auto-Save or Upload settings and toggle it on for photos (and videos if you want).
When Amazon Photos is a smart move
- You want a “backup buddy”: Use it as your second cloud copy alongside Google Photos or iCloud.
- You already use Prime: It can feel like reclaiming value from a subscription you’re already paying for.
- You share a lot with family: Amazon’s ecosystem can be convenient for household libraries and devices.
Why this method works
Auto-Save is the whole point: you take photos, they show up in the cloud. The best backup is the one that happens when you’re not thinking about it.
Way #5: Back up your computer photo folders with a desktop sync app
Phone photos are only half the story. If you have years of DSLR shots, old family scans, or a “Photos_Final_FINAL_v7” folder living on your laptop,
you want that stuff in the cloud too.
Use Google Drive for desktop (and optionally Google Photos)
Google Drive for desktop can sync folders from your computer to Google Drive. In some setups, you can also select folders to back up to Google Photos,
which is handy if you want desktop photos inside your photo library (not just as files in Drive).
- Example: Select your “Pictures” folder or your Lightroom export folder for automatic backup.
- Pro tip: Back up only the folders that matter. Backing up your entire Downloads folder is how you end up paying for 19 copies of “invoice(3).pdf”.
Use OneDrive on Windows the easy way
On Windows, OneDrive is often built in. If your Photos live in known folders (Pictures, Desktop, Documents), syncing those can be almost effortless.
Combine this with OneDrive Camera Upload on your phone and you’ve got a tidy Microsoft-centric setup.
Why this method works
Desktop sync turns “I should really back up my old photos” into “it’s happening quietly in the background.” It’s especially helpful for big libraries
that would be miserable to upload manually.
Way #6: Protect everything (including photos) with full-device cloud backup
If you want the simplest mental model“back up my computer and everything on it”a full-device cloud backup service is the move. Instead of selecting
folders, it backs up your computer automatically, including your photo library.
Who this is best for
- People with messy file systems: If your photos are scattered across 12 folders and one of them is named “aaa_sort_later,” this is for you.
- Large photo libraries: Especially if you have many gigabytes (or terabytes) of images and videos.
- External drive users: Some services can back up attached external drives too, as long as they’re connected regularly.
How to use it without overthinking
- Install the backup app on your computer.
- Confirm your photo folders (or entire drive) are included.
- Leave your computer on and connected often enough for backups to run.
Why this method works
It’s the closest thing to “oops-proofing” your photo life. If your laptop dies, gets stolen, or decides to take an unscheduled swim, you’re not
starting from zero.
Way #7: Make an “escape hatch” archive so you’re never locked in
Cloud backup is about safety. But long-term safety also means portability: you can move your photos if prices change, accounts get locked,
or a service shifts features. (It happens.)
Create an “archive” folder structure
Pick a consistent structure you can reuse anywhere:
- By year/month: 2026 → 2026-01 → 2026-02
- By event: Weddings, Trips, Family, Work, Receipts
- Hybrid: 2026-01_NewYorkTrip
Export originals occasionally
Even if you love your photo service, do a periodic export of originals (or at least your best albums) to a local drive or a second cloud provider.
It’s the digital equivalent of keeping a spare key somewhere that isn’t inside the locked car.
Why this method works
You’re building independence. Cloud services are fantasticuntil you need to switch. Having an “escape hatch” archive reduces stress and makes
migrations realistic instead of mythical (“I’ll do it someday…”).
Common mistakes to avoid
1) Assuming “sync” equals “backup”
If deletions sync instantly, one accidental cleanup can wipe photos everywhere. Look for trash/recovery windows, and keep a second copy where possible.
2) Turning on backup… then blocking it
Battery saver modes, background app restrictions, and “Wi-Fi only” settings can stall uploads. If your cloud library looks suspiciously stuck in last
Tuesday, check app permissions and background activity.
3) Ignoring storage settings until they bite
If you choose full-resolution uploads, your storage usage will climb faster. That’s not badjust plan for it. Decide what matters: printing quality,
RAW files, video backups, or maximum cost savings.
4) Keeping everything in one place
One cloud account is better than none. Two copies is better than one. If your photos matter (and they do), redundancy is a feature, not paranoia.
A quick checklist you can finish in 10 minutes
- Pick your primary service: Google Photos or iCloud Photos (start here).
- Turn on automatic backup: confirm it’s actively uploading new photos.
- Choose quality wisely: original vs space-saving, based on how you use photos.
- Add a second cloud copy: OneDrive, Dropbox, or Amazon Photos Auto-Save.
- Back up desktop photos: select at least one key photo folder to sync/backup.
- Enable security: use a strong password and turn on two-factor authentication.
- Do a test restore: download one photo from the cloud to confirm you can recover files.
If you do nothing else, do the first two steps today. That alone upgrades your photo safety from “hope-based” to “actually backed up.”
Real-world experiences: what actually happens when you do this
In theory, cloud photo backup sounds like a tidy, responsible adult activitylike recycling or knowing where your birth certificate is. In practice,
it’s usually triggered by one of three events: (1) a phone breaks, (2) someone says “Remember that picture from 2019?” and you suddenly don’t, or
(3) you open your photo app and realize your storage bar is screaming in red.
The “new phone, old panic” scenario
A common experience: someone upgrades phones and expects photos to magically follow. Sometimes they dosometimes they don’t, especially if backup was
never enabled or only worked on Wi-Fi and the phone lived on cellular. The first time you turn on automatic backup, it can take hours or days to
upload a large library. The people who feel the most relief are the ones who plug in overnight, keep Wi-Fi on, and let the initial upload finish.
After that, the system quietly handles the tiny daily trickle of new photos, which is exactly what you want: boring reliability.
The “I deleted it… everywhere” facepalm
Another real-world moment: someone “cleans up” duplicates and accidentally deletes a whole batch of photosonly to discover that sync means the cloud
copy followed the deletion like a loyal (but unhelpful) puppy. The people who recover fastest are the ones who have either (a) a second cloud copy
(like OneDrive or Dropbox) or (b) a full-device backup service that can restore files even after user error. This is why redundancy feels magical:
it turns a catastrophic mistake into a mildly annoying afternoon.
The “family sharing without the family chaos” upgrade
Many households end up with photos scattered across text threads, emails, and random social apps. Once a shared album or shared library is set up,
something surprisingly wholesome happens: fewer repeated “Can you send me that again?” messages and more “Oh wow, I forgot we took that” moments.
The cloud becomes a living family archive instead of a private hoard on one person’s phone. The best shared setups also reduce the emotional labor of
being the unofficial family historianbecause everyone can contribute.
The “work photos need to be findable” reality
If you ever take photos for workjob sites, inventory, receipts, before/after shotscloud backup quickly becomes less about memories and more about
sanity. People who use Dropbox or OneDrive often describe the same win: taking a photo on the phone and seeing it on the computer minutes later,
already organized in a predictable place. That speed reduces friction. Instead of “Where did I put that file?” you get “It’s right here,” which is
the most satisfying sentence in all of digital life.
The “storage bill” moment (and how to make peace with it)
Eventually, most photo libraries outgrow free storage. The healthiest mindset shift is treating storage like a utility: you pay for reliability.
People feel better about paying when they (1) choose the right quality settings, (2) offload old videos to a separate archive if needed, and (3)
clean up true junklike accidental screenshots of pockets, not actual memories. The win is not “never pay,” it’s “never lose.”
Bottom line: after the initial setup, cloud photo backup fades into the backgroundand that’s the success metric. The best system is the one you
don’t have to remember, because it’s already remembering for you.