
Table of Contents >> Show >> Hide
- First: Don’t Skip the Setup (It’s Where Neat Slices Are Born)
- Way 1: Classic Wedges (The “Picnic Poster Child” Cut)
- Way 2: Watermelon Sticks (a.k.a. “French Fries, But Make It Fruit”)
- Way 3: Perfect Cubes (Rind Off, Salad On)
- Way 4: Half-Moon Slices (Fast, Pretty, and Still Handle-Friendly)
- Way 5: Watermelon Bowl + Scoops (The “Look What I Made!” Move)
- Storage, Serving, and “Don’t Let It Get Weird” Tips
- Common Problems (and How to Fix Them Without Crying)
- Kitchen Field Notes: Real-World Watermelon Cutting Experiences (About )
- Wrap-Up
Watermelon is basically summer’s unofficial mascot: big, cheerful, and slightly intimidatinglike a friendly
golden retriever that weighs 18 pounds and refuses to fit on your lap. The good news: you don’t need
culinary superpowers to cut it neatly. You just need a stable setup, a sharp knife, and a plan that matches
what you’re doing next (snacking, a party platter, a fruit salad, or that “I’ll be healthy” smoothie phase).
Below are five practical, real-kitchen ways to cut a watermeloneach with clear steps, best-use scenarios,
and a few “learn-from-my-mistakes-but-not-actually-mine” tips so you don’t baptize your counter in pink juice.
First: Don’t Skip the Setup (It’s Where Neat Slices Are Born)
Pick a watermelon that’s worth your effort
Cutting is easier when the melon is ripe and firm. Look for a watermelon that feels heavy for its size,
has a creamy yellow field spot (that’s where it sat on the ground ripening), and has a rind that looks
relatively dull rather than shiny. A perfect melon won’t make you stronger, but it will make you happier.
Food safety and stability (a.k.a. “keep the bacteria out and your fingers attached”)
- Wash the outside before cutting. Even though you don’t eat the rind, your knife passes through itso anything on the surface can hitch a ride into the flesh.
- Use a big cutting board and a sharp knife. A dull blade is more likely to slip, and a tiny board turns watermelon prep into a circus act.
- Stop the board from sliding. Put a damp paper towel or non-slip mat under the cutting board so it doesn’t skate away mid-slice.
- Chill if you can. A cold watermelon is firmer, less messy, and generally more cooperative.
Now, choose your cutting style based on your mission. Want grab-and-go? Sticks. Want salad-ready? Cubes.
Want classic nostalgia? Wedges. Want your guests to say “oooh”? Bowl and scoops.
Way 1: Classic Wedges (The “Picnic Poster Child” Cut)
Wedges are the timeless move: easy to hold, fast to make, and they look like summer on a plate.
Keep the rind on for built-in handles and less sticky hands.
Steps
- Trim a flat base (optional but helpful). Slice a thin layer off one side so the melon won’t roll around.
- Cut the watermelon in half. Slice straight through the center (lengthwise or crosswiseeither works).
- Cut each half into quarters. Put the flat cut side down for stability, then halve again.
- Slice into wedges. Cut each quarter into triangles, about 1–2 inches thick at the rind, depending on how generous you feel.
Best for
- BBQs, picnics, pool days
- Kids (because: handles)
- Minimal dishes, maximum joy
Way 2: Watermelon Sticks (a.k.a. “French Fries, But Make It Fruit”)
This is the crowd-pleaser for snacking: tidy, easy to grab, and surprisingly low-drama once you get the rhythm.
It also makes portioning simplerpeople can take one stick… and then twelve more. (Science.)
Steps
- Cut the melon in half crosswise. Set one half aside.
- Place the cut side down. This turns a wobbly dome into a stable platform.
- Slice into planks. Cut parallel slices about 1 inch apart.
- Rotate and slice again. Turn the half 90 degrees and cut another set of 1-inch slices to form stick shapes.
- Separate the sticks. Pull them apart gently. If you want cubes later, you’re one quick chop away.
Best for
- Snack trays and lunchboxes
- Less mess on hands and faces
- Turning leftovers into cubes in seconds
Way 3: Perfect Cubes (Rind Off, Salad On)
Cubes are the “I’m hosting and pretending I have my life together” option. They’re ideal for fruit salads,
skewers, salsa, and anything where you want bite-sized pieces without the rind.
Steps
- Trim both ends. Slice off a thin round from the top and bottom so the melon can stand upright.
- Stand it up. Place it on one flat end (like a very large, very juicy cylinder).
- Remove the rind in strips. Slice downward, following the curve. Trim away remaining white pith for cleaner cubes.
- Cut into slabs. Lay the peeled melon on its side and slice into 1–2 inch thick rounds or planks.
- Stack and cube. Stack a couple of slabs and cut into strips, then cross-cut into cubes.
Best for
- Fruit salad with mint, lime, or berries
- Skewers with feta, cucumber, or grilled chicken
- Watermelon “ice” for smoothies (freeze cubes on a tray first)
Way 4: Half-Moon Slices (Fast, Pretty, and Still Handle-Friendly)
If wedges feel too chunky and cubes feel too fussy, half-moons are the sweet spot. They’re clean, consistent,
and look great fanned out on a platter.
Steps
- Cut the watermelon in half. Crosswise is usually easiest.
- Place cut side down. Always choose stability over bravado.
- Slice into half-moons. Cut 1-inch thick slices straight down, making rainbow-shaped pieces with rind handles.
- Optional: turn into triangles. Cut each half-moon in half to make smaller, party-friendly triangles.
Best for
- Quick serving for groups
- Platter presentation (fanned slices look instantly “done”)
- Grilling (half-moons can be cut thicker, brushed with a little oil, and grilled briefly)
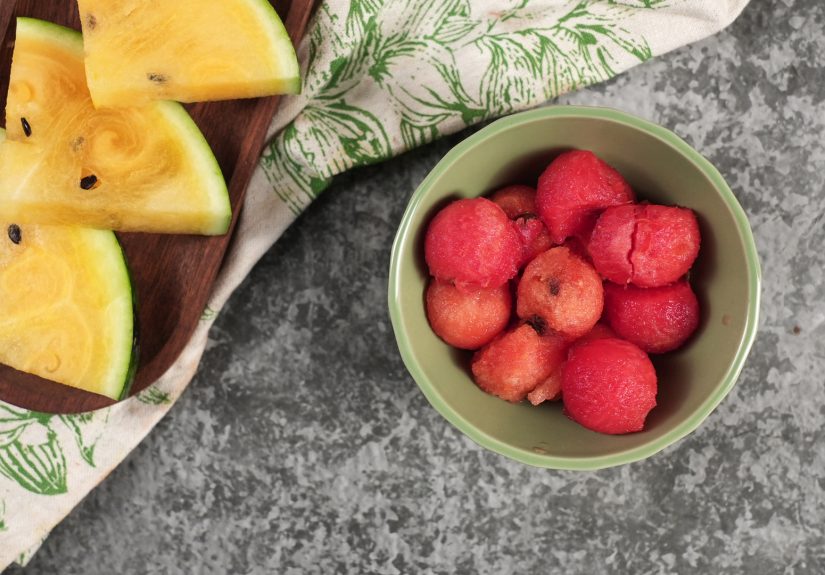
Way 5: Watermelon Bowl + Scoops (The “Look What I Made!” Move)
This is the fun, slightly show-offy approach that’s still genuinely practical. You get a serving vessel and
bite-sized pieces at the same timegreat for parties, baby showers, or any event where someone uses the phrase
“light refreshments.”
Steps
- Cut the watermelon in half. For a bowl, cut it crosswise so each half sits nicely.
- Stabilize the “bowl.” If it wobbles, slice a tiny bit off the bottom (careful not to cut a hole through).
- Scoop out the flesh. Use a melon baller for neat spheres, or a sturdy spoon for rustic chunks.
- Clean up the edges. Trim any loose bits so the bowl looks tidy.
- Serve. Put the balls back into the hollowed rind, or mix with berries, mint, and a squeeze of lime.
Best for
- Party centerpieces
- Fruit salads that need a “wow” factor
- Kids who will absolutely request “more balls” (and mean watermelon)
Storage, Serving, and “Don’t Let It Get Weird” Tips
How long can cut watermelon sit out?
Watermelon is cut fruit, which means it’s perishable once you open it. As a general safety rule,
refrigerate cut fruit within 2 hours (or within 1 hour if it’s sitting in hot outdoor temperatures).
If it has been out longer, it’s safest to toss itno one wants “summer memories” that involve stomach cramps.
How to store cut watermelon for best texture
- Use airtight containers. This keeps it from drying out and from tasting like last night’s garlic leftovers.
- Keep pieces large when possible. Bigger chunks stay juicier; dice right before serving if you want peak crunch.
- Drain excess juice. If you store cubes, a quick drain helps prevent “watermelon soup” at the bottom of the container.
Easy flavor upgrades (no fancy pantry required)
- Lime + flaky salt: Makes sweetness pop and tastes “intentional.”
- Mint + feta: Classic salty-sweet combo for salads.
- Chili powder + lime: Great for a street-style snack vibe.
- Cucumber + red onion (thinly sliced): Turn cubes into a quick summer salad.
Common Problems (and How to Fix Them Without Crying)
“My watermelon is sliding everywhere.”
Give it a flat side. Trim a thin slice off one end or one side to create a stable base. Also, anchor your cutting
board with a damp towel underneath. Your goal is “secure” not “extreme sports.”
“My cubes look like modern art.”
Modern art is valid. But if you want more uniform pieces, focus on making your slabs even thickness first.
Once the slabs are consistent, the strips and cubes naturally behave.
“The rind is tough and my knife feels too small.”
Use the longest sturdy knife you have (often a chef’s knife). Work slowly and keep the melon stable.
If your knife is struggling, it may be dullsharp knives require less force, which is safer and cleaner.
“Seedless watermelons still have seeds. Betrayal!”
Seedless usually means no big mature black seeds, but you may still see small pale ones. They’re edible.
If you’re making a smooth drink or a fancy salad, you can pick them outotherwise, no one will notice.
Kitchen Field Notes: Real-World Watermelon Cutting Experiences (About )
If you’ve ever watched someone confidently hoist a watermelon onto a cutting board like they’re about to perform
a magic trick, you already know the first truth of watermelon prep: confidence is not a substitute for friction.
In real kitchens, the best cuts happen when the melon can’t roll, the board can’t slide, and your hands aren’t
doing that awkward “please don’t slip” dance. That’s why so many people end up becoming devoted fans of the
“cut-side down” methodonce you split the melon and place the flat face on the board, everything suddenly feels
calmer, like your kitchen has entered a wellness retreat.
Another common experience: the moment you cut into a very ripe watermelon, the juice shows up instantly and starts
exploring your countertop like it pays rent. That’s not a reason to panic; it’s just a reminder to work with a
rimmed sheet pan, a large board with a groove, or even a towel nearby. Many home cooks learn to keep a “juice plan”
the same way they keep a “phone plan.” Bonus tip: that extra juice isn’t wastepour it into a glass with lime,
strain it for a quick agua fresca, or freeze it into ice cubes for lemonade.
When it comes to choosing a cut style, the “best” method usually reveals itself based on who’s eating.
Families with kids often discover that sticks disappear faster and with less mess than wedgeslittle hands hold
them like fries, and the rind acts as a built-in guardrail. Meanwhile, hosts who like neat platters tend to become
cube people, because cubes stack, skewer, and mingle with other fruit without looking chaotic. And if someone in
your life loves presentation, they will eventually attempt the watermelon bowl. It’s practically inevitable, like
decorating cupcakes or saying “we should do this more often” at the end of summer.
The most relatable lesson, though, is that watermelon cutting becomes easier on the second melonnot because the
melon changes, but because you do. You learn where to place your hands, how much pressure you actually need,
and which parts are trickier (usually the last few edge slices, where the rind curves and the pieces get smaller).
People also learn that a slightly slower pace produces faster results: fewer slips, fewer reruns, fewer sticky
cleanup missions. In other words, the secret isn’t speedit’s control. And once you have that, watermelon goes from
“big scary fruit” to “ten-minute snack plan.”
Finally, there’s the social experience: set out a tray of neatly cut watermelon, and suddenly everyone becomes
surprisingly positive. It’s bright, refreshing, and nostalgic in a way that few foods are. Whether you cut wedges
for a backyard hang, cubes for a potluck, or half-moons for a quick family dessert, the end result is the same:
someone smiles, someone reaches for another piece, and summer feels a little more official.
Wrap-Up
Watermelon doesn’t need complicated techniquejust the right cut for the right moment. Go wedges for classic
hand-held eating, sticks for clean snacking, cubes for salads and skewers, half-moons for fast platter service,
and a bowl with scoops when you want a simple centerpiece. Wash the rind, stabilize the melon, and refrigerate
cut pieces promptly so your only surprise is how quickly it disappears.


