Table of Contents >> Show >> Hide
A great home bar isn’t about having a museum of bottles you “totally plan to use someday.” It’s about making hosting easier:
drinks flow, guests feel taken care of, and you’re not sprinting between the kitchen and living room like you’re training for a marathon
sponsored by limes.
Whether you’ve got a basement begging for a speakeasy moment or a tiny apartment where “bar area” means “one brave corner,” the best setups
balance function (prep, storage, cleanup) with vibe (lighting, materials, personality). Below are 35 practical, stylish home bar ideas
designed for real entertainingplus a longer “what actually happens when people come over” section at the end.
Before You Build: The 4 Things That Make a Home Bar Work
1) Pick the right bar type: wet, dry, or “portable genius”
A wet bar includes a sinkamazing for rinsing shakers, filling water, and not treating your kitchen like a public restroom.
A dry bar skips plumbing and focuses on storage and serving. A portable bar (cart, cabinet, tray station) is the easiest
way to entertain without construction dust in your cereal.
2) Design for the “three-step bartender”
Your most-used items should be reachable in three steps: spirits, mixer, ice, glassware, and a jigger. If you need to cross the room for ice,
you’re basically hosting an obstacle coursefun, but not efficient.
3) Plan zones, not chaos
The simplest bars feel luxurious because they’re organized: a pour zone (bottles, jigger), a mix zone (shaker, spoon, strainer),
and a finish zone (garnishes, napkins, coasters). Add a small trash spot and suddenly you look like you own a restaurant.
4) Make it guest-friendly
The best entertaining bars include water, soft drinks, and a clear “help yourself” setup. Bonus points for labeling mixers or setting out a simple
drink menu so your friends don’t ask, “What do you have?” while staring directly at what you have.
35 Home Bar Ideas Perfect for Entertaining
-
Create a bar nook with a statement backsplash.
Tile, wallpaper, or a bold paint panel instantly turns a corner into a destinationlike a mini lounge, minus the sticky menus.
Pair it with floating shelves and under-shelf lighting for a polished look. -
Convert a closet into a “jewel-box” bar.
Add shelves, a small counter, and dramatic lighting. Close the doors when you’re done and the room looks tidyeven if the inside is
“organized chaos” (the most authentic hosting vibe). -
Install pocket doors for a hidden bar moment.
Pocket doors or cabinet fronts let you conceal bottles and glassware when you’re not entertaining, which is great if you prefer your living room
to feel like a living roomnot a lobby bar. -
Use a bar cabinet instead of a bar cart.
Cabinets hide clutter, protect glassware, and give you a bigger surface area for serving. Style the top with a lamp, art, and a tray so it looks
intentional, not like you parked a liquor store in your dining room. -
Turn a console table into a sleek dry bar.
Add a large tray for bottles, a bowl for citrus, and a small bin for tools. Place glassware on a shelf below or in a nearby cabinet.
This is the “no-renovation, high-impact” option. -
Build a wet bar with a compact sink.
A small sink makes a huge difference in cleanup and convenience. If you entertain far from the kitchen, a wet bar can keep the party in one place
(and keep your kitchen from looking like a science experiment). -
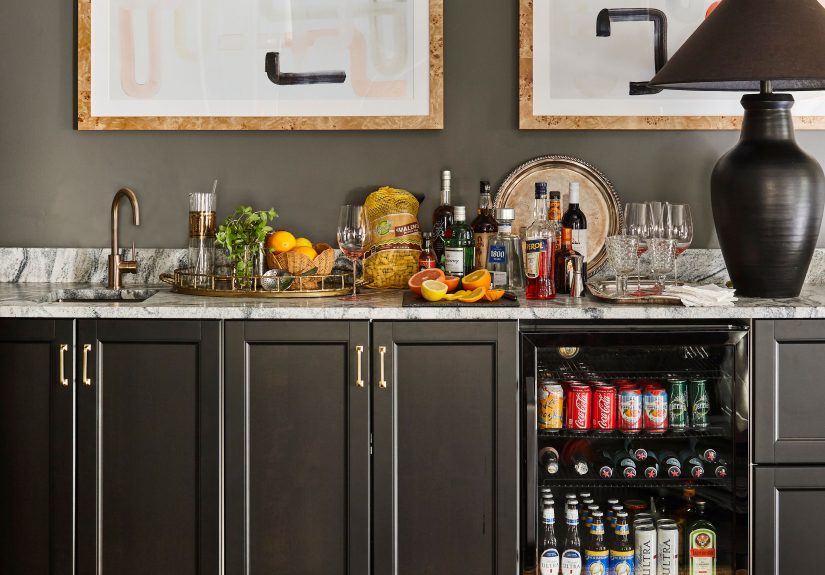
Add an undercounter beverage fridge.
A dedicated drinks fridge keeps mixers, wine, and sparkling water cold without stealing space from your food fridge. It’s a hosting upgrade that
guests notice immediatelyoften while cheering. -
Go for open shelvingbut keep it curated.
Display what looks good and gets used: a few spirits, glassware, and a cocktail book. Store backups elsewhere so the shelves don’t read as
“warehouse chic.” -
Use mirrored backing to double the glow.
Mirror panels (or mirror tile) bounce light and make small bars feel bigger. It’s also a classic bar lookand yes, it makes your bottles look
fancier than they are. -
Make lighting non-negotiable.
Add LED strip lighting under shelves, a small sconce, or a mini lamp on the bar surface. Lighting is what turns “storage area” into “cocktail
experience.” -
Carve out an under-stairs bar.
That awkward triangle space can become a built-in bar with shelves and a small counter. Even a simple cabinet setup works.
It’s the design equivalent of finding money in an old coat pocket. -
Install a bar shelf with hanging stemware.
A wall-mounted bar shelf can hold bottles up top and hang wine glasses beneath. It’s space-smart and visually sharp, especially in apartments
or dining areas. -
Go “hotel-style” with a cabinet that closes.
A cabinet bar feels upscale because it’s tidy when closed. Inside, use organizers for tools, napkins, and bitters so you’re not digging around
like you lost your keys. -
Create a self-serve station with trays and zones.
Use trays to group glassware, spirits, mixers, and garnishes. Guests can navigate without asking you twenty questions.
Add a small sign or menu and you’ve basically become the nicest host alive. -
Set up a “two-drink bar” for effortless hosting.
Choose two crowd-pleasers (like a spritz and a bourbon highball) and stock just what you need. This keeps decision fatigue low and your bar area
uncluttered. -
Design a bar with “ice strategy.”
Ice is an ingredient, not an afterthought. Add an ice bucket with tongs and keep extra ice nearby (freezer bin or ice maker).
Your drinks stay cold and your guests stop rummaging through your freezer. -
Use quality essentials: shaker, jigger, strainer, bar spoon.
You don’t need every gadget, but you do need the basics. Measuring matters more than most people admitbecause “a splash” can become “a mistake”
in about two seconds. -
Upgrade your glasswarestrategically.
Start with versatile options: rocks glasses, highballs, and a simple wine setup. Add coupes or martini glasses if you actually serve those drinks.
More isn’t always better; it’s just more to wash. -
Make a garnish-and-mixer caddy.
A small bin for citrus, simple syrup, bitters, and cocktail cherries keeps the bar clean and the workflow smooth.
It also looks impressively “together.” -
Turn a butler’s pantry into a bar hub.
If you have a pantry area, it’s perfect for a beverage station: countertop, storage, and potentially plumbing.
It keeps entertaining supplies out of the main kitchen work zone. -
Combine coffee bar + evening bar (the “all-day station”).
Keep coffee tools on one side, bar tools on the other, and swap accessories depending on time of day.
It’s the most realistic use of counter space for many households. -
Add a drop-down shelf for small spaces.
A wall-mounted folding surface gives you prep space when you need it and disappears when you don’t.
Ideal for tiny nooks and “we entertain sometimes, not every Tuesday” homes. -
Repurpose a vintage dresser or buffet.
Dressers and buffets often have perfect storage for barware. Line drawers with felt or a bar mat to prevent clinks, and you’ve got instant charm
without paying “custom built-in” prices. -
Try a rolling bar cart that can move where the party is.
Carts shine when your entertaining zones changeliving room now, patio later. Choose one with sturdy wheels and at least two tiers so it’s not
a wobbly disaster in motion. -
Create a backyard “cocktail shed” station.
For outdoor entertaining, a sheltered spot for a cart or cabinet keeps supplies protected and accessible. Add hooks for tools and a small shelf
for glasses to make the setup feel permanent. -
Build a basement bar with lounge seating.
Basements are ideal for a moody bar vibe. Pair a prep counter with comfortable seating and soft lighting so guests linger.
A basement bar should feel like a destination, not a hallway with bottles. -
Go moody with dark paint and warm light.
Deep tones make the bar area feel cozy and intentional. Warm lighting keeps it invitingthink “cocktail lounge,” not “interrogation room.” -
Add a backsplash of patterned tile for personality.
Patterned tile creates instant character and makes a small bar look designed. It also hides minor splashes better than a flat painted wall.
Practical and pretty is the goal. -
Include a small “snack pairing” shelf.
Entertaining is smoother when snacks live near the drinks. A basket for nuts, chips, or crackers keeps guests happy and helps prevent the classic
“three cocktails, no food” situation. -
Use vertical space with staggered bottle storage.
Tiered risers or stepped shelves let guests see options quickly. It reduces bottle crowding and makes selection easyespecially for parties where
people like to browse. -
Make it feel like a bar with a foot rail or ledge.
A small foot rail (or just a shallow ledge) adds that “real bar” touch. It’s subtle, but it changes how the space feelslike it was made for
hanging out. -
Add a mini menu board for signature drinks.
A chalkboard, framed print, or simple card stand can list two or three options. It’s fun, it guides guests, and it prevents you from repeating the
same explanation 19 times. -
Use a decanter for the “grown-up” look (and easy pours).
A decanter can make the bar feel elevated. Use it for spirits you actually serve regularly, and label it discreetly so nobody accidentally pours
themselves a mystery drink. -
Upgrade your ice game with clear cubes or spheres.
Clear, slow-melting ice looks great and keeps drinks from turning into watery sadness. A simple mold is enough to make cocktails feel special
without extra effort. -
Finish with comfort: stools, a small rug, and “talking space.”
If your bar is meant for entertaining, include somewhere to perch and chat. Even one or two stools changes the dynamic from “grab and go” to
“stay awhile.”
Stocking and Styling Without Overdoing It
A simple “host-ready” starter set
- Tools: shaker, jigger, bar spoon, strainer, citrus press, peeler, small cutting board and knife
- Glassware: rocks, highball, wine glasses (and coupes only if you’ll use them)
- Basics: a few spirits you enjoy, vermouth (store chilled after opening), bitters, simple syrup, soda water, tonic
- Entertaining support: ice bucket + tongs, coasters, cocktail napkins, small trash bin nearby
- Non-alcohol options: sparkling water, NA mixers, citrus, herbsmake it welcoming for everyone
Design tip that saves the party
Put water next to the bar, not across the room. When guests can grab water easily, everyone feels better, and you look like a host
who has their life together (even if you’re secretly Googling “how to open a stubborn shaker”).
Conclusion: Make the Bar Fit Your Life, Not a Catalog
The most entertaining-friendly home bars are the ones that match how you actually host. If you love big gatherings, prioritize storage, ice,
and traffic flow. If you host casually, a cabinet bar or cart with a tight “two-drink” menu keeps things easy. Add good lighting, keep tools simple,
and design with zones so the bar works even when you’re mid-conversation. The goal is a space that makes guests comfortable and makes hosting feel
funnot frantic.
Extra: Real-World Entertaining Experiences (the Stuff No One Puts in a Mood Board)
When people talk about home bars, the photos usually show perfect symmetry: three bottles, two glasses, one tasteful lime. Actual entertaining is
more like: someone asks for a drink that requires six ingredients you don’t own, another person wants “something fruity but not sweet but also not
bitter,” and a third guest is holding a cup of ice like they just discovered refrigeration. So here are some experience-based lessons hosts tend to
learn (often quickly).
First: decision fatigue is real. A fully stocked bar sounds impressive, but too many options can slow everything down. Many hosts find
that parties run smoother with a tiny “menu”two signature cocktails, one simple spirit-and-soda option, plus wine/beer/NA. It keeps the line moving,
reduces mess, and stops the bar from turning into a 20-minute consultation.
Second: ice disappears faster than your willpower. If you’re entertaining more than a few people, plan on more ice than you think,
and keep it accessible. Hosts who win at this either (a) set up an ice bucket with tongs plus a backup ice container in the freezer, or (b) use an
ice maker/extra bags. Bonus: a dedicated spot for empty bottles and used garnishes prevents the bar surface from becoming a sticky archaeological dig.
Third: guests love being helpfulif you make it easy. A self-serve station with labeled mixers, clean cups, and a simple instruction card
(“Gin + tonic, squeeze lime, enjoy being effortlessly cool”) encourages people to pour their own. That frees you up to host like a human being instead
of working a one-person pop-up cocktail lounge.
Fourth: the bar becomes a social magnet. People hover where the action is, which is why lighting and a small “landing zone” matter. Even a
little side surface for napkins and coasters helps. If your bar is in a tight hallway, you’ll get traffic jams; if it’s in a corner with one stool and warm
light, it becomes a cozy hangout. Hosts often notice that moving the bar a few feet (or choosing a rolling cart) can dramatically improve the flow.
Finally: the best bars feel hospitable, not showy. That means water, snacks, and non-alcoholic options get the same respect as the spirits.
It also means thinking about safety: offer coffee or tea after dinner, keep rideshare info handy, and don’t make anyone feel weird for skipping alcohol.
The most memorable parties aren’t defined by rare bottlesthey’re defined by comfort, ease, and the sense that everyone belongs in the space.
If you build your bar around those lived realitiessimple menus, smart ice, clear zones, and guest-friendly accessyou’ll end up with a home bar that
photographs well and functions beautifully when the doorbell rings and the good chaos begins.