Table of Contents >> Show >> Hide
- Before You Build: Quick Headboard Planning That Saves Time (and Swearing)
- 32 DIY Headboard Ideas for a Low-Cost Bedroom Refresh
- 1. Painted “Faux Headboard” Rectangle
- 2. Painted Arch or Half-Moon Headboard
- 3. Peel-and-Stick Wallpaper Panel
- 4. Hanging Quilt or Textile “Headboard”
- 5. Oversized Framed Canvas as a Headboard
- 6. Curtain Rod + Draped Fabric Panel
- 7. No-Sew Upholstered Plywood Headboard
- 8. Tufted Upholstered Headboard (Buttons or Faux Tuft)
- 9. Slipcovered Headboard (Easy to Change Seasons)
- 10. Upholstered Wall Panels (Modular + Upscale)
- 11. Wall-to-Wall Headboard (Full-Width Luxury on a Budget)
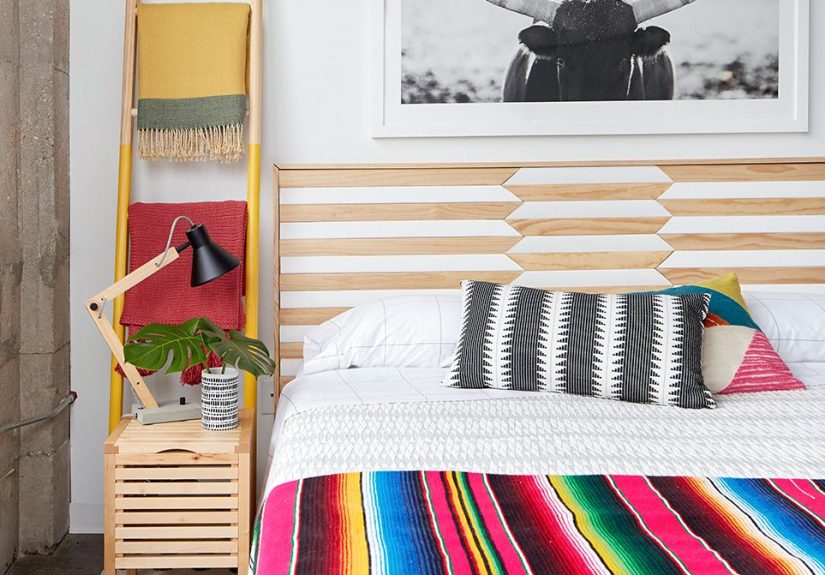
- 12. Scandinavian Vertical Slat Headboard (Furring Strip Hero)
- 13. Board-and-Batten Headboard Wall
- 14. Faux Shiplap Headboard Panel
- 15. Herringbone Plank Headboard
- 16. Wood Shim Geometric Headboard
- 17. Pallet Wood Headboard (Rustic, But Make It Clean)
- 18. Rough-Sawn Rustic Plank Headboard
- 19. Cedar Shingle Headboard
- 20. Reclaimed Door Headboard
- 21. Vintage Window Frame Headboard
- 22. Upcycled Shutters Headboard
- 23. Folding Screen / Room Divider Headboard
- 24. Stacked Crate Storage Headboard
- 25. Bookcase Headboard (Thrift + Flip)
- 26. Floating Shelf Headboard (Minimal + Functional)
- 27. Pegboard Organizer Headboard
- 28. Wooden “Woven” Slat Headboard
- 29. Fabric-Weave Headboard (Ribbon, Webbing, or Straps)
- 30. Cane Webbing / Rattan-Inspired Insert Headboard
- 31. Chalkboard (or Whiteboard) Paint Headboard
- 32. Light-Up Headboard (Soft Glow, Big Impact)
- Make It Look Expensive: Low-Cost Finishing Tricks
- Common DIY Headboard Mistakes (So You Can Skip Them)
- Conclusion
- Experience Notes: What People Learn After Making a DIY Headboard (About )
If your bedroom feels a little “meh,” you don’t need a full renovationyou need a headboard.
Seriously. A headboard is like eyebrows for your bed: the moment it shows up, everything looks more put-together.
And the best part? A DIY headboard can cost less than a fancy throw pillow (and delivers way more drama per dollar).
Below are 32 budget-friendly DIY headboard ideasfrom renter-friendly “fake it” options to weekend wood buildsplus
practical tips to help your project look expensive even if your wallet is on a strict bedtime routine.
Before You Build: Quick Headboard Planning That Saves Time (and Swearing)
1) Pick your “headboard vibe”
Do you want cozy and soft (upholstered), warm and textured (wood), or clean and minimal (painted/graphic)?
Your vibe helps you choose the right materials and avoids the classic mistake of building something gorgeous…
that clashes with everything else in the room.
2) Measure like you mean it
- Width: match your mattress width for a classic look, or go wider for that boutique-hotel feel.
- Height: tall headboards look luxe, but make sure they don’t block windows, art, or outlets.
- Clearance: if you sit up to read, add extra height so your pillows don’t eat the headboard.
3) Choose how you’ll attach it
- Wall-mounted: looks custom and stable. Great for heavy wood builds (use studs/anchors).
- Bed-frame mounted: moves with the bed. Good for rentals and frequent rearrangers.
- Leaning: easiest option. Works best for lighter pieces and low-traffic rooms.
4) Budget-friendly materials to keep on your radar
Furring strips, plywood, MDF, reclaimed boards, old doors/shutters, fabric remnants, drop cloths,
peel-and-stick wallpaper, and even pegboard can all become a cheap headboard with a little creativity.
32 DIY Headboard Ideas for a Low-Cost Bedroom Refresh
1. Painted “Faux Headboard” Rectangle
Zero lumber. Zero tools. Tape off a clean rectangle behind the bed and paint it in a bold color (or a soft neutral).
Add a thin “frame” stripe for extra polish.
2. Painted Arch or Half-Moon Headboard
For instant designer energy, paint a tall arch behind the bed. It softens sharp corners and makes a small room feel
intentional. Bonus: curves hide wobbly tape lines better than straight edges.
3. Peel-and-Stick Wallpaper Panel
Stick removable wallpaper onto a lightweight MDF/plywood panel and mount it like art. It reads as custom,
it’s renter-friendly, and it scratches the “I want a statement wall” itch without committing to the whole wall.
4. Hanging Quilt or Textile “Headboard”
Hang a quilt, woven blanket, or tapestry behind the bed using a curtain rod or wood dowel. It adds texture,
reduces wall echo, and looks cozy even if the rest of the room is still “laundry-chair chic.”
5. Oversized Framed Canvas as a Headboard
A large canvas (even a thrifted one you repaint) can function like a headboard. Choose abstract shapes or a calm
landscape palette for a high-end feel.
6. Curtain Rod + Draped Fabric Panel
Mount a rod high above the bed and drape linen-look curtains or a drop cloth behind pillows. It’s soft,
romantic, and surprisingly forgiving if your wall has… personality.
7. No-Sew Upholstered Plywood Headboard
Classic, affordable, and beginner-friendly: plywood + foam + batting + fabric, stapled on the back.
Use a remnant, a shower curtain, or heavy linen for a tailored look.
8. Tufted Upholstered Headboard (Buttons or Faux Tuft)
Want “fancy hotel” on a “weeknight budget”? Tufting delivers. You can do real button tufting, or fake it with
strategically placed upholstery nails for the look without the threading marathon.
9. Slipcovered Headboard (Easy to Change Seasons)
Make a simple upholstered base, then sew (or clever-pin) a slipcover so you can swap colors later.
It’s basically a headboard with outfit changes.
10. Upholstered Wall Panels (Modular + Upscale)
Create multiple upholstered squares/rectangles and mount them in a grid. It’s budget-friendly because small panels
use smaller fabric cutsplus it looks very “custom contractor” even if you built it in slippers.
11. Wall-to-Wall Headboard (Full-Width Luxury on a Budget)
Extend the headboard across the full wall width using wood slats, panels, or upholstered sections.
This tricks the eye into thinking the room is larger and more high-end than it probably has any right to be.
12. Scandinavian Vertical Slat Headboard (Furring Strip Hero)
Vertical slats look modern and expensive, but furring strips keep it affordable. Stain light for a Scandi vibe,
or paint the slats the same color as the wall for a sleek, architectural look.
13. Board-and-Batten Headboard Wall
Use thin strips to create classic board-and-batten lines behind the bed. Paint it all one color for a clean,
timeless finish that reads “custom millwork,” not “I watched three tutorials and got brave.”
14. Faux Shiplap Headboard Panel
Nail or glue horizontal boards (or cut plywood strips) onto a backer panel. Paint it white for farmhouse,
charcoal for modern, or the wall color for subtle texture.
15. Herringbone Plank Headboard
Herringbone instantly upgrades a room. Use inexpensive planks or plywood strips; keep spacing tight and
finish with a matte clear coat for a modern, clean look.
16. Wood Shim Geometric Headboard
Wood shims are cheap and surprisingly stylish. Arrange them in a pattern (chevrons, sunburst, diagonal fade)
and stain a few tones for dimension.
17. Pallet Wood Headboard (Rustic, But Make It Clean)
Pallet boards can look great if you sand thoroughly and seal well. Mix board widths for character, and use a
darker stain to hide mismatched wood tones.
18. Rough-Sawn Rustic Plank Headboard
Love cabin vibes? Layer rough boards over plywood and let the texture do the talking. Add a simple top ledge
for stylingbooks, a candle, and your “I totally have my life together” plant.
19. Cedar Shingle Headboard
Cedar shingles create a warm, cottage look and can be surprisingly inexpensive. Seal them to prevent odor transfer
and keep the color stable over time.
20. Reclaimed Door Headboard
A thrifted door becomes an instant statement. Sand, paint, and mount horizontally for a wide look, or vertically
for tall drama. Bonus points if it still has charming old hardware.
21. Vintage Window Frame Headboard
Old window frames add airy character. Back it with fabric or wallpaper so you don’t end up with cold glass vibes
(or a bedtime view of drywall).
22. Upcycled Shutters Headboard
Shutters are the easiest “looks custom, costs little” move. Mount a few side-by-side, paint them a muted color,
and enjoy your instant farmhouse-meets-coastal moment.
23. Folding Screen / Room Divider Headboard
If you can find a folding screen secondhand, you basically win the DIY lottery. Place it behind the bed
(or attach it carefully) for a tall, textured headboard with almost no work.
24. Stacked Crate Storage Headboard
Wood crates + a plank on top = storage, style, and a place to stash books, chargers, and the remote you swear
you didn’t lose again. Paint all one color to keep it looking intentional, not “dorm room archaeology.”
25. Bookcase Headboard (Thrift + Flip)
A low bookcase behind the bed acts like a headboard with benefits. Anchor it securely, style it simply,
and keep heavy items low for safety.
26. Floating Shelf Headboard (Minimal + Functional)
Mount a sturdy shelf at pillow height for a clean, modern look. Add plug-in sconces or clip lights,
and you’ve got function without bulky furniture.
27. Pegboard Organizer Headboard
Pegboard isn’t just for garages. Paint it, frame it, mount it behind the bed, and use hooks or small shelves
for books, plants, and bedtime essentials. Practical can be cutewho knew?
28. Wooden “Woven” Slat Headboard
Create a woven pattern using thin wood strips on a backing panel. It adds texture like rattan but reads more modern.
Stain it warm for a cozy, high-end finish.
29. Fabric-Weave Headboard (Ribbon, Webbing, or Straps)
Stretch sturdy fabric strips or webbing across a simple wood frame in a crisscross pattern. It’s lightweight,
customizable, and a great way to use leftover fabric in a truly “I meant to do that” way.
30. Cane Webbing / Rattan-Inspired Insert Headboard
Cane brings breezy texture and a vintage vibe. Keep costs down by using a cane panel as an insert within a simple
wood frame rather than building an entire headboard from scratch.
31. Chalkboard (or Whiteboard) Paint Headboard
Paint a headboard shape with chalkboard paint, or mount a smooth panel and coat it. It’s playful, great for kids’
rooms, and perfect if you enjoy leaving messages like “GOODNIGHT” or “BUY MILK” where you cannot ignore them.
32. Light-Up Headboard (Soft Glow, Big Impact)
Add LED strip lighting behind a slat headboard or along the back edge of an upholstered panel for a cozy halo effect.
Choose warm light for “relaxing retreat” instead of “interrogation room chic.”
Make It Look Expensive: Low-Cost Finishing Tricks
- Sand and seal: Even cheap wood looks better with smooth edges and a protective topcoat.
- Use a consistent color story: One stain tone or one paint color keeps DIY from looking chaotic.
- Add a top ledge: A simple cap board instantly makes a wood headboard feel “built-in.”
- Upgrade the fabric texture: Linen-look, canvas, velvet, or tweed reads richer than thin cotton.
- Hide staples and seams: Black cambric dust cover fabric on the back is a small detail with big payoff.
Common DIY Headboard Mistakes (So You Can Skip Them)
- Going too narrow: A headboard that’s noticeably smaller than the mattress can look accidental.
- Ignoring wall anchoring: Heavy headboards must be mounted safely (studs/appropriate anchors).
- Over-styling: If your headboard is busy, keep bedding simpler so the room feels balanced.
- Forgetting outlet access: Plan for chargers, lamps, and cords before you mount anything.
Conclusion
A DIY headboard is one of the fastest ways to pull a bedroom together without draining your savings. Whether you
paint a crisp arch, upholster a simple panel, or build a slatted statement wall, the secret is the same:
pick one strong idea, keep the finish clean, and commit like you meant to do it all along.
Start with the project that matches your tools, time, and patience level. The best headboard is the one you
actually buildbefore you talk yourself into a “temporary” solution that lasts three years.
Experience Notes: What People Learn After Making a DIY Headboard (About )
Most DIYers don’t remember the exact cost of their headboard a month laterbut they absolutely remember the moment
the room finally looked “finished.” That’s the sneaky magic of a headboard: it creates a visual anchor, like a frame
around the bed, and suddenly your mismatched nightstands look less like a mistake and more like a creative choice.
One common “first timer” lesson is that the simplest builds often look the most expensive. A clean
upholstered rectangle in a great fabric can look higher-end than a complicated design with uneven cuts. People also
tend to underestimate how much a fabric’s texture matters. Even if the color is perfect, a thin, shiny material can
read cheap under bedroom lighting. That’s why many DIYers end up loving linen-look blends, canvas, or velvetthey
hide minor imperfections and add depth without extra work.
Another frequent discovery: walls are rarely as straight as we assume. Painted headboards are
amazingly forgiving because you can adjust tape lines, touch up edges, and step back until it looks right. But with
wood builds, slightly crooked floors and bowed walls can create tiny gaps that drive perfectionists bananas. The fix
is usually simplescribe a line, add trim, or use a small spacerbut it’s comforting to know the problem is normal
and not a personal attack by your house.
People also learn quickly that mounting matters as much as building. A gorgeous headboard that wobbles
is like a great haircut in a wind tunneltechnically impressive, emotionally stressful. DIYers who love rearranging
furniture often prefer frame-mounted headboards or lighter wall-mounted panels, while anyone building with heavy
reclaimed wood typically appreciates the stability of a secure wall mount.
Finally, there’s the “styling reality check.” Many DIYers start by planning a headboard and end up refreshing the
bedding toonot because they have to, but because the new headboard makes everything else look like it missed the memo.
The good news is you don’t need a shopping spree. Swapping pillow covers, adding one textured throw, or matching the
headboard color to a small detail in the room can make the whole space feel cohesive. In the end, the best experience
takeaway is this: a DIY headboard doesn’t just save moneyit gives your room a story. And it’s a lot more fun to say
“I made that” than “I found it during a late-night scrolling blackout.”