
Table of Contents >> Show >> Hide
- Why Choosing the Right Cutting Method Matters
- 1. Score and Snap with a Utility Knife
- 2. Use a Jigsaw for Curves, Corners, and Notches
- 3. Cut with a Vinyl Plank Cutter or Power Saw
- Common Mistakes When Cutting Vinyl Plank Flooring
- Which Cutting Method Is Best?
- Real-World Experience: Lessons Learned While Cutting Vinyl Plank Flooring
- Conclusion
- SEO Tags
If vinyl plank flooring had a personality, it would be that friend who looks laid-back but still expects you to show up on time and with clean shoes. It is durable, stylish, and wonderfully DIY-friendly, but it also demands one thing from installers: clean, accurate cuts. A crooked cut can turn a beautiful floor into a daily reminder that overconfidence is not a power tool.
The good news is that cutting vinyl plank flooring is not complicated once you know which method to use. The even better news is that you do not need a workshop the size of a television studio to do it well. In most cases, a sharp utility knife, a jigsaw, or a flooring cutter will get the job done. The real trick is matching the method to the cut. Straight cuts, curved cuts, tricky vent openings, and door-frame notches all play by slightly different rules.
In this guide, we will break down three practical ways to cut vinyl plank flooring, when to use each one, and how to avoid the classic mistakes that make a project take twice as long and produce twice as much muttering. Whether you are installing luxury vinyl plank in a bedroom, kitchen, hallway, or rental property, these methods will help you cut cleaner, fit tighter, and finish with a floor that looks like you knew what you were doing all along.
Why Choosing the Right Cutting Method Matters
Not every plank cut is the same. Some are quick, straight trims at the end of a row. Others involve cutting around a floor vent, undercutting a door jamb, or shaping the plank around a pipe. Using the wrong tool for the job can lead to chipped edges, wasted planks, and cuts that fit like a bad haircut.
Before you start, keep these basics in mind:
- Measure twice. Then measure once more because vinyl plank is not famous for re-growing.
- Mark clearly with pencil or chalk.
- Use a straightedge or framing square for crisp guide lines.
- Leave the required expansion gap along walls, door frames, and fixed objects.
- Wear eye protection if you are using power tools.
- Save leftover planks for future repairs.
Now let’s get into the three best ways to cut vinyl plank flooring.
1. Score and Snap with a Utility Knife
Best for Straight Cuts and Quick End Trims
If you are making simple straight cuts, the score-and-snap method is usually the easiest and most beginner-friendly option. It is clean, quiet, affordable, and does not throw dust everywhere like a power saw auditioning for a demolition show.
This method works especially well for:
- Trimming planks to length at the end of a row
- Simple rip cuts on many vinyl planks
- Small adjustments during installation
- DIY jobs where you want minimal mess
What You Need
- Sharp utility knife with fresh blades
- Metal straightedge or T-square
- Tape measure
- Pencil or chalk
- Stable work surface or flat floor area
How to Do It
First, measure the plank carefully and mark your cut line. Use a framing square or straightedge to keep the line perfectly straight. Then place the straightedge on the mark and run the utility knife along the line with firm, controlled pressure. You do not need to cut all the way through the plank in one pass. In fact, trying to muscle through it is a great way to slip, curse, and possibly ruin the surface.
Instead, make one or more light scoring passes until you have created a defined groove. Once the line is scored, bend the plank away from the cut line and snap it. Many installers also score the reverse side before snapping for a cleaner break, especially on thicker or more rigid luxury vinyl plank flooring.
Why It Works
Vinyl plank flooring is designed to be workable. A sharp knife weakens the wear layer and core along a straight line, allowing the material to break predictably. That makes this method fast and surprisingly precise when used correctly.
Pro Tips
- Change blades often. A dull blade tears instead of slices.
- Use a metal straightedge, not a plastic ruler that bends like it has stage fright.
- Keep the decorative face protected from scratches while working.
- For a long rip cut, move slowly and keep the scoring angle consistent.
Drawbacks
The utility knife method is fantastic for straight cuts, but it is not the hero for every scene. Once you need curves, vent cutouts, L-shaped notches, or detailed cuts around trim, it starts to lose its charm. That is where the second method comes in.
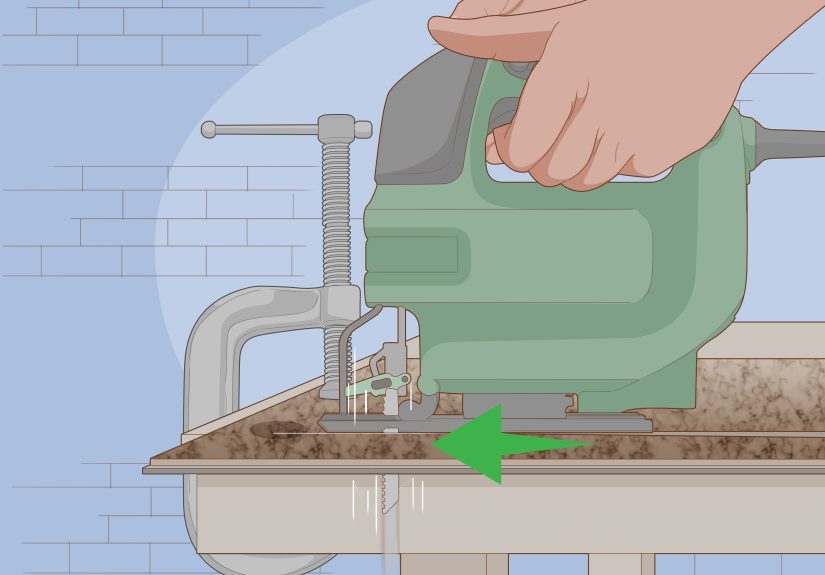
2. Use a Jigsaw for Curves, Corners, and Notches
Best for Irregular Cuts Around Obstacles
When a plank has to fit around a floor vent, cabinet corner, pipe, toilet flange, or door trim, a jigsaw is usually the best tool for the job. It gives you control, flexibility, and the ability to cut shapes that a utility knife would handle about as gracefully as a spoon cutting steak.
This method is ideal for:
- Cutting around vents
- Making U-shaped or L-shaped notches
- Trimming around pipes
- Custom cuts near cabinets, islands, and door jambs
- Any curve or non-straight pattern
What You Need
- Jigsaw
- Fine-tooth blade suitable for laminate or vinyl
- Clamps
- Tape measure
- Pencil or chalk
- Safety glasses and dust protection
How to Do It
Start by dry-fitting the plank in its intended location and marking the exact area that needs to be removed. For vent openings, many installers place the plank next to its final position and transfer the measurements carefully. For pipes, mark the center point and the diameter, remembering to allow proper clearance for expansion and trim coverage.
Clamp the plank securely to a workbench or stable surface. Then cut slowly along the marked line with the jigsaw. Let the blade do the work. Pushing too hard can chip the edge, throw the cut off line, or make the blade wander like it just remembered another appointment.
For inside corners, drill a starter hole if needed and then guide the blade into the cut. For narrow notches, make relief cuts first, then remove the waste. After cutting, test-fit the plank before locking it into place. Small refinements can often be cleaned up with a utility knife.
When a Jigsaw Beats a Knife
Any time the cut is not perfectly straight, the jigsaw earns its keep. It is especially useful near door casings where the flooring needs to slide under trim while still preserving an expansion gap. It also shines for detailed cuts that would be frustrating or inaccurate with repeated scoring alone.
Pro Tips
- Use painter’s tape over the cut line if you want extra help minimizing surface scuffs.
- Practice on a scrap plank before cutting a visible piece.
- Check blade direction and material recommendations before cutting.
- Vacuum dust often so your layout marks stay visible.
Drawbacks
A jigsaw is versatile, but it can be noisy and dusty. It is also slower than a flooring cutter when you need to make a bunch of straight repetitive cuts. For speed and consistency, the third option deserves attention.
3. Cut with a Vinyl Plank Cutter or Power Saw
Best for Speed, Repetitive Cuts, and Rigid Planks
If you are installing flooring across a larger room, making repeated straight cuts, or working with a thicker rigid core plank, a vinyl plank cutter or a miter saw can save serious time. This is the method for people who want cleaner production-style cutting and are ready to trade a little setup time for much faster workflow.
A manual flooring cutter is excellent for:
- Repeated straight crosscuts
- Quick trimming with little to no dust
- Working indoors without a lot of noise
- Installers who want consistency from cut to cut
A power saw, such as a miter saw or circular saw, is better for:
- Very rigid or thick planks
- Fast length cuts in larger projects
- Situations where hand scoring feels too slow
- Precise angle cuts and transition pieces
How to Use a Vinyl Plank Cutter
Mark your cut line, align it with the cutter blade, and bring the handle down in a controlled motion. A good cutter gives you a clean edge with minimal cleanup. It is fast, quiet, and refreshingly low-drama.
The big advantage here is efficiency. If you are cutting dozens of end pieces, a flooring cutter can feel like a cheat code. It also creates far less dust than a saw, which matters if you are working inside a finished home.
How to Use a Miter Saw or Circular Saw
Mark the plank clearly, support it well, and use a blade appropriate for clean finish work. Cut slowly and steadily. On some saw setups, installers prefer to cut with the decorative face oriented in a way that reduces visible edge chipping based on blade direction. Always test on scrap first because different planks behave differently.
Power saws are especially handy for transition strips, final-row trims, and repeated cuts when you are trying to keep the project moving. They are not subtle, though. They make noise, produce dust, and require more careful safety practices.
Pro Tips
- Set up a dedicated cutting station away from the install area.
- Use scrap material to test blade behavior before cutting finished planks.
- Keep the room clean so dust does not get into locking joints.
- Do not rush repetitive cuts. Fast is good. Wrong is expensive.
Common Mistakes When Cutting Vinyl Plank Flooring
Forgetting the Expansion Gap
One of the most common DIY mistakes is cutting planks too tight against the wall, door frame, or vent. Vinyl plank flooring needs a little room to expand and contract. If you cut too snug, the floor may buckle, lift, or complain later in the form of weird movement and clicking noises.
Using a Dull Blade
A dull utility knife blade makes ugly cuts and requires more force. That is the worst combination. Fresh blades are cheap. Wasted planks are not.
Skipping the Test Fit
Before locking a tricky piece in place, dry-fit it. That one-minute check can save you from discovering a bad notch after the row is already committed.
Cutting Without a Layout Plan
Good flooring installs start with planning. Think about seam staggering, doorway transitions, vent placement, and the width of the final row. You want the floor to look intentional, not like it was assembled by someone racing a game show buzzer.
Which Cutting Method Is Best?
If you are installing vinyl plank flooring in a typical room, the honest answer is: probably all three. Most successful installs use a combination of methods.
- Use a utility knife for straight cuts and everyday trimming.
- Use a jigsaw for notches, vents, curves, and cuts around obstacles.
- Use a flooring cutter or power saw when you want speed, consistency, or cleaner production on rigid planks.
Think of it like cooking. A chef’s knife can do a lot, but sometimes you still want kitchen shears or a mandoline. Same floor, different drama.
Real-World Experience: Lessons Learned While Cutting Vinyl Plank Flooring
The first time I cut vinyl plank flooring, I treated the project like it was going to be outrageously simple. The box said DIY-friendly. The videos looked calm. The planks clicked together with suspicious confidence. Naturally, I assumed I would be done before lunch and somehow still have time to admire my own brilliance. By midafternoon, I had learned that vinyl plank flooring is friendly, yes, but it is the kind of friendly that still expects competence.
The first lesson was that straight cuts are only easy when the measurements are honest. On my first row, I marked one plank quickly, scored it, snapped it, and felt like a flooring wizard. Then I slid it into place and realized I had forgotten to account for the expansion gap. The piece was technically the right size for the visible opening and completely the wrong size for an actual floor. That little moment changed the whole project. After that, every cut got measured with the wall gap in mind, and suddenly the floor started behaving much better.
The second lesson came at a floor vent. In theory, cutting around a vent sounded easy: just mark the opening and cut. In reality, the vent was close enough to the end of the plank to make the material feel awkward and flimsy. That was the moment a jigsaw stopped being optional and started being the star of the show. Once I clamped the plank properly and slowed down, the cut turned out neat and usable. The biggest difference was patience. Vinyl plank flooring rewards calm hands far more than heroic speed.
Another experience that stuck with me was dealing with door jambs. They looked innocent enough until the plank refused to slide into place. The real issue was not the plank. It was the trim. After undercutting the jamb and test-fitting again, the whole section went in more cleanly. That taught me something important: when a cut seems weirdly complicated, the best solution is sometimes to adjust the obstacle, not keep hacking away at the flooring.
I also learned very quickly that leftover pieces are not junk. On a later row, a cutoff from an earlier plank became the perfect starter piece to keep the seams staggered. That saved material and made the layout look more natural. By the end of the job, the scraps were not just leftovers. They were options, backups, and occasionally lifesavers.
Most of all, cutting vinyl plank flooring taught me that neat work is mostly boring work done well. It is marking carefully, checking fit, changing blades, cleaning dust, and not pretending a bad cut will somehow become a good one if you squint hard enough. The room looked finished in the end, but the real win was that the final rows went in with less force, less frustration, and a lot fewer speeches directed at inanimate objects. That is usually how you know your method is working.
Conclusion
Cutting vinyl plank flooring is not about owning every tool in the aisle. It is about knowing which method fits the cut in front of you. For most straight cuts, a utility knife and straightedge are simple and effective. For curves, corners, and notches, a jigsaw gives you the flexibility you need. And for speed, repetition, or thicker rigid planks, a flooring cutter or power saw can make the whole installation smoother.
Do the measuring carefully, leave room for expansion, dry-fit complicated pieces, and keep your blades sharp. Those habits matter more than fancy gear. Get the cuts right, and the whole floor looks better, installs faster, and feels much more professional. Get them wrong, and you may become very familiar with the phrase, “Well, that plank is now a practice piece.”


