
Table of Contents >> Show >> Hide
- Foil Balloon Basics (So You Don’t Fight the Valve)
- Way #1: Inflate Foil Balloons With a Helium Tank (Best for Floating)
- Way #2: Inflate Foil Balloons With an Air Pump (Best for Decor)
- Way #3: Inflate Foil Balloons With a Straw (Best for Emergencies and Small Balloons)
- Common Problems (and the Fast Fixes)
- Safety Notes (Because Fun Should Stay Fun)
- Conclusion: Pick Your Method, Then Inflate Like a Pro
- Real-World Experiences: What Usually Happens (and How to Win Anyway)
“Blow up” sounds dramaticlike your birthday party is sponsored by an action movie.
But in normal, law-abiding, cake-forward life, it simply means inflate.
And when you’re dealing with foil balloons (often called “Mylar” balloons),
inflation is wonderfully low-stress once you know how the valve works.
This guide walks you through three reliable ways to blow up foil balloons:
with a helium tank (for floating), with an air pump (for garlands and décor), and with the
surprisingly effective “straw method” (for when you’re balloon-less… but not straw-less).
Along the way, you’ll get troubleshooting tips, safety notes, and real-world “been there” scenarios
so your balloon looks crispnot crumpled like it slept on the couch.
Foil Balloon Basics (So You Don’t Fight the Valve)
What makes foil balloons different?
Foil balloons are made from a thin, metallic-coated plastic film. Unlike latex balloons,
they typically include a self-sealing valve. That’s the magic little tunnel near the “tail”
(the tab at the bottom) that lets air or helium inand then pinches itself shut when you remove
the nozzle or straw.
Helium vs. air: which one should you use?
- Use helium if you want the foil balloon to float (balloon bouquets, “floating” numbers, centerpieces).
-
Use air if you’re hanging, taping, or building décor (balloon garlands, wall backdrops, table runners).
Air-filled foil balloons look greatthey just won’t hover like a tiny UFO.
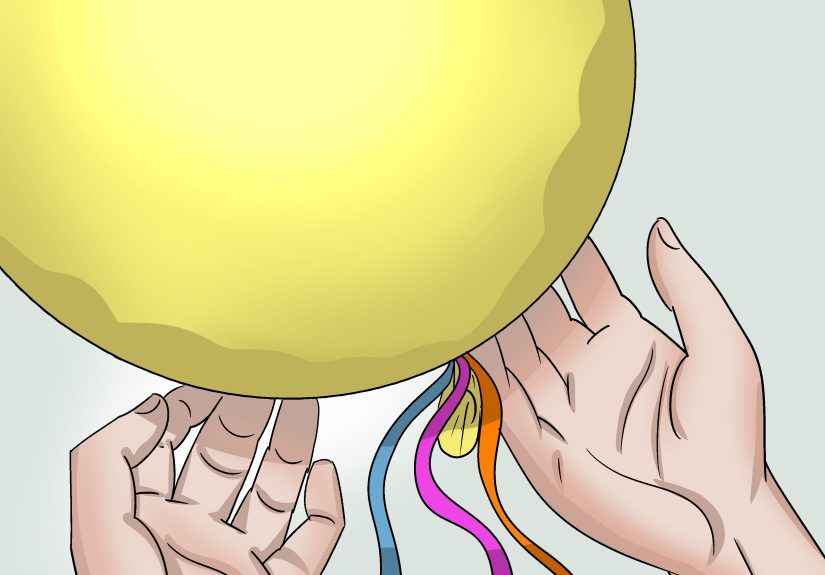
How to find the valve (aka the “Where do I put the thing?” moment)
Flip the balloon so you’re looking at the bottom tab. The valve opening is usually inside that tab,
between two layers of clear plastic. If you gently separate the layers with your fingers, you’ll find a
narrow channel that leads into the balloon.
Pro tip: If you’re poking randomly and nothing is happening, you’re not “bad at balloons.”
You’re just not in the valve yet. (Yes, that sounds like a metaphor. No, we’re not unpacking it.)
Way #1: Inflate Foil Balloons With a Helium Tank (Best for Floating)
If your goal is maximum “wow,” helium is the way to go. You can use a small disposable helium tank
at home or get your foil balloons inflated at a party store. Either way, the technique is similar:
you insert the nozzle into the valve and fill until the balloon is firmbut not rock-hard.
What you’ll need
- A helium tank (disposable or refillable) with a nozzle
- Your foil balloon(s)
- Ribbon or balloon weight (highly recommended)
- Optional: a plastic straw adapter (some kits include one)
Step-by-step
- Unfold the balloon completely. Creases are fine; just make sure the balloon isn’t stuck together in a way that blocks airflow.
- Locate the valve. Find the opening inside the bottom tab.
- Insert the nozzle gently. Slide the nozzle (or straw adapter) into the valve channel. You don’t need to force it.
- Inflate slowly. Add helium in short bursts. Watch the balloon expand evenly.
-
Stop when it’s firm, not tight. A properly inflated foil balloon looks smooth and rounded, but it still has a tiny bit of “give.”
Overinflation is the #1 reason foil balloons popusually right when you’re feeling proud of yourself. - Remove the nozzle and let the valve seal. Pull the nozzle straight out. The valve should self-seal automatically.
- Add ribbon + weight. Even one gust of wind can turn a floating balloon into a local legend.
When this method is the best choice
- You want balloons to float for a party entrance, photo backdrop, or bouquet
- You’re inflating big number/letter balloons and want that “floating headline” effect
- You want longer-lasting shape and less wrinkling (foil tends to stay crisp with helium)
Helium tank sanity checks (quick but important)
Helium tanks are compressed-gas cylinders. Treat them like the serious containers they are:
keep them stable, don’t store them near heat, and follow the instructions printed on the tank.
This isn’t meant to scare youjust to keep your party from becoming a cautionary tale.
Way #2: Inflate Foil Balloons With an Air Pump (Best for Decor)
Air pumps are the unsung heroes of balloon decorating. They’re fast, easy, and you won’t run out of breath
halfway through a balloon garland and start questioning every decision that brought you to this moment.
What you’ll need
- A hand pump (dual-action pumps work great) or an electric balloon pump
- Your foil balloon(s)
- Optional: balloon tape, command strips, or string for hanging
- Optional: a balloon stick (great for hand-held balloons without helium)
Step-by-step
- Find the valve in the bottom tab.
-
Insert the pump tip into the valve channel.
If the pump tip is too wide, use a narrower attachment or switch to the straw method below. - Pump slowly at first. Once the balloon starts to take shape, you can speed up.
- Stop at about “firm and smooth.” The balloon should look full but not strained.
- Remove the pump tip. The self-sealing valve should close automatically.
When this method is the best choice
- You’re making balloon décor (garlands, walls, arches, table displays)
- You don’t need the balloon to float
- You want a fast, repeatable method for inflating multiple balloons
Decor example: a simple foil balloon backdrop
Inflating foil stars or hearts with air and taping them to a wall can look surprisingly upscale.
Mix sizes (18-inch plus mini balloons), cluster in groups of 3–5, and let them “trail” diagonally.
Add a banner and suddenly your living room looks like it has a party budget.
Way #3: Inflate Foil Balloons With a Straw (Best for Emergencies and Small Balloons)
No tank? No pump? No problem. The straw method works because the foil balloon valve is designed to open
when something slides into it. Once you remove the straw, the valve seals shut again.
It’s simple, effective, and feels like a life hack your future self will brag about.
What you’ll need
- A regular drinking straw (straight ones are easiest)
- Your foil balloon(s)
- Optional: a small clip or clothespin (helpful, not required)
Step-by-step
- Locate the valve in the bottom tab. Gently separate the two clear layers if needed.
-
Insert the straw into the valve channel. Slide it in until you feel it pass through the inner seal.
Don’t jabthink “polite,” not “sword fight.” -
Blow steadily to inflate. Slow and even breaths work better than frantic huffing.
If you feel lightheaded, take a break. The balloon will wait. - Pinch the tab around the straw to reduce air escaping while you inflate.
-
Remove the straw and let the valve seal. Pinch the valve area lightly as you pull out the straw.
The balloon should stay inflated.
When this method is the best choice
- You’re inflating a few balloons and don’t want extra equipment
- You’re traveling or decorating somewhere without tools
- You’re inflating small foil balloons or letter balloons designed for air fill
Common Problems (and the Fast Fixes)
“It won’t inflate at all.”
- Most likely: you’re not in the valve channel.
- Fix: pull out, re-find the opening, and slide in gently at a slightly different angle.
“Air/helium leaks out when I remove the nozzle.”
- Most likely: the nozzle/straw didn’t go past the inner seal, or you tore the valve area slightly.
- Fix: reinflate and remove more slowly. If there’s a tiny tear, clear tape placed neatly over the valve tab area can help (don’t block the valve opening while inflating).
“It looks wrinkly.”
- Most likely: it’s underinflated.
- Fix: add a little more air/helium until the surface smooths out. Wrinkles often disappear near the end.
“It’s too tight and scary.”
- Most likely: it’s overinflated.
- Fix: carefully insert a straw just into the valve to release a small amount of air/helium, then remove the straw to reseal.
“Can I deflate and reuse a foil balloon?”
Often, yes. Insert a straw into the valve channel until air begins to escape, then let it deflate slowly.
Fold it gently for storage. Reuse depends on the balloon quality and whether the valve stays intact.
Safety Notes (Because Fun Should Stay Fun)
-
Keep foil balloons away from power lines. Foil balloons have a metallic layer that can conduct electricity.
Always keep them tied down, and never try to retrieve balloons that get caught in lines. - Don’t inhale helium. It can be dangerous and can cause fainting. Helium belongs in balloonsnot lungs.
- Use adult supervision for younger kids. Balloons can pose choking and strangulation hazards (especially ribbons).
- Handle tanks responsibly. Follow tank instructions, keep cylinders stable/upright, and store away from heat sources.
- Plan transport. Fully inflated balloons can block visibility in a car. Put them in the back seat or trunk (if size allows) and drive safely.
Conclusion: Pick Your Method, Then Inflate Like a Pro
If you want floating balloons, choose helium. If you’re building décor, choose a hand pump or electric pump.
If you’re working with limited supplies, the straw method is your reliable backup plan.
The real secret is understanding the self-sealing valve: once you can find it and insert your nozzle/straw correctly,
foil balloons become one of the easiest party upgrades you can pull offno balloon wizard license required.
And remember: “firm” is the goal. Not “tight enough to bounce off the ceiling like a drum.”
Inflate slowly, stop when smooth, and your balloons will look crisp, festive, and photo-ready.
Real-World Experiences: What Usually Happens (and How to Win Anyway)
Let’s talk about the part no one puts on the packaging: the actual experience of blowing up foil balloons.
Not the perfect, slow-motion commercial where someone smiles while effortlessly creating a balloon bouquet in an all-white kitchen.
Real life has pets, humidity, car rides, and at least one person asking, “Is it supposed to make that noise?”
One common experience is the “inflated too early” surprise. You blow up your foil balloons the night before the party,
wake up excited, andplot twistsome of them look a little softer. Foil balloons typically hold shape well, but temperature changes
can make them look less firm. A cooler room can make balloons look slightly deflated; a warmer room can make them look tighter.
The fix is simple: plan for a quick top-off close to party time, especially if the balloons are part of a photo moment.
It’s not a failureit’s balloon maintenance, like fluffing couch pillows but shinier.
Another classic: transporting big number or letter balloons. In your mind, you’re calmly arriving with a gorgeous “16”
floating behind you like a celebrity entrance. In reality, the balloon tries to take over the car. It wedges itself between
the headrest and the window, blocks the rearview mirror, and bonks your passenger like it’s trying to start a conversation.
The best move is to transport large foil balloons partially inflated if you’re air-filling (then finish on site),
or if they must be fully inflated with helium, secure them low with weights and place them in the back seatnot the front.
Bonus points if you bring tape, ribbon, and scissors. Those three items have saved more parties than any playlist ever has.
People also run into the “valve confusion loop.” You find the tab, you insert the nozzle, nothing happens, you try again,
still nothing, and suddenly you’re negotiating with an inanimate object. This is incredibly normal. The valve is a narrow channel,
and if you don’t slide past the inner seal, your air or helium won’t go anywhere. The experience tip here is to slow down and
use a gentle approach: separate the tab layers, angle the nozzle slightly upward, and insert until it feels like it “seats.”
Once it’s in the right spot, inflation becomes easy and you’ll wonder why it felt impossible 30 seconds ago.
Then there’s the “wrinkles vs. overinflation” debate. Many people stop too early because wrinkles look like something is wrong.
But with foil balloons, wrinkles often mean the balloon is simply underfilled. Inflate gradually and watch the surface smooth out.
The other side of the coin is going too far and making the balloon drum-tight. That’s when seams get stressed and popping becomes more likely.
A good real-world rule: aim for smooth and rounded, but still slightly flexible if you press gently with your palm.
If it’s so tight it feels like it’s judging you, back off.
Finally, there’s the experience of deciding between helium and air in the middle of decorating.
A lot of people start with “Everything will float!” and then realize they’re doing a balloon garland where floating is unnecessary.
Air-filled foil balloons are often the smarter move for décor because they’re easier to position and won’t drift.
You can tape them exactly where you want, create layered backdrops, and avoid the constant tug-of-war between ribbon and gravity.
Helium is perfect when you want movement and height; air is perfect when you want control and structure.
Knowing the difference makes decorating feel less like chaos and more like a planwhich is the closest thing to magic most parties need.


