
Table of Contents >> Show >> Hide
- Why Board and Batten Still Looks Timeless
- Before You Start: The DIY Game Plan That Saves You from Regret
- 1) Pick the wall strategically
- 2) Plan your layout before buying wood
- 3) Space battens evenly (but don’t panic about perfection)
- 4) Choose the right material: MDF vs. wood
- 5) Prep matters more than you think
- 6) Use the right finish steps
- 7) Pick paint sheen based on the room
- 8) Safety check (the one you should not skip)
- 15 DIY Board and Batten Wall Ideas for a Timeless Look
- 1) Classic Half-Wall Board and Batten in a Hallway
- 2) Floor-to-Ceiling Vertical Battens for Height
- 3) Three-Quarter Height Board and Batten with Wallpaper Above
- 4) Entryway Drop Zone Board and Batten
- 5) Moody Dining Room Paneling
- 6) Minimalist Grid-Style Board and Batten
- 7) Bedroom Accent Wall Behind the Bed
- 8) Bathroom Board and Batten for Texture (and Style Balance)
- 9) Stairway Board and Batten with a Gallery Wall
- 10) Board and Batten Around a Window for a Built-In Feel
- 11) Board and Batten with a Top Ledge for Styling
- 12) Wide-Spaced Battens for a Soft Modern Look
- 13) Contrasting Battens and Wall Color
- 14) Horizontal Board and Batten for a Twist
- 15) Simple Beginner-Friendly Accent Wall in a Small Room
- How to Make Your Board and Batten Wall Look Expensive (Without Spending a Fortune)
- Extended DIY Experience Notes (500+ Words): What Real Projects Usually Teach You
- Final Thoughts
If your walls are giving “builder-grade rental office” energy, board and batten is the DIY upgrade that can fix that fast. It adds texture, shadow, rhythm, and old-house character without requiring you to rebuild your home from the studs (or your personality from Pinterest).
Better yet, a DIY board and batten wall can work in almost any style: modern, farmhouse, coastal, traditional, transitional, and even that “I don’t know my style, but I want it to look expensive” style. The trick is choosing the right layout, spacing, height, and paint finish for the room.
In this guide, you’ll get 15 timeless board and batten wall ideas, plus practical planning tips (spacing, materials, paint sheen, and common mistakes) so your project looks intentionalnot like a weekend argument between a nail gun and a tape measure.
Why Board and Batten Still Looks Timeless
Board and batten has staying power because it creates architectural detail with simple lines. Traditionally, the look involved wide boards with narrow battens covering seams. For many interior DIY projects today, you can create the same visual effect by attaching battens directly to drywall, which keeps the project simpler and more affordable while still delivering that classic paneled look.
What makes it timeless is flexibility. You can go floor-to-ceiling for drama, half wall for classic wainscoting vibes, or three-quarter height for a custom designer look. You can paint everything one color for a seamless effect or contrast the battens and wall for a more graphic look. Same concept, wildly different personalities.
Before You Start: The DIY Game Plan That Saves You from Regret
1) Pick the wall strategically
Start with a wall that has fewer interruptions (windows, doors, switches, and outlets) if this is your first project. A simple rectangle is the easiest training ground. You can absolutely do a more complex wall laterafter you and your miter saw build trust.
2) Plan your layout before buying wood
The best board and batten walls look balanced, not random. A smart approach is to start with a center reference point and work outward so the left and right sides feel symmetrical. Draw a quick diagram, note outlet locations, and test spacing on paper before cutting anything. This step feels boring, but it’s the part that makes the finished wall look professionally designed.
3) Space battens evenly (but don’t panic about perfection)
Many DIYers use spacing in the roughly 10–24 inch range depending on wall width, batten width, and style. Tighter spacing reads more traditional or detailed; wider spacing feels calmer and more modern. The goal is visual consistencynot mathematical perfection down to the millimeter. Old houses, especially, will remind you that “square” is more of a suggestion.
4) Choose the right material: MDF vs. wood
For interior accent walls, primed MDF is a popular option because it’s smooth, paint-friendly, affordable, and easy to work with. Solid wood is more durable and may be a better choice in moisture-prone areas, but it can cost more and may warp or have knots depending on the grade. For many beginners, MDF is the easiest path to a clean finish.
5) Prep matters more than you think
Remove or work around baseboards intentionally. If you leave thin baseboards in place, battens can protrude awkwardly. Some DIYers solve this with mitered cuts at the bottom; others replace baseboards for a cleaner, more built-in result. Also, textured walls may need a skim coat or thin backer panel if you want that crisp, smooth millwork look.
6) Use the right finish steps
Fill nail holes, sand, caulk seams, and paint thoroughly. Paintable latex caulk is a favorite for trim-to-wall seams because it cleans up easily and takes paint well. This is the difference between “cute DIY” and “Wait, who did your millwork?”
7) Pick paint sheen based on the room
For bedrooms and living rooms, eggshell or satin is a safe, attractive choice. For bathrooms or splash-prone areas, satin or semi-gloss tends to hold up better. If you want to hide wall imperfections, lower sheens usually help. If you want easier wipe-downs, go a little glossier.
8) Safety check (the one you should not skip)
If you’re removing outlet covers, cutting around switches, or working near electrical boxes, turn off power to the circuit and verify it is off before starting. This project should be dramatic only in appearance, not in the emergency-room sense.
15 DIY Board and Batten Wall Ideas for a Timeless Look
1) Classic Half-Wall Board and Batten in a Hallway
A half-wall treatment is one of the most beginner-friendly ways to start. It adds architectural detail without committing to full-height paneling, and it works beautifully in hallways, entryways, and stair landings. Pair it with a narrow ledge or top rail for a finished wainscoting look.
Timeless tip: Keep the color soft (white, greige, muted sage) and hang art above it. The paneling becomes the frame, and your decor does the talking.
2) Floor-to-Ceiling Vertical Battens for Height
If your ceilings feel low, vertical battens can visually stretch the room. The eye follows the lines upward, which makes even a modest room feel taller and more polished. This is especially effective in small bedrooms, offices, and narrow spaces.
Timeless tip: Use evenly spaced battens and paint wall + battens the same color for a seamless, architectural finish.
3) Three-Quarter Height Board and Batten with Wallpaper Above
This is the sweet spot between traditional and playful. Run the paneling up about three-quarters of the wall, then add wallpaper or a contrasting paint color above. It gives you texture down low (where walls take the most abuse) and personality up top.
Timeless tip: Choose a wallpaper with classic patterning (stripes, botanicals, subtle geometrics) instead of ultra-trendy prints.
4) Entryway Drop Zone Board and Batten
Board and batten in an entryway is not just prettyit’s practical. It visually organizes the space and creates a natural backdrop for hooks, benches, baskets, and shoe storage. Even a tiny entry can look intentional with this treatment.
Timeless tip: Add sturdy hooks aligned with battens for a custom mudroom feel, even if your “mudroom” is just a brave little corner.
5) Moody Dining Room Paneling
Want instant drama? A board and batten wall in a dining room can make the space feel more formal and layered. Deep green, charcoal, navy, or warm brown tones look incredible here, especially with warm lighting and art.
Timeless tip: Pull your panel color from another element in the room (rug, drapes, wallpaper, or upholstery) so the look feels cohesive rather than random.
6) Minimalist Grid-Style Board and Batten
Traditional board and batten is vertical, but a simple grid pattern can feel clean and modern. This works well in offices, bedrooms, and living rooms where you want architectural detail without farmhouse styling.
Timeless tip: Keep the trim profile simple and spacing consistent. Grid walls look best when they’re crisp, restrained, and not over-accessorized.
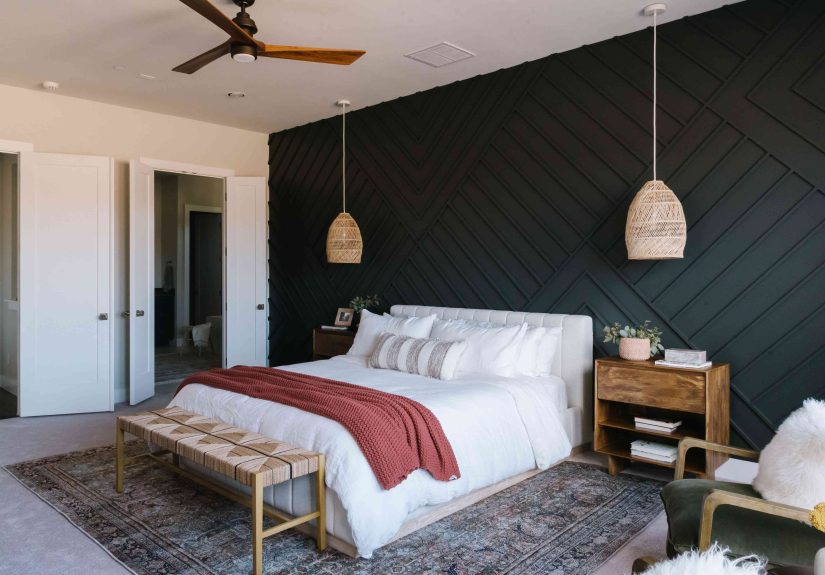
7) Bedroom Accent Wall Behind the Bed
A board and batten wall behind the bed creates a built-in headboard effect and makes the room feel custom. You can go half-wall for a classic look or full-height for drama. It’s one of the highest-impact DIY upgrades for a bedroom.
Timeless tip: Paint the wall a calming color (soft blue, warm white, muted green, or dusty gray) and let bedding add the pattern.
8) Bathroom Board and Batten for Texture (and Style Balance)
Bathrooms can feel tile-heavy or plain, so board and batten is a great way to add warmth and visual detail. It also balances bolder elements like patterned floors, brass hardware, or statement mirrors.
Timeless tip: Use moisture-friendly paint sheen (often satin or semi-gloss) and caulk seams carefully for a durable, easy-to-clean finish.
9) Stairway Board and Batten with a Gallery Wall
Stairways are often overlooked, but they’re prime real estate for wall treatments. Subtle board and batten adds depth, and the vertical structure makes it easier to align framed art in a way that looks intentional instead of chaotic.
Timeless tip: Keep the paneling tone-on-tone with the wall if your gallery wall is colorful or eclectic. Let the frames be the stars.
10) Board and Batten Around a Window for a Built-In Feel
Don’t avoid windowsdesign around them. Framing a wall with board and batten around a window can make the entire room feel more custom. This works especially well in nurseries, guest rooms, and breakfast nooks.
Timeless tip: Match the trim proportions to the window casing so the wall treatment looks like it belongs there from day one.
11) Board and Batten with a Top Ledge for Styling
A top ledge (often created with a horizontal board and slim cap) adds a polished finish and gives you a tiny perch for decor in some spaces. It’s especially charming in dining rooms, nurseries, and bathrooms.
Timeless tip: Keep ledge styling minimalone framed print, a small vase, or a few practical items. Don’t turn it into a tiny clutter shelf museum.
12) Wide-Spaced Battens for a Soft Modern Look
If traditional spacing feels too busy, spread the battens farther apart. Wide spacing creates a calmer rhythm and lets paint color do more of the visual work. This look is excellent in modern homes and open-plan spaces.
Timeless tip: Use slightly thinner battens if the spacing is wide so the wall stays elegant instead of heavy.
13) Contrasting Battens and Wall Color
Most people paint everything the same color, but contrast can look fantastic when done carefully. Think cream wall with soft greige battens, or pale sage wall with off-white trim. The effect is subtle dimension without shouting.
Timeless tip: Keep contrast low to medium. High-contrast black-and-white can be beautiful, but it feels more trend-driven and less forgiving.
14) Horizontal Board and Batten for a Twist
Yes, you can flip the orientation. A horizontal approach can make a room feel wider and works especially well in midcentury-inspired or modern spaces. It’s less common, which makes it feel fresh while still rooted in classic paneling logic.
Timeless tip: Use this in rooms that benefit from visual width, like narrow sitting rooms or compact offices.
15) Simple Beginner-Friendly Accent Wall in a Small Room
If you’re new to DIY, pick one small wall and keep the layout simple: top rail, bottom rail, side trim, evenly spaced battens, one paint color. This gives you the board and batten look without a complicated floor plan or endless cuts.
Timeless tip: A small room is actually a great place to be bold with color. The paneling adds structure, so even moody paint can feel refined instead of overwhelming.
How to Make Your Board and Batten Wall Look Expensive (Without Spending a Fortune)
- Prioritize symmetry: Uneven spacing is the fastest way to make the wall feel off.
- Use a level constantly: “Looks straight” is not a measurement method.
- Caulk every visible seam: Clean transitions create that built-in millwork effect.
- Choose one consistent trim thickness: Random profiles can make the wall look patched together.
- Paint after full prep: Spackle, sand, caulk, then paint. In that order. Future you will be grateful.
- Buy extra material: A little waste allowance saves you from matching boards later.
Extended DIY Experience Notes (500+ Words): What Real Projects Usually Teach You
One of the most useful “experience-based” lessons with board and batten is that the planning stage always feels slower than it shouldand then proves completely worth it. Most people imagine the hard part is nailing boards to the wall, but the real challenge is layout confidence. Once the first few lines are marked and the spacing looks balanced, the project suddenly becomes much easier. Before that moment, it can feel like geometry class with sawdust.
Another common experience: walls are almost never perfectly straight. Floors slope. Corners lean. Baseboards are not always the same thickness from one side of the room to the other. New DIYers sometimes assume they measured wrong when a board is off by a small amount, but often the house is the reasonnot the person. The best response is to measure each batten individually (especially on older homes), use a level for every install, and treat filler + caulk as normal finishing tools, not signs of failure.
Textured walls are another surprise. On paper, adding battens directly to drywall sounds wonderfully simple, and it often is. But if the wall texture is heavy, the gaps around battens can look messy until you address the surface. That’s why many DIYers end up either skim coating or using a thin backer panel for a smoother finish. It sounds like an extra step (because it is), but it can be the difference between “pretty good from far away” and “wow, this looks custom.”
A lot of people also discover that paint color behaves differently on paneled walls than on flat walls. Board and batten creates shadows, so the same color can look deeper, moodier, or richer once it’s on the finished feature wall. That’s usually a good thingbut it means sample testing matters. If you’re between two shades, the lighter option often lands closer to your expectation after the battens go up and create depth.
Then there’s the finishing phase, which almost everyone underestimates. Cutting and nailing feels like the “main event,” so it’s tempting to rush the last steps. But filling nail holes, sanding smooth, caulking seams, and painting carefully are what make the wall look intentional. This is the point in the project where patience pays off visibly. A slightly rushed caulk line can be seen forever. A clean, smooth seam disappears into the design and makes the whole wall feel built-in.
One more practical experience note: board and batten changes how a room feels, not just how it looks. In entryways, it creates order. In bedrooms, it adds coziness. In dining rooms, it adds formality. In small bathrooms, it can make the room feel styled and layered instead of plain. That’s why this DIY project stays popular year after yearit’s not just decorative trim. It gives ordinary walls a sense of purpose.
And finally, the most relatable experience of all: your first wall takes the longest. The second wall goes faster. By the third one, you’ll start saying things like “we can knock this out in a weekend,” which is exactly how every DIY tool collection mysteriously grows. Proceed accordingly.
Final Thoughts
A DIY board and batten wall is one of the best ways to add timeless style on a realistic budget. Whether you choose a classic half wall, a dramatic floor-to-ceiling accent, or a modern grid, the secret is simple: balanced layout, clean lines, careful prep, and a paint finish that suits the room.
Start small if you’re new, trust your measurements (after checking them twice), and remember that the finishing details make the magic. Done well, board and batten doesn’t just decorate a wallit makes the whole room feel more finished, more intentional, and a lot more expensive than it actually was.


