
Table of Contents >> Show >> Hide
- Why Winterizing on a Budget Matters
- 1. Seal Gaps with Caulk and Weatherstripping
- 2. Install Door Sweeps and DIY Draft Stoppers
- 3. Add Plastic Window Insulation Film
- 4. Seal Outlets and Switch Plates on Exterior Walls
- 5. Insulate Exposed Pipes and Protect Plumbing
- 6. Swap Furnace Filters and Do Basic Heating Maintenance
- 7. Use Curtains, Blinds, and Rugs as “Soft Insulation”
- 8. Adjust the Thermostat Strategically
- 9. Flip Ceiling Fans to “Winter Mode”
- 10. Weatherize Around the Basement and Attic
- 11. Do a DIY Mini Home Energy Audit
- Everyday Habits That Make Winterizing Even More Effective
- Real-Life Experiences: What Actually Works When You’re Cold and on a Budget
- Conclusion: Cozy Doesn’t Have to Be Costly
Winter shows up every year like that friend who never texts first but still eats all your snacks.
The good news? You don’t have to choose between paying the heating bill and buying groceries.
With a few smart, budget-friendly ways to winterize your home, you can cut drafts, stay cozy,
and keep most projects under $50.
Below are 11 practical, low-cost winter home upgrades you can tackle on weekends or even
after work. Most require basic tools, a little patience, and maybe a hot drink as a reward.
Why Winterizing on a Budget Matters
Heating is one of the biggest energy expenses in a typical American home, especially in
colder regions. Even small air leaks around windows, doors, and outlets can make your furnace
work harder and your wallet cry louder. By sealing those leaks, adding simple insulation,
and tweaking your daily habits, you can shave a noticeable chunk off your heating bill
often 5–20 percent over a seasonwithout major renovations.
Think of winterization as giving your home a warm winter coat. The better the coat, the
less your heating system has to panic every time the temperature drops.
1. Seal Gaps with Caulk and Weatherstripping
If your home feels drafty, the first culprits are usually windows and doors. Tiny cracks and
gaps around frames let cold air sneak in and warm air escape. Fortunately, a $5–$10 tube of
caulk and a $10–$20 roll of weatherstripping can make a huge difference.
How to do it for under $30
- On a windy day, run your hand around window and door frames. Feel a breeze? That’s a leak.
- Use interior latex caulk to seal cracks where trim meets walls or window frames.
- Add self-adhesive weatherstripping to the sides and top of drafty doors and old windows.
This quick project is beginner-friendly and can turn a “cold hallway” into a “totally fine hallway”
in one afternoon.
2. Install Door Sweeps and DIY Draft Stoppers
That icy line of air creeping under exterior doors? That’s money sneaking out of your house.
Door sweeps and draft stoppers are the bouncers at the bottom of your doors, kicking cold air
back outside.
What it costs
- Basic screw-on door sweeps: about $10–$20 each.
- Under-door draft stoppers or “draft snakes”: $10–$25, or free if you DIY.
DIY option
Fill a long fabric tube (or even an old leg from sweatpants) with rice, dried beans, or
old socks and place it along the inside of the door. It’s not glamorous, but it is warm
and extremely budget friendly.
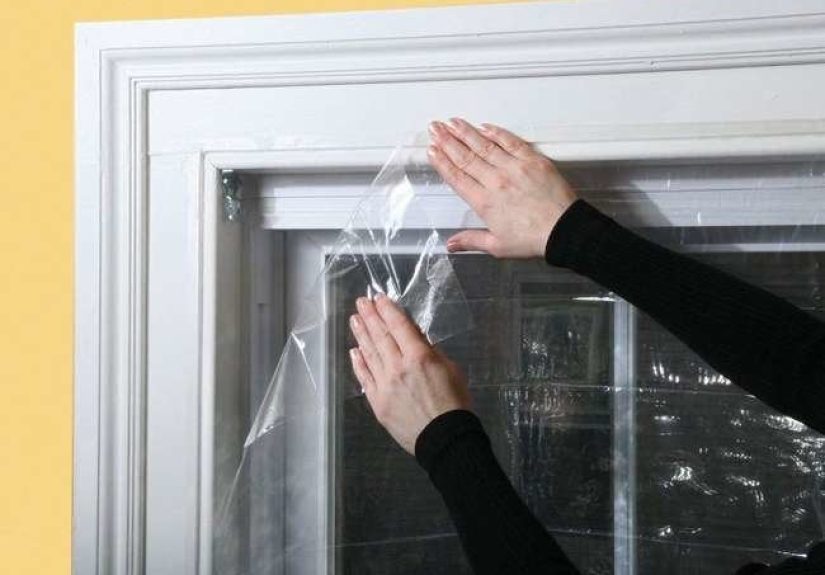
3. Add Plastic Window Insulation Film
Old or single-pane windows can feel like they’re made of tissue paper in winter. Window
insulation film kits turn them into temporary “storm windows” that trap an extra layer of
air and reduce heat loss.
Cost and payoff
- Window film kits typically cost $10–$25 for several windows.
- Applied correctly, they can noticeably cut drafts and help rooms feel less chilly.
How to use it
- Clean the window frame so the tape sticks well.
- Apply double-sided tape and then attach the plastic film.
- Use a hair dryer to shrink the film until it’s tight and nearly invisible.
If you’re really on a shoestring budget, some people line window frames with basic plastic
wrap or even bubble wrap as a temporary solution. It’s not pretty, but your heating bill
will be too busy dropping to complain.
4. Seal Outlets and Switch Plates on Exterior Walls
It sounds wild, but electrical outlets and switch plates on exterior walls can be sneaky
sources of drafts. Those little openings are connected to wall cavities that may not be well
insulated.
Cheap fix, big comfort boost
- Foam outlet and switch gaskets cost just a few dollars for a pack.
- Pop off the cover plate, place the foam gasket behind it, and screw it back on.
- For extra sealing, add childproof outlet plugs to unused receptacles.
This is a five-minute job that can make noticeably cold walls feel more comfortable,
especially in bedrooms and home offices.
5. Insulate Exposed Pipes and Protect Plumbing
Frozen pipes are a winter nightmareand a very expensive one. Insulating exposed pipes
in unheated areas (like basements, crawl spaces, or garages) helps prevent freezing and
keeps hot water warmer on the way to your faucets.
Stay under $50
- Foam pipe insulation sleeves usually cost $1–$3 per 6-foot length.
- Focus on pipes near exterior walls, in crawl spaces, and near garage doors.
- Use tape or zip ties to secure any loose sections.
During extreme cold snaps, let faucets drip slightly and open cabinet doors under sinks on
exterior walls so warm air can circulate. Those tricks cost nothing and can save you from a
massive plumbing bill.
6. Swap Furnace Filters and Do Basic Heating Maintenance
Your heating system can only work efficiently if it can breathe. Dirty furnace filters force
the blower to work harder, wasting energy and shortening the life of the equipment.
What to do
- Change disposable filters every one to three months during heavy heating use.
- Most filters range from $5–$20, well within the $50 budget.
- Vacuum floor registers and return grills to remove dust and pet hair.
If you can afford it later, a professional tune-up is a great idea. But even basic DIY
maintenance helps your system run smoother and keeps more heat where it belongsinside.
7. Use Curtains, Blinds, and Rugs as “Soft Insulation”
Your textiles can work overtime in winter. Heavy curtains, layered window treatments, and
thick rugs do more than just look cozythey help slow heat loss.
Low-cost warmth boosters
- Close curtains and blinds at night to trap warmth, especially on older or north-facing windows.
- Open them on sunny days to let in free solar heat.
- Add a rug over cold tile or hardwood floors in frequently used rooms.
-
If thermal curtains aren’t in the budget, double up existing panels or hang a fleece blanket
behind them for the season.
Most of this uses what you already own, which is the best price point of all: free.
8. Adjust the Thermostat Strategically
You don’t have to shiver in a parka indoors, but a few degrees can make a big difference.
Setting the thermostat a bit lower when you’re sleeping or away from home helps cut energy
use over time.
Budget version
- Manually lower the thermostat 5–7°F at night and when you’re out for several hours.
- Layer clothing and use extra blankets rather than cranking the heat.
- Close doors to unused rooms so you aren’t heating guest spaces that see zero guests.
Smart thermostats are great but often cost more than $50. If that’s not in your budget yet,
a simple schedule and a bit of thermostat discipline can still save money.
9. Flip Ceiling Fans to “Winter Mode”
Ceiling fans aren’t just for summer. Most have a tiny switch on the side of the motor that
reverses the direction of the blades. In winter, you want the fan to push warm air gently
down without creating a breeze.
How to use fans in winter
- Turn the fan to rotate clockwise on low speed.
- This pulls cool air up and pushes warm air near the ceiling back down into the room.
- Use this trick in rooms with high or vaulted ceilings where heat tends to get stuck up top.
The cost? Basically nothing beyond the electricity to run the fan on low, which is minimal
compared with turning the thermostat way up.
10. Weatherize Around the Basement and Attic
Heat likes to escape through the top of the house and sneak in through the bottom. While
full insulation upgrades can be pricey, you can still tackle smaller budget-friendly steps
in these areas.
Under-$50 ideas
- Seal gaps along the basement sill plate (where the foundation meets the framing) with caulk or foam.
- Use expanding spray foam around larger holes where pipes or vents enter and exit.
- Add weatherstripping or a gasket to the attic hatch to cut air leaks.
These “invisible” fixes aren’t glamorous, but they help keep warm air from rushing straight
out of your house like it pays the gas bill.
11. Do a DIY Mini Home Energy Audit
You don’t need fancy equipment to get a basic idea of where your home is losing heat. A quick
walk-through can help you prioritize the most important fixes.
What to check
- Feel around doors, windows, outlets, and baseboards for drafts.
- Look for visible gaps where light shines in around door frames.
- Check attic and basement areas for chilly spots or obvious air gaps.
- Note which rooms are always colder than othersthey probably need extra attention.
Start with the easiest and cheapest fixes first, then move up to bigger projects if your
budget allows. Winterization doesn’t have to happen all at once; you can chip away each
season and keep improving.
Everyday Habits That Make Winterizing Even More Effective
The physical upgrades you makelike caulking, insulating, and adding door sweepsdo most
of the heavy lifting. But your daily habits can either turbocharge those efforts or quietly
undo them.
- Keep doors closed between heated and unheated spaces.
- Use space heaters safely and only in the areas you’re actually using.
- Cook and bake at home more in winter; the oven adds bonus warmth to the kitchen.
- Dry clothes indoors on racks sometimes (if humidity allows), adding a bit of moisture and warmth.
None of these cost much, but together they help your winterization projects pay off faster.
Real-Life Experiences: What Actually Works When You’re Cold and on a Budget
Theory is great, but winter hits differently in real life. Here are some lived-in,
tried-and-true experiences from people who’ve winterized on tight budgetsand learned what
really works (and what doesn’t).
The drafty rental that finally became livable
Take the classic older rental apartment with beautiful windows and absolutely zero insulation.
One renter noticed that no matter how high she cranked the thermostat, the living room stayed
freezing and the heating bill kept climbing. Instead of begging the landlord for new windows,
she spent around $40 on plastic window film and a basic door sweep.
First, she sealed the leakiest windows with film, shrinking it tight with a hair dryer until
the plastic was clear and drum-tight. Then she added a draft stopper to the front door. The
result? The room still wasn’t tropical, but suddenly she could sit on the couch without wearing
three layers and a beanie. The next month’s heating bill dropped enough to more than cover the
cost of the supplies.
The older home with the shocking energy bill
Another family in an older house got a wake-up call after the first big cold snap. Their
energy bill nearly doubled from fall to winter. Instead of panicking, they treated it as
a clue: the house was leaking heat everywhere.
Over a few weekends, they:
- Sealed basement sill plates and gaps with caulk and spray foam.
- Installed foam gaskets behind outlets and switches on exterior walls.
- Replaced an embarrassingly dirty furnace filter.
- Closed doors to guest rooms and focused heat where they actually lived.
None of these fixes were dramatic on their own, but together they cut the “constant draft”
feeling throughout the house. When the next bill arrived, it was noticeably lower, even
though the weather had gotten colder. That’s the quiet victory of winterization: you feel
more comfortable, and your bills stop jumping every month.
Apartment dwellers and the “soft insulation” trick
For people in apartments who can’t do major upgrades, textiles become secret weapons. One
couple in a chilly corner unit couldn’t alter the building or replace windows, so they leaned
hard into what they could control.
They layered heavier curtains over the existing blinds, added a big rug over cold tile, and
used fabric draft stoppers at balcony doors. They also reversed the ceiling fan and kept it
on low to recirculate warmth from the ceiling. The total cost? Under $80, spread out over a
few paychecks. The payoff was a living room that finally felt cozy enough for movie nights
without needing a pile of blankets just to sit still.
Mistakes to avoid (so you don’t learn the hard way)
-
Ignoring the furnace filter: It’s easy to forget, but a clogged filter
makes the system inefficient and can leave some rooms under-heated. -
Over-sealing without ventilation: Yes, you want to stop drafts, but you
still need fresh air and proper venting for gas appliances and bathrooms. Balance is key. -
Closing too many vents: Shutting a vent or two in unused rooms is fine,
but closing lots of them can increase pressure in the ducts and stress your system. -
Waiting for a “perfect” budget: Winterization doesn’t have to be all or
nothing. Even a $10 roll of weatherstripping can make an immediate difference.
The common theme in all these experiences is simple: start small and start where you feel it
most. Fix the worst drafts, insulate the coldest spots, and build from there as time and
money allow. Over a few seasons, your home can go from “constantly chilly” to “pleasantly
cozy” without ever touching a five-figure renovation budget.
Conclusion: Cozy Doesn’t Have to Be Costly
Winterizing your home doesn’t require a huge renovation or a bottomless bank account. With
simple, budget-friendly steps like sealing leaks, adding door sweeps, insulating pipes, and
using curtains and rugs strategically, you can stay warmer and spend less. Most of the tips
above cost under $50 each, and many are closer to $10–$20or completely free.
Pick one or two projects to tackle this weekend, then add more as you go. Before long,
you’ll have a home that holds on to heat, a heating system that isn’t overworked, and a
winter budget that doesn’t feel quite so brutal.


