Table of Contents >> Show >> Hide
- Why Winterizing Raised Beds Matters
- 1. Clean Out the Bed, But Do Not Go Full Crime Scene
- 2. Toss Diseased Plants in the Trash, Not Into Wishful-Thinking Compost
- 3. Feed the Soil With Finished Compost, Not Fresh Nitrogen Drama
- 4. Test Your Soil in Fall So Spring Is Less Guesswork and More Gardening
- 5. Do Not Leave Bare Soil Naked All Winter
- 6. Mulch at the Right Time, With the Right Materials, at the Right Depth
- 7. Water Before the Ground Freezes, Because Dry Soil Is a Terrible Blanket
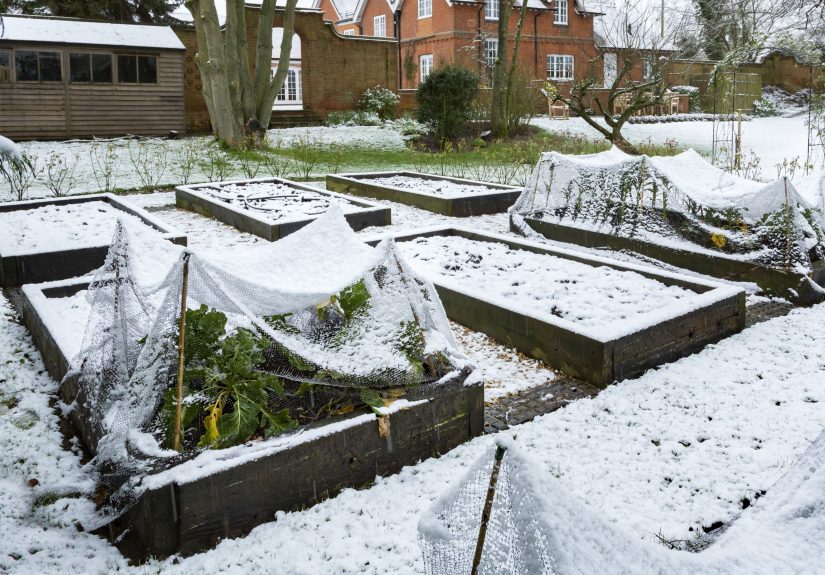
- 8. Use Row Covers or Low Tunnels if You Want Beds to Keep Producing
- 9. Inspect the Bed Itself Before Winter Wrecks It for You
- 10. Clean Your Tools, Label the Beds, and Make Next Year’s Rotation Plan
- Common Mistakes to Avoid When Winterizing Raised Beds
- Final Thoughts
- Experience Section: What Winterizing Raised Garden Beds Taught Me the Hard Way
If your raised garden beds look a little tired by late fall, congratulations: they are behaving exactly like the rest of us. The tomatoes are dramatic, the basil has given up emotionally, and the weeds are somehow still feeling great. But before you declare the season officially over and walk away with a rake over one shoulder like a retired cowboy, give your beds a proper winter send-off.
Winterizing raised garden beds is not about making them look neat for the neighbors. It is about protecting soil structure, reducing disease pressure, preserving moisture, cutting spring workload, and setting up next year’s crops for a stronger start. Raised beds warm quickly in spring and drain well, which is wonderful during the growing season. It also means they can lose organic matter and dry out faster if you leave them bare all winter.
The good news is that winter prep does not have to be complicated. You do not need a tractor, a laboratory, or an advanced degree in compost philosophy. You just need a smart sequence of tasks and the discipline to avoid “helpful” mistakes that create more work later. Here are 10 practical tips for winterizing raised garden beds properly, without turning the whole process into a cold-weather soap opera.
Why Winterizing Raised Beds Matters
Raised beds are efficient, productive, and easier on your back than kneeling in open ground while questioning your life choices. But because the soil is elevated and often lighter in texture, it is more exposed to winter wind, temperature swings, nutrient leaching, and moisture loss. Leaving beds empty and uncovered invites erosion, weed pressure, and tired soil by spring.
A proper winter routine helps you protect the soil food web, reduce overwintering pests and diseases, hold onto nutrients, and keep the bed structure in good shape. In short, winterizing is less about shutting the garden down and more about putting it into maintenance mode.
1. Clean Out the Bed, But Do Not Go Full Crime Scene
Start by harvesting what is left and removing dead annual vegetables, spent vines, fallen fruit, and weeds. This basic cleanup improves airflow, reduces hiding places for pests, and keeps diseased debris from hanging around until spring like an uninvited houseguest.
That said, do not treat every bit of plant material as an enemy. Healthy roots and disease-free residue can still be useful. In many cases, it makes sense to remove the top growth while allowing roots from healthy plants to remain in the soil, where they will break down gradually and support structure and microbial life. The goal is selective cleanup, not total scorched-earth gardening.
What to remove right away
- Dead tomato, pepper, squash, and bean plants
- Any plant material with obvious disease symptoms
- Weeds that have gone to seed
- Rotting vegetables and dropped fruit
2. Toss Diseased Plants in the Trash, Not Into Wishful-Thinking Compost
This is where many gardeners get overly optimistic. If plants were hit with blight, mildew, wilt, rust, or major insect infestations, do not casually toss them into a slow backyard compost pile and hope nature sorts it out. Sometimes it does. Sometimes it gives you a lovely pathogen starter kit for next spring.
Unless you run a hot compost system that reliably reaches temperatures high enough to destroy disease organisms, it is safer to dispose of infected material. The same goes for plants crawling with pests or packed with eggs and larvae. Winter is not the time to provide free bed-and-breakfast service for next season’s problems.
3. Feed the Soil With Finished Compost, Not Fresh Nitrogen Drama
Once the bed is cleaned up, top-dress it with finished compost. This is one of the best things you can do for raised beds before winter. Compost adds organic matter, supports soil biology, improves structure, and helps the bed hold moisture more evenly. It is like sending your soil into winter with a warm coat and a stocked pantry.
A one- to two-inch layer of mature compost is usually enough for most raised beds. If you also use manure, make sure it is well aged and fully composted. Fresh or “hot” manure can burn roots, create nutrient imbalances, and introduce other issues you do not want to troubleshoot in April when you are already trying to remember where you put the trowel.
Do not overdo high-nitrogen fertilizers in late fall. Big flushes of tender growth are not the goal when winter is approaching. Think steady soil improvement, not a caffeinated growth spurt.
4. Test Your Soil in Fall So Spring Is Less Guesswork and More Gardening
If you skip soil testing every year and just throw random amendments into the bed based on vibes, your raised beds deserve better. Fall is a great time to test soil because it gives you time to correct pH and nutrient issues before spring planting. That matters in raised beds, where repeated harvests and regular watering can change fertility faster than many gardeners realize.
A basic soil test can tell you where the pH stands and whether key nutrients like phosphorus and potassium are low, adequate, or excessive. That lets you add lime or other recommended amendments with a real plan instead of making your bed guess what it needs. Most vegetables prefer balanced, fertile soil rather than a chaotic buffet of whatever happened to be on sale at the garden center.
Soil test reminders
- Take samples when the bed is relatively dry and workable
- Sample from several spots in the same bed for a more accurate result
- Label each bed if you manage multiple crops or mixes
- Save the report so you can compare year to year
5. Do Not Leave Bare Soil Naked All Winter
Bare soil in a raised bed is basically winter’s favorite target. Rain compacts it, wind dries it, weeds move in, and nutrients can wash downward. If a bed will sit empty for months, give it some kind of cover. Your two best options are cover crops or mulch. If you can use both strategically, even better.
Cover crops such as winter rye, oats, peas, or vetch can protect the soil surface, reduce erosion, suppress weeds, and add organic matter. Some also help with nutrient cycling. If your climate and timing allow, sowing a cover crop in fall is one of the smartest long-term moves for raised-bed soil health. Just be sure to choose a crop that matches your winter conditions and your spring planting schedule.
If you missed the planting window for cover crops, mulch is still a strong backup plan. The worst option is simply doing nothing and hoping your soil meditates its way through winter.
6. Mulch at the Right Time, With the Right Materials, at the Right Depth
Mulching is where many gardeners either underdo it or pile it on like they are frosting a sheet cake. A protective winter mulch helps regulate soil temperature, reduce erosion, suppress weeds, and limit repeated freeze-thaw cycles that can damage shallow roots and disturb soil structure.
The timing matters. In many regions, the best time to apply winter mulch is after the first hard frost or once the soil has cooled significantly. Put it down too early, and you may keep the soil too warm for too long. Put it down too late, and the bed has already taken the hit.
Good mulch choices for raised beds include shredded leaves, straw, chopped leaf mold, or other clean organic materials. Shred leaves when possible so they do not mat into a soggy blanket that smothers the soil surface. For most raised beds, a layer around two to four inches works well. Around crowns of perennial herbs or plants that need extra insulation, a bit more may be useful, but avoid burying stems directly.
Best winter mulch options
- Shredded leaves
- Clean straw
- Leaf mold
- Finished compost topped with a loose organic mulch
7. Water Before the Ground Freezes, Because Dry Soil Is a Terrible Blanket
This tip surprises a lot of gardeners. Winter prep is not only about covering beds. It is also about moisture management. Dry soil does a poorer job protecting roots than evenly moist soil, and raised beds can dry out faster than in-ground plots because they drain more freely and are exposed on the sides.
If autumn has been dry, water the bed deeply before the ground freezes. The goal is moist soil, not swamp conditions. You are not building a rice paddy. You are helping the root zone hold a more stable temperature and reducing stress on anything overwintering in the bed, including garlic, onions, herbs, and hardy greens.
In milder climates or during dry winters, you may also need occasional winter watering when the soil is not frozen. Check the bed instead of assuming snow or cold air automatically solved the moisture question.
8. Use Row Covers or Low Tunnels if You Want Beds to Keep Producing
Winterizing does not always mean shutting everything down. If you grow spinach, kale, mâche, carrots, scallions, lettuce, or other cold-tolerant crops, raised beds are excellent candidates for season extension. A simple floating row cover or low tunnel can provide meaningful protection from frost, wind, and temperature swings.
Row cover is especially handy because it lets in light while buffering cold. Low tunnels add another layer of control and can help keep hardy crops harvestable longer into winter. For gardeners who are not emotionally prepared to say goodbye to fresh greens, this is the bridge between “garden season is over” and “actually, I’m still harvesting salad in a jacket.”
Just remember that covers need ventilation on warmer days and secure fastening before storms. A winter protection system that blows into the neighbor’s yard is less of a system and more of a public performance.
9. Inspect the Bed Itself Before Winter Wrecks It for You
Winterizing raised garden beds is not only about soil and plants. Check the hardware. Tighten loose screws, straighten warped corners, reinforce weak boards, and repair damaged hoops, trellises, or wire supports. If your bed has drip irrigation, disconnect, drain, and store vulnerable parts before freezing weather can crack them.
This is also a smart time to look for drainage issues. If one bed stayed soggy all season, do not ignore it until spring. Add a note now so you can correct the soil mix, level, or irrigation layout before planting begins again. Raised beds are wonderfully manageable, but only if you manage them.
10. Clean Your Tools, Label the Beds, and Make Next Year’s Rotation Plan
Yes, this sounds boring. It is also one of the highest-return garden jobs you can do in under an hour. Dirty tools can spread disease, rust over winter, and greet you in spring looking like archaeological finds. Wash them, disinfect cutting surfaces, dry them well, and lightly oil metal parts before storage.
Then label or map your raised beds and note what grew where. Crop rotation matters in vegetable gardening because related crops can build up the same pest and disease issues in the same soil. Even in a small raised-bed setup, moving tomatoes, peppers, eggplant, potatoes, cucurbits, and brassicas around when possible can pay off in healthier plants next year.
A simple notebook or garden journal is enough. Write down what performed well, what flopped, what got diseased, where the irrigation failed, and which bed turned into a zucchini jungle. Your future self will be thrilled.
Common Mistakes to Avoid When Winterizing Raised Beds
- Leaving beds bare all winter
- Composting diseased plants in a weak compost pile
- Adding fresh manure right before winter
- Applying mulch too early or in a dense, matted layer
- Forgetting to water during a dry fall
- Ignoring loose bed boards, damaged hoops, or undrained irrigation lines
- Skipping notes and then forgetting everything by spring
Final Thoughts
If you want healthier soil, fewer headaches, and a smoother spring start, winterizing raised garden beds properly is absolutely worth the effort. You do not need to do every possible task, but you should do the important ones well. Clean selectively, remove diseased material, add finished compost, test the soil, cover the surface, mulch wisely, manage moisture, protect crops that can keep going, fix the frame, and clean your tools.
Think of it this way: winterizing is not the boring end of gardening season. It is the first smart move of next season. And your raised beds will remember whether you tucked them in properly or just threw a leaf at them and walked away.
Experience Section: What Winterizing Raised Garden Beds Taught Me the Hard Way
The biggest lesson I learned about winterizing raised beds was embarrassingly simple: the garden always notices when you cut corners, even when no one else does. For years, I treated late fall cleanup like a race. I yanked out plants, tossed a little mulch over the top, and called it “good enough.” Then spring arrived, and my beds looked tired, crusty, and weirdly uneven, like they had spent the off-season making bad decisions.
One year I left two beds completely bare because I figured snow would “take care of things.” Snow did not, in fact, take care of things. By the time planting season rolled around, the top layer had crusted over, weeds had moved in with shocking confidence, and the soil texture felt less like fluffy garden soil and more like a stale bakery item. That was the year I finally understood that bare raised beds lose more than neatness over winter. They lose momentum.
I also used to remove every root I could find because I thought a perfectly empty bed was the gold standard. It looked tidy, sure, but the soil dried faster and seemed looser in the wrong way, almost hollow. Later, when I started leaving healthy roots in place and only removing the diseased top growth, the beds held together better. The soil felt richer, more crumbly, and more alive in spring. It was a small change, but it made the bed feel less stripped and more supported.
Mulch timing taught me another lesson. One fall I applied a thick mulch layer way too early because the weather turned chilly for about five minutes and I panicked. That mulch settled into a heavy mat, and part of the bed stayed too damp. Another year I waited until after the weather had really cooled, used shredded leaves instead of whole ones, and got a much better result. The bed stayed protected, the mulch did not turn into a soggy lid, and spring prep was easier.
My favorite improvement, though, was finally taking fall watering seriously. I used to assume cold weather meant the watering season was over. But after a dry autumn, I noticed my garlic and hardy greens came through winter much better when the soil went into the season evenly moist. Not drenched. Just properly hydrated. It was one of those annoyingly effective tips that made me wish I had listened sooner.
Now my winter routine is simple and repeatable: clean out the junk, save healthy roots, add compost, sow a cover crop or mulch, water if fall has been dry, and write down what happened. Nothing fancy. No dramatic soundtrack. Just better habits. And honestly, that is what changed the garden most. Winterizing raised beds stopped feeling like cleanup and started feeling like an investment. The beds wake up better in spring, and I do too.