Table of Contents >> Show >> Hide
- Why No-Bake Bars Deserve a Spot in Your Dessert Hall of Fame
- The Anatomy of Great No-Bake Bars
- Yummy No-Bake Bars: The Go-To Recipe (Chewy + Crunchy + Chocolate)
- Easy Variations (Same Method, Different Vibes)
- Troubleshooting: If Your Bars Get Weird
- Storage, Make-Ahead, and Freezing
- Smart Ingredient Swaps (So Everyone Gets Dessert)
- FAQ: Quick Answers for Busy Snack People
- Conclusion
- Kitchen Moments & Shared Experiences (Because No-Bake Bars Have a Personality)
If you want a dessert that tastes like you worked really hardbut actually took the “no oven, no stress” routethese yummy no-bake bars are your new best friend.
They’re chewy, crunchy, chocolatey, and dangerously easy to slice into “just one more” squares.
This guide includes a reliable no-bake bars recipe, smart ingredient swaps, and a few fun variations so you can keep your oven off and your snack game on.
Why No-Bake Bars Deserve a Spot in Your Dessert Hall of Fame
No-bake dessert bars are the ultimate “show up with a pan and become the favorite person at the party” move. They’re ideal when it’s hot outside, when you’re short on time,
or when you simply refuse to preheat anything out of principle.
- Fast: Most recipes are 15–25 minutes of active work.
- Make-ahead friendly: Chill now, slice later, accept compliments forever.
- Beginner-proof: No leavening, no timing drama, no “why did it sink?” mysteries.
- Endlessly customizable: Sweet-salty, fruity, nutty, extra chocolatechoose your personality.
The Anatomy of Great No-Bake Bars
The best no-bake bars hit three goals at once: they hold together cleanly, they have at least two textures (chewy + crunchy is the dream), and they taste like dessertnot “healthy sadness.”
Here’s what matters:
1) The Binder (a.k.a. the “Don’t Crumble on Me” System)
Most bars stay together thanks to one (or a combo) of these: nut butter, melted butter, syrup/honey, or sweetened condensed milk. When chilled, fats firm up and sugars help lock the mixture in place.
Translation: the fridge is your structural engineer.
2) The Crunch
Crunchy ingredients (crispy rice cereal, cornflakes, crushed cookies, toasted oats, chopped nuts, pretzels) do two things:
they add texture and they prevent the bars from eating like a block of sweet fudge (which is delicious, but sometimes you want a little snap).
3) The Topping
A simple melted chocolate layer makes everything feel “bakery worthy.” Adding a pinch of salt (or a little peanut butter) can keep the sweetness balanced and the flavor extra bold.
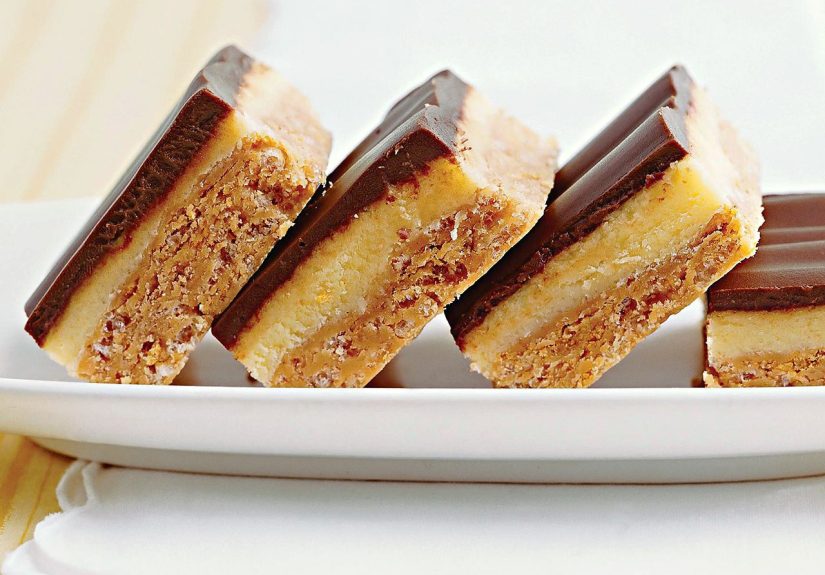
Yummy No-Bake Bars: The Go-To Recipe (Chewy + Crunchy + Chocolate)
This version is a crowd-pleaser: peanut buttery base, a satisfying crunch from cereal, and a glossy chocolate top.
It’s the kind of easy no-bake dessert that disappears faster than your phone battery at an airport.
Ingredients (Makes 20–24 bars)
- Base
- 1/2 cup (1 stick) unsalted butter, melted
- 1 1/4 cups creamy peanut butter (or sunflower seed butter for nut-free)
- 2 1/4 cups powdered sugar
- 1 1/2 cups graham cracker crumbs (about 10–12 sheets)
- 2 cups crispy rice cereal
- 1 1/2 cups cornflakes, lightly crushed
- 1/2 teaspoon vanilla extract
- 1/4 teaspoon fine salt
- Chocolate Topping
- 1 1/2 cups semi-sweet chocolate chips
- 3 tablespoons peanut butter
- 1 tablespoon butter (optional, for extra shine)
- Pinch of salt (optional, but strongly encouraged)
Equipment
- 9×13-inch pan (or 8×8-inch for thicker bars)
- Parchment paper (highly recommended)
- Mixing bowl + sturdy spatula
- Measuring cups/spoons
Step-by-Step Instructions
-
Prep the pan.
Line a 9×13-inch pan with parchment paper, leaving overhang on two sides so you can lift the bars out later.
Lightly grease the parchment if you want ultra-easy removal. -
Make the base.
In a large bowl, stir together melted butter and peanut butter until smooth. Add powdered sugar, graham cracker crumbs, vanilla, and salt.
Mix until thick and cohesive. -
Add the crunch.
Fold in crispy rice cereal and lightly crushed cornflakes. Stir gently but thoroughlyaim for even distribution without turning everything into dust. -
Press it in.
Transfer mixture to the lined pan. Press firmly into an even layer.
(Pro move: cover with a second piece of parchment and press with the bottom of a measuring cup.) -
Melt the topping.
In a microwave-safe bowl, heat chocolate chips in 20–30 second bursts, stirring between each burst.
When mostly melted, stir until smooth. Mix in peanut butter (and optional butter) until glossy.
Add a pinch of salt if you like that sweet-salty vibe. -
Top and chill.
Pour chocolate over the base and spread evenly. Refrigerate at least 2 hours (or until firm enough to slice cleanly). -
Slice and serve.
Lift bars out using parchment overhang. Slice into squares or rectangles.
For cleaner edges, wipe your knife between cuts.
Flavor Notes (Why This Works)
The graham cracker crumbs and powdered sugar create a classic “candy bar base” texture, while cereal keeps it light and snackable.
Peanut butter gives richness and structure, and the chocolate topping adds that “I definitely bought these from a fancy place” finish.
Easy Variations (Same Method, Different Vibes)
One of the joys of no-bake dessert bars is that you can change the personality without changing the process. Try one of these:
1) Rocky Road Crunch (Nut-Free Option)
- Swap peanut butter for sunflower seed butter.
- Fold 1 cup mini marshmallows + 1/2 cup crushed pretzels into the base.
- Add extra pinch of salt on top for a sweet-salty finish.
2) Chewy Oat “Snack Bar” Style
- Replace cornflakes with 1 1/2 cups rolled oats (toasted if you want deeper flavor).
- Add 1/2 cup mix-ins: dried cherries, raisins, chopped almonds, pepitas, or shredded coconut.
- Use dark chocolate on top if you want a more grown-up bite.
3) Berry Icebox Bars (Summer Party Energy)
- Use a graham cracker crust base (crumbs + butter), pressed firmly.
- Top with a quick chilled layer (like a pudding-and-cream style filling), then fresh berries.
- Chill until sliceable and serve cold.
4) “Mocha” Chocolate Upgrade
- Stir 1/2 teaspoon instant espresso powder into melted chocolate topping.
- Add flaky salt on top for contrast.
Troubleshooting: If Your Bars Get Weird
Problem: Bars are too crumbly
- Likely cause: not enough binder or not pressed firmly enough.
- Fix: next time, press harder and/or reduce dry ingredients slightly (a bit less cereal or crumbs).
Problem: Bars are too soft or greasy
- Likely cause: warm kitchen, too much butter, or not enough chill time.
- Fix: chill longer; store in fridge. If they’re very soft, freeze 20 minutes before slicing.
Problem: Chocolate cracks when slicing
- Likely cause: topping is very cold and firm.
- Fix: let bars sit at room temp 5–10 minutes, then slice with a warm knife.
Problem: The base is too sweet
- Balance it: use darker chocolate, add a pinch more salt, or fold in more cereal/oats for a less candy-like bite.
Storage, Make-Ahead, and Freezing
- Refrigerator: Store in an airtight container for up to 1 week for best texture.
- Room temperature: Fine for a few hours at a party, but they’ll soften if it’s warm.
- Freezer: Freeze sliced bars (layered with parchment) up to 2–3 months. Thaw in the fridge overnight.
Smart Ingredient Swaps (So Everyone Gets Dessert)
Nut-free
Use sunflower seed butter and confirm your chocolate is produced in a nut-safe facility if needed.
Gluten-free
Use gluten-free graham-style crumbs or crushed gluten-free cookies and verify cereal is gluten-free.
Dairy-free
Use plant-based butter and dairy-free chocolate chips. Choose a nut/seed butter without added dairy ingredients.
Lower-sugar (without ruining the party)
No-bake bars are inherently a treat, but you can gently reduce sweetness by using dark chocolate, adding more oats/cereal,
and leaning on mix-ins like nuts/seeds for texture. (Please do not replace all the powdered sugar with pure optimism.)
FAQ: Quick Answers for Busy Snack People
Do I have to use cornflakes?
Nope. Cornflakes add a light crunch, but you can use more crispy rice cereal, toasted oats, crushed pretzels, or chopped nuts.
Can I make these in an 8×8 pan?
Yesyour bars will be thicker. Chill time may increase slightly, and you’ll likely cut fewer pieces.
Why parchment paper?
Because lifting bars out of the pan in one piece is the difference between “clean bakery squares” and “tasty rubble.”
Parchment overhang acts like handles, which makes slicing easier and neater.
How long do they need to chill?
Plan for at least 2 hours in the fridge for firm, sliceable bars. Overnight is even better if you’re making them ahead.
Conclusion
This yummy no-bake bars recipe is the kind of dessert you’ll keep on repeat: quick to assemble, easy to customize, and basically guaranteed to disappear.
Whether you stick with the classic peanut butter + chocolate combo or riff into rocky road crunch territory, the method stays simple:
mix, press, melt, chill, slice, and try not to “taste test” half the pan.
Kitchen Moments & Shared Experiences (Because No-Bake Bars Have a Personality)
No-bake bars tend to show up in real life the same way a good friend does: exactly when you need them and with minimal drama.
Think summer afternoons when the AC is fighting for its life and the idea of turning on the oven feels like a personal attack.
That’s when people reach for the pantry, find peanut butter and cereal, and suddenly the whole kitchen mood shifts from “too hot to function” to “wait… dessert is happening.”
They’re also the dessert that quietly saves busy weeks. Someone remembers at 9:30 p.m. that there’s a school event, a potluck, a work meeting, or a “please bring something sweet”
request the next day. Baked goods are lovely, surebut no-bake bars are practical magic. You can stir everything in one bowl, press it into a pan, and let the refrigerator do the heavy lifting
while you do literally anything else (including, ideally, sitting down).
And then there’s the slicing moment: the universal test of patience. Everyone wants perfect squares, but nobody wants to wait for the chill time.
If you’ve ever cut too early, you already know the outcome: chocolate smears, crumbly corners, and one bar that becomes “the cook’s sample” because it doesn’t look presentable.
The funny part is that no one cares once they taste it. The “ugly bar” disappears firstbecause it’s right there, and because humans are predictable snack creatures.
No-bake bars also have that rare talent of being both nostalgic and flexible. The classic peanut butter-and-chocolate version feels like a throwback to bake sales and family gatherings,
but you can easily adjust it to match whatever your life looks like now. Need nut-free for a classroom? Sunflower seed butter steps in confidently.
Want something that feels a little more “snack bar” than “dessert bar”? Add oats, seeds, dried fruit, and a pinch of salt so it tastes balanced instead of purely sweet.
Feeling fancy? A tiny bit of espresso powder in the chocolate topping makes the flavor taste deeper, like you planned it that way on purpose.
The best “experience” of all, though, is the reaction they get. People bite in expecting something basicmaybe even a little too sweetand then they hit that combination of creamy base,
crispy crunch, and rich chocolate top. Suddenly, the questions start: “What’s in these?” “Can I get the recipe?” “Did you really not bake them?”
That last question always has the same satisfying answer: “Nope. The fridge did the work.” And honestly, that’s the entire point.