Table of Contents >> Show >> Hide
- What’s Inside
- What Wood Charcoal Actually Is
- How Charcoal Is Made (Pyrolysis, Minus the Headache)
- Types of Wood Charcoal: Lump, Briquettes, and the Fancy Stuff
- How to Choose Charcoal Like You Know What You’re Doing
- Lighting Methods That Don’t Taste Like Regret
- Heat Control: Two-Zone Cooking and Airflow
- Safety: Carbon Monoxide, Fire Placement, and Common Mistakes
- Cleanup & Disposal: Ash, Leftovers, and Storage
- Environmental Considerations (Without the Guilt Trip)
- FAQs
- of Real-World Wood Charcoal Experiences (So You Don’t Have to Learn the Hard Way)
- Wrap-Up
Wood charcoal is the original “set it on fire and cook something delicious” technology: take wood, remove most of the water and volatile stuff,
and you’re left with a lightweight, carbon-rich fuel that burns hot, responds quickly to airflow, and can turn a plain Tuesday into a backyard festival.
It’s also oddly easy to overthinkso let’s make it simple, practical, and (mostly) smoke-free in the metaphorical sense.
This guide breaks down how wood charcoal is made, what types exist, how to choose the right bag, and how to use it safely for everything from steak-searing
to low-and-slow barbecue. At the end, you’ll get a 500-word “real-world experiences” sectionbecause charcoal theory is cute, but charcoal reality has wind.
What Wood Charcoal Actually Is
Wood charcoal is wood that has been heated in a low-oxygen environment until most moisture and many volatile compounds are driven off.
What remains is mostly carbon (plus minerals that become ash). That carbon structure is why charcoal can burn hotter than raw wood by weight,
and why it’s great at delivering steady heat in a compact space.
Think of it like this: raw wood is a sponge full of water and chemistry. Charcoal is what you get after you wring out the water, kick out much of the smoke-producing
compounds, and keep the burn-ready skeleton. The result is a fuel that lights faster than logs, makes less visible smoke once fully lit, and reacts quickly when you open or close vents.
How Charcoal Is Made (Pyrolysis, Minus the Headache)
The core process is pyrolysis: heating wood hot enough that it breaks down chemically, but with not enough oxygen for the wood to simply burn to ash.
As temperature rises, wood releases vapors and gases. If those vapors are burned or captured, the process can be cleaner and more efficient.
Once it gets going, the reaction can generate some of its own heat.
What happens to the wood?
- Water leaves first (drying), because wet fuel is a buzzkill for steady heat.
- Volatiles break off and escape (some are flammable gases).
- Carbon-rich char remains, which becomes the charcoal you cook with.
Why production details matter to cooks
Not all charcoal behaves the same because production isn’t one-size-fits-all. Temperature, time, and how oxygen is limited can influence how “pure” the final charcoal is,
how dense it feels, how much ash it creates, and how it reacts to airflow. In cooking terms: one charcoal might be a steady marathon runner, another might be a sprinter that
burns hot and fast.
Types of Wood Charcoal: Lump, Briquettes, and the Fancy Stuff
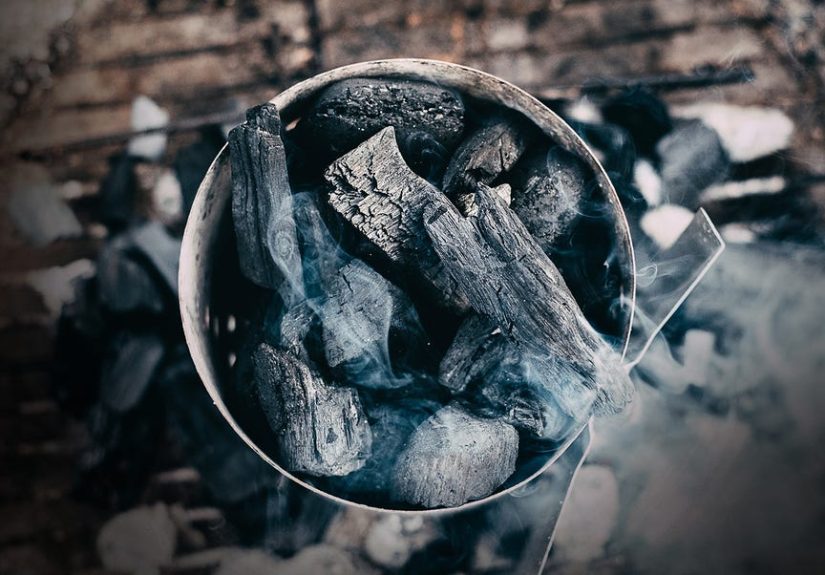
Lump charcoal (the “just wood” option)
Lump charcoal is typically made by carbonizing pieces of wood. It’s irregular in shape and size, which sounds annoying until you realize it can be useful:
large chunks for long cooks, smaller pieces to fill gaps, and plenty of airflow between pieces when stacked well. Lump usually lights faster, burns hotter,
and leaves less ashgreat for searing and for cooks who like responsive vent control.
Charcoal briquettes (the “engineered consistency” option)
Briquettes are made from ground charcoal (often from wood byproducts) pressed into uniform shapes. That uniformity makes heat more predictable and burn time
easier to plan. Many briquettes use binders and may include additives designed for easier lighting or steadier burning. The upside is consistency;
the tradeoff can be more ash and, with some products, odors during startup if additives are present.
Instant-light charcoal (the “convenience tax” option)
Instant-light products are pre-treated with an ignition aid. They’re convenient, but they’re also the most likely to make your food taste like a mechanic’s handshake
if you cook too early. If you use them, the key is patience: wait until the coals are fully ashed over and any strong chemical smell is gone.
High-carbon specialty charcoal (the “I take grilling personally” option)
Some specialty charcoals are made at very high temperatures and can burn exceptionally clean, long, and hotoften with a higher price tag.
If you’re doing precise grilling (like thin skewers, high-heat searing, or minimalist seasoning), these can be impressive. For everyday burgers? Your regular
lump or quality briquettes will absolutely get the job done.
A quick comparison
| Type | Best for | Strengths | Watch-outs |
|---|---|---|---|
| Lump charcoal | Searing, responsive grilling, kamado-style control | Hot burn, quick lighting, low ash | Irregular pieces can mean uneven heat if you don’t manage the coal bed |
| Briquettes | Low-and-slow, predictable heat, beginners | Consistent shape, steady burn | More ash; some formulas include additives that smell during startup |
| Instant-light | Fast weeknight grilling (if you’re disciplined) | Easiest ignition | Must wait for full ash-over to avoid off-flavors |
| Specialty high-carbon | Precision grilling, long clean burn | Very clean, efficient, reusable in some setups | Cost; may be overkill for casual grilling |
How to Choose Charcoal Like You Know What You’re Doing
1) Decide what you’re cooking (and how long)
- Quick, hot cooks (steaks, burgers, chops): lump shines because it gets ripping hot fast.
- Long cooks (ribs, pork shoulder, brisket on charcoal): briquettes can be easier for a stable, predictable burn.
- Temperature-sensitive grills (ceramic/kamado): many cooks prefer lump for airflow control and low ash.
2) Read the bag like it owes you money
If the ingredient list looks like a science fair volcano, you may get more smoke, more odor during lighting, or more ash.
For briquettes, “all-natural” or “hardwood” formulations tend to minimize weird startup aromas (still: let them ash over).
3) Check the size and density
With lump charcoal, chunk size matters. Big chunks burn longer and allow airflow; lots of tiny bits can choke airflow and burn unpredictably.
Heavier charcoal for the same volume often means denser pieces that can burn longeruseful for longer sessions.
4) Expect some variationthen plan for it
Lump charcoal is wonderfully natural and occasionally chaotic. Instead of fighting it, build a coal bed that matches your cook:
use larger pieces as a base, tuck smaller pieces in gaps, and keep a “reserve pile” of medium chunks for mid-cook refueling.
Lighting Methods That Don’t Taste Like Regret
The goal is simple: light charcoal efficiently, avoid harsh odors, and start cooking only when the coals are ready.
“Ready” usually means mostly ashed over (gray/white coating), no strong chemical smell, and stable heat.
The chimney starter method (fan favorite)
- Fill a chimney with the amount of charcoal you need (full chimney for high heat; half for smaller cooks).
- Place paper (or a wax-based starter) underneath and light it.
- Wait until the top coals are showing ash and the burn looks even.
- Pour into the grill, then set up your heat zones.
Why it works: a chimney creates strong upward airflow, which accelerates ignition without requiring you to marinate your dinner in lighter-fluid vibes.
Lighter cubes or wax starters (clean and simple)
Pair these with a chimney, or place a couple within a small mound of charcoal in the grill. They’re generally cleaner-smelling than liquid accelerants.
About lighter fluid (not banned, but…)
If you use lighter fluid, use it correctly: apply to unlit charcoal, wait a moment for it to soak in, then igniteand do not cook until it’s fully ashed over.
Never add fluid to lit coals. Also: never use gasoline or random flammable liquids. Your eyebrows deserve better.
Heat Control: Two-Zone Cooking and Airflow
Two-zone setup (the “cheat code”)
Two-zone cooking means you place most coals on one side (direct heat) and leave the other side with little or no charcoal (indirect heat).
This gives you a built-in safety net:
- Sear on the hot side for crust and color.
- Finish on the cooler side to avoid burnt outsides and raw centers.
- Manage flare-ups by moving food off direct heat instantly.
Airflow is your thermostat
Charcoal responds to oxygen. More airflow = hotter fire; less airflow = cooler, slower burn. If your grill has bottom vents and a top vent:
- Bottom vent: controls how much oxygen enters (major heat control).
- Top vent: helps manage smoke and fine-tunes airflow.
If your fire keeps dying, it’s often an airflow problem (ash buildup, too many small pieces choking gaps, vents too closed) rather than “bad charcoal.”
Low-and-slow without losing your mind
For longer cooks on a charcoal grill, many people use a “banked coals” setup (charcoal piled to one side) or a “snake/fuse” method (a curved line of charcoal that burns gradually).
The idea is controlled fuel: you don’t want everything lit at once. Add small amounts of lit charcoal to unlit fuel so the fire creeps along instead of stampeding.
Safety: Carbon Monoxide, Fire Placement, and Common Mistakes
Charcoal is outdoor-only. Always.
Burning charcoal produces carbon monoxide (CO), an odorless gas that can build up in enclosed or semi-enclosed spaces and become deadly.
That means: never use charcoal indoors, in garages, in tents, in vehicles, or near open windows/doors where fumes can drift in.
Placement prevents panic
- Keep the grill well away from siding, deck railings, overhangs, and anything that can burn.
- Keep children and pets away from the grill zone (charcoal grills get extremely hot).
- Have a plan for flare-ups: a long-handled tool, a clear “cool side,” and a way to close the lid and reduce oxygen.
Don’t rush the “ready” stage
Many charcoal complaints (“my food tastes weird,” “it’s so smoky,” “why does it smell like a tire fire?”) come from cooking before the coals are properly lit.
Give the charcoal time to ash over and stabilize. Your taste buds will send thank-you notes.
Cleanup & Disposal: Ash, Leftovers, and Storage
Let it cool. Then cool it some more.
Charcoal and ash can stay hot for a surprisingly long time. The safest habit is to let everything cool completelyoften overnightbefore moving ash or dumping anything.
Use a metal ash container with a tight-fitting lid if you need to collect ash.
Can you reuse leftover charcoal?
Usually, yes. If you shut down airflow after cooking (close vents, lid on), you may save partially burned pieces for next time.
Knock off excess ash, store in a dry place, and mix with fresh charcoal for predictable ignition.
Is charcoal ash good for the garden?
This is where it gets tricky. Ash from clean, untreated wood can sometimes be used in gardens in small amounts, but charcoal products vary.
Ash from briquettes may include additives or fillers and is generally not a great candidate for soil. Even with “cleaner” charcoal, overuse can raise soil pH
and cause problems. If you want to use ash in the yard, treat it like a soil amendment: minimal amounts, targeted use, and avoid sensitive plants.
Storage tips (aka “keep your fuel from turning into sadness dust”)
- Keep charcoal drymoisture slows lighting and increases smoke.
- Store bags sealed, or transfer to a lidded bin.
- Keep away from open flames, high heat, and children.
Environmental Considerations (Without the Guilt Trip)
Wood charcoal sits at the intersection of forestry, manufacturing, cooking, and air quality. The impact depends on how the wood is sourced and how the charcoal is produced.
Some producers use waste wood streams; others rely on dedicated harvesting. Cleaner production methods can burn or capture vapors rather than releasing them as smoke.
Practical ways to reduce your footprint
- Buy smarter: look for producers that disclose sourcing and avoid questionable hardwood origins.
- Burn efficiently: use a lid, manage vents, and avoid overfueling (unused charcoal is still a resource).
- Reuse leftovers: shutting down the grill properly can save charcoal for another cook.
- Know local rules: in some areas, outdoor burning and charcoal grilling may be restricted during high fire danger or poor air quality days.
If you’re curious about the “charcoal cousin” used in soil projects, biochar is essentially charcoal made with specific goals and specs.
It’s a reminder that the same basic processpyrolysiscan be tuned for cooking fuel, soil improvement, or industrial uses.
FAQs
Is wood charcoal the same as activated charcoal?
Not exactly. Activated charcoal is processed to create a very high surface area and is used for filtration and specialized applications.
Cooking charcoal is produced primarily for heat and may not be safe or suitable for filtration. Don’t swap them like they’re interchangeable batteries.
Why does some charcoal spark a lot?
Sparks can come from certain wood types, small brittle pieces, or dust, and sometimes from how the charcoal was made.
Using larger chunks, avoiding bags full of tiny bits, and keeping airflow controlled can reduce the “fireworks” effect.
How do I know my charcoal is ready to cook on?
Look for an even layer of gray/white ash on most coals, steady heat, and no harsh startup odors.
If you still smell strong chemical notes, wait.
What’s the easiest way to get steady heat for beginners?
Use a chimney starter, build a two-zone setup, and start with a charcoal type known for consistency.
Steady heat comes from steady fuel + controlled airflow, not from wishing intensely.
of Real-World Wood Charcoal Experiences (So You Don’t Have to Learn the Hard Way)
Ask a handful of backyard cooks about wood charcoal and you’ll hear the same “chapter titles,” because charcoal has a personality.
First comes the Chimney Starter Epiphany: someone struggles with stubborn coals, then tries a chimney and suddenly feels like a fire wizard.
The experience is less “light charcoal” and more “summon heat on command.” The lesson: charcoal likes airflow, and tools that create airflow make everything easier.
Next is the Bag of Mystery Chunks. Lump charcoal can be incredibleuntil you open a bag that’s half beautiful big pieces and half crunchy gravel.
Many cooks learn to sort quickly: big chunks for the base, medium pieces to fill gaps, and the tiny stuff saved for short cooks or tossed if it’s mostly dust.
The lesson: your coal bed is a structure, not a pile. Build it like you want it to behave.
Then there’s the “Why Is My Chicken Black?” moment. That’s usually a direct-heat-only setup with no escape hatch.
After a few crispy tragedies, people discover two-zone cooking and suddenly everything becomes calmer: sear on one side, finish on the other, move food away from flare-ups,
and stop playing culinary dodgeball with dripping fat. The lesson: charcoal cooking isn’t just heatit’s heat management.
Wind provides its own unforgettable chapter: The Breezy Day That Turned Your Grill Into a Blast Furnace.
A gusty afternoon can feed extra oxygen through vents and crank temps higher than expected. Cooks learn to position the grill out of wind,
adjust vents sooner, and keep the lid closed more often. The lesson: your grill is basically a controlled oxygen machine, and wind is an uninvited co-pilot.
For longer cooks, many people hit The Overnight Confidence Test: setting up a controlled burn, learning how small vent changes matter,
and realizing that “just add more charcoal” isn’t always the answer. Too much lit fuel can spike temperature and shorten the cook.
The lesson: for low-and-slow, you want a gradual burn path, not a full-on charcoal party at 9 p.m.
Finally comes The Ash Reality Check. Everyone thinks the fire is “out” until they dump ash and find surprise heat still hiding inside.
The experienced routine becomes boring and safe: close vents to snuff the fire, let everything cool completely, move ash only when cold, and store it in metal if needed.
The lesson: charcoal doesn’t stop being charcoal just because you went inside to eat.
Wrap-Up
Wood charcoal is simple at heartcarbon-rich fuel made by heating wood with limited oxygenbut it rewards good technique.
Choose the type that matches your cook, light it cleanly, control heat with airflow, and always treat safety (especially carbon monoxide risk) as non-negotiable.
Do that, and charcoal stops being “fussy” and starts being the most satisfying way to cook outdoors: real fire, real flavor, real control.