Table of Contents >> Show >> Hide
- What “Square Trimless BeveLED Mini” Actually Means
- Why Designers and Homeowners Love This Style
- Anatomy of a Square Trimless Mini Recessed Downlight
- Specs That Matter (and How to Choose Like a Pro)
- Lumens: Think “delivered light,” not just bragging rights
- Beam angle and distribution: Wide, medium, and “why is there a spotlight on my cereal?”
- Glare control: Regressed optics, bevels, and comfort
- CRI and color quality: Your home deserves better than “sad tomato red”
- CCT (Kelvin): 2700K vs 3000K vs 4000K
- IC rating, airtightness, and location ratings: Boring stuff that prevents expensive surprises
- Dimming: The driver is the boss (and it’s picky)
- Installation Reality Check: Trimless Is Beautiful (and Slightly Demanding)
- Lighting Design Tips for Square Trimless Mini Downlights
- Common Mistakes (So You Don’t Have to Learn the Hard Way)
- So, Is a Square Trimless BeveLED Mini Recessed Downlight Worth It?
- Real-World Experience: Living With Square Trimless BeveLED Minis ( of Truth)
- Conclusion
If your ceiling could talk, it would probably ask for fewer accessories. (Same, ceiling. Same.)
Enter the Square Trimless BeveLED Mini Recessed Downlight: a small, sharp-edged,
“where-did-the-fixture-go?” kind of light that’s basically the lighting equivalent of a perfectly tailored suit.
No visible trim ring. No clunky hardware vibe. Just a crisp square opening and clean illumination that makes
rooms feel intentionally designedeven when you’re still deciding whether the couch should face the TV or your existential dread.
In this guide, we’ll break down what makes a square trimless recessed downlight special, how the
“beveled mini” idea helps with comfort and aesthetics, what specs actually matter (and which ones are marketing confetti),
and how to plan, install, and live happily ever after with a ceiling that looks like it belongs in an architecture magazine.
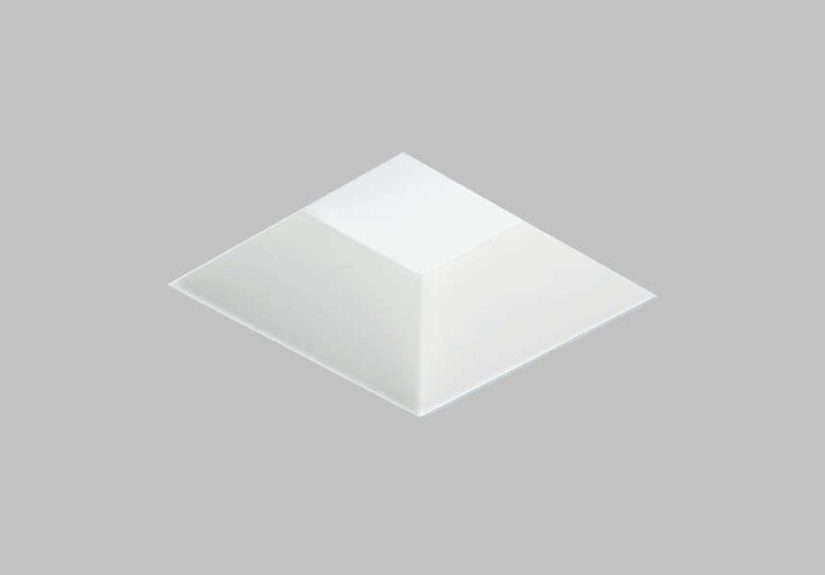
What “Square Trimless BeveLED Mini” Actually Means
Square: Clean geometry that plays well with modern spaces
A square recessed downlight is exactly what it sounds like: a recessed fixture with a square aperture
instead of a round one. Squares tend to align naturally with modern millwork, linear cabinetry, and contemporary ceiling
details. If your room has sharp lines (kitchen uppers, a grid ceiling, modern trim profiles), square apertures can look
more “on purpose” than round trims sprinkled across drywall like pepperoni.
Trimless: The “quiet ceiling” effect
Trimless recessed lighting (also called mud-in or plaster-in recessed lighting)
is designed so the visible trim disappears into the ceiling. Instead of a finished flange sitting below the drywall,
a special frame gets installed and blended with joint compound. After sanding and paint, the light appears to emerge from a
seamless openinglike your ceiling has discovered minimalism and won’t shut up about it.
BeveLED Mini: Small aperture, high performance, and a bevel that’s not just for looks
“Mini” generally signals a smaller aperture (often in the 2–3 inch neighborhood, sometimes slightly larger depending on the
product family). “Beveled” typically refers to an angled edge around the opening, which can help visually soften the cutout
and reduce the “black hole” look. In many architectural lines, beveling and optic recessing are used to manage glare and create
a more comfortable, premium beam.
Why Designers and Homeowners Love This Style
1) It makes the ceiling look expensive (without yelling about it)
A trimless LED downlight reads as architectural rather than decorative. The ceiling plane stays calm,
which makes everything elsemillwork, artwork, furniturefeel more elevated. It’s the difference between “new build”
and “custom build.”
2) Small apertures can feel more refined than big cans
Traditional 5–6 inch recessed cans can work, but they’re visually obvious. A mini recessed downlight
can deliver a discreet “pinhole” aesthetic while still providing useful outputespecially with modern LED engines
and efficient optics.
3) Square + trimless is great for grid layouts
If you care about alignment (and if you’re reading this, you probably do), square apertures make it easier to line up with
cabinets, islands, beams, and architectural rhythms. Your lighting layout becomes part of the design language instead of a
separate, chaotic subplot.
Anatomy of a Square Trimless Mini Recessed Downlight
While exact construction varies by manufacturer, most high-end architectural recessed downlights share a few
key parts:
- Mud-in / plaster frame: The trimless “skeleton” that gets blended into drywall or plaster.
- Light engine: LED module + optic/reflector system that shapes the beam.
- Driver: Powers the LED and determines dimming behavior (0–10V, phase-cut, DALI, etc.).
- Service access strategy: Tool-less or low-impact removal so you can maintain without wrecking the ceiling finish.
- Optional wet/damp seals: If it’s heading to a shower or exterior soffit, ratings matter.
Specs That Matter (and How to Choose Like a Pro)
Lumens: Think “delivered light,” not just bragging rights
For a mini downlight, lumen output often lands in a range that can support both ambient and accent applicationsespecially in
residential and boutique commercial spaces. The real question is: What do you want the light to do?
- Ambient layering: Use wider beams and enough fixtures for even coverage.
- Accent and sparkle: Use narrower beams, regress the optic, and aim intentionally.
- Task lighting (kitchens, vanities): Prioritize glare control and placement over sheer lumen numbers.
Beam angle and distribution: Wide, medium, and “why is there a spotlight on my cereal?”
Beam angles are often defined by the points where intensity drops to 50% of peak, but what you feel in a room is the
overall distribution. A narrow beam can be gorgeous for art. It can also make your living room look like a museum exhibit
titled “Sofa, Under Interrogation.”
Practical approach: go wider for general coverage, tighter for accents, and always check photometrics when the project
is sensitive (art walls, high ceilings, hospitality).
Glare control: Regressed optics, bevels, and comfort
If you’ve ever walked into a space and felt personally attacked by ceiling lights, you’ve met glare. Mini fixtures often
control glare through a combination of deeper recessing, optic design, and aperture shaping. A beveled opening can help the
transition from ceiling to aperture feel more intentional, and many premium systems use regressed light sources to improve comfort.
In short: you want bright surfaces, not bright eyeballs.
CRI and color quality: Your home deserves better than “sad tomato red”
For residential and hospitality, high color quality is a big deal. Look for strong CRI performanceespecially if you care about
skin tones, wood finishes, and food looking appetizing. (A kitchen where the strawberries look gray is not a vibe.)
CCT (Kelvin): 2700K vs 3000K vs 4000K
The “right” color temperature depends on style and use:
- 2700K: Warm, cozy, classic residential feel.
- 3000K: Slightly cleaner white; popular for modern residential and upscale interiors.
- 3500–4000K: Crisp and energetic; great for contemporary kitchens, offices, galleries, and some commercial spaces.
- Selectable / tunable white: Useful when you want flexibility, but still choose thoughtfully (and avoid “everything at 5000K forever”).
IC rating, airtightness, and location ratings: Boring stuff that prevents expensive surprises
In real-world ceilings, insulation and air leakage matter. If the fixture will contact insulation, you want the correct
insulation-contact rating. If you’re trying to reduce drafts and energy loss, airtight construction becomes a meaningful spec.
And if the fixture is headed to a shower ceiling or damp environment, you need the appropriate damp/wet rating.
Dimming: The driver is the boss (and it’s picky)
Dimming is where great lighting either becomes magical… or becomes a flickering soap opera. The control protocol matters
(0–10V, phase-cut, DALI, DMX, etc.), but the driver’s capabilities and the control’s compatibility are what
determine whether your dimming is smooth and predictable. If you’re mixing brands, insist on compatibility documentation and
test earlyespecially in large installs.
Installation Reality Check: Trimless Is Beautiful (and Slightly Demanding)
New construction: The easiest path to “seamless”
The best time to install mud-in recessed lighting is before the ceiling is finished. The frame gets fastened,
then the drywall crew blends it in. After sanding and paint, the light module is installed. This method delivers the cleanest result.
Retrofit: Possible, but it’s a patch-and-paint party
You can add trimless fixtures to an existing ceiling, but it’s rarely a “quick swap.” Expect cutting, framing,
mudding, sanding, and repainting the surrounding area so the trim truly disappears. If your home was built in the era of
“textured ceilings forever,” plan accordingly.
Alignment is everything (because your ceiling will not forgive you)
Trimless installs reward precision. A tiny misalignment can cast shadows that no amount of positive thinking will erase.
Use templates, levels, and layout lines. If you want that crisp square aperture look, the frame must sit in-plane with the ceiling.
Lighting Design Tips for Square Trimless Mini Downlights
Use layers: Ambient + task + accent
Relying on recessed downlights alone can flatten a space. Pair your square trimless minis with wall lighting, decorative fixtures,
under-cabinet lighting, or linear coves. Recessed lighting is the “supporting actor” that can still steal the scenejust don’t
make it do the entire movie by itself.
Spacing: Let beam angle and ceiling height guide you
A common planning approach is to consider ceiling height and beam spread together. Wider beams typically allow wider spacing,
while narrower beams require closer spacing for uniformity. Many designers start with a simple rule-of-thumb layout and then refine
using photometrics for critical spaces (kitchens, galleries, high ceilings).
Kitchen example: Make counters bright, not your retinas
In a kitchen, place downlights so the beam lands on work surfaces without casting your own shadow onto the cutting board.
A mini square trimless downlight can look stunning in a clean grid, but the placement should follow task zones:
sink, prep, cooktop, island edgesthen fill in ambient as needed.
Art wall example: Go narrow and intentional
For artwork, consider narrower distributions or adjustable versions aimed precisely. The trimless square aperture keeps the ceiling
quiet while the beam makes the art pop. If you’re lighting textured pieces, test angles to avoid harsh specular reflections.
Bathroom example: Check ratings and control glare
For showers and wet zones, choose fixtures rated for the environment. Also, prioritize glare controlbathrooms are full of mirrors,
and mirrors love returning light directly to your face at the worst possible moment.
Common Mistakes (So You Don’t Have to Learn the Hard Way)
- Over-lighting with tiny apertures: Mini fixtures are discreet, which tempts people to add “just a few more.”
Suddenly your ceiling looks like it has measles. Balance output and quantity. - Ignoring driver access: Some systems place drivers remotely. Make sure future service won’t require demolition.
- Mismatched color temperatures: Mixing 2700K and 4000K in the same visual field is… noticeable.
- Assuming all dimming is equal: Confirm control protocol and compatibility before drywall goes up.
- Skipping photometrics where it matters: Especially for tall ceilings, art, and hospitality-grade outcomes.
So, Is a Square Trimless BeveLED Mini Recessed Downlight Worth It?
If your goal is an architectural ceiling, high visual comfort, and a modern, intentional lookyes, this category can be absolutely
worth it. You’re paying for design integration, optics, and the kind of finish that disappears into the architecture.
The tradeoff is complexity: trimless lighting asks for better planning, cleaner installation, and a little more patience during finishing.
Real-World Experience: Living With Square Trimless BeveLED Minis ( of Truth)
After spending time in spaces that use square trimless beveled mini recessed downlights, a few patterns show up
again and againusually right after the homeowner says, “I can’t believe how clean the ceiling looks,” and right before someone
asks, “So… how do you change one if something goes wrong?”
First: the quiet ceiling effect is real. It’s not just a buzz phrase designers whisper to each other at tile
showrooms. When you remove visible trim rings and keep apertures small, the ceiling stops competing with everything else. In a modern
kitchen with slab cabinets, trimless squares feel like they belong to the same design family as the millworkorganized, crisp, and
confidently understated.
Second: you will become emotionally invested in drywall craftsmanship. Trimless fixtures only look “invisible” if the finishing is
excellent. In one project, the lighting layout was perfect, but the mud work around two apertures was slightly uneven. After paint,
those two spots caught a raking light angle and telegraphed every tiny edge. The fix wasn’t complicated, but it did require sanding,
feathering, and repainting. Translation: trimless lighting doesn’t forgive shortcuts, and your ceiling will keep receipts.
Third: glare control is the secret sauce. The best mini downlight installs aren’t about blasting lumensthey’re about shaping light.
A regressed optic, a thoughtful bevel, and a good beam distribution can make a room feel bright without feeling harsh. In living rooms,
especially those with TVs, it’s amazing how much calmer the space feels when you avoid “hot spots” and keep beams off glossy screens.
People notice comfort before they notice specs.
Fourth: dimming is where “premium” proves itself. I’ve seen gorgeous trimless ceilings undermined by dimming that steps, flickers,
or bottoms out too high. The win is to select the driver/control approach early, confirm compatibility, andif the job is substantialtest
a sample run before everything is installed. When dimming is smooth, these fixtures can shift from functional daytime brightness to
restaurant-level mood lighting in the evening, and it feels effortless.
Fifth: layout matters more than you think. With minis, it’s tempting to chase symmetry. Symmetry is good, but task zones are better.
In kitchens, downlights placed perfectly centered in ceiling bays can still land poorly on counters. The happiest homeowners are the ones
who prioritize what the light hits: counters, artwork, circulation paths, seating zonesthen refine the geometry so it still looks
beautifully intentional.
Final takeaway: a Square Trimless BeveLED Mini Recessed Downlight is one of those choices that looks subtle but feels
transformative. When it’s done well, you don’t notice the fixtureyou notice the space. And that’s the whole point.
Conclusion
A square trimless beveled mini recessed downlight is where architecture and lighting stop arguing and start collaborating.
If you plan the layout, choose the right optics and color quality, confirm ratings and dimming compatibility, and treat installation
like finish carpentry (not a speed run), you get a ceiling that looks cleaner, feels calmer, and lights better for everyday life.