
Table of Contents >> Show >> Hide
- Before You Start: Keep the Design Simple
- Step 1: Measure Your Nativity Figures First
- Step 2: Sketch a Quick Plan and Make a Cut List
- Step 3: Choose the Right Wood for the Job
- Step 4: Gather Tools, Hardware, and Safety Gear
- Step 5: Cut the Base, Uprights, and Roof Pieces
- Step 6: Dry-Fit Everything Before Assembly
- Step 7: Build the Base and Main Frame
- Step 8: Add Roof Supports and Cross Bracing
- Step 9: Attach the Roof
- Step 10: Reinforce the Joints and Hide the Rough Spots
- Step 11: Sand, Prime, and Finish the Wood
- Step 12: Add Rustic Details Without Overcomplicating the Build
- Step 13: Display It Safely and Store It Smartly
- Common Mistakes to Avoid
- Real-Life Experience: What It’s Actually Like to Build a Nativity Stable
- Conclusion
- SEO Tags
A nativity stable is one of those Christmas projects that looks meaningful, timeless, and a little intimidating right up until you realize it is basically a very charming mini shed with better public relations. The good news is that you do not need a full workshop, a contractor’s résumé, or the patience of a saint to build one. You just need a simple plan, a few common materials, and the wisdom to measure before cutting instead of cutting first and entering the “creative redesign” phase later.
If you want a rustic tabletop display for small figurines or a larger outdoor manger scene for the yard, the same basic principles apply: choose the right wood, build a stable frame, reinforce the joints, protect the surface, and make sure the finished piece fits your nativity figures instead of swallowing them whole. This guide walks you through 13 simple steps so your stable looks intentional, sturdy, and warm rather than like a confused birdhouse that went to seminary.
Before You Start: Keep the Design Simple
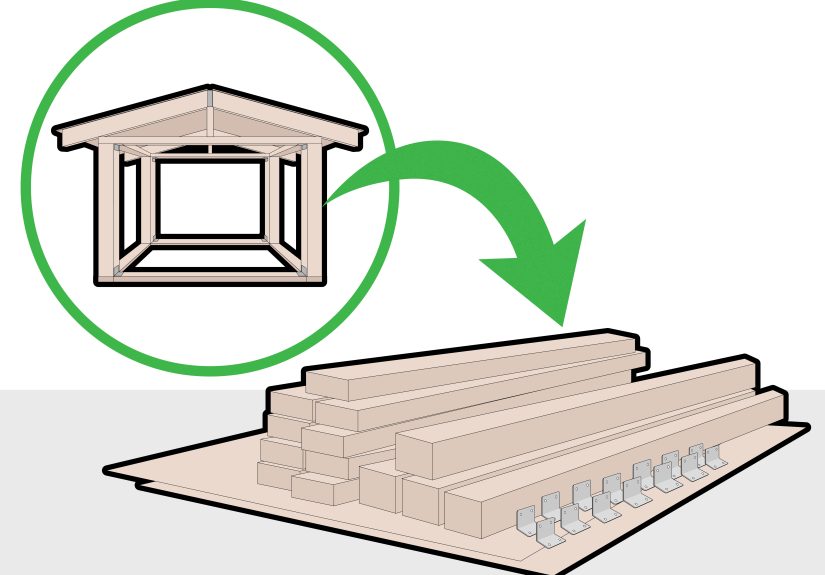
The easiest nativity stable has five core parts: a base, two side supports, a back frame or partial back wall, roof supports, and a roof. That is it. You can add extras like faux beams, a star, moss, straw, lantern lighting, or a distressed finish later. But first, build the structure.
For most DIYers, a beginner-friendly stable works best with:
- 1×2 or 1×3 boards for trim and framing
- 1×4 boards or plywood for the base and roof
- Wood screws or finish nails
- Wood glue
- Sandpaper
- Primer, paint, stain, or clear exterior sealer
- A drill/driver, saw, measuring tape, square, and pencil
If your stable will live outdoors, use exterior-rated materials and finishes. If it will live on a mantel, shelf, or entry table, you can keep things lighter and more decorative.
Step 1: Measure Your Nativity Figures First
Do not build the stable and then discover your Joseph is too tall for the roof. Measure the tallest figure, the widest figure grouping, and the depth of the arrangement you want. Add enough breathing room so the figures do not look packed into a holiday elevator.
A good rule is to leave several inches of headroom above the tallest figure and enough width for the Holy Family plus any animals you plan to include. If you are building for a store-bought set, check whether the pieces are meant for a tabletop stable or a wider crèche-style display. A stable should frame the scene, not crowd it.
Step 2: Sketch a Quick Plan and Make a Cut List
You do not need architectural drawings. A five-minute sketch on paper is plenty. Mark the width, depth, and height. Then turn that sketch into a cut list for the base, uprights, crosspieces, and roof panels.
This tiny planning step saves time, wood, and frustration. It also helps you avoid one of the most common DIY mistakes: buying lumber based on vibes alone. Lumber is sold by nominal sizes, not exact finished dimensions, so your plan should account for the real thickness of the boards.
Step 3: Choose the Right Wood for the Job
For an indoor stable, pine is affordable, easy to cut, and easy to paint or stain. For an outdoor stable, cedar, cypress, or redwood are smart choices because they naturally hold up better outdoors. Pressure-treated lumber can also work for a yard display, but it needs time to dry properly before painting or finishing.
If you want a rough-hewn, rustic look, reclaimed boards or fence pickets can be great. Just make sure they are clean, stable, and not splitting badly. A nativity stable should look beautifully weathered, not one rainstorm away from retirement.
Step 4: Gather Tools, Hardware, and Safety Gear
Set yourself up before you cut anything. At minimum, you will want:
- Safety glasses and hearing protection
- A tape measure and speed square
- A pencil for marking cuts
- A saw, such as a miter saw, circular saw, or hand saw
- A drill/driver with drill bits and driver bits
- Exterior or interior wood screws, depending on location
- Clamps if you have them
- Paintbrushes or foam brushes for finishing
If you are new to woodworking, keep the joinery basic. Butt joints, screws, wood glue, and a few discreet brackets can build a perfectly sturdy stable. Fancy joinery is optional. Holiday joy is not measured in dovetails.
Step 5: Cut the Base, Uprights, and Roof Pieces
Transfer your measurements carefully to the wood. Mark every cut clearly, then cut the base first. After that, cut the two front uprights, the two rear supports if your design includes them, and the roof panels or planks.
If you want the classic manger look, make the back slightly taller than the front so the roof slopes forward or backward. That single angle does a lot of visual work. Suddenly your simple structure looks intentional and finished instead of like a flat-topped storage crate for sheep.
For repeated cuts, use a stop block or cut guide if possible. It helps keep matching pieces truly matching, which is one of those details you do not notice when it goes well and absolutely notice when it does not.
Step 6: Dry-Fit Everything Before Assembly
Lay all the pieces out on a floor or worktable before driving a single screw. This dry fit lets you see whether the proportions work and whether the roof overhang looks balanced. It also gives you a chance to make small fixes without having to undo fasteners later.
Check for wobble, crooked lines, and tight figure clearance. Set your nativity pieces inside the dry-fit frame if you already have them. If Mary looks like she needs to duck, now is the time to adjust the roof height.
Step 7: Build the Base and Main Frame
Start with the base. Attach the side uprights first, then add the back crosspiece or rear support boards. Use wood glue and screws for strength. Pilot holes are worth the extra minute because they make driving screws easier and help prevent splitting, especially near the ends of boards.
If you are screwing one board over another, consider drilling a clearance hole in the top piece so the screw pulls the joint together snugly. This creates tighter, cleaner assembly and avoids gaps that can make even a simple project look sloppy.
Use a square as you assemble. A nativity stable can be rustic, but it should not look accidentally diagonal.
Step 8: Add Roof Supports and Cross Bracing
Once the frame stands on its own, add horizontal roof supports near the top. These pieces connect the sides and give the roof something solid to sit on. If your stable is larger or meant for outdoor use, add a brace across the back or angled corner supports for extra strength.
This step matters more than people expect. Roofs get bumped during decorating, moved during storage, and sometimes challenged by wind if displayed outside. A little extra structure now prevents the classic December problem of “Why is the roof leaning like it heard shocking news?”
Step 9: Attach the Roof
You can make the roof from two plywood panels, overlapping wood planks, fence pickets, or even thin cedar strips. For a very simple build, two flat panels meeting at the top are enough. For a more rustic style, stagger narrow boards for more texture.
Leave a slight overhang on the front and sides. It looks better and also helps shed water if the stable is outdoors. Secure the roof with screws or brad nails, depending on the thickness of the material. Make sure the roof is centered before fastening it permanently.
Step 10: Reinforce the Joints and Hide the Rough Spots
After the main assembly is done, go back and tighten up the structure. Add any missing screws, corner braces, or trim boards. If you want a cleaner finish, fill visible holes with wood filler. If you want a rustic finish, leave some screw heads visible and let the wood texture do the talking.
This is also the time to soften sharp edges with sandpaper. Even decorative projects benefit from rounded corners and smoother touch points. It makes the stable look more polished and keeps splinters from becoming an unexpected Christmas subplot.
Step 11: Sand, Prime, and Finish the Wood
If you are painting or staining bare wood, surface prep matters. Sand first, remove dust, and then choose the finish that suits your look and location. For painted stables, primer helps the topcoat grip better and look more even. For stained or natural wood stables, a clear sealer or exterior stain helps protect the surface from moisture.
For an indoor nativity stable, you can go with matte paint, milk-paint style finishes, or a warm stain. For an outdoor stable, use exterior-rated primer, paint, stain, or sealer. Apply thin coats, allow each coat to dry fully, and recoat as needed. Rushing a finish is a great way to end up with fingerprints immortalized in polyurethane.
Step 12: Add Rustic Details Without Overcomplicating the Build
Once the structure is solid, you can have some fun. Add faux rafters, a star, a little moss, raffia, straw, or burlap. Dry-brush white or gray paint over stained wood for a weathered look. Wrap a tiny lantern light around the back beam for a glow. Attach a simple wood star above the roof peak if you want a traditional silhouette.
Less is usually more here. The stable is the setting, not the main character. If every board is embellished, distressed, carved, painted, and accessorized, the Holy Family starts competing with your glue gun.
Step 13: Display It Safely and Store It Smartly
If the stable is going outside, place it on level ground or a solid platform. Anchor lightweight pieces if wind is an issue. Outdoor lights and extension cords should be rated for outdoor use, plugged into a GFCI-protected outlet, and checked for damage before setup. Turn decorative lights off when you go to bed or leave home.
When the season ends, brush off dust and straw, wipe the surfaces clean, and store the stable in a dry place. If your design allows it, make the roof removable for easier storage. Smart storage keeps next year’s setup peaceful instead of turning it into an archaeological dig through tangled bins.
Common Mistakes to Avoid
Building Without Measuring the Figures
This is the number-one trap. A beautiful stable that does not fit the nativity set is just seasonal abstract art.
Skipping Pilot Holes
Fast, yes. Wise, not always. Pilot holes help keep thin boards from splitting and make assembly much easier.
Using Interior Finishes Outdoors
If the stable will live on a porch, lawn, or church entry, exterior-rated coatings are worth it. Moisture does not care how festive your project is.
Making the Roof Too Heavy
A heavy roof on a light frame can pull the whole structure out of square. Keep the proportions balanced.
Overdecorating the Stable
A nativity stable should support the scene. It does not need to audition for its own spinoff.
Real-Life Experience: What It’s Actually Like to Build a Nativity Stable
Building a nativity stable is one of those projects that ends up being about more than wood. At first, it feels practical. You gather boards, look for screws, try to remember where the pencil went, and tell yourself this will be a quick Saturday project. Then something funny happens. The pace slows down. You start paying attention to the grain in the wood, the roof angle, and the question of whether the structure feels warm enough, simple enough, and calm enough to match the scene it is meant to hold.
That is part of the charm. A nativity stable is not just décor; it is a setting with emotional weight. Even a very plain one can become meaningful because you made it with your own hands. Maybe the boards are not perfectly matched. Maybe one side sits a hair lower than the other and only you know it. Maybe the stain turned out darker than expected and the roof took two attempts because the first cut was not exactly what you had in mind. Somehow those small imperfections often make the finished piece better, not worse. It looks human. It looks handmade. It looks lived in.
Many people also discover that this project becomes a family memory machine. One person measures, another sands, someone else holds the board steady, and a child inevitably asks whether the donkey gets a special room. Suddenly the build is not just about finishing a holiday decoration. It becomes part of the tradition itself. Years later, people often remember the making almost as clearly as the display.
There is also something satisfying about the scale of the job. A nativity stable is large enough to feel like a real build, but small enough to finish without needing a week of vacation or a second mortgage. You can make one from scraps, upgrade it year after year, or rebuild it in a new style when your taste changes. That flexibility makes it especially rewarding for beginners. You learn measuring, cutting, assembly, finishing, and design in one manageable project.
And then there is the moment of placement. You set the figures inside, adjust the straw, step back, and the stable suddenly stops being boards and screws. It becomes a scene. The structure frames the story. The project becomes atmosphere. That transformation is the whole point. A good nativity stable does not scream for attention. It quietly creates a place for the figures to belong. In a season that can get loud, rushed, and glittery enough to alarm the neighbors, that quietness is a pretty wonderful thing to build.
Conclusion
Building a nativity stable does not have to be complicated. Start with the size of your figures, sketch a simple design, choose wood that suits the display location, and build the frame step by step. Use pilot holes, reinforce the joints, protect the finish, and keep the details tasteful. The result can be rustic, elegant, or charmingly simple, but the real win is that it becomes part of your Christmas tradition year after year.
Whether you place it on a mantel, a church table, a front porch, or a yard display, a well-built manger stable adds warmth, meaning, and a handmade touch that store-bought décor rarely matches. And best of all, once you finish one, you will probably start thinking, “That was not so hard.” Which is exactly how DIY projects lure you into building three more before New Year’s.
SEO Tags
Note: Adjust the dimensions to fit your specific nativity figures, and always follow manufacturer safety instructions for saws, drills, lights, extension cords, primers, paints, and sealers.


