
Table of Contents >> Show >> Hide
- First: What “Against the Grain” Actually Means
- Should You Shave Against the Grain?
- The Golden Rule: Build Up to Against the Grain (Don’t Start There)
- Prep Like You Mean It (Because Your Skin Knows When You Don’t)
- Pick the Right Tool for Against-the-Grain Shaving
- How to Shave Against the Grain Safely: Step-by-Step
- Aftercare: Lock In Smoothness Without the Sting
- Razor Burn vs. Razor Bumps: Know the Difference
- Special Considerations (Because Skin Types Are Not Copy-Paste)
- Common Mistakes That Make Against-the-Grain Shaving Miserable
- Quick FAQ
- A Simple “Against the Grain” Checklist
- Final Thoughts: Smooth Is Great, Comfortable Is Greater
- Experiences & Lessons Learned (Real-World, Not Fairy-Tale Smooth)
Shaving against the grain sounds a little rebelliouslike your razor is wearing a leather jacket and ignoring curfews.
And to be fair, it can deliver that “glass-smooth” finish people chase before big events, photo days, or anytime you want your face/legs to feel like a dolphin.
But it can also hand you razor burn, bumps, and ingrowns that make you regret every life decision you’ve made since breakfast.
This guide breaks down exactly what “against the grain” means, when it makes sense, how to do it safely, and how to avoid turning your skin into a complaint department.
We’ll cover tools, technique, troubleshooting, and real-world lessonswithout the cringe, without the copy-paste vibes, and without pretending every face is the same.
First: What “Against the Grain” Actually Means
“The grain” is simply the direction your hair grows. Shaving with the grain means your razor moves in the same direction the hair naturally lies.
Shaving against the grain means the razor moves in the opposite directionlifting and cutting hair more closely, often below the skin’s surface.
Why your grain is not as “north-to-south” as you think
On the cheeks, hair often grows downward. On the neck? It can swirl, change directions, and behave like it has a personal grudge.
On legs and underarms, growth direction can vary by area and even from one side to the other.
How to map your grain (yes, you should do this)
- Let hair grow for 24–48 hours (enough to feel the stubble).
- Run clean fingers lightly across the area in different directions.
- The direction that feels smooth is with the grain. The direction that feels scratchy is against the grain.
- Mentally note the “zones” (especially on the neck and jawline) or sketch a quick map.
Should You Shave Against the Grain?
The honest answer: sometimes. Shaving against the grain is a high-reward, higher-risk move.
It can produce a closer shave, but it also increases friction and the odds of cutting hair too shorttwo big contributors to irritation and ingrown hairs.
Reasons people choose to shave against the grain
- Maximum closeness: Great for a super-smooth finish (think photos, interviews, performances).
- Stubborn stubble: Some hair types feel “sandpapery” unless you go closer.
- Longer-lasting smoothness: A closer cut can feel smoother for more hours (not guaranteed for every skin type).
When shaving against the grain is a bad idea
- You’re prone to razor bumps/ingrowns: Especially with curly hair or sensitive skin.
- You already have irritation, acne flare-ups, or healing skin: Don’t add “micro-scrapes” to the situation.
- You’re using a dull blade or rushing: Against-the-grain shaving punishes sloppy prep like it’s a sport.
- You shave daily and your skin barely recovers: Your face needs a rest day too.
The Golden Rule: Build Up to Against the Grain (Don’t Start There)
If you take one thing from this guide, take this: don’t make your first pass against the grain.
A safer approach is to shave in phases:
- Pass 1: With the grain (WTG) to reduce bulk.
- Pass 2: Across the grain (XTG) to get closer without maximum irritation.
- Pass 3 (optional): Against the grain (ATG) only where your skin tolerates it.
Prep Like You Mean It (Because Your Skin Knows When You Don’t)
“Prep” is the difference between a clean shave and a regret spiral. The goal is to soften hair, reduce friction, and protect the skin barrier.
Step 1: Warmth + water = softer hair
Shave after a warm shower or use a warm, damp cloth for a couple minutes. Hydrated hair cuts more easily, which means less tugging and fewer angry follicles.
Step 2: Clean the skin (not squeaky, just clean)
Use a gentle cleanser to remove oil, sweat, and product buildup. This helps your shaving product work properly and reduces the chance of clogged follicles.
Step 3: Light exfoliation (optional but helpful)
Exfoliation can help lift trapped hairs and remove dead skin that contributes to bumps. Keep it gentle:
a soft washcloth, mild scrub, or an exfoliant you already tolerate.
If you’re sensitive, skip aggressive scrubsyour face doesn’t need sandpaper training.
Step 4: Use a real shaving lubricantand give it a minute
Shaving cream, gel, or a quality shave soap creates slip and reduces friction. Apply it and let it sit briefly so hair softens.
If you’re going to shave against the grain later, you’ll want that cushion.
Pick the Right Tool for Against-the-Grain Shaving
Cartridge razors: convenient, but can be tricky
Multi-blade cartridge razors can shave very close, fast. The downside? The “closer” they shave, the higher the risk of cutting hair below the skin surface
which can increase ingrown hair risk for some people. If you’re prone to bumps, you may do better with fewer blades and a lighter touch.
Safety razors: fewer blades, more control
A single blade can be gentler for bump-prone skin because you’re not repeatedly scraping the same area with multiple blades.
But a safety razor demands respect: correct angle, minimal pressure, and patience. Pressing like you’re trying to erase a mistake will create new ones.
Electric shavers or trimmers: not as close, often kinder
If your skin gets angry easily (bumps, ingrowns, irritation), an electric shaver or beard trimmer may be the best “smooth enough” compromise.
You’ll usually trade ultra-close results for fewer problemsoften a great deal.
Blade hygiene and sharpness matter more than brand names
A dull blade tugs hair and increases friction. A dirty blade can irritate skin and contribute to follicle inflammation.
Rinse often during shaving and replace blades regularly.
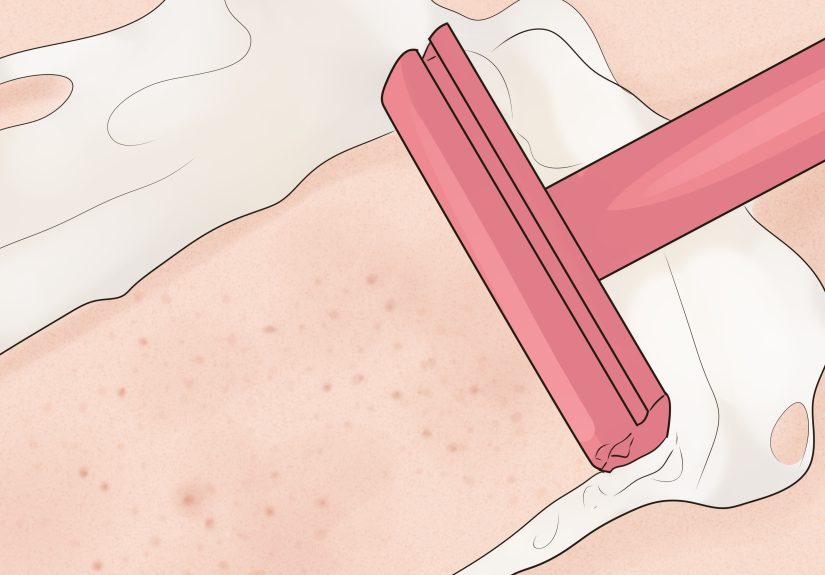
How to Shave Against the Grain Safely: Step-by-Step
Ready for the main event? Here’s a practical, skin-friendly method that reduces risk while still chasing closeness.
1) Start with the first pass: with the grain
- Use short strokes.
- Use light pressurelet the blade do the work.
- Rinse the blade frequently so it doesn’t drag.
2) Re-lather (yes, every time)
Never shave an area “bare” just because it still feels a bit slick. Reapply cream/gel/soap before each additional pass.
Against-the-grain shaving without lubrication is basically friction cosplay.
3) Second pass: across the grain (the underrated MVP)
Shaving across the grain can get you impressively close with less irritation than full ATG.
For many people, XTG is the sweet spot: smooth results without the “why is my neck on fire?” aftermath.
4) Optional third pass: against the grainonly where tolerated
Now, if your skin is calm and you still want closer:
- Re-lather again.
- Use even shorter strokes than before.
- Maintain a steady angle (especially with a safety razor).
- Do not stretch the skin tight to “get closer.” That can increase how far hair retracts below the surface after the cut.
5) Watch your “danger zones”
Certain areas are more likely to protest:
- Neck and under jaw: hair often grows in swirls and skin is thinner.
- Upper lip and chin: thicker hair + curves = more pressure mistakes.
- Bikini line/inner thighs: friction and tight clothing afterward can worsen bumps.
- Underarms: growth direction changes and skin is sensitive.
If you’re new to ATG shaving, consider only doing it on “easy” areas first (like flatter cheek zones) and skip it on the neck until your technique is consistent.
Aftercare: Lock In Smoothness Without the Sting
Rinse and calm the skin
Rinse with cool or lukewarm water and pat dry. Avoid harsh rubbingthe shave already created enough “excitement.”
Moisturize (especially if you went ATG)
Use a gentle, fragrance-free moisturizer or soothing product. If you love traditional aftershave, pick one that doesn’t feel like a paint thinner prank.
The goal is comfort, not a dramatic monologue in the mirror.
Give your skin a break from friction
- Avoid tight collars or tight waistbands right after shaving.
- For body shaving, breathable clothing helps reduce irritation.
- Skip heavy fragranced products immediately after shaving.
Razor Burn vs. Razor Bumps: Know the Difference
Razor burn
Razor burn usually shows up quicklyredness, stinging, and irritation soon after shaving. It’s often caused by friction, too much pressure, dry shaving,
dull blades, or shaving against the grain too aggressively.
Razor bumps (ingrowns/pseudofolliculitis)
Razor bumps often show up later as small bumps where hairs curl back into the skin or get trapped. They’re more common with curly hair and very close shaves.
Shaving against the grain can increase the risk because it cuts hair very short.
What to do when your skin is irritated
- Pause close shaving for a bit: Let inflammation settle.
- Cool compress: Helps calm irritation.
- Gentle moisturizer: Support the skin barrier.
- Avoid picking or digging out hairs: That’s how minor bumps turn into bigger problems.
If you notice worsening pain, spreading redness, warmth, pus, or signs of infection, it’s worth checking with a clinician or dermatologist.
Special Considerations (Because Skin Types Are Not Copy-Paste)
If you’re prone to ingrown hairs or razor bumps
If razor bumps are your frequent enemy, consider these adjustments:
- Skip ATG shaving entirely or limit it to rare occasions.
- Use a single-blade option (or fewer blades) and avoid pressing hard.
- Shave with the grain, then stopdon’t “chase perfection” on irritated areas.
- Consider trimming with clippers for a neat look without the too-close cut.
If you have sensitive or very dry skin
- Choose a shave cream/gel labeled for sensitive skin.
- Shave fewer passes, not more.
- Moisturize immediately after shaving.
- Consider an electric shaver if irritation is frequent.
If you’re shaving body hair
The same rules apply, but friction is often the bigger issueespecially where clothing rubs.
For legs, many people tolerate ATG on flatter areas but struggle on knees/ankles.
For bikini line and underarms, ATG shaving can be a fast track to bumps. If you do it, do it gently, with fresh lubrication, and don’t do repeated “cleanup” strokes.
Common Mistakes That Make Against-the-Grain Shaving Miserable
- Going ATG on the first pass (your skin didn’t consent to speed-running irritation).
- Skipping re-lathering between passes.
- Using pressure to force closeness instead of improving prep and technique.
- Over-shaving the same patch because one stubborn hair hurt your feelings.
- Shaving over already irritated skin and expecting it to be fine.
- Not replacing blades (dull blades tug; tugging leads to inflammation).
Quick FAQ
Will shaving against the grain make hair grow back thicker?
Noshaving cuts hair at the surface. It can feel stubbier as it grows because the tip is blunt, but it doesn’t change hair thickness or growth rate.
How often can I shave against the grain?
That depends on your skin. Some people can tolerate ATG occasionally; others get irritation every time.
A good rule: if you’re getting burn or bumps, reduce passes, shave less closely, or switch tools.
Is it safer to shave ATG with a safety razor or cartridge?
Either can work. The bigger factors are technique, pressure, prep, and whether your skin is prone to ingrowns.
Many bump-prone people do better with fewer blades, while some prefer a cartridge’s guard and pivot. Your face gets the final vote.
A Simple “Against the Grain” Checklist
- Map your grain.
- Warm water prep (shower or warm cloth).
- Cleanse gently.
- Apply shaving cream/gel and let it soften hair.
- WTG pass first.
- Re-lather.
- XTG pass.
- Re-lather.
- ATG only where tolerated, with short strokes and no pressure.
- Rinse, pat dry, moisturize.
Final Thoughts: Smooth Is Great, Comfortable Is Greater
Shaving against the grain isn’t “wrong”it’s just not automatically right for everyone.
The closest shave is only a win if your skin stays calm afterward. If ATG shaving gives you smoothness and peace, enjoy it.
If it gives you bumps and regret, remember: a slightly less close shave can still look clean, feel good, and keep your skin happy.
Experiences & Lessons Learned (Real-World, Not Fairy-Tale Smooth)
People usually start shaving against the grain for one reason: they want that extra-close finish that looks and feels “done.”
The first few attempts often go one of two ways. Either it’s shockingly smooth and you wonder why no one told you sooner… or your skin reacts like you just tried to shave with a tiny lawnmower.
Both outcomes are normal, and the difference usually comes down to prep, pressure, and how many passes you take.
A common experience is realizing the cheeks are “easy mode” and the neck is the final boss. On flatter cheek areas, many people can do a careful ATG pass with minimal fallout.
Then they try the same thing on the neckwhere hair grows in different directionsand suddenly they’ve invented a brand-new constellation of bumps.
The lesson most people learn (sometimes the hard way) is that ATG shaving is not an all-or-nothing decision.
You can shave with the grain on the neck and still go ATG on the cheeks, or go across the grain on sensitive areas and save ATG for special occasions only.
Another frequent “aha” moment: re-lathering isn’t optional. Lots of irritation stories start with, “It still felt slippery, so I did a few more strokes.”
That “still slippery” feeling often comes from leftover water and a thin film of productnot enough to protect the skin for an ATG pass.
When people commit to reapplying shaving cream/gel before every pass, the shave usually gets smoother and the burn drops dramatically.
It’s not glamorous advice, but it works. (Honestly, re-lathering is like using oven mittsannoying until the moment you don’t.)
Pressure is the next big theme. Many shavers start by pressing harder because they assume closeness comes from force.
Then they discover closeness actually comes from the opposite: better prep, a sharper blade, shorter strokes, and a lighter hand.
The “light touch” advice sounds vague until you test it: try holding the razor closer to the end of the handle instead of gripping near the head.
That small change naturally reduces pressure and makes it harder to bulldoze your skin.
People also report that their best against-the-grain shaves happen when they slow down and treat it like a three-step process instead of a speed run.
The first pass with the grain removes bulk. The second pass across the grain refines the result.
By the time they try a small, careful ATG pass, there’s less hair left to “fight,” so the razor glides instead of dragging.
That’s why ATG shaving often feels terrible when you try it too earlyand surprisingly comfortable when you do it last, after reduction.
Finally, a lot of experienced shavers eventually adopt a healthier definition of success:
not “I got every single hair perfectly smooth,” but “I got a close shave with zero irritation.”
For some, that means ATG only on the cheeks. For others, it means never doing ATG at all and switching to an electric shaver or a trimmer that leaves the tiniest stubble.
And here’s the funny part: most people looking at you can’t tell the difference between perfectly smooth and “very close.”
Your skin, however, can absolutely tell the differenceso it’s worth choosing the approach that keeps you comfortable.


