
Table of Contents >> Show >> Hide
- What a “Power Pack” Range Hood Actually Is
- Why 43.4375 Inches Matters (And Why It’s Not Just Being Extra)
- Performance Basics: CFM, Capture, and Why Bigger Isn’t Always Better
- Noise: Sones, Ducting, and the “Jet Engine” Myth
- Filters & Grease Management: The Unsexy Hero of a Clean Kitchen
- Lighting and Controls That Won’t Make You Rage-Click
- Installation Planning for a 43.4375-Inch Power Pack
- Maintenance: How to Keep It Working Like Day One
- Who Should Consider a 43.4375-Inch Power Pack?
- Cost & Value: What You’re Paying For
- Power Pack vs. Canopy Hood: Quick Comparison
- Buying Tips to Avoid “Ventilation Regret”
- Conclusion: The Sweet Spot of Custom Design and Real Venting Power
- Real-Life Experience: Living With a 43.4375-Inch Power Pack (500+ Words)
If you’ve ever shopped for a built-in range hood and thought, “Why is this thing measured like it was designed by a
17th-century shipwright?”welcome. A 43.4375-inch power pack range hood (that’s 43 7/16 inches
for the sane among us) is a specific kind of hood insert made for custom enclosures. It’s the “engine” that hides inside
a wood or metal hood surround so your kitchen can look like a magazine spread while still evacuating smoke, grease, and
last night’s fish experiment.
This guide breaks down what a power pack is, why this oddly precise size matters, what performance numbers actually mean,
and how to choose one without accidentally buying an expensive stainless-steel noise machine. We’ll keep it practical,
a little funny, and very focused on what matters when you’re investing in ventilation you’ll use every day.
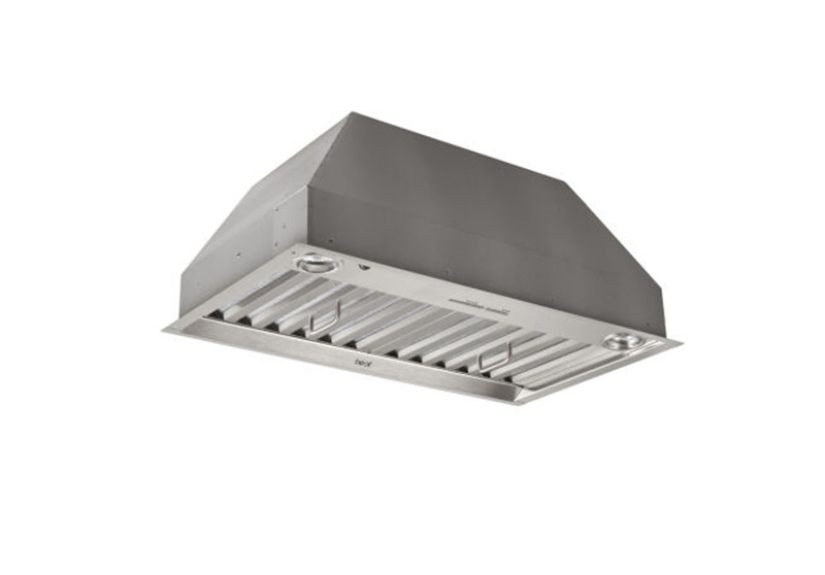
What a “Power Pack” Range Hood Actually Is
A power pack (also called a range hood insert or hood liner insert) is a built-in
ventilation unit designed to be installed inside a custom hood shell or cabinet. Instead of a visible chimney or canopy hood,
you get a clean, integrated looklike your hood was born there and not awkwardly bolted on during a late-night remodel panic.
Most power packs include:
- Blower system (internal or designed to work with external/remote blowers)
- Grease filtration (mesh or baffle filters)
- Lighting (often LED)
- Controls (push-button, slider, electronic, or sometimes smart-ish)
- A liner or protected intake area to help shield surrounding cabinetry from grease and heat
The power pack is especially popular when you want a custom wood hood that matches cabinets, a statement plaster hood,
or a “built-in” look without sacrificing ventilation performance.
Why 43.4375 Inches Matters (And Why It’s Not Just Being Extra)
The 43.4375-inch width exists because many “nominal” hood sizes and custom enclosures are built around
standardized openingsand power packs are engineered to fit those openings precisely. You’ll often see sizes marketed as
“45-inch class” or “fits 44-inch opening,” but the actual metal width might be 43 7/16 inches to allow proper clearance,
mounting flanges, and installation tolerances.
In real-life terms: this size is common in larger custom hoods where you want strong capture coverage over a bigger cooktop
(or you simply cook like you’re running a short-order diner in your own home).
Quick sizing sanity check
- Hood width is ideally at least as wide as the cooktopoften wider for better smoke capture.
- Insert width must match the custom hood opening and liner dimensions, not just the cooktop size.
- Depth matters tooespecially if your front burners are doing the most.
Performance Basics: CFM, Capture, and Why Bigger Isn’t Always Better
Range hood performance gets marketed like truck commercials: “MORE POWER!” But ventilation isn’t just airflow.
It’s about capturehow effectively the hood collects smoke and grease and moves it out.
A high-CFM blower paired with bad ducting can still perform like a sad desk fan.
CFM: the headline number (and the most misunderstood)
CFM (cubic feet per minute) measures how much air the hood can move. General guidelines commonly reference
cooktop width (for electric/induction) and total BTU output (for gas). In plain English:
- Electric/induction: airflow estimates often scale with cooktop width.
- Gas: airflow estimates often scale with total BTUs because combustion cooking makes more heat and byproducts.
But here’s the part people forget: your home is a system. If you crank a powerful hood, it has to pull replacement air from
somewhere. In newer, tighter homes, that “somewhere” can turn into backdrafting fireplaces, fighting HVAC airflow, or pulling
air through every tiny gap your house can find like it’s trying to inhale through a straw.
Makeup air: the “surprise roommate” of high-CFM ventilation
Many building codes in the U.S. require makeup air when a kitchen exhaust system is capable of moving more than
a certain airflow threshold (often cited at 400 CFM). Translation: above that level, you may need a dedicated
way to bring fresh air back into the house so the hood can vent safely and effectively.
If your 43.4375-inch power pack is paired with a high-output blower (especially external/remote options), it’s worth planning
makeup air earlybecause it’s much cheaper to plan it than to discover it after installation when your kitchen door suddenly
feels like it’s vacuum-sealed shut.
Noise: Sones, Ducting, and the “Jet Engine” Myth
People fear powerful hoods because they’ve heard one that sounded like it was trying to achieve lift-off. Noise is measured in
sones, but real-world loudness depends heavily on installation details.
What actually makes a hood loud?
- Undersized ducting forcing the blower to work harder
- Too many elbows and long duct runs
- Cheap backdraft dampers that rattle like a tambourine
- High speed used as “default” because the lower speeds aren’t capturing well
A well-designed power pack can be very comfortable day-to-day if you can cook on low or medium speed most of the time, and only
hit “turbo” for heavy searing, wok cooking, or that one friend who believes blackened salmon should be cooked until it becomes
a cautionary tale.
Filters & Grease Management: The Unsexy Hero of a Clean Kitchen
A power pack’s filters are where grease goes to be captured instead of redecorating your cabinets in a fine, invisible film.
Most inserts use either:
- Mesh filters: common, affordable, effective, but can clog faster and may need more frequent cleaning.
- Baffle filters: often preferred for heavier cooking; durable, easy to rinse, and typically dishwasher-safe.
If you cook with high heat often (stir-fry, cast-iron searing, frequent frying), baffle filters can be a quality-of-life upgrade.
Either way, plan to clean filters regularlybecause a clogged filter doesn’t just reduce airflow; it can increase noise and make
your hood smell like yesterday’s onions.
Ducted vs. ductless (recirculating)
Many power packs are designed primarily for ducted ventilation (venting outside), which generally performs best.
Some setups can be converted to ductless recirculation with charcoal filters, but recirculating systems typically
won’t remove heat and moisture as effectivelyand charcoal filters require routine replacement to stay useful.
Lighting and Controls That Won’t Make You Rage-Click
Modern inserts often include bright, efficient LED lightinggreat for actually seeing your food, not just creating dramatic
shadows as you flip pancakes like a noir detective.
Features that are worth caring about
- Multiple fan speeds: so you can use low for simmering and high for serious smoke.
- Delay-off timer: lets the hood run for a few minutes after cooking to clear lingering odor.
- Easy-to-clean control surface: because grease loves buttons.
- Good light placement: front coverage matters, not just “ambient glow.”
Bonus points if controls are intuitive. A hood you hate using becomes decorative stainless steeland that’s an expensive art piece.
Installation Planning for a 43.4375-Inch Power Pack
This is the part where people either feel like remodeling geniuses… or end up measuring the same cabinet opening twelve times
while whispering, “Please fit.”
1) Measure what matters (not what you hope is true)
- Exact opening width inside the custom hood or cabinet
- Depth (and whether the insert will fully cover front burners)
- Clearances for mounting brackets, liners, and trim
- Access for filter removal and servicing
2) Ducting: don’t bottleneck your investment
Ducting is where good ventilation goes to either shineor get nerfed. Best practice is typically smooth metal ducting, with the
shortest, straightest run possible. Each elbow adds resistance, and resistance makes the blower work harder (hello noise, hello reduced airflow).
Also: match duct size to what the hood/blower is designed for. If your system expects a larger duct and you force it into a smaller
one, the hood can’t move air efficiently. That’s like putting a sports car engine on a bicycle chain and calling it “performance.”
3) Mounting height: balance capture and safety
Many manufacturer recommendations for mounting height fall into a broad range depending on fuel type and hood design.
Too low, and you risk heat damage and bonking your head. Too high, and smoke escapes before the hood can capture it.
Always follow the specific product manual for your insert and cooktop setup.
4) Electrical and service access
Plan power supply, switches (if any), and future service access. Inserts live inside cabinetry; you want to be able to remove filters,
access lights, and service components without dismantling your entire hood like it’s an archaeological dig.
Maintenance: How to Keep It Working Like Day One
The “secret” to a great range hood is boring: clean it.
But the payoff is hugebetter airflow, less smell, less noise, and fewer mysterious sticky surfaces near your cooktop.
A realistic maintenance routine
- Weekly (or every few heavy-cook sessions): quick wipe of the underside and control area.
- Monthly: clean grease filters (more often if you fry a lot).
- Quarterly: check duct connection points and listen for rattles.
- As needed: replace charcoal filters (if ductless) and worn light modules.
Pro tip: if your hood has a delay-off function, use it. Running the fan a few minutes after cooking helps clear lingering odor
and moisture that would otherwise settle into your home like an uninvited guest.
Who Should Consider a 43.4375-Inch Power Pack?
This size is usually a fit when you’re building a larger custom hood enclosure or you have a wider cooktop/range and want strong
capture coverage without a giant visible canopy hood.
Great fit if you…
- Have a custom hood surround and want a built-in, seamless look
- Cook frequently with high heat (searing, wok cooking, grilling pans)
- Want a ventilation solution that feels “premium” without shouting about it
- Need a size that matches a specific enclosure opening (hello, 43 7/16″)
Maybe not ideal if you…
- Rarely cook and mostly heat soup (no judgmentsoup has feelings too)
- Can’t vent outside and don’t want the upkeep of charcoal filters
- Have limited cabinet depth that prevents good capture over front burners
Cost & Value: What You’re Paying For
Power packs can range from “reasonable upgrade” to “did my hood just cost more than my first car?” Pricing usually reflects:
- Blower configuration: internal vs. external/remote blower options
- Build quality: stainless gauge, welds, fit/finish, vibration control
- Rated performance: airflow, sound ratings, certification testing
- Usability features: lighting quality, delay timers, better controls
The smart value move is to match the hood to your actual cooking habits and your house’s ventilation reality. A well-sized, well-installed
unit that you run daily is worth more than a monster blower you avoid using because it’s loud and triggers makeup-air complications.
Power Pack vs. Canopy Hood: Quick Comparison
- Power pack insert: hidden inside custom hood, clean built-in look, flexible design options, often requires more planning.
- Canopy hood: visible statement piece, can be simpler to select and install, style is limited to the hood’s design.
If your dream kitchen includes a custom hood that matches cabinets or makes your stove wall look like a high-end showroom, the power pack approach is
usually the way to get there.
Buying Tips to Avoid “Ventilation Regret”
1) Prioritize tested ratings and certification
Look for performance ratings you can trust and compare. Certified testing helps you avoid the classic scenario where marketing says “quiet” and your
ears say “I can’t hear my own thoughts.”
2) Plan ducting first, not last
Great hood + bad ducting = disappointment. Minimize elbows, keep runs short, and match duct size to the design.
3) Don’t ignore makeup air conversations
If you’re pairing the insert with a high-capacity blower, talk to your contractor early about code requirements and the best way to bring air back in.
4) Choose filters based on how you actually cook
Heavy frying and searing? Durable baffles are your friend. Light cooking? Mesh filters may be perfectly finejust clean them.
Conclusion: The Sweet Spot of Custom Design and Real Venting Power
A Power Pack Range Hood 43.4375-Inch is for people who want the custom-hood look without giving up performance.
The “weird” width is actually a practical, install-friendly dimension that fits common larger custom hood openings. If you choose
a unit with sensible airflow, solid filtration, and a plan for ducting (and makeup air if needed), you get something priceless:
a kitchen that stays cleaner, smells better, and feels comfortable when you cook.
Bottom line: focus on fit, capture, and installation quality over hype. Your lungs,
your cabinets, and your future self scrubbing less grease will thank you.
Real-Life Experience: Living With a 43.4375-Inch Power Pack (500+ Words)
Here’s what surprised me most the first time I lived with a larger power pack insert: the biggest upgrade wasn’t the “wow” moment
during installationit was the quiet, boring everyday moments when the kitchen simply stayed pleasant. You know that lingering
onion smell that clings to curtains like it’s emotionally attached? With a properly sized insert, it stops happening. Not always
instantly, not magically, but consistently enough that you notice when you cook somewhere else and suddenly remember what “kitchen air”
used to feel like.
The first real test was bacon. Bacon is basically a greased-pig sprint for your ventilation system: fast smoke, airborne fat, and
a smell that travels like gossip. With the insert on a low-to-mid speed before the pan even heated up (yes, turning it on early matters),
the smoke got captured instead of drifting into the living room to announce itself. After cooking, the delay-off timer felt like a small luxury.
I’d plate the food, wipe the counter, and let the hood run for a few minutesno extra effort, no forgetting, no “Why does my hoodie smell
like breakfast?”
The second surprise was how much ducting affected daily comfort. In a previous setup, a high fan speed sounded aggressive but didn’t actually
clear steam well. It turned out the duct run had too many turns, and the duct size wasn’t ideal. In the better setup, the insert could do most
cooking on a lower speed because the airflow had a clean path out. Lower speed means less noise. Less noise means you actually use the hood.
And using the hood is the entire point of owning one. It’s a cycle of competence: good ducting makes the hood more pleasant, pleasant makes it used,
used keeps the kitchen cleaner, cleaner makes you love the kitchen, and suddenly you’re cooking morepossibly enough to justify that fancy pan you swore
you didn’t need.
Cleaning was also less dramatic than expected. With baffle-style filters, the routine became almost automatic: pop them out, run them through the
dishwasher (or soak and rinse if you’re cautious), dry, reinstall. It’s not glamorous, but it’s easier than cleaning sticky cabinet doors for the
hundredth time and wondering if the grease is now part of the finish. The underside of the insert still needs wipinggrease is ambitiousbut it’s
manageable. A quick degreasing wipe once a week kept the surface from becoming that shiny, tacky “museum exhibit of cooking decisions.”
The most unexpectedly “adult” moment was learning about makeup air. A powerful hood can change how a house behavesdoors feel different, fireplaces
draft differently, HVAC airflow can get weird. Even if you don’t install a separate makeup air system, understanding the concept helps you make smarter
choices about blower size and how often you run the hood on max. If your kitchen is open to the rest of the house, you also notice how a good hood
improves comfort beyond the kitchenless smell drift, less humidity hanging around after boiling, less “Why is the whole place warm now?” after searing steak.
Overall, living with a 43.4375-inch power pack insert felt less like owning a fancy appliance and more like owning a practical tool that quietly prevents
problems. And honestly? That’s the best kind of upgrade: the kind you stop thinking about because it’s doing its job.


