
Table of Contents >> Show >> Hide
- Why a Wood Engraved Portrait Just Hits Different
- Handmade Engraving Styles I Use (and What They’re Best For)
- How I Turn a Photo into a Wood Engraved Portrait
- Step 1: Choosing a photo that will actually engrave well
- Step 2: Picking the right wood (aka “the grain decides your fate”)
- Step 3: Surface prep (the unglamorous part that makes everything look expensive)
- Step 4: Transferring the design without ruining my will to live
- Step 5: Carving/burning/engraving the portrait (the “don’t sneeze” phase)
- Step 6: Finishing (protecting the portrait without murdering the contrast)
- My Handmade Wood Engraved Portrait Gallery (34 Pics)
- Finishing an Engraved Portrait Without Losing the Details
- Commission Tips: Pricing, Proofing, and Keeping Everyone Happy
- Common Mistakes (and How I Learned Them the Hard Way)
- FAQ: Handmade Wood Engraved Portraits
- Conclusion
- My Extra Bench Notes: of Real-Life Experience (Because Wood Has Opinions)
If you’ve ever looked at a regular photo and thought, “Nice… but what if it were carved into a tree?”
welcome. I make handmade wood engraved portraits: faces, pets, wedding moments, memorials, the whole
emotional buffet. The goal is simple: turn a flat image into something you can actually feel with your
fingertips (and occasionally with your soul).
Wood is honest. It doesn’t care about filters, it doesn’t do “retakes,” and it definitely doesn’t appreciate
being rushed. But if you respect the grain, work the light, and keep your tools sharp, a portrait in wood
becomes more than a pictureit becomes an heirloom that survives batteries, cloud logins, and whatever
social network we’re all pretending we like next year.
Why a Wood Engraved Portrait Just Hits Different
A printed photo is a moment. A handmade engraved portrait is a decision. It says:
“This person (or this dog) matters enough to be permanently embedded in cellulose.”
When you engrave a portrait, you’re not just copying a faceyou’re translating it. The shadows become
depth, the highlights become restraint, and the little details (crow’s feet, freckles, a slightly crooked grin)
become the difference between “pretty” and “that’s them.”
Perfect for meaningful gifts (without being cheesy)
- Anniversary and wedding gifts: A custom wood portrait of the couple, date, and location coordinates.
- Memorial portraits: A respectful engraved photo on wood with a short inscription.
- Pet portraits: Fur texture in wood is weirdly satisfying (and yes, cats judge the results).
- Family portraits: Great for parents who claim they “don’t want anything” while wanting everything.
Handmade Engraving Styles I Use (and What They’re Best For)
1) Hand-carved engraving (classic, tactile, and slightly addictive)
This is the traditional routecarving lines and textures by hand using small chisels, V-tools, gouges, and
sometimes a rotary tool for tight areas. It creates a real, physical relief that catches light differently at every
angle. If you like the look of old-world craftsmanship (and you enjoy running your hand over the surface),
this one’s your jam.
2) Pyrography (wood burning portraits with serious mood)
Pyrography is basically drawing with controlled heat. It’s fantastic for soft, realistic shadingespecially
portraits with dramatic lighting. The downside is that it’s like cooking: a second too long and you’ve gone from
“golden brown” to “crispy regret.” The upside is that it can look incredibly lifelike.
3) Laser-engraved photo base + hand-finished details (best of both worlds)
If a client wants ultra-fine photo detail (like eyelashes and tiny reflected highlights), a laser can lay down a
consistent base. Then I come in with hand finishingdeepening shadows, cleaning edges, refining hair texture,
and correcting what machines don’t understand (like how a smile is shaped by emotion, not pixels).
No matter the method, I’m always chasing the same thing: recognition. When someone says,
“That’s my dad,” or “That’s my dog’s exact expression,” I know the portrait landed.
How I Turn a Photo into a Wood Engraved Portrait
Step 1: Choosing a photo that will actually engrave well
The best images for an engraved portrait have clear lighting and real contrast. A bright window light, a side-lit
face, or an outdoor shot in shade usually beats harsh overhead lighting. If the face is blurry or the shadows are
blown out, wood can’t magically invent missing details (and neither can I, unless you pay me in snacks).
Step 2: Picking the right wood (aka “the grain decides your fate”)
For detailed engraved photo portraits, I prefer fine, tight-grain woods that behave predictably.
Think maple, basswood, birch, and high-quality birch plywood. If the grain is wild, the portrait can look like it’s
wearing a striped sweater made of chaos. Beautiful for decorative projectsless ideal for a realistic face.
Step 3: Surface prep (the unglamorous part that makes everything look expensive)
I sand until the surface feels like a clean countertop. Smooth wood gives crisp lines and smoother shading,
especially for pyrography and fine carving. If I skip sanding, the portrait will still exist… but it will also look
like it’s being viewed through a field of splinters.
Step 4: Transferring the design without ruining my will to live
I’ll either trace a printed reference using transfer paper, do a light graphite transfer, or use a carefully taped
pattern method. The goal is a clean map: placement of eyes, nose, mouth, and major shadow shapes. After that,
the real work beginsturning that map into depth.
Step 5: Carving/burning/engraving the portrait (the “don’t sneeze” phase)
Faces are basically a collection of subtle curves. I work from large shapes to small: block the shadow masses,
build midtones, then add crisp detail where the eye naturally goes (eyes, smile lines, edges of hair, collar lines).
If you jump straight to eyelashes, you’re building a house by painting the doorknob first.
Step 6: Finishing (protecting the portrait without murdering the contrast)
A good finish makes the portrait richer and easier to clean. A bad finish fills the engraved details and turns your
careful shading into a glossy blur. I usually lean toward light, controlled coats (often sprayed or wiped gently),
especially when the engraving has deep texture.
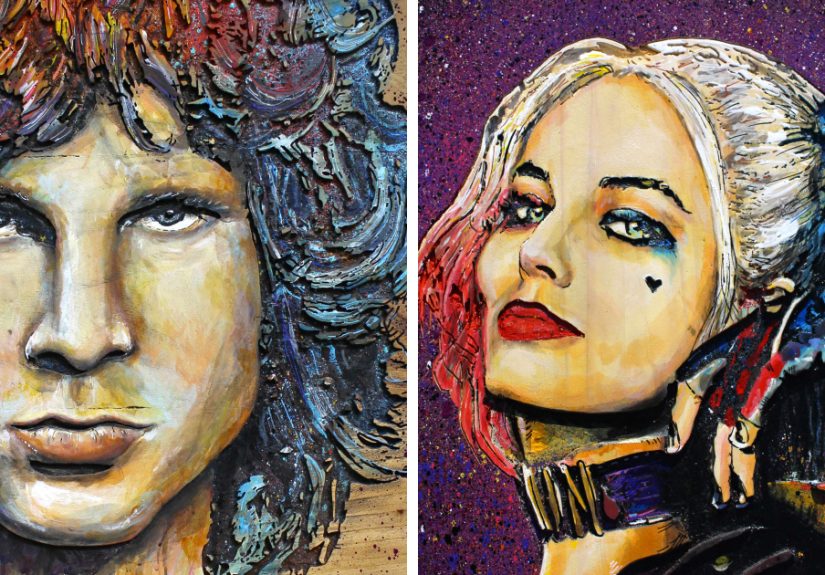
My Handmade Wood Engraved Portrait Gallery (34 Pics)
Below are 34 examples of the portrait styles I make. Each “pic” includes a suggested caption and image alt text
you can use for web publishing. (Swap in your actual image files where needed.)


Finishing an Engraved Portrait Without Losing the Details
Finishing engraved wood is a balancing act. You want protection, but you don’t want to flood the grooves.
My general rule: thin coats, controlled application, and test on scrap.
Finishes that tend to behave nicely on engraved portraits
- Shellac (thin coats): Great as a seal coat and dries fasthelpful when you don’t want drips settling into details.
- Wipe-on varnish / oil-varnish blends: Easy to control, especially if you apply lightly and wipe clean.
- Spray lacquer or spray poly: Useful when the engraving is deep and you want even coverage without puddling.
If you’re finishing a laser engraved portrait on wood, be mindful: the engraving can be slightly sooty. A gentle
cleanup (soft brush, light wipe) plus a seal coat can prevent smears. For hand-carved portraits, the biggest risk is
finish pooling in the textureso I keep a clean brush and a lint-free cloth nearby and act like a lifeguard for puddles.
Commission Tips: Pricing, Proofing, and Keeping Everyone Happy
Custom work is part art, part project management, and part emotional support. Here’s what keeps my handmade
wood engraved portraits running smoothly:
Set expectations early
- Style: Photorealistic engraving vs. more illustrative linework.
- Size: Bigger isn’t always bettersometimes it’s just more sanding.
- Timeline: Wood portraits take time because the “undo” button is mostly myth.
Do a simple proof
I like to share a basic layout preview: crop, placement, text (if any), and overall contrast direction.
It prevents the classic surprise: “Oh… I didn’t realize my ex was still in that photo.”
Price for complexity, not just dimensions
Hair, fur, and high-contrast lighting can be gorgeousbut they increase the work. A 10×14 portrait with a busy
background can take longer than a larger piece with clean negative space. If you’re selling engraved photo portraits,
your pricing should reflect the detail level, not just the ruler.
Common Mistakes (and How I Learned Them the Hard Way)
1) Picking wood with dramatic grain for a realistic face
Strong grain can look amazingjust not on someone’s forehead. For portrait realism, fine-grain wood usually wins.
2) Going too dark too fast
Whether carving or burning, you can always deepen shadows. Lighten them? That’s a whole different hobby called
“creative problem solving.” I build contrast gradually.
3) Over-detailing everything
Realism isn’t made of tiny lines everywhere. It’s made of decisions: where to sharpen edges and where to
let the viewer’s eye do the work. A portrait needs quiet areas or it looks like it’s shouting.
4) Finishing without a scrap test
Wood can surprise you. Finish can surprise you. Together, they can throw a party you didn’t RSVP to.
A quick test saves heartbreak.
FAQ: Handmade Wood Engraved Portraits
How long does a custom wood engraved portrait take?
It depends on size, detail, and method. A small pet portrait might be a focused sprint; a multi-person family portrait is a marathon with snacks.
The more texture and faces you add, the longer the piece needs to look “right” from every angle.
What’s the best wood for an engraved photo portrait?
For clean detail, I lean toward maple, basswood, and birch (including high-quality birch plywood). They’re predictable, smooth, and don’t fight your shading.
Walnut and cherry can be beautiful too, but their natural color can reduce contrast if you’re not careful.
Can you engrave portraits from old or low-quality photos?
Sometimesespecially if the face is clear and the lighting isn’t a disaster. If it’s a treasured old photo,
I’ll focus on capturing expression and recognizable features rather than chasing every pixel.
Is this a good gift idea?
Yes. It’s personal, durable, and it doesn’t need a charger. Also, it’s one of the few gifts that can make grown adults
quiet for a full five secondswhich is basically magic.
Conclusion
Handmade wood engraved portraits are where craft and memory meet. They’re not mass-produced, they’re not “good enough,” and they’re definitely not rushed.
Each one is built from light, shadow, and a stubborn commitment to making the face feel like the person.
If you’re commissioning a custom wood portraitor making one yourselfpick a strong photo, choose fine-grain wood, go slow with contrast, and finish with care.
Your future self (and your future wall) will thank you.
My Extra Bench Notes: of Real-Life Experience (Because Wood Has Opinions)
The first time I tried a portrait on wood, I thought it would be like drawingjust harder, dustier, and with more opportunities to accidentally stab myself.
I was half right. Wood portraits are less like drawing and more like negotiating with a very stubborn material that speaks exclusively in grain patterns.
You can bring your best plan, your cleanest reference photo, your fancy tools… and the wood will still whisper, “That’s cute. Try again.”
My biggest early lesson: contrast is everything, but timing is the whole game. If I go too dark too early, the portrait turns into a
dramatic stage actor who refuses subtlety. If I stay too light for too long, it looks washed out and timid. Now I build portraits the way you build a
good sauceslow reduction. I creep up on the darks, I check the piece under different light, and I walk away for five minutes when my eyes start lying to me.
(Yes, your eyes will lie. They’ll tell you the left eye is perfect when it’s actually drifting into a different zip code.)
People think the hardest part is carving the eyes. It’s not. The hardest part is knowing what to leave alone. In a photo, a camera can
capture endless micro-detail. In wood, micro-detail can quickly become noise. I’ve learned to simplify where it matterskeep cheeks and forehead smoother,
and spend my detail budget on the places that carry identity: the shape of the eyelids, the corner of the mouth, the silhouette of the hairline, the
little crease that only shows up when someone laughs for real.
Pet portraits taught me humility. Fur isn’t “lines.” Fur is direction, layering, and value changes. The first dog I did looked like it had been styled by a
weed whacker. Now I map fur in zones: muzzle fur goes one way, cheek fur another, neck fur does its own wild thing. I carve or burn in passes, letting the
texture build. And I always protect the eyesone clean highlight can make a pet portrait feel like it’s looking back at you.
Finishing was my villain arc. I once applied a finish too heavily and watched it pool into the engraving like it was trying to fill the Grand Canyon.
The portrait survived, but my pride did not. Since then, I test finishes on scrap, apply thinner coats, and treat engraved grooves like delicate architecture.
I also learned that “just one more coat” is a phrase that has ruined many perfectly good projects.
The best moment, every time, is the reveal. When a client recognizes the expressionwhen they laugh, get quiet, or hold the piece like it’s fragilethat’s
the payoff. Wood engraved portraits are slow work, but they’re the kind of slow that lasts. And honestly? In a world that scrolls past everything, making
something that demands attention feels like a small, stubborn victory.


