
Table of Contents >> Show >> Hide
- What Is a Modular CNC Machine?
- How the Modular CNC Build Works
- Mill Mode: What the Spindle Does Best
- Laser Mode: What the Diode Laser Does Best
- Why Modularity Matters More Than It Sounds
- Key Components of a Successful Modular CNC Build
- Safety: The Non-Negotiable Part
- Software Workflow for Milling and Laser Cutting
- What Can You Make With a Modular CNC Mill and Laser Cutter?
- Common Mistakes to Avoid
- Is a Modular CNC Build Worth It?
- Hands-On Experiences With a Modular CNC Mill and Laser Cutter
- Conclusion
A modular CNC build is one of those workshop ideas that sounds almost too good to be true: one motion platform, one controller, one work area, and two very different personalities. Add a spindle, and it becomes a small CNC mill or router. Swap in a laser module, and suddenly the same machine can engrave logos, mark templates, cut thin stock, and make your shop feel like a tiny manufacturing lab with better snacks.
The appeal is obvious. Instead of buying a separate desktop CNC mill and laser cutter, makers can build a flexible cartesian machine that accepts different tool heads. A well-planned modular CNC machine can mill wood, plastics, foam, soft metals, printed circuit boards, and engraving blanks, then switch to laser engraving for signs, artwork, labels, and layout marks. It is not magic. It is motion control, rigidity, calibration, safety, and a healthy respect for flying chips and invisible hazards.
The well-known DIY concept behind this type of build uses a desk-sized gantry frame, V-slot aluminum extrusion, belt-driven X and Y axes, a screw-driven Z axis, stepper motors, an Arduino-style controller, and swappable mounts for a spindle and diode laser. In practical terms, that means the frame does the positioning while the tool head decides the job. It is the workshop version of “same truck, different trailer.”
What Is a Modular CNC Machine?
A modular CNC machine is a computer-controlled motion platform designed to accept interchangeable tools. Traditional CNC routers usually carry a spindle or trim router. Laser engravers carry a laser head. Plotters carry a pen. Pick-and-place machines carry a nozzle. A modular CNC build borrows from all of these ideas by separating the motion system from the tool system.
The basic architecture is familiar: a rigid frame supports a gantry that moves along the Y axis. A carriage moves across the gantry on the X axis. A Z axis raises and lowers the tool. The machine receives G-code from CAM software, then uses motors to move the tool along programmed paths. The difference is that the tool mount is designed from the beginning to be replaceable.
The Two-in-One Advantage
The main benefit is space efficiency. A hobbyist, small shop owner, student, or prototyping team may not have room for several dedicated machines. A modular CNC mill and laser cutter setup lets one platform do multiple jobs. The spindle handles subtractive cutting, pocketing, drilling, surfacing, and light carving. The laser handles engraving, marking, image work, thin craft materials, and layout guides.
There is also a learning advantage. Once you understand steps per millimeter, work coordinates, homing, feeds, speeds, toolpaths, and material hold-down, those lessons apply across both modes. The laser will not teach you chip load, and the spindle will not teach you laser focus, but the shared CNC foundation makes the learning curve friendlier.
How the Modular CNC Build Works
A typical modular CNC build starts with an aluminum extrusion frame because extrusion is straight, available, reasonably strong, and easy to cut with common shop tools. V-slot extrusion is especially popular because the frame itself can act as a linear guide when paired with properly adjusted wheels. For a desktop build, that keeps the design simple and affordable.
The X and Y axes are often belt driven. Belts are fast, quiet, inexpensive, and suitable for laser engraving and light routing. The Z axis is commonly driven by a lead screw because vertical movement needs better holding force and finer control. This combination makes sense: belts provide speed across the work area, while the screw-driven Z axis gives the spindle or laser head controlled height adjustment.
Motors and Motion Control
Many DIY machines use NEMA 17 stepper motors for lighter axes and a larger NEMA 23 motor where extra torque helps. The controller is often based on GRBL-compatible hardware, such as an Arduino Uno with stepper drivers or a more modern integrated motion controller. GRBL remains popular because it is open, widely documented, and capable of controlling both spindle-style and laser-style workflows.
For milling, the controller treats spindle speed commands as RPM-style output. For laser work, the controller can use laser mode, where power changes are handled more smoothly during motion. That matters because a laser reacts almost instantly, while a spindle needs time to change speed. Without the correct settings, corners may burn too dark, straight lines may look uneven, or the machine may pause in places where continuous motion would be better.
The Tool-Head Swap
The heart of the project is the modular tool mount. The mount needs to hold a spindle securely enough for cutting forces, but it also needs to accept a laser module without turning the swap into a three-hour puzzle involving missing screws, muttered language, and one bolt that rolls under the workbench forever.
A good modular mount uses repeatable alignment points. The spindle plate and laser plate should attach in a predictable position so the tool center does not shift wildly every time you switch. Some builders use printed plates, machined aluminum adapters, or slotted brackets. The ideal setup lets you remove one tool, plug in the other, update the software profile, reset the Z height or laser focus, and begin testing.
Mill Mode: What the Spindle Does Best
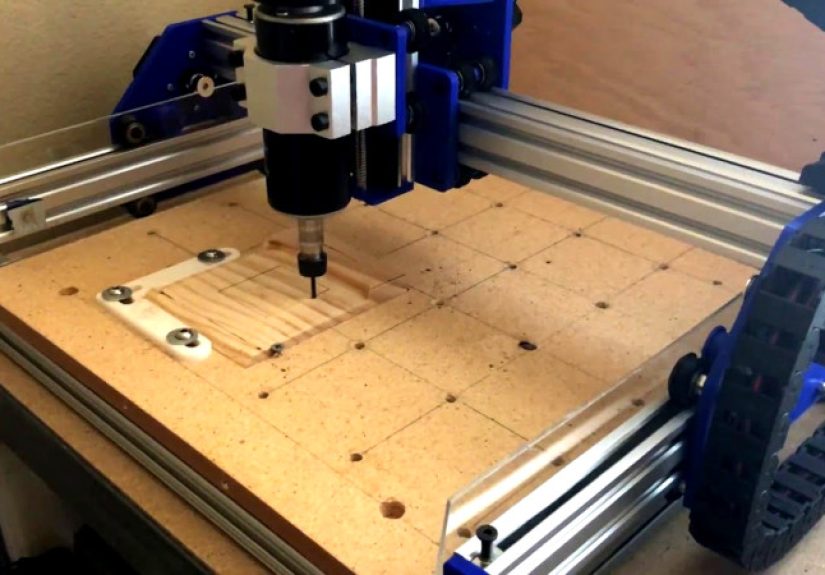
In mill mode, the machine becomes a small CNC router or light-duty mill. A 500W spindle, for example, is suitable for wood, plastics, engraving stock, PCB isolation milling, foam, wax, and careful light passes in softer materials. It is not a replacement for a heavy vertical mill, and it will not enjoy being treated like one. The machine’s frame, wheels, belts, plates, and spindle mount all define how aggressively it can cut.
The spindle shines when you need actual material removal. It can cut pockets, drill holes, profile parts, engrave signs, flatten small boards, carve reliefs, and make functional parts. A laser can mark a shape, but a spindle can remove the material cleanly through depth. If you want a bracket, jig, gear, fixture, small enclosure, wooden inlay pocket, or PCB trace separation, the spindle is usually the right tool.
Feeds, Speeds, and Rigidity
The biggest mistake beginners make is assuming that because the spindle spins fast, the machine can cut fast. CNC cutting is a balance of spindle speed, feed rate, depth of cut, tool diameter, flute count, material, and rigidity. Push too hard, and the bit chatters. Push much too hard, and the machine starts making noises that translate roughly to “please reconsider your life choices.”
For a belt-driven desktop CNC, shallow passes are usually the smart approach. Start with conservative feeds, secure the workpiece properly, use sharp bits, and listen to the cut. Clean chips are good. Dust instead of chips may mean rubbing. Screeching means something is wrong. Smoke means stop immediately.
Laser Mode: What the Diode Laser Does Best
In laser mode, the same CNC platform becomes an engraver or light laser cutter. A 2.5W diode laser is most useful for engraving wood, leather alternatives that are confirmed laser-safe, cardboard, paper, painted surfaces, and certain coated materials. More powerful diode modules can cut some thin woods and dark acrylics, but material choice matters enormously.
Laser work is different from milling because there is no physical cutting force. That means the machine can move faster and does not need the same rigidity for engraving. However, laser work adds serious hazards: eye injury, fire risk, smoke, fumes, reflections, and material toxicity. A laser module is not just a fancy blue flashlight. It is a concentrated beam that deserves grown-up safety controls.
Focus, Power, and Speed
Laser quality depends on focus, power, speed, material, airflow, and software settings. For engraving, you usually adjust speed and power until the mark is clean without excessive burning. For cutting thin materials, multiple lower-power passes may produce better edges than one slow, smoky pass. Air assist can reduce charring, improve cut quality, and help keep the lens cleaner.
Unlike a spindle, a laser does not care about chip load, but it cares deeply about focus distance. Even a small error can turn a crisp line into a fuzzy scorch mark. A simple focus gauge, repeatable Z setting, and test grid can save hours of frustration.
Why Modularity Matters More Than It Sounds
Modularity is not just a cool feature; it changes how a workshop operates. A modular CNC platform can become a prototyping center. You can mill a wooden control panel, laser engrave labels, cut a cardboard test fit, drill mounting holes, and mark alignment points with the same machine. That workflow is powerful because the coordinate system stays familiar.
For example, imagine making a small electronics enclosure. The spindle can cut the front panel opening, drill screw holes, and pocket recesses. The laser can engrave port labels, logos, switch markings, and decorative details. Instead of measuring twice between two machines, you can run separate toolpaths on one platform, using careful offsets and fixture references.
Other Tool Heads You Can Add
Once the platform is modular, the spindle and laser are only the beginning. A pen holder can turn the CNC into a plotter for drawings, templates, or circuit artwork. A drag knife can cut vinyl or masking film. A small dispensing head can apply glue or solder paste. A camera mount can help with inspection. Some ambitious builders even experiment with pick-and-place attachments or 3D printing extruders, although each added tool brings its own software and mechanical challenges.
The point is not to bolt every possible gadget to the gantry. The point is to design a machine that can grow. A future-proof mount, accessible wiring, and clean cable management make upgrades much easier.
Key Components of a Successful Modular CNC Build
1. A Rigid Frame
The frame determines how much accuracy the machine can realistically deliver. Aluminum extrusion is popular because it is modular and easy to assemble, but it must be squared carefully. Loose corners, uneven rails, and twisted frames cause binding, missed steps, poor engraving alignment, and cuts that look like they were designed during an earthquake.
2. A Practical Work Area
Bigger is not always better. A larger frame gives more cutting space, but it can reduce stiffness if not properly reinforced. Many desktop modular CNC builds perform best when sized for realistic projects: signs, small panels, parts, jigs, craft pieces, and prototypes. Choose a work envelope based on what you actually make, not what looks heroic in a forum post.
3. Reliable Electronics
A modular CNC mill and laser cutter needs clean wiring, adequate power supplies, stepper drivers matched to the motors, proper grounding, and emergency stop access. Do not treat electronics as an afterthought. Spindles generate electrical noise, lasers require stable control, and stepper motors can lose position if current or acceleration settings are wrong.
4. Safe Tool Separation
The spindle and laser should not both be active at the same time. Ideally, the build should use separate connectors, keyed plugs, relays, or software profiles that reduce the chance of accidentally powering the wrong tool. Label everything. Future you will be grateful, especially when present you is tired and holding a USB cable like it contains all the answers.
5. Dust and Fume Control
Milling creates chips and dust. Laser engraving creates smoke and fumes. These are different problems and need different controls. For spindle work, use dust collection, a dust shoe when appropriate, and regular cleanup. For laser work, use an enclosure and exhaust system suitable for the materials being processed. Never laser unknown plastics, PVC, vinyl, or materials that can release corrosive or toxic gases.
Safety: The Non-Negotiable Part
A modular CNC build combines two hazard categories in one machine. The spindle can cut fingers, throw broken bits, create dust, and ignite material if abused. The laser can damage eyes, burn skin, start fires, and release harmful fumes. Safety is not the boring chapter. Safety is what allows the fun chapters to continue.
For laser operation, use a proper enclosure, wavelength-appropriate eye protection, ventilation, fire monitoring, and material verification. Do not rely only on tinted acrylic unless it is rated for the laser wavelength and power. Avoid reflective surfaces near the beam path. Keep a fire extinguisher nearby, and never leave the machine unattended while cutting or engraving.
For milling, secure the workpiece, confirm the tool is tight, check the toolpath before running, keep hands away from moving parts, and use an emergency stop. Wear eye protection. Understand that dust from wood, composites, plastics, and metals can be harmful. Good housekeeping is not glamorous, but neither is explaining why the shop vacuum ate a hot ember.
Software Workflow for Milling and Laser Cutting
The software workflow usually includes CAD, CAM, a G-code sender, and controller firmware. For milling, CAD defines the part, CAM creates toolpaths, and the sender streams G-code to the controller. For laser work, design software or laser CAM creates engraving and cutting paths, often using power and speed settings instead of depth of cut.
The best practice is to maintain separate machine profiles for spindle mode and laser mode. The acceleration, feed limits, Z behavior, spindle commands, laser mode settings, and post-processors may differ. A clean profile system reduces mistakes and makes results more repeatable.
Calibration Steps That Matter
Calibration begins with steps per millimeter for each axis. Then come squaring, belt tension, wheel tension, backlash checks, spindle tram, laser focus, work offsets, and test cuts. A modular machine also needs tool-offset awareness. If the laser dot and spindle center are not in the same physical location, you need to record the offset or use fixtures that make alignment repeatable.
Run test patterns before real projects. A simple square can reveal whether the axes are perpendicular. A circle can reveal backlash or belt issues. A laser power grid can show the best speed and power combination for a material. These tests may not look exciting, but they are the quiet heroes behind clean finished work.
What Can You Make With a Modular CNC Mill and Laser Cutter?
The project possibilities are broad. In spindle mode, you can make small wooden signs, PCB prototypes, acrylic panels, foam molds, drawer organizers, guitar pickguards, templates, nameplates, and custom brackets. In laser mode, you can engrave logos, serialize parts, mark measurement scales, cut paper stencils, decorate packaging, and create artwork on wood or coated surfaces.
The two modes become especially useful when combined. You can mill a recessed pocket in walnut, then laser engrave a logo inside it. You can cut a control panel profile, then engrave switch labels. You can machine a jig, then laser mark alignment lines. You can create a prototype in cardboard with the laser before committing to a spindle-cut part in plywood or plastic.
Common Mistakes to Avoid
Building Too Large Too Soon
A giant machine with weak rails is less useful than a compact machine that cuts accurately. Start with a size your frame can support. Upgrade later when you understand the limits.
Ignoring Cable Management
Loose wires can snag, break, or introduce electrical noise. Use drag chains, strain relief, labeled connectors, and clean routing. Cable management is not just neatness; it is reliability.
Expecting One Machine to Do Everything Perfectly
A modular CNC build is versatile, but every tool has trade-offs. A belt-driven platform may engrave beautifully and route wood nicely, but it will not behave like an industrial VMC. A diode laser may engrave wonderfully, but it will not replace a high-power CO2 laser for thick acrylic cutting. Know the machine’s lane, then enjoy driving in it.
Skipping Enclosures
Open-frame lasers are risky. Open-frame routers are messy. A thoughtful enclosure can reduce noise, contain chips, support ventilation, and improve safety. Add viewing, lighting, access doors, and interlocks where practical.
Is a Modular CNC Build Worth It?
For makers who enjoy building tools as much as using them, yes, a modular CNC build can be extremely rewarding. It teaches mechanical design, electronics, firmware, CAM, material behavior, and troubleshooting. It also creates a machine that can produce real work.
For someone who only wants finished parts immediately, a commercial CNC router and a separate enclosed laser may be a better choice. Modular DIY machines require patience. You will tune belts, chase vibration, update firmware settings, remake brackets, improve dust control, and occasionally stare at the machine like it personally betrayed you. That is part of the journey.
The sweet spot is the maker, educator, engineer, artist, or small-shop owner who wants a flexible platform for experimentation. If you value learning, customization, and shop versatility, the modular approach is hard to beat.
Hands-On Experiences With a Modular CNC Mill and Laser Cutter
The first real lesson from using a modular CNC machine is that tool changes are only “quick” when the machine was designed for quick changes. A spindle-to-laser swap sounds simple until you realize the spindle cable, laser power lead, air assist tube, Z-height setting, software profile, and work offset all need attention. The best experience comes from creating a repeatable checklist. Remove the spindle. Install the laser mount. Connect the laser. Confirm the spindle is unplugged. Load the laser profile. Set focus. Test fire at low power. Run a small frame outline. Only then start the real job.
Another experience: the laser is fantastic for planning spindle jobs. Before cutting an expensive piece of hardwood or acrylic, use the laser at low power to mark the outline on painter’s tape or scrap stock. This gives a quick visual check of scale, placement, and orientation. It catches embarrassing mistakes, such as mirrored text, wrong origin, or a part that is technically perfect but located exactly where a clamp is waiting to be destroyed.
Spindle work teaches humility faster than laser engraving. With the laser, if the design is too light, you adjust power or speed. With the spindle, a poor setup can snap a bit, shift the workpiece, or carve a modern art trench through the wasteboard. Secure clamping is everything. Double-sided tape, low-profile clamps, threaded inserts, and a surfaced spoilboard make the machine feel more professional. The more repeatable the workholding, the less drama in the cut.
Dust control becomes important almost immediately. A few minutes of routing MDF or plywood can cover rails, belts, wheels, electronics, and lungs with fine dust. A detachable dust boot helps, but it must not interfere with clamps or small parts. For laser work, smoke control is just as important. Even harmless-looking wood smoke can irritate the workspace, coat optics, and leave residue on the machine. A sealed enclosure with exhaust airflow makes the machine cleaner, safer, and far more pleasant to use.
One of the most satisfying experiences is combining both tools in one finished project. For example, create a small wall sign by milling the outer profile and keyhole slot with the spindle, then switching to the laser to engrave lettering and decorative linework. The result looks more polished than either process alone. The spindle gives dimension and clean edges; the laser adds detail and personality.
The biggest long-term lesson is to document settings. Keep a shop notebook or spreadsheet with material, bit size, feed rate, spindle speed, depth of cut, laser power, laser speed, focus height, and notes. “Maple engraved nicely at medium power” is helpful. “Maple, 3 mm thick, 1200 mm/min, 35% power, focused with 6 mm gauge, two passes” is much better. Future you will not remember. Future you is busy looking for that bolt that rolled under the bench.
A modular CNC build gets better with small upgrades. Better connectors, stiffer plates, drag chains, limit switches, a surfaced spoilboard, an enclosure, air assist, cable labels, and a reliable emergency stop all improve the daily experience. None of these upgrades are as flashy as the laser beam or spinning cutter, but they are what make the machine feel dependable.
In the end, the best modular CNC mill and laser cutter is not the one with the biggest spec sheet. It is the one you understand, maintain, and trust. When the machine is square, the tools are calibrated, the safety systems are in place, and the workflow is repeatable, it becomes more than a DIY project. It becomes a compact manufacturing partner that can turn ideas into objects before your coffee gets cold.
Conclusion
A modular CNC build that works as both a mill and a laser cutter is one of the most practical DIY workshop projects for makers who want flexibility without filling the room with separate machines. By using a rigid frame, reliable motion system, swappable tool mounts, safe electronics, and careful software profiles, one platform can handle routing, light milling, engraving, marking, prototyping, and creative fabrication.
The key is realistic expectations. The spindle side needs rigidity, workholding, chip control, and conservative cutting parameters. The laser side needs focus, ventilation, enclosure, material awareness, and serious eye and fire safety. When both sides are respected, the machine becomes a versatile tool that rewards careful setup with impressive results.
Note: This article is educational and intended for web publishing. Always follow manufacturer documentation, local safety rules, proper laser safety practices, and appropriate ventilation requirements before building or operating any CNC or laser equipment.


