
Table of Contents >> Show >> Hide
- Before You Start: What You Need to Record Vinyl in Audacity
- How to Use Audacity to Record Vinyl: 11 Steps
- Step 1: Clean the Record and Stylus
- Step 2: Connect Your Turntable to the Computer
- Step 3: Install or Update Audacity
- Step 4: Choose the Correct Recording Device
- Step 5: Set the Project Sample Rate
- Step 6: Monitor and Adjust Recording Levels
- Step 7: Start Recording Before Dropping the Needle
- Step 8: Stop, Save, and Record Side B
- Step 9: Trim Silence and Remove Obvious Problems
- Step 10: Split the Album into Individual Tracks
- Step 11: Export in the Right Format and Back Up Your Files
- Best Audacity Settings for Recording Vinyl
- Common Problems When Recording Vinyl in Audacity
- Should You Remove Clicks and Crackle?
- Legal and Practical Reminder
- Real-World Experience: What Recording Vinyl in Audacity Actually Feels Like
- Conclusion
Note: This guide synthesizes current information from reputable audio software, turntable, hi-fi, and preservation resources, including official Audacity documentation and established U.S.-based audio education sources.
Recording vinyl into Audacity is one of those projects that sounds intimidating until you actually do it. Then it becomes oddly satisfying: you drop the needle, watch the waveform crawl across the screen, and suddenly your record collection looks like it has entered the witness protection program under a new digital identity.
Whether you want to digitize vinyl records for easier listening, preserve rare LPs, back up family recordings, or turn your favorite album into clean WAV, FLAC, or MP3 files, Audacity gives you a powerful and free way to do it. The trick is not just pressing the red Record button. You need the right cable path, sensible recording levels, a clean record, and a little patience when splitting tracks and removing clicks.
This in-depth guide walks you through how to use Audacity to record vinyl in 11 practical steps. It covers USB turntables, standard turntables with phono preamps, audio interfaces, recording levels, cleanup, export settings, and real-world tips that save you from the classic beginner mistake: recording an entire side of an album only to discover it sounds like it was captured through a potato.
Before You Start: What You Need to Record Vinyl in Audacity
Before opening Audacity, make sure your hardware setup is ready. Vinyl is an analog format, so your computer needs a way to receive that signal. There are three common setups:
Option 1: USB Turntable
A USB turntable is the simplest route. It has a built-in analog-to-digital converter, so you connect it directly to your computer with a USB cable. Many beginner-friendly turntables from brands like Audio-Technica include this feature. In Audacity, the turntable usually appears as a USB audio device or codec.
Option 2: Standard Turntable + USB Phono Preamp
If your turntable does not have USB output, you can connect it to a USB phono preamp. The phono preamp boosts the tiny signal from the cartridge and applies the correct RIAA equalization. Without this step, the recording may sound extremely quiet, thin, and weirdly allergic to bass.
Option 3: Turntable + Receiver or Phono Preamp + Audio Interface
For better control, use a turntable connected to a phono preamp or receiver, then send the line-level output into an audio interface. This setup can produce excellent results, especially if your interface has good converters and input gain controls.
You will also need a clean vinyl record, a stylus in good condition, a computer, Audacity installed, and enough storage space. One full album recorded as uncompressed WAV can take several hundred megabytes, so do not try this on a laptop with only enough free space for three screenshots and emotional regret.
How to Use Audacity to Record Vinyl: 11 Steps
Step 1: Clean the Record and Stylus
Good digital audio starts before Audacity even opens. Dust, static, fingerprints, and old sleeve debris can create clicks, crackle, distortion, and skips. Use a carbon fiber record brush before playback. For dirty records, consider a proper record cleaning solution or cleaning machine. Always handle records by the edges and label area, not the grooves.
Clean the stylus too. A dirty needle can drag dust through the groove and make your recording sound dull or scratchy. Use a stylus brush designed for the job, brushing gently from back to front. Do not scrub sideways unless you enjoy buying replacement cartridges sooner than planned.
Step 2: Connect Your Turntable to the Computer
If you are using a USB turntable, plug it directly into your computer rather than a USB hub. Direct connection reduces the chance of connection problems. If Audacity was already open before you connected the turntable, restart Audacity or use the option to rescan audio devices.
For a traditional turntable, connect the turntable to a phono preamp first. Then connect the preamp to your computer through a USB output or audio interface. If your turntable has a PHONO/LINE switch, use the setting that matches your setup. Use LINE if the turntable’s built-in preamp is active. Use PHONO only when sending the signal into a true phono input.
Step 3: Install or Update Audacity
Download Audacity from the official Audacity website or a trusted app store source. Audacity is free, open-source, and available for Windows, macOS, and Linux. Keeping it updated helps ensure smoother device detection, better export options, and fewer mysterious “why is this not recording?” moments.
After installing, open Audacity and create a new project. Save the project early with a clear name such as Miles Davis – Kind of Blue Vinyl Transfer or Grandma’s 1978 Christmas Record. A clear file name is boring until the day it saves you from sorting through sixteen projects called “Untitled.”
Step 4: Choose the Correct Recording Device
In Audacity, go to the audio setup or device toolbar and select your input device. For a USB turntable, this may appear as “USB Audio CODEC,” “USB PnP Audio Device,” or the name of the turntable. For an audio interface, choose the interface input receiving the turntable signal.
Set recording channels to 2 channels stereo. Vinyl records are usually stereo, and recording in mono will collapse the left and right channels into one. That might be fine for some older mono records, but for most LPs, stereo is the correct choice.
If your device does not appear, check your operating system’s sound settings. On Windows, confirm the device is enabled under input devices. On macOS, check System Settings and Audio MIDI Setup if needed. Then return to Audacity and rescan audio devices.
Step 5: Set the Project Sample Rate
For most vinyl recording projects, set Audacity’s project sample rate to 44,100 Hz. This is the standard sample rate for audio CDs and is Audacity’s common default. You can also use 48,000 Hz, especially if you plan to use the audio in video projects.
For bit depth, Audacity commonly works internally with 32-bit float, which is helpful while editing because it gives you room to process audio without immediately damaging the file. When exporting, you can choose formats such as WAV, FLAC, or MP3 depending on your purpose.
Do not obsess over ultra-high sample rates unless you have a specific reason. A clean 44.1 kHz recording with proper levels will beat a distorted 96 kHz recording every time. Fancy numbers do not rescue a bad cable, a dusty stylus, or a volume knob set to “volcano.”
Step 6: Monitor and Adjust Recording Levels
Before recording the whole album side, start monitoring the input level in Audacity. Play a loud section of the record and watch the recording meter. Your goal is a strong signal that does not clip. Clipping happens when the input is too loud and the waveform hits the ceiling, creating harsh distortion that cannot be truly repaired later.
A practical target is to let peaks reach around -12 dB to -6 dB. If the meter enters the red zone or clips near 0 dB, lower the input level. Depending on your hardware, you may adjust the recording slider in Audacity, the input gain on your audio interface, or the level control on a USB preamp.
Record a short test first. Listen through headphones. Check for hum, buzzing, distortion, missing channels, or a recording that is only coming through the left speaker. Fix these problems now, not after spending forty minutes capturing Side A.
Step 7: Start Recording Before Dropping the Needle
Click the red Record button in Audacity before lowering the stylus onto the record. Give yourself a few seconds of silence at the beginning. That silence can help later if you need a noise profile for gentle noise reduction, and it gives you room to trim cleanly.
Lower the tonearm carefully and let the record play. Avoid typing, tapping the desk, or loudly celebrating your analog-to-digital victory while the recording is running. Turntables are sensitive, and vibrations can travel into the audio. Your microphone may not be recording, but your cartridge is definitely paying attention.
Let the entire side play through without stopping. If there is a skip or obvious issue, you can stop and restart, but generally it is easier to record each side as one long file, then split it into tracks afterward.
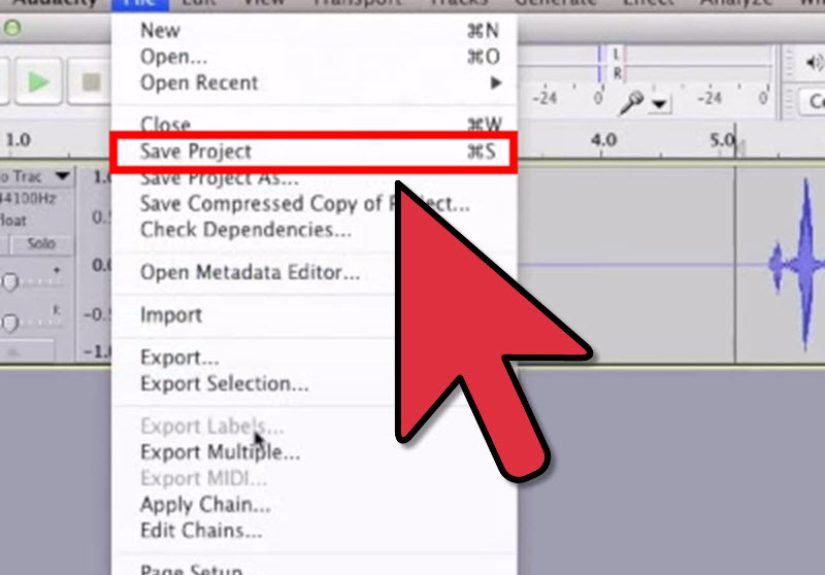
Step 8: Stop, Save, and Record Side B
When Side A ends, let Audacity record a few extra seconds, then stop. Save the project immediately. If your album has a Side B, flip the record, clean it lightly, and record the second side in the same project or a new one.
Some people prefer one Audacity project per album. Others prefer one project per side. Either works. For simple organization, recording both sides in one project can make track splitting easier, but large projects may take longer to save and manage.
At this stage, do not delete the raw recording. Your unedited capture is your safety net. If an effect setting turns your favorite jazz record into underwater soup, you can return to the original and try again.
Step 9: Trim Silence and Remove Obvious Problems
Now the editing begins. Use Audacity’s selection tool to trim extra silence at the beginning and end. Be careful not to cut off the natural fade-in, room tone, or first transient of the music. Vinyl often has a little pre-track character, and trimming too aggressively can make the digital file feel abrupt.
Zoom in to inspect large clicks, bumps, or needle drops. Audacity includes tools such as Click Removal and Repair. Click Removal can help with repeated small clicks, while Repair is useful for very short, isolated defects. Use these tools gently. Over-processing can dull the sound or create unnatural artifacts.
For constant hum or hiss, Noise Reduction may help, but it is not magic. It works best on steady background noise, not random pops or groove damage. If you use it, capture a noise profile from a silent section and apply a conservative amount. The goal is to improve the recording, not sterilize it until it has the personality of a spreadsheet.
Step 10: Split the Album into Individual Tracks
Once the full side sounds good, split it into songs. In Audacity, add labels at the start of each track. You can place a label where each song begins, then name it with the track title. This is especially helpful when exporting multiple files.
Zoom in on the gaps between songs. Place labels just before the audio begins, leaving a natural amount of space. If the album has crossfades or live transitions, do not force harsh cuts. Some records are designed to flow, and chopping them too aggressively can ruin the listening experience.
When your labels are ready, use Export Multiple to create separate files based on those labels. This saves time compared with exporting one song at a time. Add metadata such as artist, album, track title, year, and genre where appropriate.
Step 11: Export in the Right Format and Back Up Your Files
Choose your export format based on how you plan to use the recording. For archiving, export as WAV or FLAC. WAV is widely compatible and uncompressed, while FLAC is lossless and saves space. For phones, car stereos, and casual listening, MP3 is convenient, especially at a high-quality setting such as 256 kbps or 320 kbps.
A smart workflow is to keep three versions: the original Audacity project, a lossless archive file, and a smaller listening copy. Store them in clearly named folders. Example:
- Raw Project: Artist – Album – Audacity Project
- Archive: FLAC or WAV files
- Listening: MP3 files for phone or car use
Back everything up to an external drive or cloud storage. Vinyl digitization happens in real time, which means a 42-minute album takes at least 42 minutes to record before editing. Losing finished transfers feels like dropping your record collection into a digital volcano.
Best Audacity Settings for Recording Vinyl
For most users, the best Audacity settings for vinyl are simple:
- Recording channels: 2-channel stereo
- Project sample rate: 44,100 Hz or 48,000 Hz
- Recording level: Peaks around -12 dB to -6 dB
- Editing format: 32-bit float inside Audacity
- Archive export: WAV or FLAC
- Portable export: MP3 at high quality
These settings balance quality, compatibility, and file size. They are also beginner-friendly. You can get more advanced later with external declicking software, high-resolution capture, cartridge alignment, and dedicated audio restoration tools. But for your first serious vinyl transfer, clean signal flow matters more than exotic settings.
Common Problems When Recording Vinyl in Audacity
No Sound Is Recording
Check that the correct recording device is selected in Audacity. Make sure the USB cable is connected directly to the computer. Confirm that your operating system recognizes the device. If needed, restart Audacity or rescan audio devices.
The Recording Is Too Quiet
You may be recording a phono-level signal without a phono preamp. Make sure your turntable has a built-in preamp switched on, or connect it through an external phono preamp before sending audio to your computer.
The Recording Sounds Distorted
Your input level is probably too high, or you may be sending a line-level signal into the wrong input. Lower the gain and watch the meters. If the waveform is squared off at the top and bottom, the audio is clipping.
Only One Channel Records
Check your cables, adapter, and recording channel setting. Make sure Audacity is set to stereo recording. Also inspect RCA connectors, because a loose red or white plug can make half your album disappear like a magician with commitment issues.
There Is Hum or Buzz
Hum can come from grounding problems, bad cables, power interference, or turntable placement. If your turntable has a ground wire, connect it to the phono preamp or receiver ground terminal. Keep audio cables away from power bricks and avoid stacking the turntable near noisy electronics.
Should You Remove Clicks and Crackle?
Yes, but carefully. A few clicks are part of the vinyl experience. Too many clicks can be distracting. Audacity’s Click Removal effect can reduce common vinyl pops, but heavy settings may damage transients, especially drums, percussion, and bright guitar attacks.
For rare records or sentimental recordings, make a copy of the track before applying restoration effects. Try subtle settings first. Preview the change. Listen to the music, not just the noise. If the snare drum suddenly sounds like someone tapping a cardboard box with a breadstick, you have gone too far.
Legal and Practical Reminder
Digitizing vinyl you own for personal listening or preservation is a common practice, but copyright laws can vary depending on where you live and how you use the files. Do not upload, sell, or distribute copyrighted recordings unless you have the legal right to do so. Making a convenient copy for your own library is very different from becoming an accidental pirate with a USB turntable.
Real-World Experience: What Recording Vinyl in Audacity Actually Feels Like
The first time you record vinyl in Audacity, the process feels more technical than musical. You are watching meters, checking cables, wondering whether “USB Audio CODEC” is your turntable or a tiny robot trapped inside your computer. But after a few tries, the workflow becomes surprisingly relaxing. It turns into a ritual: clean the record, clean the stylus, check the levels, press Record, lower the needle, and let the album breathe.
One useful experience is learning that the loudest part of a record is not always where you expect. A quiet-looking folk album may suddenly jump during a chorus. A rock record may have one hot cymbal crash that sends the meter into the red. That is why a test recording matters. Play a louder section before capturing the full side. It feels like an extra chore until it saves you from re-recording an entire album because one chorus clipped like a toaster in a thunderstorm.
Another lesson is that cleaning matters more than beginners think. A dusty record can make even a good turntable sound disappointing. Sometimes a record that seems permanently crackly improves dramatically after a proper clean. Audacity can reduce clicks, but it cannot fully replace good physical care. The best restoration is often prevention: clean grooves, stable tracking, correct stylus pressure, and a quiet recording environment.
It also helps to accept that vinyl transfers are slow. You cannot rip an LP at 20x speed like a CD. The record plays in real time. Then you edit in real time, listen in real time, and sometimes question your life choices in real time. But that slowness is part of the charm. You notice album sequencing, side breaks, hidden details, and the difference between a clean pressing and one that has clearly survived three apartments, a basement, and someone’s college party era.
Track splitting is where patience pays off. Labeling songs carefully makes the final library feel polished. Good file names and metadata make your transfers easier to enjoy later. Instead of one huge file called “recording-final-final2.wav,” you get a tidy digital album with track names, artist information, and proper order. Your future self will thank you, possibly while wearing headphones and pretending to be a mastering engineer.
The biggest practical tip is to keep your raw recording. Do not rush to process and delete it. Save an untouched version before applying noise reduction, click removal, normalization, or fades. Audio editing is reversible only if you planned ahead. A raw backup lets you return to the original capture when your first cleanup attempt becomes a science experiment.
Finally, do not chase perfection so hard that you remove the soul of the record. Vinyl has texture. A little surface sound can be acceptable, especially on older albums. The goal is not to make every LP sound like a sterile digital remaster. The goal is to create a faithful, enjoyable copy that preserves the music and the feeling of playing the record. Audacity gives you the tools, but your ears make the final decision.
Conclusion
Learning how to use Audacity to record vinyl is mostly about building a clean, repeatable workflow. Connect the turntable properly, choose the correct input device, set a sensible sample rate, test your levels, record each side, clean up carefully, split tracks with labels, export in the right format, and back up your work.
Audacity is powerful enough for detailed vinyl digitization but simple enough for beginners. With a USB turntable or a standard turntable connected through a phono preamp or audio interface, you can preserve your LP collection and enjoy it on modern devices without abandoning the warm ritual of vinyl playback.
The best results come from patience. Clean records sound better. Safe recording levels prevent distortion. Gentle editing preserves musical detail. Good metadata keeps your library organized. And backups protect the time you spent capturing every pop, groove, chorus, and glorious analog wobble.


