
Table of Contents >> Show >> Hide
- Before You Start: What You’ll Need (and What You Should NOT Do)
- Ivory vs. Bone in Plain English
- Quick Cheat Sheet: The Two Biggest Clues
- The 8-Step Process to Tell Ivory from Bone
- Step 1: Look for “where could you even see the structure?”
- Step 2: Check the overall feel and look (but don’t “convict” on this alone)
- Step 3: Use magnification to hunt for pores (bone’s “freckles”)
- Step 4: Look for Schreger lines (ivory’s “crosshatch signature”) on a cut end
- Step 5: Check the grain direction (long lines vs. busy structure)
- Step 6: Inspect seams and construction clues (especially on piano keys and inlays)
- Step 7: Use UV light as a supporting clue (not a verdict)
- Step 8: If the stakes are high, get a professional ID (and keep it non-destructive)
- Common Look-Alikes (So You Don’t Get Tricked by “Ivory-ish” Things)
- Legal and Ethical Reality Check (U.S.-Focused)
- Care Tips If You Think It Might Be Ivory (or Bone)
- Real-World Experiences: What People Commonly Run Into (About )
- Frequently Asked Questions
- Conclusion
You’ve got a creamy-white carving, a vintage bracelet, or an old set of piano keys, and a question that can instantly turn
into a very big deal: “Is this ivory… or is it bone?”
Telling ivory from bone matters for three reasons: (1) value (people pay differently for different materials),
(2) care (they age and crack differently), and (3) legality (ivory trade is tightly regulated in the U.S. and beyond).
This guide is designed for identification and educationnot to help anyone buy, sell, or move restricted wildlife products.
When in doubt, treat the object gently and consult a qualified professional.
Before You Start: What You’ll Need (and What You Should NOT Do)
Helpful, low-risk tools
- Bright light (a flashlight or a desk lamp)
- 10x magnifying loupe (or a phone macro lens attachment)
- Soft cloth (microfiber) for wiping dust
- UV flashlight (optional; long-wave UV is safer for quick checks)
- Camera/phone for close-up photos you can zoom into
Avoid these “tests”
- Hot needle / heated pin tests: destructive, can ruin antiques, and can produce misleading results on coatings.
- Bleach, acetone, acids, or “whitening” tricks: can permanently damage ivory and bone.
- Sanding or scraping: removes the evidence you’re trying to see.
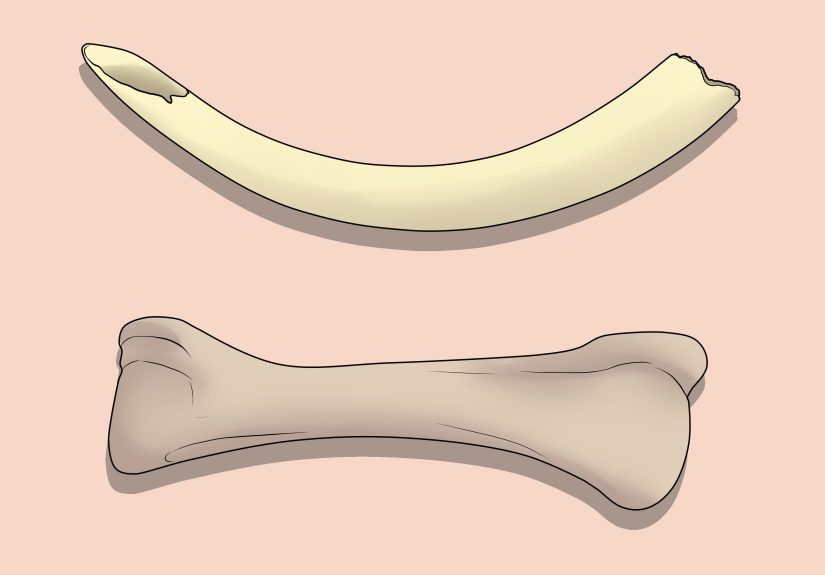
Ivory vs. Bone in Plain English
Ivory is dentin from tusks or teeth. It’s dense and has growth structures that can form distinctive patterns,
especially in elephant and mammoth tusk ivory.
Bone is living tissue built around blood supply channels. Those channels (often called Haversian systems) leave
telltale pores and pitsespecially on cut or worn surfaces.
Quick Cheat Sheet: The Two Biggest Clues
-
Schreger lines (cross-hatch “engine turning”) = likely tusk ivory.
If you see a repeating crosshatch pattern on a cut end, that’s a major ivory signal. -
Haversian canals (random pores/pits) = bone.
If the surface looks peppered with tiny holes or elongated pits, bone jumps to the front of the line.
The 8-Step Process to Tell Ivory from Bone
Step 1: Look for “where could you even see the structure?”
Start by finding a place that’s cut, chipped, worn, or unfinishedthe underside of a carving, the back of jewelry,
the end grain of a handle, or the edge of a keytop. Polished faces can hide everything you need to see.
Step 2: Check the overall feel and look (but don’t “convict” on this alone)
Ivory is often creamy rather than bright white and can show age-related yellowing. Bone can look similar, but may appear
more chalky or slightly grainy. Both can be stained, dyed, or coated, so treat this step as a quick vibe checknot proof.
Step 3: Use magnification to hunt for pores (bone’s “freckles”)
With a 10x loupe, inspect the surfaceespecially any cut area. Bone often shows
tiny pits, dots, or elongated pores (the remnants of blood-vessel channels).
Dirt can settle in them, making them look like pepper or tiny dark commas.
If you see widespread pores that look like little pinholesespecially in irregular clustersyou’re probably looking at bone.
Step 4: Look for Schreger lines (ivory’s “crosshatch signature”) on a cut end
On elephant and mammoth tusk ivory, a cut cross-section can reveal
Schreger lines: a repeating, cross-hatched pattern that may resemble
stacked chevrons, faint X-shapes, or “engine turning.”
Key point: this pattern is easiest to see on a flat, cut end (like the base of a carved piece or an exposed cross-section),
not necessarily on the front face.
Step 5: Check the grain direction (long lines vs. busy structure)
Rotate the piece and look along the length. Ivory can show
gentle, wavy lines or a soft, layered lookmore like wood grain that’s trying to behave.
Bone, especially when carved, often shows a more speckled or porous texture under magnification.
Step 6: Inspect seams and construction clues (especially on piano keys and inlays)
Many “ivory” piano keys are not solid ivory blocks. Traditional ivory key coverings were often made in pieces
(commonly a top section and a front/side piece), leaving a fine seam line.
A seam doesn’t prove ivorysome plastics and replacements can also have seamsbut it’s a clue to investigate further.
Step 7: Use UV light as a supporting clue (not a verdict)
Under UV light, some genuine ivory can show a subtle white-to-blue glow.
Many plastics may glow differentlyor not at all. Bone can fluoresce too, depending on age, treatment, and residues.
Translation: UV can help you compare areas and spot repairs or mixed materials, but it shouldn’t be your only deciding test.
Step 8: If the stakes are high, get a professional ID (and keep it non-destructive)
If you’re dealing with a valuable antique, an heirloom with documentation needs, or anything that could trigger legal concerns,
the smartest move is a professional evaluation. Conservators and some gem/material labs can use
microscopy and (when appropriate) advanced methods like spectroscopy or other lab analyses to separate
ivory from look-alikeswithout carving off “just a little sample,” which can be a very expensive mistake.
Common Look-Alikes (So You Don’t Get Tricked by “Ivory-ish” Things)
- Bone: pores/pits (Haversian canals) are the giveaway.
- Antler: often shows a more “spongy” internal structure and can have a different pattern than dense tusk ivory.
- Plastic/resin (ivorine): can look too uniform; may show mold lines or a glassy sameness under magnification.
- Tagua nut (“vegetable ivory”): often has a central “eye” or star-like pattern and a seed-like structure.
- Composite/laminated materials: a thin layer on top of another base (common in restored items).
Legal and Ethical Reality Check (U.S.-Focused)
Ivory laws can be strict and can vary by product type, age, documentation, and location. In many cases,
owning an ivory-containing item is treated differently from selling, trading, importing/exporting, or even transporting it
across borders. If you suspect an item is ivory, approach any transaction with caution, and check the rules that apply
before you act.
The safest approach: focus on identification for care and awareness, and consult official guidance or a qualified professional
if you’re unsure. When legality matters, “I read a comment thread once” is not a compliance strategy.
Care Tips If You Think It Might Be Ivory (or Bone)
- Avoid rapid temperature or humidity swings: both materials can crack or warp.
- Keep it out of direct sunlight: UV and heat can accelerate yellowing and drying.
- Clean gently: dry microfiber first; avoid soaking or harsh cleaners.
- Handle with clean hands or gloves: oils can stain porous bone and aged ivory.
Real-World Experiences: What People Commonly Run Into (About )
In the real world, “ivory vs. bone” rarely shows up in a neat lab sample. It shows up at estate sales, in inherited jewelry boxes,
in antique stores with dim lighting, and in online listings photographed with a potato. And the most common experience is this:
the object looks convincing… until you find the one spot that tells the truth.
One classic scenario is the estate-sale figurine. From five feet away, it’s smooth, creamy, and definitely giving “museum energy.”
Up close, though, the underside reveals tiny dark specks. With a loupe, those specks become little pitsrandomly spaced and slightly elongated.
That’s the “bone freckles” moment. Sellers often call it “ivory” because it’s shorthand for “old and fancy,” not because they’ve verified it.
The best outcome is when the buyer uses magnification, realizes it’s likely bone, and adjusts expectations (and budget) accordinglywithout
arguing that an object should be something it isn’t.
Another frequent experience involves piano keys. People hear “old piano” and assume “ivory keys,” then try to confirm it by color alone.
The more useful moment is noticing the construction seam on the keytop and then checking texture under light and magnification.
Sometimes the keys are modern replacements (plastic), sometimes they’re older coverings, and sometimes you find a mixbecause repairs happen.
UV can help here: not to proclaim “ivory!” but to show that one key (or one section) behaves differently than its neighbor, hinting at a replacement.
The takeaway most owners report is that the keys don’t need a dramatic testthey need gentle handling and a cautious plan if restoration is involved.
A third scenario is the online “bone carving” that arrives looking suspiciously perfect. Under magnification, there are no pores, no pits,
and the surface looks unnaturally uniform. That doesn’t automatically mean ivoryit could be resin or another substitutebut it does mean
you should look harder. People often learn the value of Step 1 here: find an edge, a hole, or a worn corner. If you can’t find any natural structure
anywhere, you may be dealing with a synthetic that’s been designed to mimic the “old-world” vibe.
Finally, there’s the experience of discovering that identification is sometimes about knowing your limits. Small carvings may not show a clean cross-section.
Coatings can hide pores. Patina can confuse color. That’s why many collectors and caretakers treat this like a confidence scale:
if multiple clues point to bone (pores, spongy interior, dotted texture), they call it bone. If they see a convincing crosshatch pattern consistent with Schreger lines
on a cut end, confidence rises toward ivory. And when the object is valuable or legally sensitive, they stop guessing and get a professional opinionbecause
the most expensive test is the one you do after you accidentally damage the piece.
Frequently Asked Questions
Can I tell ivory from bone just from a photo?
Sometimesbut only if the photo is sharp, well-lit, and close enough to show pores or crosshatching. If you can’t zoom in and see texture,
you’re mostly judging color and vibes, which is not a reliable method.
What if I see “lines,” but they don’t look like a neat crosshatch?
Not all lines are Schreger lines. Bone can show linear grain, tools marks can create streaks, and aging can produce cracks.
Schreger lines are typically a repeating intersecting pattern best seen on a cut cross-section.
What’s the safest next step if I still can’t tell?
Stop escalating your tests. Document the piece with detailed close-ups, avoid destructive probing, and consult a conservator or qualified specialist.
If legality is a concern, consult official guidance.
Conclusion
If you remember only one thing, make it this: bone has pores; tusk ivory has a crosshatch.
Use magnification, find a truthful edge, and stack multiple clues before you decide.
And when the decision affects money, restoration, or legality, let a professional confirm itbecause the goal isn’t to “win the argument,”
it’s to get the material right.


