
Table of Contents >> Show >> Hide
- Table of Contents
- What a Headlight Washer Cover Is (and Why It Falls Off)
- Parts and Tools You’ll Want Nearby
- Before You Start: Confirm Fitment and Color
- Step-by-Step: How to Replace a Headlight Washer Cover
- Painting Tips for a Factory-Looking Match
- Troubleshooting: When the New Cover Won’t Stay On
- Time, Cost, and When to Call a Pro
- FAQ
- Real-World Experiences (The 500-Word “I’ve Been There” Section)
Headlight washer covers are the tiny “blink and you’ll miss it” bumper pieces that protect the pop-out washer nozzle. When one disappears, your car suddenly looks like it’s missing a toothplus the exposed nozzle can get knocked around. The good news: replacing a headlight washer cover is usually a quick DIY job (with a small asterisk the size of your bumper).
In this guide, you’ll learn how to replace a headlight washer cover safely, get the washer nozzle to stay popped out long enough to work on it, and avoid the classic rookie move: scratching your bumper while “gently prying” like a raccoon opening a soda can.
What a Headlight Washer Cover Is (and Why It Falls Off)
If your car has headlight washers, it also has a small cover (sometimes called a headlight washer cap or headlamp washer nozzle cover) that sits flush with the front bumper. When you activate the washer system, the nozzle pops out, sprays the headlight, then retracts back behind that cover like a shy turtle.
These covers typically attach to the washer nozzle assembly with clips, tabs, a hinge-style bracket, or a small retaining piece. They don’t usually fall off because they’re boredthey fall off because:
- Clips or tabs break (plastic gets brittle with age and weather).
- The cover wasn’t seated fully after prior bumper work or a car wash incident.
- Something hit it (ice chunks, road debris, parking blocks, or that one curb you “barely touched”).
- The nozzle mechanism sticks and the cover gets stressed during extension/retraction.
Important note: if your cover is missing, don’t ignore it forever. The exposed nozzle can be damaged, and if the washer line leaks, you can lose washer fluid faster than you lose faith in humanity during rush hour.
Parts and Tools You’ll Want Nearby
The exact steps vary by make and model, but the tool list is usually short. Here’s the “do it right, don’t do it twice” kit:
Parts
- Replacement headlight washer cover (left or rightdon’t guess; verify).
- Optional: retaining clip/hinge bracket (if your original hardware is broken).
- Optional: a pre-painted cover (convenient but usually pricier) or a primed/unpainted cover (cheaper, needs paint).
Tools
- Plastic trim tool or plastic pry tool (avoid metal tools on painted bumpers).
- Painter’s tape (to protect paint around the cover).
- Microfiber towel (because your bumper deserves better than your hoodie sleeve).
- Small flathead screwdriver (only if necessary, and only with tape + caution).
- Gloves and eye protection (washer fluid is not a luxury skincare product).
- If bumper access is required: basic socket set and trim-clip remover.
Before You Start: Confirm Fitment and Color
Headlight washer covers are annoyingly specific. “Close enough” is how you end up holding a part to your bumper like it’s a seashell you found at the beach, whispering, “Why don’t you fit?”
1) Confirm left vs. right
Most listings specify driver side and passenger side. In the U.S., driver side is left, passenger side is right (from the driver’s seat perspective). Double-check your vehicle’s part diagram or parts catalog.
2) Decide: pre-painted vs. primed/unpainted
Many covers are sold primed or unpainted so you can paint-match your bumper. That’s normal. If you want the easiest route, a professionally painted, paint-to-match cover can save time. If you’re budget-minded (or you enjoy tiny projects that turn into big ones), primed is fine.
3) Inspect the washer nozzle assembly
If the cover flew off, the nozzle assembly may be fineor it may have a broken hinge, missing clip, or a nozzle that doesn’t retract smoothly. Take 30 seconds and look for cracked plastic, dangling parts, or a nozzle that sits crooked.
Step-by-Step: How to Replace a Headlight Washer Cover
There are two common ways to do this job: (A) replace the cover from the outside with the nozzle extended, or (B) access the assembly from behind (sometimes requiring partial bumper access). Start with Method A. If your car laughs at Method A, move to Method B.
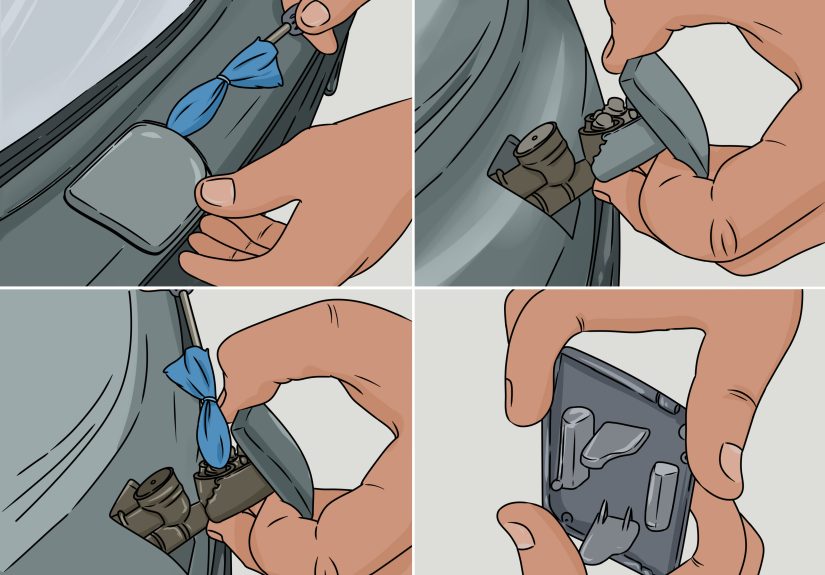
Method A (Most Common): Pop the Nozzle Out and Swap the Cover
- Prep the area. Wash or wipe the bumper area around the cover opening. Dirt is basically sandpaper in disguise. Add painter’s tape around the opening to protect the paint.
- Get the headlight washer nozzle to extend. Many cars extend the headlight washers only when the headlights are on and the windshield washers are activated. Turn the ignition on (or start the car), turn on the headlights, then activate the washer.
Pro tip: have a helper hit the washer while you stand by the nozzle like a pit crew memberbecause it retracts quickly. - Hold the nozzle extended. Once the nozzle pops out, gently hold it with a gloved hand or a microfiber towel. Some people use a plastic trim tool as a gentle wedge, but do this carefully to avoid bending the nozzle or scuffing paint.
- Remove the old/broken cover (if it’s still there). Depending on design, the cover may slide off tabs, unclip from a bracket, or release from two small clips. Use a plastic trim tool to depress tabs if needed. Keep your movements small and controlled. The goal is “surgical,” not “crowbar.”
- Inspect the attachment points. Look at the cover’s backside: you’ll usually see tabs, hooks, or a hinge point. Then look at the nozzle piece it attaches to. If the nozzle-side bracket is broken, a new cover won’t magically fix that.
- Install the new cover. Align the tabs/hinge first (don’t force it). Press until you feel a firm click or it sits flush and secure. Confirm it’s seated evenly and not rocking.
- Test it. Activate the washer again and watch the cover/nozzle movement. The cover should move as designed (some pivot with the nozzle) and return flush without binding.
Method B (When Method A Isn’t Enough): Access from Behind
Some vehicles make it hard to reach clips from the outsideor the washer cover attaches to a hinge that’s only reachable from behind the bumper. In these cases, you may need partial bumper access.
- Safely gain access behind the bumper. Park on a flat surface, set the parking brake, and turn the wheel for better wheel-well liner access if needed. Remove a few fasteners on the wheel-well liner or lower splash shield to reach behind the bumper.
- Locate the headlight washer assembly. You’re looking for a small cylinder/nozzle unit near the headlight area behind the bumper. If you see a washer hose routed to it, you’re in the right neighborhood.
- Support the nozzle and release the cover. From behind, you can often squeeze tabs more easily and support the nozzle body while removing/installing the cover. This prevents you from stressing the mechanism.
- If you disconnect a washer hose, plug it. Washer fluid can drain quickly. If you must disconnect a hose, clamp it or plug it temporarily so you don’t turn your garage floor into a “mystery slippery zone.”
- Reassemble and test. Reinstall fasteners, liners, and any trim panels. Then test the washer function again.
Mini Checklist: A Proper Install Looks Like This
- The cover sits flush with the bumper and matches body lines.
- It doesn’t wiggle, rattle, or sit “proud” (sticking out).
- The washer nozzle extends/retracts smoothly without snagging.
- No leaks, no weird angles, no “it works if I poke it.”
Painting Tips for a Factory-Looking Match
If you bought a primed/unpainted headlight washer cover, painting it well is the difference between “nice repair” and “my bumper has a tiny mismatched Post-it note on it.”
Best practices
- Use your paint code. Your vehicle’s paint code is usually on a door jamb sticker, under the hood, or in the owner documentation.
- Follow the paint system. Many modern finishes use base coat + clear coat. Don’t skip clear unless the paint system is designed for it.
- Prep matters. Lightly scuff the primed part (if recommended by the paint you’re using), clean it, and avoid touching it with bare oily fingers.
- Thin coats win. Multiple light coats reduce runs and improve even coverage.
- Let it cure. Handling too soon leads to fingerprints, dents, or that “soft gummy edge” you’ll stare at forever.
If you want zero drama, a pre-painted cover can be worth itespecially on tricky colors where a rattle-can match is “close” in the same way that a housecat is “close” to a tiger.
Troubleshooting: When the New Cover Won’t Stay On
If your headlight washer cover replacement pops off again, don’t blame the universe yet. Work through these common causes:
Problem: The cover won’t click into place
- Wrong part (left/right or wrong bumper style). Some trims (sport/M package, different model years) use different covers.
- Broken nozzle-side bracket. If the receiving tabs are snapped, there’s nothing for the cover to grab.
- Debris in the mounting area. Road grit can prevent full seating.
Problem: The cover installs, but it sits crooked or sticks out
- Tabs are misaligned. Remove and reinstall carefullydon’t force it at an angle.
- Washer nozzle isn’t centered. If the nozzle mechanism is bent or shifted, the cover won’t sit flush.
- Bumper alignment issues. If the bumper was previously removed or bumped, panel alignment can affect fit.
Problem: The cover pops off during washer activation
- Cover not fully seated. It should be secure before testing.
- Clips/tabs are weak (aftermarket variance). Some aftermarket parts fit fine; others fit “fine-ish.”
- Mechanism sticks. A sticky actuator can yank on the cover during movement.
Problem: Washer fluid leaks after the repair
- Hose connection disturbed. If you accessed from behind, recheck clamps and hose seating.
- Cracked nozzle body. If the cover was ripped off violently, the nozzle assembly can crack too.
- Grommets and seals. Some systems use grommets that can age and leakworth inspecting if fluid disappears quickly.
Time, Cost, and When to Call a Pro
How long does it take?
- Easy install (Method A): 10–30 minutes.
- Access-from-behind (Method B): 45–120 minutes depending on fasteners, liners, and how cooperative your car feels that day.
How much does it cost?
- Primed/unpainted cover: usually the cheapest option.
- Pre-painted cover: typically more expensive but saves time and hassle.
- If the mechanism is broken: you may need additional parts (brackets, nozzles, or actuator components).
When to call a professional
- You can’t get the nozzle to extend reliably (system issue, pump issue, electrical/fuse issue).
- The nozzle assembly is damaged or leaking and requires bumper removal.
- You need an exact paint match and don’t want to gamble on DIY paint.
- Your bumper has advanced-level fasteners that require specialized tools (or patience you don’t currently possess).
FAQ
Do I need to remove the bumper to replace a headlight washer cover?
Not always. Many vehicles allow replacement with the nozzle extended (Method A). If the cover attaches to hardware that’s only accessible from behindor if tabs are hard to reachyou may need partial access through the wheel-well liner or underside (Method B).
Why are so many headlight washer covers sold primed or unpainted?
Because paint matching is finicky. Selling the cover primed lets you paint it to match your specific color and finish. It also reduces SKU complexity for retailers.
Will aftermarket covers fit as well as OEM?
Sometimes yes, sometimes “mostly.” If you want the best chance at perfect clip tension and fit, OEM is the safe bet. Aftermarket can be great, but inspect the tabs and seating carefully before trusting it with high-pressure washer action.
My headlight washers don’t activate every time. Is that normal?
On many vehicles, the system is programmed not to spray the headlights on every single windshield wash cycle. It may require headlights to be on and may operate intermittently to conserve washer fluid.
Real-World Experiences (The 500-Word “I’ve Been There” Section)
Let’s talk about the part nobody admits out loud: this job is small, but it has a talent for becoming a sitcom. The first time you replace a headlight washer cover, you think, “It’s a tiny cap. I could replace this with a confident nod.” Then the nozzle retracts the second you blink, and you’re left holding a new cover in one hand and your dignity in the other.
Here’s what usually happens in real driveways. You start by trying to pop the nozzle out by spraying the windshield washer. Nothing. You spray again. Still nothing. You spray a third time and realize your headlights are off. You turn them on, spray again, andsurpriseyour car launches a high-pressure washer jet that somehow targets the exact spot on your hoodie that will look like a suspicious stain for the rest of the day. That’s when you learn Lesson #1: wear gloves, and maybe don’t dress like you’re going to a photo shoot.
Lesson #2 is all about paint. Primed covers are totally normal, but they can feel like the auto parts store sold you an unfinished craft project. If your car is black or white, you can get away with a decent match more easily. If your car is a complex metallic color, though, you might paint it, step back, and realize it’s not “slightly different”it’s “a new shade that only exists in your garage.” The smartest move I’ve seen is treating paint choice like a convenience fee: pay more for a professionally painted cover when the color is tricky, or accept that DIY painting is part art, part patience, and part refusing to repaint it every time you notice it in sunlight.
Lesson #3: protect your bumper like it’s your phone screen. Painter’s tape around the opening is cheap insurance. A plastic trim tool is your best friend. A metal screwdriver is your worst influencethe friend who says “Do it, it’ll be fine,” right before you scratch the clear coat. And if you do need to pry, use a microfiber towel as a buffer. Your future self will thank you.
Lesson #4 is about “why it fell off in the first place.” If your last cover vanished during a car wash, don’t assume the universe hates you. Often the retaining tabs are already cracked, so the first strong push of water (or icy slush) finishes the job. When installing the new cover, check the nozzle-side bracket carefully. If it’s damaged, replace that hardware too. Otherwise, you’re basically taping a hat to a pogo stick and acting surprised when it flies away.
And finally: take a victory lap. When the cover sits flush, the nozzle pops out smoothly, and everything retracts like it came from the factory, you’ll feel an unreasonable level of pride for a piece of plastic smaller than a credit card. That’s the magic of DIY car repair: tiny fix, huge satisfaction, and a great story the next time someone says, “Wait… your headlights have washers?”


