
Table of Contents >> Show >> Hide
- Before You Start: The “Don’t Regret This Later” Checklist
- Tools and Materials
- How a Chain Link Fence Is Put Together (So You Can Take It Apart)
- Step-by-Step: Removing a Chain Link Fence
- Step 1: Set up a safe work zone
- Step 2: Remove gates first (if you have them)
- Step 3: Free the fence fabric (mesh)
- Step 4: Remove the top rail and remaining hardware
- Step 5: Remove line posts (the easier posts)
- Step 6: Remove terminal posts (corner/end/gate posts)
- Step 7: Stubborn concrete footingswhat actually works
- Step 8: The “last resort” optioncut the posts
- What to Do After the Fence Is Out
- Disposal and Recycling: The Responsible Exit Strategy
- Common Mistakes (So You Can Avoid Them Like a Pro)
- When to Hire a Pro Instead
- FAQ
- Real-World Experiences: What People Learn After Removing a Chain Link Fence (The Hard Way)
- Conclusion
Chain link fences are the “utility jeans” of the backyard: not glamorous, but they show up, do the job, and somehow survive everything from soccer balls to suspicious raccoons. Still, there comes a day when you need it gonemaybe you’re upgrading to privacy fencing, replacing rusted sections, regrading the yard, or you just want to stop explaining to guests why your fence leans like it’s avoiding commitment.
The good news: removing a chain link fence is a very doable DIY project if you plan it right. The bad news: it’s metal, it’s awkward, and it has a talent for poking you exactly where your gloves aren’t. This guide walks you through the process step-by-step, with options for stubborn posts, concrete footings, and safe cleanupso you can finish the job with fewer surprises (and fewer new words added to your vocabulary).
Before You Start: The “Don’t Regret This Later” Checklist
1) Confirm ownership, property lines, and rules
If the fence is on or near a property line, slow down before you start unbolting things like a backyard action hero. Shared boundary fences can involve neighbor agreements, HOA rules, and local code requirements. A quick check of your survey (or a call to your city/county building office) can save you from the world’s most annoying redo.
2) Call 811 before digging
Even if you think, “It’s just a fence post,” digging can hit buried utilities. Call 811 a few business days before you dig so utility lines can be marked. This is not the part where you wing it.
3) Plan your end game
- Reuse? If the mesh isn’t rusted out, you may be able to roll and store it for another project.
- Recycle? Many scrap yards accept steel fence components.
- Dispose? Concrete is heavy and often requires a landfill or recycling center that accepts it.
Tools and Materials
Must-haves (most fences)
- Work gloves (thickchain link loves fingerprints)
- Safety glasses
- Wrench/socket set (for tension bands and rail hardware)
- Pliers and wire cutters/bolt cutters (for ties and clips)
- Flathead screwdriver (helpful for prying stubborn clips)
- Shovel (digging around posts and footings)
- Wheelbarrow or tarp (for hauling dirt and debris)
Nice-to-haves (for faster or tougher removals)
- Reciprocating saw with a metal-cutting blade (for cutting rails/posts)
- Farm jack / post puller (for pulling posts and concrete plugs)
- Pickaxe or digging bar (for compacted soil)
- Sledgehammer and cold chisel (for breaking concrete)
- Demolition hammer (rental option for thick concrete)
- Spray paint or flags (to mark your work area and keep parts organized)
How a Chain Link Fence Is Put Together (So You Can Take It Apart)
Most chain link fences have a few main components:
- Fence fabric (the mesh itself)
- Top rail (horizontal pipe running across the top)
- Line posts (posts between corners/end posts)
- Terminal posts (corner/end/gate postsusually thicker and set in bigger concrete footings)
- Tension bar + tension bands (hardware at the ends that holds the mesh tight)
- Ties/clips (wire ties attaching mesh to the rail and posts)
- Bottom tension wire (optional, runs along the bottom to prevent lifting)
Your removal plan works best in the reverse order of installation: detach the fabric, remove the rails and hardware, then deal with posts and concrete.
Step-by-Step: Removing a Chain Link Fence
Step 1: Set up a safe work zone
- Wear gloves and safety glasses (cut wire ends and flying concrete chips are not friendly).
- Clear plants, debris, and clutter along the fence line.
- If kids/pets exist, relocate thempreferably indoors with snacks.
- Stage a “parts area” so you don’t lose bolts and clamps in the grass.
Step 2: Remove gates first (if you have them)
Gates are heavy and awkward, but they’re usually simple: unbolt the hinges or lift the gate off hinge pins (depending on your hardware). Set the gate aside on a tarp so it doesn’t become a surprise trip hazard.
Step 3: Free the fence fabric (mesh)
You have two main ways to detach the mesh. Choose based on whether you want to reuse it or just remove it quickly.
Option A: “Cleaner” removal (best if reusing the mesh)
- Start at a terminal post (end or corner). Look for the vertical tension bar running through the mesh at the end.
- Unbolt the tension bands holding the tension bar to the post. Keep bolts together in a container.
- Slide out the tension bar to release the mesh end.
- Remove ties along the top rail and line posts as you go (pliers/wire cutters help).
- Roll the mesh into a tight cylinder. Tie it off with leftover wire ties so it doesn’t “unroll itself” the second you blink.
Option B: “Get it gone” removal (fastest)
- Cut the wire ties/clips connecting mesh to posts and the top rail.
- Pull the fabric free in sections.
- Roll as you go. (Trying to roll it at the end is how you earn a long evening of wrestling galvanized spaghetti.)
Bottom tension wire tip: If your fence has a wire running along the bottom, cut it near a terminal post and pull it free as you remove the mesh. It may be threaded through the fabric or attached with clips.
Step 4: Remove the top rail and remaining hardware
- Loosen rail ends and clamps at terminal posts. You’ll usually find brace bands and rail end cups.
- Slide the top rail out from the line post loops/collars. Many rails come out in sections.
- If the rail won’t slide (rust happens), cut it into manageable lengths with a reciprocating saw and metal blade.
Step 5: Remove line posts (the easier posts)
Line posts are typically set in smaller concrete footings than corner/end/gate posts. You’ve got three practical approaches:
Method 1: Dig and rock (classic DIY)
- Dig around the post until you expose the concrete plug.
- Rock the post back and forth to loosen soil.
- Lift the post and concrete plug out together if it breaks free.
Method 2: Use a jack or post puller (faster, less back drama)
- Dig enough to expose part of the concrete footing.
- Wrap a chain around the post (or the concrete plug if accessible).
- Use the jack/post puller to lift the post upward gradually.
- Reset the jack as needed until the post and footing come free.
Method 3: Water assist (for posts with little/no concrete)
If posts aren’t heavily concreted, saturating the soil can help. Loosen the dirt with a digging bar, flood the area, and work the post loose with steady movement. This is messybut sometimes effective.
Step 6: Remove terminal posts (corner/end/gate posts)
Terminal posts are the “boss level” because they anchor tension. They’re often thicker and set deeper with larger footings.
- Best option: jack/post puller after digging around the footing.
- If the footing is huge: break it up with a sledgehammer and cold chisel after exposing it.
- If it’s near concrete slabs (driveway/sidewalk): be carefulfootings may be tied into or poured adjacent to hardscape, making removal tougher.
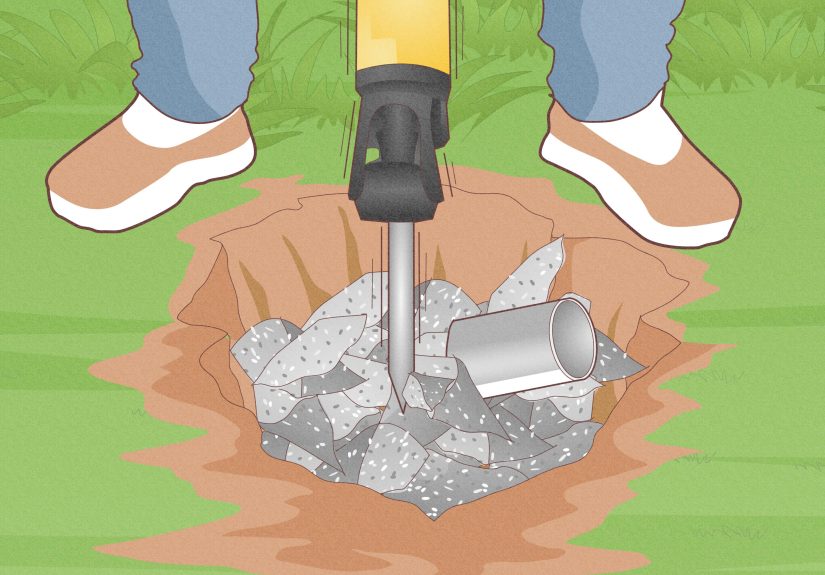
Step 7: Stubborn concrete footingswhat actually works
Concrete removal goes smoother when you remove soil support first. The more you can dig around/under the footing, the easier it is to crack, pry, or lift.
- Dig a perimeter trench: going 6–8 inches around the footing helps free the plug.
- Break in controlled pieces: use a chisel to create fracture points, then strike with a sledgehammer.
- For thick concrete: consider renting a demolition hammer (more control than a full jackhammer for many homeowners).
Step 8: The “last resort” optioncut the posts
Sometimes you hit a post that is basically married to the earth. If you truly cannot remove it, you can cut it as low as possible and deal with the stump safely (cover it, remove sharp edges, and consider whether local rules allow leaving concrete in place). This is not ideal if you’re planting, regrading, or installing a new fence, but it can be a practical fallback in specific situations.
What to Do After the Fence Is Out
Fill holes properly (so your lawn doesn’t become a surprise ankle test)
- Remove loose concrete chunks and scrap metal from the hole.
- Backfill with soil in layers, tamping each layer to reduce settling.
- If drainage is a concern, add a small amount of gravel near the bottom first.
- Top with soil, then seed/sod to match the lawn.
Clean and sort materials for disposal or recycling
- Metal (mesh, rails, posts): bundle and recycle if possible.
- Concrete: plan transportconcrete is heavy and not usually accepted in curbside pickup.
- Hardware: collect bolts/bands in a bucket so they don’t become lawnmower confetti later.
Disposal and Recycling: The Responsible Exit Strategy
Chain link fences are mostly steel and generally recyclable. Concrete disposal is more location-specific, and many recycling centers require “clean” concrete (no metal). Call your local facilities before loading the truckthis can save you a wasted trip and a bad mood.
Quick disposal tips
- Roll mesh tightly and tie it off so it’s safe to transport.
- Cut long rails into shorter sections if needed for your vehicle.
- Don’t overload your vehicle with concreteweight adds up fast.
Common Mistakes (So You Can Avoid Them Like a Pro)
- Not rolling the mesh as you go: it becomes a snarled monster.
- Skipping safety gear: wire ends and concrete chips don’t care about your weekend plans.
- Ignoring 811: “It’ll probably be fine” is not a utility safety strategy.
- Removing terminal posts too early: keep anchor points until the mesh/rails are detached.
- No disposal plan: a pile of fence parts is not a minimalist yard feature.
When to Hire a Pro Instead
DIY is greatuntil it isn’t. Consider professional help if:
- Posts are set in massive footings or tied into concrete slabs.
- You’re dealing with long fence runs and limited tools/transport.
- The fence borders a tricky property line or you’re unsure about ownership.
- You need same-day removal and hauling (especially for concrete).
FAQ
Can I remove a chain link fence without removing the concrete?
Sometimes, but it depends on your goals. If you’re installing a new fence in the same line, you’ll usually want the concrete out. If you’re just clearing the yard and the footings are deep, some homeowners choose to cut posts and leave footings buriedthough it can interfere with future landscaping and may not be allowed in all situations.
What’s the fastest way to pull posts?
A farm jack or post puller is often the best combo of speed and leverage, especially after you dig enough to expose the footing. It reduces the “shovel marathon” and can make larger posts manageable.
Do I need a permit to remove a fence?
Rules vary widely. Many places focus permitting on installation/replacement, but if you’re removing and replacingor changing height/material/placement you may need approvals. If you have an HOA, you may also need permission before changes along visible or boundary lines.
Real-World Experiences: What People Learn After Removing a Chain Link Fence (The Hard Way)
Here’s the part no one tells you in a 60-second “watch me do this in flip-flops” video: chain link fence removal is less about brute strength and more about managing awkward materials, surprise concrete, and the psychology of patience. Homeowners who’ve done this job tend to share the same lessonsusually right after they’ve finished (and right before they swear they’ll never do it again… until the next project).
One common experience is realizing the mesh has a mind of its own. People often start out thinking they’ll just “pull it down” and toss it into a pile. Then the fabric catches on a post, springs back, and turns into a shiny metal tumbleweed that refuses to be contained. The fix is simpleroll it as you go and tie it offbut it’s amazing how many DIYers learn that only after the mesh has tried to re-enact a wrestling match in the yard.
Another frequent surprise: not all concrete footings are created equal. Two posts might pop out with a little digging, while the third is set in a concrete plug that feels like it was poured by someone training for a pyramid-building competition. This is where people start to “negotiate” with the earth: soak the soil, dig a wider ring, rock the post in tiny increments, andwhen the footing still won’t movebring in leverage (jack/post puller) or switch tactics to breaking the concrete into manageable chunks. The big takeaway is that changing methods isn’t failure; it’s strategy.
Many homeowners also discover that the job is easier with a system. The best DIY stories include little process hacks: keeping a bucket for bolts and bands, stacking rails in one direction, rolling mesh into uniform bundles, and setting a “finished parts” zone so the yard doesn’t become a metal obstacle course. It’s not glamorous, but it’s the difference between “project” and “ongoing backyard situation.”
Safety “aha” moments show up in almost every retelling. People remember the first time a cut wire end snags a sleeve, or a concrete chip flies when a sledgehammer hits just right. After that, gloves and eye protection stop feeling optional and start feeling like the price of admission. There’s also the lesson about pacing: fence removal is repetitive work, and fatigue leads to sloppy handlingespecially when carrying rails or wrestling posts out of holes. The smart approach is frequent breaks, steady motion, and not trying to do the entire fence in one heroic sprint.
Finally, the most universal experience is disposal reality. It’s easy to underestimate how much space a “simple fence” takes once it’s off the property. Rolled mesh is bulky, posts are long, and concrete is heavy enough to make you question your vehicle’s suspension. People who plan ahead (calling a recycler, checking local rules, arranging a trailer or pickup help) finish the project with relief. People who don’t plan… end up with a pile that sits for a week while they figure out where, exactly, one takes “a hundred pounds of concrete chunks” on a Tuesday.
The good news? Nearly everyone ends up glad they did it. Removing a chain link fence opens up the yard, clears space for landscaping, and makes upgrades possible. And once you’ve done it, you’ve earned a very specific kind of DIY confidence: the kind that says, “Yes, I can do hard things and I also know when to rent the right tool.”
Conclusion
Removing a chain link fence is a project that rewards planning, patience, and the right amount of leverage. Start by confirming rules and safety steps, detach and roll the fabric, remove rails and hardware, then tackle posts using the method that matches your soil and concrete situation. Finish strong with proper backfilling and a disposal plan that keeps your yard (and vehicle) from turning into a scrap metal museum.
Whether you’re clearing space for a new fence or reclaiming your backyard’s vibe, the goal is the same: remove it safely, cleanly, and with fewer surprises than your average home improvement weekend.


