Table of Contents >> Show >> Hide
- Why Container Bulbs Are So Good at Showing Off
- The Secret to Continuous Spring Blooms: Layer by Bloom Time
- Best Bulbs for Layered Spring Containers
- What You Need Before You Plant
- How to Plant Bulbs in Containers Step by Step
- Sample Bulb Layering Recipes for a Long Spring Show
- Where to Keep Potted Bulbs Over Winter
- Spring Care for the Best Bloom Sequence
- Common Mistakes That Cut the Show Short
- Design Tips for a Container That Looks Good the Whole Time
- Practical Experiences and Lessons Gardeners Learn Over Time
- Final Thoughts
Note: Copy-ready HTML body only. SEO JSON block is at the end.
If your patio, porch, balcony, or front steps look a little too much like a winter waiting room, container bulbs are the cheerful overachievers you need. Plant them in fall, tuck them in for winter, and they will burst into bloom in waves when spring arrives. Better yet, with the right bulb layering strategy, you do not have to settle for one dramatic week of flowers followed by a pot of green leaves and heartbreak. You can build a container that starts early, keeps going, and makes your neighbors wonder whether you secretly hired a garden stylist.
The trick is simple: choose bulbs with different bloom times, plant them in layers, use a container that drains well, and protect the pot through winter. Gardeners often call this the “lasagna planting” method, which sounds delicious, looks impressive, and thankfully does not require ricotta. Done well, it gives you continuous spring blooms from the first little pop of color to the final showy tulips or late daffodils.
Why Container Bulbs Are So Good at Showing Off
Spring-flowering bulbs are already built for drama. They store energy underground, root during cool weather, and then rocket upward when temperatures rise. In containers, they become even more flexible. You can place them by the front door, move them to the patio for peak bloom, and rotate fading pots out of sight before they become a public relations problem.
Containers are especially useful if you have poor garden soil, limited space, hungry squirrels, or a deep emotional resistance to digging large holes in chilly fall weather. They also make color planning easier. You are not committing to a whole border; you are curating a little spring performance in one portable spot.
The Secret to Continuous Spring Blooms: Layer by Bloom Time
If you plant one type of bulb in one pot, you get one bloom window. Lovely, yes. Long-lasting, not exactly. For a longer show, combine early, midseason, and late-blooming bulbs in the same container. Plant the biggest, latest bulbs deepest, then add soil and plant the next layer, then finish with the smallest and earliest bulbs closer to the top.
Think of it like a floral relay race:
Top Layer: Early Bloomers
Crocus, grape hyacinths, small irises, and other minor bulbs are great for the top layer. They wake up early, flower low and neat, and start the season with a burst of color when you are still emotionally recovering from winter.
Middle Layer: Midseason Performers
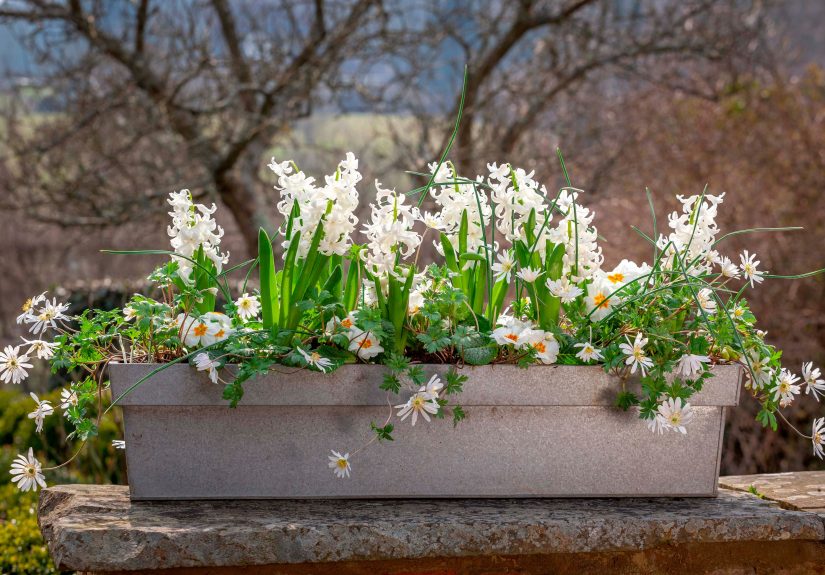
Hyacinths and miniature or midseason daffodils are excellent here. They bring fragrance, structure, and a stronger visual presence once the earliest blooms start to fade.
Bottom Layer: Late Spring Stars
Tulips and taller daffodils often go in the deepest layer. They need more rooting room and usually bloom later, so they finish the container with height, richer color, and a “yes, I absolutely meant to do this” look.
The goal is not to create a botanical traffic jam. It is to stack bloom times and plant sizes so each group gets enough room to grow while still delivering a long, seamless spring display.
Best Bulbs for Layered Spring Containers
Here are some of the most dependable choices for spring bulb containers:
For Early Spring
Crocus, snowdrops, grape hyacinths, and reticulata iris are excellent for the first wave. They are compact, cold-hardy, and perfect for the top portion of a layered pot.
For Mid-Spring
Hyacinths, miniature daffodils, and some early tulips step in next. These provide fragrance, fuller blooms, and stronger color saturation.
For Late Spring
Larger tulips, taller daffodils, and alliums can extend the show. Tulips are especially valuable if you want a grand finale, while daffodils tend to be more forgiving and reliable.
When choosing varieties, read the catalog or label carefully and pay attention to bloom season. “Early,” “mid,” and “late” matter more than flower color when your goal is continuous bloom. The smartest container in the world can still flower all at once if you choose a cast of bulbs that shares the same schedule.
What You Need Before You Plant
Before you start arranging your bulb masterpiece, gather the basics:
- A deep container with drainage holes
- Fresh, well-draining potting mix
- Bulbs in a mix of early, midseason, and late bloom times
- A hand trowel
- A watering can
- Optional top dressing such as gravel, shredded leaves, or evergreen boughs
Choose a container that is deep enough for multiple layers. A shallow pot can still hold one layer beautifully, but if you want a continuous spring bloom parade, deeper is better. Also, skip heavy garden soil. In containers, it compacts too easily, drains poorly, and turns your bulbs’ cozy winter home into a swampy regret.
How to Plant Bulbs in Containers Step by Step
1. Start With the Right Pot
Drainage is non-negotiable. Bulbs hate sitting in soggy soil. If water cannot escape, your carefully chosen bulbs may rot before they ever get the chance to wow you. A pot made of plastic, resin, glazed ceramic, or other frost-tolerant material is often easier to manage through winter than fragile clay.
2. Add Potting Mix to the Bottom
Fill the container with enough potting mix so the lowest layer of bulbs will sit at an appropriate depth. The biggest bulbs go first, because they need the most room below and above them.
3. Place the Largest Bulbs
Set tulips or larger daffodils pointy side up, root plate down. Space them closely for a full display. Container bulbs can be planted much tighter than bulbs in the ground because you are aiming for a concentrated show, not a long-term colony.
4. Cover With More Potting Mix
Add another layer of mix, enough to separate the first layer from the second. You do not need a huge gap, but you do want enough room so the bulbs are not directly stacked nose-to-nose like commuters on a packed train.
5. Add the Middle Layer
Place hyacinths or midseason daffodils over the next soil layer. Shift them slightly so they sit in the spaces between the bulbs below, not directly on top.
6. Finish With the Smallest Bulbs
Add another layer of potting mix, then place crocus, grape hyacinths, or other smaller bulbs near the top. These can be planted quite close together because they stay small and bloom early.
7. Top Off the Pot
Fill the container with potting mix until the bulbs are covered and the soil sits just below the rim. Leaving a little lip at the top makes watering easier and prevents potting mix from washing out every time you irrigate.
8. Water Thoroughly
After planting, water the pot well so the mix settles around the bulbs and root growth can begin. The soil should be moist, not waterlogged. Think “wrung-out sponge,” not “mini rice paddy.”
Sample Bulb Layering Recipes for a Long Spring Show
Classic Color Sequence
Top: Crocus
Middle: Mini daffodils
Bottom: Tulips
This is one of the easiest and most effective combinations. Crocus opens first, miniature daffodils take over next, and tulips close the season with a strong finish.
Fragrant Spring Pot
Top: Grape hyacinths
Middle: Hyacinths
Bottom: Late tulips
This combination adds serious scent along with staggered bloom. Put it near a walkway, porch, or sitting area where you can actually enjoy the fragrance instead of making the mailbox smell nice.
Reliable and Low-Fuss Mix
Top: Minor bulbs such as crocus or muscari
Middle: Dwarf daffodils
Bottom: Standard daffodils
If you want fewer diva moments, lean more heavily on daffodils. They are often more dependable than tulips, especially in challenging climates.
Where to Keep Potted Bulbs Over Winter
Once planted, your bulbs need cold conditions but also protection from repeated freeze-thaw stress. That is the tricky part with containers. Bulbs planted in the ground get natural insulation from surrounding soil. Bulbs in pots are more exposed.
In mild to moderate climates, you can often keep the container outdoors in a sheltered spot. In colder regions, many gardeners protect pots by clustering them together, surrounding them with mulch, placing them in an unheated garage, burying nursery pots in the ground temporarily, or moving them into another cold but protected space.
The goal is simple: keep the bulbs cold enough to stay on schedule, but protect the root zone from wild temperature swings and deep freezing. If you are using decorative containers, it can be smart to plant the bulbs in plain nursery pots first, overwinter those in a protected area, and then slip them into prettier containers when shoots appear in late winter or early spring.
Spring Care for the Best Bloom Sequence
Move Pots Into View at the Right Time
As soon as you see shoots emerging, start checking the container more often. Move it into its display position when the growth is visible but before the flowers fully open. That way, the pot looks intentional instead of like a last-minute relocation program.
Keep Soil Evenly Moist
As temperatures warm and top growth increases, potted bulbs dry out faster. Water when the potting mix begins to dry, but do not keep it constantly wet.
Give Them Sun
Most spring bulbs bloom best with bright light. A sunny or lightly shaded location usually works well, especially once buds begin to form.
Do Not Remove Green Foliage Too Early
This is the part gardeners hate because it is less glamorous. After flowering, the leaves keep working, sending energy back into the bulb. Let the foliage yellow naturally before cutting it away. If you remove it too early, you are essentially canceling next year’s savings account.
Common Mistakes That Cut the Show Short
Using a Pot Without Drainage
Nothing ruins spring faster than a wet, rotting bulb situation. Always prioritize drainage.
Choosing Bulbs That Bloom at the Same Time
If all your bulbs are early bloomers, you will get a spectacular but brief show. Mix bloom windows for a longer season.
Planting Too Shallow
Bulbs planted too close to the surface may perform poorly, flop, or suffer more winter damage. Even in containers, depth still matters.
Overwatering in Winter
Bulbs need moisture, but they do not want to marinate. Cold, soaked potting mix is a fast route to rot.
Forgetting About Overwinter Protection
A pot left fully exposed in the coldest weather may not provide enough insulation for bulbs to survive well, especially in smaller containers.
Design Tips for a Container That Looks Good the Whole Time
Continuous bloom is not only about plant timing. It is also about appearance between bloom waves. Tuck pansies, violas, or trailing ivy on top of the pot after bulbs are planted if your climate allows. These companions can keep the container looking lively while bulbs are still underground or between flushes of bloom.
You can also coordinate flower color with container color. Cool-toned containers make pinks, purples, and blues feel elegant. Warm terracotta or bronze pots make yellows, oranges, and reds feel richer. Or ignore all design advice and plant whatever makes you happy. The bulbs will not complain.
Practical Experiences and Lessons Gardeners Learn Over Time
Gardeners who grow bulbs in containers for several seasons usually report the same interesting pattern: the first year is all enthusiasm, the second year is all refinement, and by the third year they suddenly have Opinions. Very strong opinions. Usually about drainage, pot size, and whether tulips are worth the emotional investment.
One of the most common experiences is underestimating how tightly bulbs can be planted in a pot. In the ground, you leave generous spacing because you expect the planting to live there for a long time. In containers, the goal is different. You want an abundant display, so the bulbs can sit much closer together. Many new gardeners are too polite with spacing the first time and end up with a pot that blooms beautifully but looks a little sparse, like it is still waiting for half its guests to arrive. The next season, they pack bulbs more confidently and finally get that full, lush look.
Another common lesson involves container depth. Shallow bowls are gorgeous in theory, but deep pots are usually easier for layered plantings. Gardeners often discover that a deeper container gives them more freedom with bloom timing, bulb choice, and overall design. It is hard to stage a long spring sequence in a pot that barely has enough room for one layer and a hopeful attitude.
Weather also teaches fast. In cold climates, many gardeners learn that an exposed pot on a windy deck is not the same as a protected pot near the house or in an unheated garage. Bulbs may be hardy, but roots in containers are more vulnerable than roots in the ground. That realization often changes everything. People begin grouping pots together, mulching around nursery containers, or using protected storage areas. The result is usually better survival and more consistent bloom the following spring.
There is also the great foliage lesson. Nearly everyone wants to tidy up too soon after the flowers fade. The container had its moment, the show is over, and suddenly those leaves look like they are overstaying their welcome. But experienced gardeners learn patience here. Letting the leaves yellow naturally really does matter. It is not glamorous, but it pays off. Many gardeners solve the aesthetic problem by moving the pot to a less prominent spot for a few weeks or slipping another shallow container in front of it while the foliage finishes its work.
Perhaps the best experience-related insight is how much easier spring feels when the work was done in fall. There is something deeply satisfying about seeing blooms emerge from a container you planted months earlier, especially when everything else is still waking up. It feels efficient, optimistic, and just a little smug in the best possible way. The garden world is full of unpredictable variables, but a thoughtfully layered bulb container gives you one of the most reliable spring rewards around.
And once gardeners experience that sequence of crocus, then daffodils, then tulips rising from one pot, they rarely go back to single-layer planting. The effect is too good. It turns one container into a whole season. It proves that small-space gardening can still feel abundant. And it offers a gentle reminder that the best spring displays do not happen by accident. They happen because someone, sometime in fall, filled a pot with soil, tucked in a pile of bulbs, and believed that future color was worth planning for.
Final Thoughts
If you want continuous spring blooms in containers, do not just plant bulbs. Choreograph them. Choose a deep pot, use a free-draining mix, layer bulbs by size and bloom season, protect the container through winter, and let the foliage finish naturally after bloom. That one strategy turns a simple container into a spring-long performance.
Best of all, it works whether you garden on a suburban porch, a city balcony, or a tiny patio with room for exactly one excellent pot. Start with one layered container this fall. When spring arrives in rolling waves of color, fragrance, and smug personal satisfaction, you will understand why so many gardeners become completely devoted to the method.