
Table of Contents >> Show >> Hide
- What Makes Ojibwe Style Frybread Distinct?
- Ingredients for Ojibwe Style Frybread
- Step-by-Step: How to Make Ojibwe Style Frybread
- How to Tell If Your Frybread Is Right
- Common Frybread Mistakes and How to Fix Them
- Best Ways to Serve Ojibwe Style Frybread
- The History Behind the Bread
- Why This Recipe Works
- Extended Reflections: The Experience of Making Ojibwe Style Frybread
There are recipes that politely ask for your attention, and then there are recipes like frybread, which show up warm, golden, slightly dramatic, and smelling so good that people begin orbiting the kitchen like hungry moons. Ojibwe style frybread belongs in that second category. It is simple food made from basic pantry ingredients, yet it carries history, memory, and family rhythm in every puffed, crispy edge.
If you are here to learn how to make Ojibwe style frybread, the first thing to know is that there is no single official version stamped somewhere in flour dust by the Frybread Police. Ojibwe families, Anishinaabe communities, and Native households across regions make breads in slightly different ways. Some recipes use milk, some use water, some add a touch of sugar, some keep it savory, and some let the dough rest longer than your last group project. What matters most is understanding the method, respecting the story behind the food, and making a batch that comes out tender inside, crisp outside, and deeply satisfying.
What Makes Ojibwe Style Frybread Distinct?
Ojibwe style frybread is best understood as a family-and-community style of bread rather than a rigid formula. In Great Lakes Native food traditions, bread can show up in more than one form. Some families make frybread, while others also make bannock, which is related but not exactly the same thing. That distinction matters. Bannock is often baked or cooked differently, while frybread is flattened and fried until it turns golden and airy.
So when people talk about Ojibwe style frybread, they are usually talking about a practical, adaptable bread made from flour, baking powder, salt, and liquid, then fried in hot oil or shortening. It is often served with savory dishes, sweet toppings, or simply eaten plain while still warm, which is a perfectly respectable life choice.
It is also important to be honest about the history. Frybread is widely loved in Native communities, but it is not a pre-colonial relic from some imaginary untouched past. It emerged from hardship, displacement, ration ingredients, and survival. That complexity is part of what gives frybread its emotional weight. It is comforting food, but it also tells a hard story.
Ingredients for Ojibwe Style Frybread
The Core Dough
- 3 cups all-purpose flour
- 3 teaspoons baking powder
- 1 teaspoon salt
- 2 teaspoons sugar, optional
- 1 cup milk or warm water, plus a little more if needed
- 1 tablespoon neutral oil, optional for a softer dough
- Oil or shortening for frying
This ingredient list is a practical middle ground based on several real recipe patterns. Some Ojibwe recipes use milk, some use water, and some add a little sugar. Milk tends to give a slightly richer bite, while water keeps things simple and classic. Either one works.
Optional Toppings and Pairings
- Honey or maple syrup
- Berry sauce or jam
- Cinnamon sugar
- Venison stew, chili, or bean topping
- Soup, fish, or wild rice dishes
In other words, frybread is wonderfully flexible. It can show up beside dinner, under taco-style toppings, or at the dessert end of the table wearing a honey drizzle like it knows it looks good.
Step-by-Step: How to Make Ojibwe Style Frybread
1. Mix the Dry Ingredients
In a large bowl, whisk together the flour, baking powder, salt, and optional sugar. This step looks boring, but it matters. You want the baking powder and salt evenly distributed so every piece fries up properly instead of giving you one heroic puff and three sad flat cousins.
2. Add the Liquid
Pour in the milk or warm water. If you are using the tablespoon of oil, add that now too. Stir until a rough dough forms. The dough should feel soft and workable, not soupy and not dry enough to fight back. If it looks too shaggy, add a tablespoon of liquid at a time. If it is sticky enough to cling to your fingers like a needy housecat, dust in a little more flour.
3. Knead Lightly
Turn the dough onto a lightly floured surface or keep it in the bowl and knead gently for a minute or two. This is not sandwich bread, so do not overwork it. You are not training for an arm-wrestling tournament. You just want the dough to come together until it feels soft, smooth enough, and slightly springy.
4. Let It Rest
Cover the dough with a clean towel and let it rest for 15 to 30 minutes. Some cooks rest it longer, and some family recipes give it an hour or more. A rest helps the dough relax, which makes shaping easier and the final texture better. It is the culinary version of telling everybody to calm down before the real action starts.
5. Divide and Shape
Pinch off 6 to 8 equal pieces and roll them into balls. Flatten each one with your hands or a rolling pin until it is about 1/4 inch thick. Some cooks like a small hole or dimple in the center, which helps the dough fry more evenly and keeps it from ballooning in one dramatic spot.
The shape does not need to be perfect. In fact, slightly irregular frybread often looks more homemade and inviting. A perfect circle is nice, but delicious beats geometric every time.
6. Heat the Oil
Pour about 1 inch of oil into a heavy skillet or deep pan and heat it over medium to medium-high heat. You want the oil hot enough that a tiny scrap of dough sinks briefly, then rises and sizzles. If the oil is too cool, the bread will soak up grease. If it is too hot, the outside will brown before the inside is cooked. Frybread has standards.
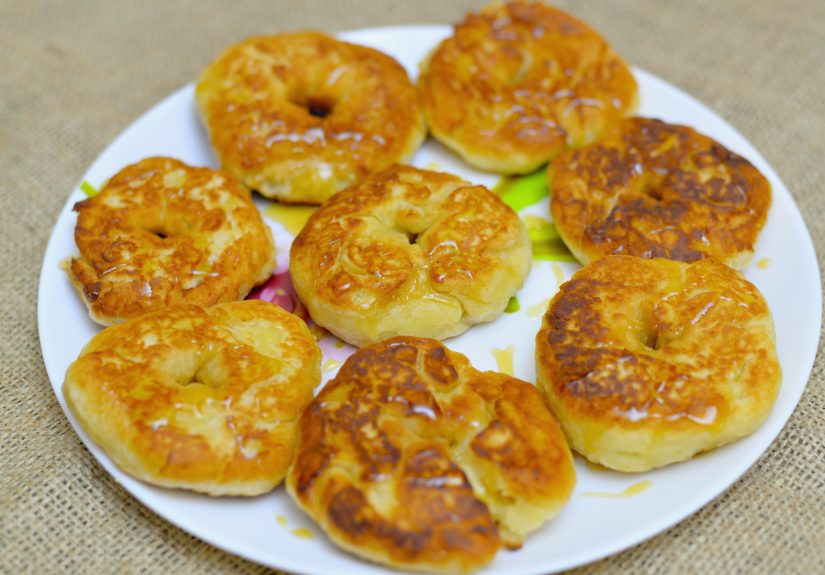
7. Fry Until Golden
Carefully slide one or two pieces of dough into the hot oil. Do not crowd the pan. Fry each piece for about 2 to 3 minutes per side, turning once, until golden brown with bubbles and puffed spots. The outside should look crisp and lightly blistered, while the inside stays tender.
Transfer the cooked bread to a paper towel-lined plate or rack. Serve warm. This is not one of those foods that improves by waiting around for a formal invitation.
How to Tell If Your Frybread Is Right
Good Ojibwe style frybread should be golden, flexible, and cooked through, with a crisp exterior and a soft center. It should not taste raw in the middle, and it should not feel heavy with oil. When you tear a piece open, you want steam, tenderness, and the immediate urge to tear off another piece before anyone else gets ideas.
Common Frybread Mistakes and How to Fix Them
It Turned Out Greasy
Your oil was probably too cool. Raise the heat slightly and test again with a scrap of dough.
It Browned Too Fast
Your oil was too hot. Lower the heat and give the pan a minute to settle down before frying the next round.
It Was Tough
You may have over-kneaded the dough or added too much flour. Frybread dough should stay soft.
It Was Doughy in the Middle
The rounds may have been too thick, or the oil may have been too hot. Flatten a little more next time and cook at a steadier temperature.
It Did Not Puff Much
That can happen if the dough was too dry, the baking powder was old, or the bread was not given enough rest. Even so, flat frybread can still taste excellent, so this is not a tragedy. It is just a crunchy detour.
Best Ways to Serve Ojibwe Style Frybread
The beauty of frybread is that it can go in a dozen directions without complaining. For a sweet version, drizzle it with honey, maple syrup, or berry sauce. For a savory meal, serve it with venison stew, chili, beans, or soup. In some homes, frybread is the side that disappears first, which is always a strong endorsement.
If you want a Great Lakes-inspired serving idea, try it alongside fish, wild rice soup, or a berry topping. That combination feels hearty, practical, and grounded in the flavors many people associate with northern Native kitchens. It also tastes fantastic, which remains an underrated culinary achievement.
The History Behind the Bread
No article about how to make Ojibwe style frybread is complete without the history, because frybread is never just frybread. Across Native communities, it is often described as a food born from ration ingredients distributed after displacement and confinement. Flour, lard or shortening, salt, and sugar were not the foods that had sustained Native peoples for generations. They were replacement ingredients handed over during brutal political and social disruption.
That is why frybread can hold two truths at once. It is cherished and criticized. It can symbolize family, gatherings, generosity, adaptability, and survival. It can also remind people of colonial damage, nutritional change, and the loss of older foodways. Many Indigenous chefs today honor frybread while also encouraging people to rediscover pre-colonial Native foods such as corn, beans, squash, wild rice, fish, berries, and game.
That tension is not a contradiction. It is reality. A respectful recipe does not pretend otherwise.
Why This Recipe Works
This version works because it respects the common traits found across real recipes without pretending to be the one universal answer. The flour provides structure, baking powder creates lift, salt gives flavor, and the liquid brings the dough together. A short knead keeps the bread tender, a rest makes shaping easier, and steady frying gives you that classic contrast between crisp outside and soft inside.
It is approachable enough for beginners and flexible enough for experienced cooks who already have a favorite trick, a seasoned cast-iron pan, or an auntie-level instinct for when the dough “just looks right.”
Extended Reflections: The Experience of Making Ojibwe Style Frybread
Making Ojibwe style frybread at home is one of those kitchen experiences that starts out looking almost too simple. You glance at the ingredient list and think, “That’s it?” Flour, baking powder, salt, liquid, and hot oil do not exactly sound like the cast of a blockbuster. But then the dough comes together in your hands, soft and warm and a little imperfect, and suddenly the whole thing feels less like a recipe and more like a rhythm.
The first real surprise is how physical the process is. You are not just measuring and dumping. You are feeling whether the dough is too dry, too sticky, or just right. You are learning when to stop kneading before it gets tough. You are shaping each piece by hand, which means every round comes out slightly different. One is almost circular, one looks like a lopsided state, and one somehow resembles a cloud that has seen things. That irregularity is part of the charm. It reminds you that handmade food is supposed to look alive.
Then comes the moment the dough hits the oil. That soft sizzle is the sound of the recipe becoming real. The surface blisters, the center puffs, and the kitchen starts smelling rich and toasty in a way that makes people wander in and ask casually what you are making, even though they are obviously here to sample the evidence. Frybread has that effect. It turns bystanders into “quality control.”
Another experience many cooks have is that the first piece is rarely the prettiest. It is the test piece, the scout, the brave little pancake that teaches you whether the oil is too hot or too cool. Maybe it browns too fast. Maybe it soaks a little too much oil. Maybe it comes out absolutely perfect and gives you dangerous confidence. Either way, that first round teaches you more than a paragraph of instructions ever could.
There is also something deeply communal about frybread. Even when you make it alone, it feels like food that belongs with people. It begs to be stacked on a plate, passed around, torn open, topped, shared, talked over. It is the kind of bread that makes a table feel busy in the best possible way. Someone wants honey. Someone wants chili. Someone insists the best piece is the one with the giant bubble. Someone else is already eating the “ugly” one over the sink before dinner officially starts.
For many people, the experience of making frybread also opens up a more thoughtful response. Because once you learn even a little about the history, the bread stops being just a fun fried recipe and becomes a conversation about resilience. You begin to understand why so many people speak about it with affection and complexity at the same time. That awareness does not take the comfort out of the food. It deepens it.
And maybe that is the most memorable part of all. Ojibwe style frybread is delicious, yes. It is crisp, warm, and wildly easy to keep eating, absolutely. But the experience of making it is bigger than taste. It teaches patience, observation, flexibility, and respect. It reminds you that some of the most meaningful foods are made from simple ingredients and hard histories, carried forward because people refused to let either memory or flavor disappear.
So when your batch is done, eat it warm. Share it if you are feeling generous. And if you are not feeling generous, at least pretend to be while quietly saving the best piece for yourself. That, too, is a time-honored kitchen instinct.


