
Table of Contents >> Show >> Hide
- Start Here: Decide Whether You Want a Temporary or Permanent Fix
- Tools You May Need
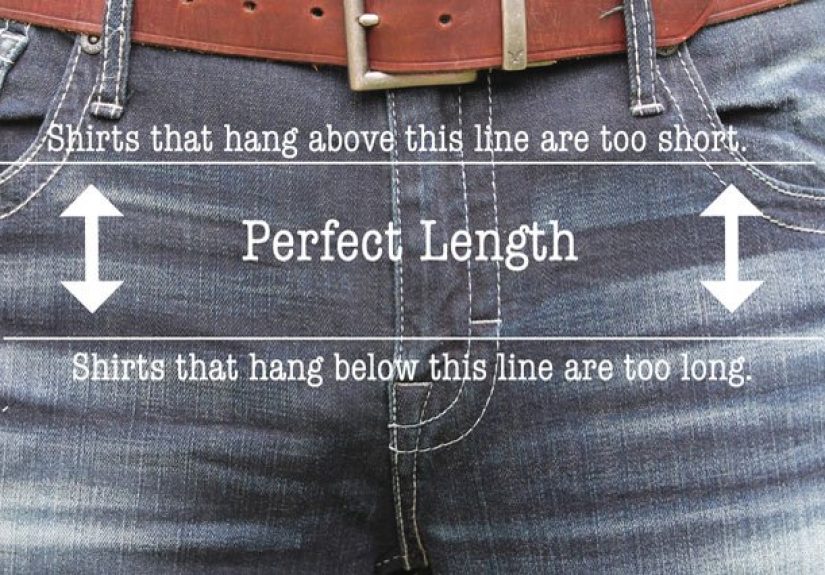
- How Much Shorter Should the Shirt Be?
- Method 1: The Easiest Ways to Make a Long Shirt Look Shorter Without Sewing
- Method 2: How to Make a Long Shirt Shorter With No Sewing
- Method 3: How to Shorten a Shirt by Hand Sewing
- Method 4: How to Shorten a Shirt With a Sewing Machine
- How to Shorten Different Types of Shirts
- Common Mistakes to Avoid
- Should You Hem It Yourself or Take It to a Tailor?
- Final Thoughts
- Real-Life Experiences With Making a Long Shirt Shorter
A shirt can be too long in a surprisingly rude number of ways. Sometimes it bunches over your jeans like it is trying to become a tunic. Sometimes it hits at the widest part of your hips and throws off your whole outfit. And sometimes it looks great everywhere else, but the hem says, “I was made for someone three inches taller and emotionally stronger.”
The good news is that shortening a shirt is absolutely doable at home. You do not need a fashion degree, a tailor on speed dial, or a mystical grandmother who can hem by candlelight. You just need the right method for the right shirt. A knit tee needs different handling than a crisp button-down. A curved shirttail behaves differently than a straight hem. And a permanent alteration is a very different decision from a quick “make this work for dinner tonight” fix.
In this guide, you will learn how to make a long shirt shorter in several ways: temporary styling tricks, no-sew hemming, hand-sewing, and machine sewing. You will also learn how to avoid the classic mistakes that turn a simple shirt alteration into a tiny textile tragedy. Whether you are working with an oversized T-shirt, a dress shirt, or a casual blouse, this step-by-step guide will help you shorten the hem cleanly and confidently.
Start Here: Decide Whether You Want a Temporary or Permanent Fix
Before you even touch scissors, answer one question: do you want the shirt to be shorter forever, or just for now?
Choose a temporary fix if:
You are testing a new length, you only need the shirt to work with one outfit, or you are nervous about cutting into perfectly decent fabric. A front tuck, side knot, hidden fold, or hem tape can save the day without committing you to anything dramatic.
Choose a permanent fix if:
You already know the shirt is too long every time you wear it, you want a cleaner silhouette, or the shirt deserves a proper hem that looks intentional instead of improvised in a parking lot.
A smart rule is this: test the length first, then cut later. Put the shirt on, stand in front of a mirror, and try folding the hem under until it hits where you want it. Move around. Sit down. Raise your arms. If the new length still looks right after all that, you are ready for the real alteration.
Tools You May Need
You do not need every sewing gadget on Earth. You just need a few practical basics:
- Measuring tape or ruler
- Fabric chalk or washable marker
- Sharp fabric scissors
- Straight pins or sewing clips
- Iron or steamer
- Needle and thread
- Sewing machine, if you are machine hemming
- Hem tape or fabric tape, if you want a no-sew method
If your shirt is knit, like a T-shirt or jersey top, a ballpoint needle and stretch-friendly thread setup can help. If your shirt is woven, like a dress shirt, standard sewing supplies usually do the trick.
How Much Shorter Should the Shirt Be?
This is where many people get cocky. Do not eyeball it and hope for the best. Shirts have a sneaky way of looking shorter once they are cut, pressed, and actually worn with real pants.
Try this easy method:
- Put the shirt on with the bottoms you actually plan to wear.
- Fold the hem under to your ideal length.
- Pin it evenly all the way around.
- Check the front, sides, and back in a mirror.
- Mark the fold line, then add hem allowance before cutting.
For most shirts, you will want to add about 1/2 inch to 1 inch for the hem allowance, depending on the fabric and finish. If you are doing a narrow hem on lightweight fabric, a smaller allowance works. If you are recreating a broader original hem, you may need a bit more.
And yes, always measure twice. The shirt is not going anywhere. Your regret might.
Method 1: The Easiest Ways to Make a Long Shirt Look Shorter Without Sewing
1. Do a front tuck or half tuck
If your shirt is only slightly too long, start here. A front tuck works especially well with jeans, trousers, and skirts with some waist definition. It shortens the visual line of the shirt without changing the garment at all.
2. Tie a side or front knot
This works best with soft, casual shirts that have enough extra fabric to knot comfortably. It gives the shirt a cropped, styled look and can add shape at the waist. It is especially handy for oversized tees and roomy button-downs.
3. Fold the hem under and secure it temporarily
If you want the shirt to appear shorter for a day, fold the hem to the inside and secure it with removable fashion tape or temporary hem tape. This is ideal when you need a quick fix for an outfit, a photo shoot, or a “why is this shirt suddenly so long?” emergency.
These temporary methods are perfect when you want zero commitment and maximum flexibility. They will not replace a proper shirt hem, but they can absolutely rescue an outfit in five minutes flat.
Method 2: How to Make a Long Shirt Shorter With No Sewing
If you want a cleaner result but do not want to sew, a no-sew hem is your best friend. This method works especially well on casual shirts, lightweight tops, and pieces you do not wear hard enough to stress the hem constantly.
Step 1: Mark the new shirt length
Put the shirt on, pin the desired length, then take it off and mark that line all the way across. Use a ruler so the line stays even.
Step 2: Add the hem allowance
Measure below your finished length and add enough extra fabric to fold under. For a simple double-fold hem, 1 inch total is common. Then cut off the excess fabric carefully.
Step 3: Fold and press
Fold the raw edge up once, then again, hiding the cut edge inside. Press the fold firmly with an iron. This step matters more than people think. Pressing is the difference between “clean alteration” and “why does this shirt look like it lost a fight?”
Step 4: Apply hem tape
Place the bonding strip or no-sew hem tape inside the fold according to the product directions. Press again to secure it. Let it cool completely before handling the shirt.
This method is fast, neat, and beginner-friendly. The downside is durability. No-sew hems are usually less sturdy than stitched hems, especially after repeated washing. But for casual wear or occasional use, they can work beautifully.
Method 3: How to Shorten a Shirt by Hand Sewing
Hand sewing takes longer, but it gives you more control and does not require a sewing machine. It is especially useful for delicate fabrics, curved hems, and people who own a needle but not a machine.
Step 1: Measure, mark, and cut
Mark your finished length, add your hem allowance, and trim the shirt evenly. If the hem is curved, take your time and cut slowly so the shape stays smooth.
Step 2: Fold the hem twice
Turn the raw edge to the inside, press it, then fold again and press once more. Pin or clip it in place.
Step 3: Sew using a blind stitch or catch stitch
If you want the stitches to be discreet on the outside, use a blind hem stitch. If the fabric needs a bit more flexibility, a catch stitch can be a great option. Keep your stitches small and even. Take only a few threads from the outer fabric so the stitching barely shows on the right side.
Step 4: Press the finished hem
Once you are done sewing, give the shirt one final press. This helps the new hem settle into place and look far more polished.
Hand sewing is slower, yes. But it is also wonderfully forgiving. You can stop, adjust, undo, and redo without the machine zooming ahead like an overexcited squirrel.
Method 4: How to Shorten a Shirt With a Sewing Machine
If you want the most durable and professional-looking result, machine sewing is the way to go. This is usually the best method for everyday shirts that will be washed often.
Step 1: Mark and trim
Measure the new hemline carefully, add the hem allowance, and cut off the extra length. Keep the cut smooth and even.
Step 2: Press a double-fold hem
Fold the raw edge under, press, then fold again and press. Pin it in place. For curved shirttails, smaller folds often behave better than one bulky fold.
Step 3: Stitch close to the inner folded edge
Sew slowly and keep your seam even all the way around. Backstitch at the beginning and end to secure the hem. If the shirt is narrow or awkward to maneuver, a free arm on your machine can make the job much easier.
Step 4: Press again
Yes, again. Sewing and pressing are basically roommates. One makes the seam; the other makes it look like you knew what you were doing.
How to Shorten Different Types of Shirts
T-shirts and knit tops
Knit fabric stretches, curls, and occasionally behaves like it resents authority. Use a stretch-friendly stitch, twin needle, or coverstitch-style finish if you have the setup. If not, a narrow zigzag can help preserve stretch better than a rigid straight stitch.
Button-down shirts
These often have a curved hem and side seams that need to stay balanced. Keep the curve gentle and symmetrical. If the shirt is worn untucked, the hem shape matters a lot more than people realize.
Blouses in lightweight fabric
A narrow hem usually looks best. Heavy folds can weigh the shirt down or make it ripple oddly. Fine fabrics reward patience and punish rushing.
Oversized shirts
If the shirt is not only too long but also too wide, shortening the hem may not fully fix the fit. Sometimes what looks like a length problem is actually a proportion problem. In that case, cropping alone may help, but side seam adjustments might be the real answer.
Common Mistakes to Avoid
- Cutting before testing the length: Always pin and try it on first.
- Skipping the iron: Pressing keeps the hem even and professional-looking.
- Using a bulky hem on thin fabric: Lightweight shirts usually need a narrow hem.
- Forgetting fabric stretch: Knits need flexibility, not a stiff, cranky hemline.
- Ignoring the original shape: A curved shirt hem should usually stay curved.
- Sewing too fast: Accuracy beats speed every time on shirt alterations.
Should You Hem It Yourself or Take It to a Tailor?
Do it yourself if the shirt is casual, the fabric is cooperative, and you are comfortable with a basic hem. Take it to a tailor if the shirt is expensive, silk, heavily curved, or part of a work wardrobe where every little detail shows.
There is no shame in outsourcing. Confidence is great. So is not ruining your favorite shirt five minutes before a wedding.
Final Thoughts
If you have ever stood in front of a mirror tugging, folding, and muttering at a hemline, you are not alone. Learning how to make a long shirt shorter is one of the most useful clothing alteration skills you can have. It saves money, improves fit, and helps you get more wear out of pieces that almost worked but not quite.
Start with the simplest option that matches your goal. If you just want the look, tuck or knot it. If you want a quick home fix, use a no-sew hem. If you want something that lasts, hand-sew or machine-sew a proper hem. The key is to measure carefully, press often, and treat the shirt like it deserves a second chance instead of a panic haircut.
Once you do it successfully, you will never look at an overly long shirt the same way again. You will look at it like a person with options. A powerful, iron-owning person with options.
Real-Life Experiences With Making a Long Shirt Shorter
The first time many people shorten a shirt, they expect the hard part to be sewing. It usually is not. The hard part is deciding where the new hem should land. A shirt that looks perfect when held up in the air can suddenly look too cropped once it is paired with jeans, or still too long once it is worn with tailored pants. That is why experienced home sewists often test the length in front of a mirror, walk around the room, sit down, and even raise their arms before making a final mark. It sounds a little dramatic, but so does cutting off two extra inches you cannot glue back on.
A common experience with T-shirts is discovering that knit fabric has opinions. You lay it flat, it curls at the edge. You pin it, it shifts. You start sewing, and suddenly the hem looks slightly wavy, like it has been through a minor emotional event. This is normal. Many beginners feel frustrated the first time they hem a knit shirt because the fabric stretches more than expected. The trick is slowing down, avoiding excess pulling, and pressing the fold before stitching. Once people learn that one habit, their results improve fast.
Button-down shirts tell a different story. They tend to fool people into thinking they are easier because the fabric is crisp and stable. But the shaped hem can be surprisingly tricky. Plenty of DIY alterers have shortened the front successfully, only to discover the side seams now curve awkwardly or the back hem no longer matches. After one mistake like that, most people become devoted fans of marking the whole hemline evenly before cutting. It is not glamorous, but it saves a lot of muttering.
No-sew hemming also creates memorable experiences. People love it because it feels almost magical: fold, tape, press, done. And honestly, for a casual top or a one-time outfit fix, it can be fantastic. But many also learn the same lesson after a few washes: temporary methods are wonderful until they are asked to act permanent. If the shirt is a favorite, most eventually decide it is worth stitching the hem for real.
Another frequent experience is realizing that shortening the shirt changes the whole balance of the outfit. A top that once looked sloppy can suddenly feel sharper, more flattering, and easier to style. That is often the most satisfying part. You are not just removing fabric. You are fixing proportion. You are making the shirt hit the right place on your body, which can make your waist look more defined, your legs look longer, and your outfit look more intentional.
And then there is the emotional side of it. Altering clothing at home can feel oddly empowering. You stop shopping as if your only choices are “fits perfectly” and “guess I suffer.” You start seeing clothing as adjustable. Too long is no longer a deal-breaker. It is a project. A fixable one. Sometimes a shirt only needs one careful hem to go from forgotten closet filler to reliable favorite. That is a very satisfying transformation for such a small change.


