
Table of Contents >> Show >> Hide
If you have ever looked at a thick old hardcover and thought, “You know what this needs? A secret identity,” welcome to the club. A DIY book safe is one of those gloriously sneaky projects that feels equal parts craft, magic trick, and old-school spy movie. It looks innocent on the shelf, blends in with the rest of your books, and gives you a small hidden compartment for things like emergency cash, a spare key, a USB drive, or a note you do not want floating around the house like a tiny paper scandal.
The good news is that making a book safe is not complicated. The even better news is that you do not need a garage full of fancy tools or a degree in covert operations. With the right hardcover book, a sharp blade, glue, patience, and a little common sense, you can turn a thrift-store find into a practical hidden storage box that actually looks good. This guide will show you exactly how to make a book safe, how to avoid the usual beginner mistakes, and how to make the finished project look less “middle school craft disaster” and more “clever hidden storage you actually want to keep.”
Why Make a Book Safe in the First Place?
A book safe is useful because it hides in plain sight. Most people glance at a bookshelf and see, well, books. That makes a hollow book a fun option for low-profile storage. It is also inexpensive, customizable, and surprisingly satisfying to make. You are not just gluing pages together; you are building a disguised compartment with personality.
That said, let us keep both feet on the ground. A book safe is best for small, low-stakes items. It is not a replacement for a fireproof safe, a lockbox, or a proper security system. Think “discreet stash spot,” not “Fort Knox disguised as literature.” If you want to store passports, family jewelry, or critical legal documents, use a real safe and let the book do what it does best: quietly pretend to be boring.
What You Need
- A thick hardcover book you do not mind altering
- Ruler or metal straightedge
- Pencil or pen
- Utility knife or craft knife with a sharp blade
- White glue, decoupage medium, or Mod Podge
- Small paintbrush or foam brush
- Wax paper, plastic bags, or parchment to protect pages
- Painter’s tape or masking tape
- Heavy objects or clamps for pressing while drying
- Optional: felt, decorative paper, ribbon pull, self-healing cutting mat, and drill for cleaner corners
How To Choose the Right Book
The best book safe starts with the right book, and this is where many people get overconfident. Not every book is a good candidate. Choose a hardcover book that is thick enough to create a decent cavity but not so huge that cutting it feels like tunneling through a paper mountain. A book with sturdy pages and a firm spine is ideal.
Old dictionaries, outdated textbooks, damaged hardcovers, and thrift-store novels are all fair game. Avoid anything rare, collectible, antique, or personally meaningful. In other words, do not grab Grandma’s first edition or a signed copy of your favorite novel just because it looks handsome on a shelf. The safest choice is a used book with no resale or sentimental value. You want “noble second life,” not “future family argument.”
Color and appearance matter too. A plain, ordinary-looking hardcover usually blends in better than something flashy. If your shelves are full of dark clothbound books, a giant neon cookbook is going to stick out like a disco ball at a librarian convention.
Step-by-Step: How To Make a Book Safe
1. Protect the pages you are not cutting
Open the book somewhere between the first 30 and 100 pages, depending on how thick you want the front section to be. Leaving a chunk of pages intact at the beginning helps the book look normal when someone flips it open. Slide wax paper or a plastic bag under the page where your cutout will begin so glue does not seep into the lower pages too early.
You can also cover the front pages and inside covers with plastic or paper and tape them lightly in place. This keeps stray glue off surfaces that should still look untouched. That simple bit of prep saves a lot of muttering later.
2. Draw the storage compartment
Use a ruler to draw a rectangle on the page where you want the hollow compartment to begin. Leave at least a 1-inch border on all sides, sometimes a little more near the spine. That border is what gives the book structure. If you cut too close to the edges, the cover will weaken, the pages may tear more easily, and your secret compartment will start looking less “clever” and more “the book lost a fight.”
Make the cavity large enough to hold what you actually want to store. This sounds obvious, yet it is a classic DIY trap. If the end goal is a USB drive and folded cash, a modest rectangle is fine. If you want to fit a jewelry pouch or a small keepsake box, test the item first and trace accordingly.
3. Glue the outer edges of the pages
Close the book and brush glue or decoupage medium along the outside edges of the pages. Do not drown it. A thin to medium coat is usually enough. The goal is to bond the page block together so it acts more like a box and less like several hundred independent opinions.
Once the outer edges are coated, place wax paper inside the covers, shut the book, and put it under a stack of heavy books or another flat weight. Let it dry thoroughly. Depending on the glue, this can take several hours. Overnight drying is the safest bet if you want the page block to stay crisp and stable.
4. Cut the center slowly and in layers
Now for the part that makes people feel like crafty secret agents: cutting the cavity. Open the book back to your marked page and, using a metal ruler, carefully cut along the rectangle. Do not try to slice through half the book in one dramatic move. This is not a sword-in-the-stone situation. Make multiple shallow passes instead.
After every few pages, remove the cut paper and keep going. Slow, steady cuts create cleaner walls and reduce the chance of slipping. If you want sharper inside corners, you can drill tiny starter holes at each corner before cutting, but this is optional. Many people do just fine with a knife and patience.
Keep checking the depth as you go. Some book safes only hollow out the middle portion of the page block, leaving the back section intact. Others go deeper, stopping before the back cover. Either approach works, but leave enough pages at the bottom so the book still feels solid and does not sag.
5. Seal the inside of the cavity
Once the hole is cut to the depth you want, brush glue along the inside walls and the bottom of the cavity. This helps lock the cut pages together, strengthens the compartment, and reduces loose paper fuzz. If the inside looks a little scruffy, do not panic. Most first cuts do. A sealing coat improves the finish quite a bit.
Put wax paper over the glued area, close the book, and press it again while it dries. The second drying stage is what helps your project stop looking like a book with commitment issues and start looking like a finished hidden box.
6. Add a lining if you want a cleaner look
If you want the inside to look polished, line the cavity with felt, cardstock, decorative paper, or thin fabric. Black felt is a popular choice because it hides rough edges and gives the compartment a clean, deliberate finish. You can also glue in a ribbon tab so the hidden contents are easier to lift out.
Want to get fancy? Add a magnetic closure, disguise the page edges with paint, or create two compartments instead of one. Just remember: the more elaborate the project becomes, the more it shifts from “quick afternoon craft” to “I live here now, apparently.”
Common Mistakes To Avoid
Using the wrong book: Paperback books are usually too flimsy, and rare books should be left alone. Go for a sturdy hardcover that nobody will mourn.
Cutting too fast: Rushing is the fastest way to get jagged walls, torn pages, and a blade slip. Multiple shallow cuts are slower, but they look far better.
Using too much glue: If glue puddles into the pages, the book can warp, wrinkle, or glue itself shut in weird places. Thin, even coats work best.
Skipping surface protection: Use a cutting mat or a protected work surface. Your dining table did not sign up for battle damage.
Ignoring safety: A sharp blade is great at cutting paper and extremely committed to cutting anything else in its path. Keep fingers out of the line of cut, work in good light, and wear eye protection if you are drilling or trimming aggressively.
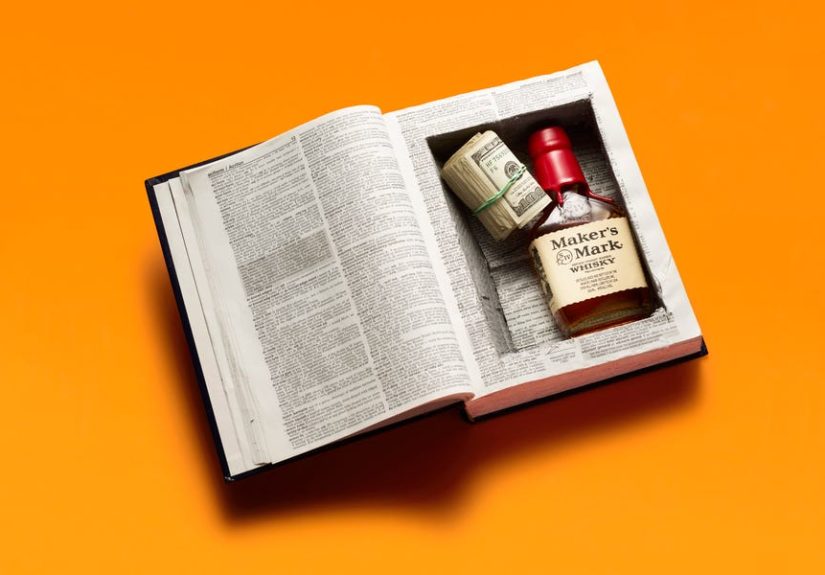
What Should You Store in a Book Safe?
A book safe works best for small items you want to keep out of casual sight. Good options include emergency cash, a spare key, a USB drive, backup passwords stored on paper, a tiny jewelry pouch, or personal notes. It can also make a clever gift box for money, tickets, or a small surprise.
Things you should probably not store there include anything irreplaceable, anything that could be damaged by moisture, and anything you would be devastated to lose in a fire or burglary. A hollow book is hidden storage, not high-security storage. Think of it as a decoy with charm.
Easy Design Upgrades
If you want your book safe to look less homemade and more intentionally designed, a few upgrades go a long way. Use a fresh blade for the final trimming pass. Sand or gently scrape fuzzy paper edges after they dry. Add felt to the compartment floor. Paint the cut edges with a matching matte color. Slip the finished book onto a shelf between similarly sized volumes so it disappears into the lineup like a paper-based ninja.
You can also theme the project. A hollowed-out cookbook can hide recipe cards or emergency cash in the kitchen. An old law book can store spare keys or flash drives in a home office. A beat-up atlas can become travel stash storage. The best book safe is not just functional; it looks like it belongs exactly where you put it.
Final Thoughts
Learning how to make a book safe is one of those DIY skills that feels way cooler than the materials list suggests. At its core, this project is simple: glue, cut, dry, repeat. But the finished result is surprisingly useful, especially if you want a hidden storage idea that is affordable, customizable, and just plain fun to make.
The secret to a good result is not speed. It is restraint. Choose the right hardcover, protect the pages, use moderate glue, make careful cuts, and let each stage dry properly. Do that, and you will end up with a book that still looks respectable on the outside while hiding a neat little compartment on the inside. Which, honestly, is more than can be said for most of us before coffee.
Experiences and Lessons From Making a Book Safe
One of the most common experiences people have when making a book safe for the first time is realizing that the project is less about brute force and more about patience. At first glance, it looks easy: draw a box, cut out the middle, done. Then the cutting starts, and suddenly you understand why so many tutorials quietly repeat the phrase “go slowly.” The first few passes barely seem to do anything, which tricks beginners into pressing harder than they should. That usually leads to ragged edges, crooked corners, and a brief moment of reflection about life choices. By the second attempt, most people figure out that a calm, repetitive rhythm gives a much cleaner result.
Another very real experience is discovering that book choice affects everything. A thick hardcover with solid paper feels cooperative. A flimsy, brittle, or oddly glossy book feels like it is actively plotting against you. Some pages slice beautifully, while others tear, drag, or bunch up. That is why many DIYers eventually become surprisingly picky about thrift-store books. They start picking up dictionaries and old textbooks like produce shoppers checking melons, quietly judging spine strength and page quality with great seriousness.
Glue is another lesson generator. Too little, and the pages shift around like they are trying to escape. Too much, and the book wrinkles, warps, or sticks where it should not. There is a sweet spot, and people usually find it after one slightly sticky mishap. The same goes for drying time. Many first-timers get impatient, reopen the book too soon, and end up smudging glue or pulling fibers loose. After that, waiting overnight starts to feel less like a suggestion and more like wisdom passed down from the craft gods.
There is also the oddly satisfying moment when the project finally stops looking ruined and starts looking intentional. During the middle stages, a book safe can appear unimpressive, messy, and a little haunted. Then the inside gets sealed, the edges tighten up, maybe a felt lining goes in, and suddenly the whole thing clicks. It becomes a finished hidden compartment instead of a book that had a stressful afternoon.
People also tend to learn that the best use for a book safe is simple, everyday discretion. It is great for emergency cash, a note, a spare key, or a flash drive. It is also fun as a gift box because nobody expects a novel to contain birthday money. But after making one, most people quickly understand its limits. It is clever, not invincible. It hides items from casual view, not from every possible risk. That balance is part of what makes the project charming. You are not building a fortress. You are building a smart little decoy with style, usefulness, and just enough theatrical flair to make the whole process memorable.


