Table of Contents >> Show >> Hide
- Quick Snapshot: What You’re Aiming For
- Before You Start: Tenderloin vs. Loin (The Mix-Up That Ruins Dinner)
- Tools & Ingredients That Make This Easy
- Step 1: Prep the Tenderloin (5–15 minutes)
- Step 2: Set Up the Grill for Two-Zone Heat (10–15 minutes)
- Step 3: Grill the Tenderloin (Sear, Then Finish Indirect)
- Step 4: Rest, Slice, and Serve Like You Meant To Do This All Along
- Common Mistakes (and the Fixes That Save Dinner)
- Flavor Ideas That Keep Pork Tenderloin Interesting
- Extra: Real-World Grilling Experiences (What Usually Happens and How to Handle It)
- Conclusion
Pork tenderloin is the weeknight superhero of the grill world: lean, quick-cooking, and fancy enough to make people think you “really know what you’re doing.”
The only problem? It’s also the cut most likely to get overcooked into “polite chewing practice” if you treat it like a thick pork roast.
The good news is that grilling pork tenderloin is incredibly simple once you use the right setup and let a thermometer do the hard work.
This guide breaks everything down into four clear stepsplus all the little details (heat zones, timing, resting, slicing, seasoning) that turn “pretty good” into
“why is this so juicy?” Let’s grill.
Quick Snapshot: What You’re Aiming For
- Cut: Pork tenderloin (not pork loin)
- Method: Sear + finish over indirect heat (two-zone grilling)
- Target temp: Pull at 140–145°F in the thickest part, then rest
- Rest time: 3–10 minutes (juices settle, temp finishes climbing)
- Texture goal: Slightly blush-pink center = tender and juicy (not “raw,” just not overcooked)
Before You Start: Tenderloin vs. Loin (The Mix-Up That Ruins Dinner)
Pork tenderloin is long, slim, and usually around 1 to 1½ pounds. It cooks fast.
Pork loin is thicker, wider, and built for longer roasting or slower grilling.
If you grill a loin like a tenderloin, the outside burns while the inside stays stubbornly underdone.
If you grill a tenderloin like a loin, it dries out and sulks.
Tools & Ingredients That Make This Easy
Tools
- Grill (gas, charcoal, or pellet all work)
- Instant-read thermometer or probe thermometer (the real MVP)
- Tongs
- Small bowl + brush (for oil or glaze)
- Cutting board and sharp knife
Basic Ingredients (Flexible on Purpose)
- 1 pork tenderloin (1–1½ lbs)
- 1–2 tablespoons neutral oil (or olive oil)
- Kosher salt and black pepper
- Optional flavor boosters: garlic powder, smoked paprika, brown sugar, chili powder, mustard, fresh herbs, citrus zest
- Optional sauce/glaze: BBQ sauce, honey-mustard, maple-bourbon glaze, chimichurri, salsa verde
Step 1: Prep the Tenderloin (5–15 minutes)
Great grilling starts before the grill is hot. Pork tenderloin is lean, which means it loves flavor and hates neglect.
Your job here is to (1) trim what won’t soften, and (2) season in a way that helps it stay juicy.
1) Trim the silver skin (don’t skip this)
Look for a shiny, tight membrane on part of the tenderlointhis is silver skin. It does not melt while cooking.
Instead, it tightens and can cause curling, plus it’s chewy in an “I regret my choices” way.
- Slide the tip of a sharp knife just under the silver skin.
- Angle the blade slightly upward (so you don’t carve off good meat).
- Use short strokes to separate the membrane while pulling it taut with your other hand.
2) Choose your seasoning strategy
Pick one of these based on your schedule. All of them work; the “best” one is the one you’ll actually do.
Option A: Dry-brine (best texture, easiest plan-ahead)
Salt the tenderloin all over and refrigerate uncovered for 2–24 hours. This seasons deeper and helps the meat hold onto moisture.
If you can do this, it’s a cheat code for juiciness.
Option B: Quick marinade (best for big flavor)
Marinate 30 minutes to 4 hours. Keep acidic ingredients (vinegar, lots of citrus) reasonabletenderloin is already tender.
A simple marinade that won’t bully the meat:
- 2 tbsp oil
- 1 tbsp soy sauce
- 1 tbsp Dijon mustard
- 1–2 tsp honey or brown sugar
- 1 minced garlic clove (or ½ tsp garlic powder)
- Black pepper, pinch of smoked paprika
Option C: Rub + oil (fastest, still delicious)
Pat dry, coat lightly with oil, then apply a rub. This is perfect when dinner needs to happen today.
Try this balanced rub:
- 1 tsp kosher salt
- 1 tsp smoked paprika
- ½ tsp garlic powder
- ½ tsp onion powder
- ½ tsp black pepper
- ½ tsp brown sugar (optional, helps browning)
- Pinch cayenne (optional, for a little swagger)
Pro move: After seasoning, let the tenderloin sit at room temp for about 10–20 minutes while you preheat the grill.
It takes the chill off and promotes more even cooking (without turning your kitchen into a food-safety science experiment).
Step 2: Set Up the Grill for Two-Zone Heat (10–15 minutes)
Two-zone grilling is how you get a browned crust and a juicy interior. Think of it as giving the pork a tan on one side of the beach
and a relaxing nap under an umbrella on the other.
Gas grill setup
- Preheat with the lid closed for about 10–15 minutes.
- Create zones: set one side to medium-high (direct heat) and the other side to low or off (indirect heat).
- Target temps: direct side should be hot enough to sear; indirect side should sit around 350–400°F.
Charcoal grill setup
- Light charcoal (a chimney starter makes this painless).
- Bank the hot coals on one side (direct heat) and leave the other side coal-free (indirect heat).
- Put the lid on and adjust vents to stabilize heat (you want a confident, steady grillnot a mood swing).
Pellet grill setup
- Set to 400°F for grilling, or run lower (225–275°F) then sear at the end if your pellet grill has a good sear zone.
- Pellet grills excel at gentle heatjust don’t forget you still want browning, not “warm pork vibes.”
Stick-prevention tip: Clean grates, preheat well, then lightly oil the meat (not the grates).
Oiling the food helps promote caramelization and reduces sticking without turning your grill into a slip-and-slide.
Step 3: Grill the Tenderloin (Sear, Then Finish Indirect)
Here’s the simple rhythm: sear for color + move to indirect for doneness.
Your thermometer decides when you’re donenot the clock, not the grill marks, and definitely not your cousin who says “just cut it open.”
Part A: Sear over direct heat (6–10 minutes)
- Place the tenderloin on the direct heat side.
- Sear 2–3 minutes per side, turning to brown all around (usually 3–4 turns total).
- If flare-ups happen, move the tenderloin briefly to indirect and close the lid.
You’re not trying to “cook it through” here. You’re building flavor and a crustlike giving the pork a better résumé.
Part B: Finish over indirect heat (6–15 minutes)
- Move the tenderloin to the indirect heat side.
- Close the lid and cook until the thickest part reaches 140–145°F.
- Start checking early. Most tenderloins finish faster than people expect.
Timing guide (because people always ask)
Exact time depends on thickness, grill temp, wind, and whether your grill is feeling dramatic today. But these are useful ranges:
- Total grill time: about 15–25 minutes for a typical 1–1½ lb tenderloin
- Sear time: 6–10 minutes total (turning for even browning)
- Indirect finish: 6–15 minutes (until target temp)
Where to place the thermometer
Insert the thermometer into the thickest part of the tenderloin, aiming for the center.
Avoid poking through to the other side (that reads hotter and lies to you).
When to sauce
If your sauce contains sugar (BBQ sauce, honey glazes, maple anything), brush it on during the last 2–4 minutes.
Otherwise it can burn fastsweet sauces are delicious, but they’re also tiny arsonists.
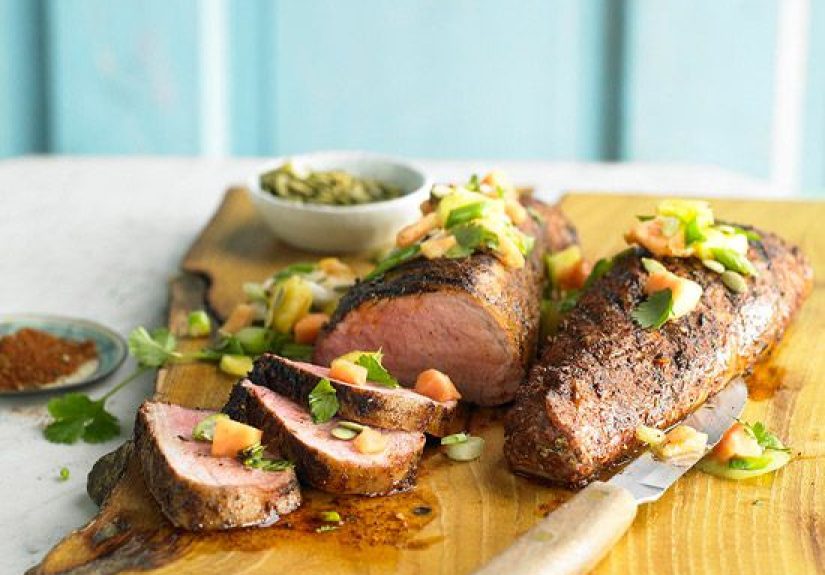
Step 4: Rest, Slice, and Serve Like You Meant To Do This All Along
Resting is not a “maybe.” It’s the difference between juicy slices and a cutting board that looks like it lost an argument.
When you rest meat, juices redistribute and the internal temp finishes climbing a bit (carryover cooking).
Rest
- Transfer to a cutting board.
- Tent loosely with foil.
- Rest for 3–10 minutes (smaller rest if you’re starving, longer rest if you’re patient).
Slice
Slice into ½-inch medallions across the grain. If the tenderloin has a skinny tail end, keep it attached while slicing so everything stays neat.
Or cut the tail off before grilling and use it as the cook’s snack. (A sacred tradition.)
Serve
Pork tenderloin plays well with nearly anything. A few crowd-pleasers:
- Summer plates: corn salad, grilled peaches, cucumber-tomato salad
- Comfort mode: mashed potatoes, roasted broccoli, mac and cheese
- Sandwich energy: sliced tenderloin + slaw + pickles + mustard sauce
- Taco night: slice thin, add salsa verde, onions, cilantro, lime
Common Mistakes (and the Fixes That Save Dinner)
Mistake: Overcooking because “pork has to be 160°F”
Fresh cuts like tenderloin are safe and juicy when cooked to the modern standard of 145°F with a short rest.
Cooking to 160°F isn’t “wrong,” but it is much easier to dry out a lean tenderloin.
Mistake: Only using direct heat
Direct heat alone can work, but it’s less forgiving. Two-zone grilling gives you a safety net:
you can brown the outside without panic, then finish gently without incinerating the edges.
Mistake: Cutting to check doneness
Cutting releases juices and doesn’t give you a precise answer anyway. Use a thermometer, then slice after resting.
You’ll look like a pro, and your pork will taste like it.
Mistake: Skipping the silver skin trim
The “mysterious tough strip” people complain about? Usually silver skin.
Trim it and suddenly pork tenderloin seems like an unfairly easy dinner win.
Flavor Ideas That Keep Pork Tenderloin Interesting
1) BBQ Classic
Rub with smoked paprika, garlic, pepper, and a touch of brown sugar. Finish with BBQ sauce in the last few minutes.
Serve with slaw and pickles.
2) Garlic-Herb
Rub with salt, pepper, garlic, rosemary, thyme, and lemon zest. Serve with chimichurri or a bright herb sauce.
3) Sweet-Heat
Use a rub with chili powder and smoked paprika, then glaze with honey + Dijon + a splash of vinegar near the end.
This is “cookout famous” behavior.
4) “Taco Night, But Grilled”
Season with cumin, chili powder, oregano, garlic, and lime. Slice thin and serve with salsa verde and charred onions.
Extra: Real-World Grilling Experiences (What Usually Happens and How to Handle It)
Grilling pork tenderloin sounds straightforwardand it isbut the real world has wind, uneven grill hot spots, distracted multitasking,
and that one friend who keeps lifting the lid “to check on it.” These are the common experiences people run into, plus the small adjustments
that make you feel in control instead of improvising dinner like it’s a reality show challenge.
The “Why Is It Cooking So Fast?” moment
Pork tenderloin is smaller and leaner than most cuts people grill, so it can move from “not ready” to “done” in just a few minutes.
The best habit is checking earlier than you think you need toespecially after you move to indirect heat. Many grills run hotter than their
built-in thermometers suggest, and tenderloins vary in thickness even in the same package. When you start treating temperature as the finish line
(instead of time), the stress level drops instantly.
The flare-up surprise
Even lean pork can trigger flare-ups if marinade drips or oil hits the flame. The most useful experience-based trick is not to panic and start
flipping like you’re playing ping-pong. Instead, slide the tenderloin to the indirect side, close the lid, and let the grill settle.
If you’re using sugary marinades, remember that sugar browns fastdelicious when controlled, bitter when burned. That’s why glazing late works so well:
you get shine and flavor without turning the outside into a caramelized cautionary tale.
The uneven browning problem
Many grills have hot spots. You’ll notice one side searing beautifully while another looks like it’s still waiting for its turn.
A simple “real life” solution is rotating the tenderloin’s position during the sear, not just flipping it. Also, don’t chase perfect grill marks.
You’re cooking dinner, not printing a logo. A consistently browned surface tastes better than a few dramatic stripes over pale meat.
The “It’s curling and rolling around” situation
If silver skin isn’t removed, the tenderloin can curl as it cooks, making it harder to brown evenly. Another cause is one end being much thinner than the other.
Two fixes: (1) trim the silver skin, and (2) tuck the thin tail end under and tie it with kitchen twine to even the thickness.
This feels extrabut it’s a 30-second move that makes cooking more predictable and prevents the tail from drying out.
The “I nailed the temp but it’s still not juicy” confusion
This usually comes down to slicing too soon or slicing too thin. Resting gives juices time to redistribute.
Slicing into thicker medallions (around ½ inch) keeps each piece juicy and tender. Another small upgrade people notice right away is salting in advance
(dry-brining). It’s one of those quiet techniques that doesn’t look exciting, but your first bite will explain everything.
The leftover redemption arc
Pork tenderloin leftovers can be incredible if you treat them gently. A common experience is reheating slices too aggressively and ending up with dry pork.
Instead, warm slices briefly in a covered skillet with a splash of broth, or eat them cold in a sandwich with mustard and crunchy veggies.
Thin slices also make excellent “next day” meals: wraps, salads, rice bowls, or quick stir-fries. The best part is that grilled tenderloin tends to taste
even better the next day when paired with something bright (pickles, citrus, vinaigrette, salsa).
The overall lesson most people learn after a couple of rounds is simple: pork tenderloin rewards calm grilling. Use two zones, trust the thermometer,
rest before slicing, and keep sauces for the end. Once you do that, it becomes one of the most reliable “looks impressive, barely tried” meals you can make.
Conclusion
If you remember only one thing, make it this: grill pork tenderloin by temperature, not by time.
Sear over direct heat for flavor, finish over indirect heat for control, rest for juiciness, and slice like a person who wants compliments.
With these four steps, you’ll get tender, flavorful pork that’s perfect for weeknightsand worthy of the “wait, you made this?” reaction.