
Table of Contents >> Show >> Hide
- What Does It Mean to Gather Fabric into Ruffles?
- Tools and Materials You’ll Need
- How Much Fabric Do You Need for Ruffles?
- How to Gather Fabric into Ruffles: 8 Steps
- Step 1: Measure the Area Where the Ruffle Will Go
- Step 2: Cut the Fabric Strip
- Step 3: Finish the Outer Edge First
- Step 4: Set Your Sewing Machine for Gathering
- Step 5: Sew Two Rows of Basting Stitches
- Step 6: Pull the Bobbin Threads to Gather
- Step 7: Distribute the Gathers Evenly
- Step 8: Sew the Ruffle in Place
- Alternative Methods for Making Ruffles
- Best Fabrics for Ruffles
- Common Ruffle Problems and How to Fix Them
- Helpful Tips for Professional-Looking Ruffles
- Practical Experience: What Sewing Ruffles Teaches You
- Conclusion
Ruffles are the sewing world’s way of saying, “Let’s add a little drama, but make it adorable.” Whether you’re sewing a skirt, dress, pillow cover, apron, table runner, costume, curtain, baby outfit, or romantic blouse, knowing how to gather fabric into ruffles is one of those basic sewing skills that instantly makes your projects look more polished.
The good news? You do not need a fancy machine, a mysterious heirloom sewing foot, or the patience of a Victorian seamstress working by candlelight. You can create neat, even ruffles with a regular sewing machine, a long stitch length, and a little thread-pulling magic. The trick is understanding fabric ratio, stitch placement, thread tails, and how to distribute gathers evenly before you sew everything permanently in place.
This guide breaks the process into eight beginner-friendly steps, with practical tips for lightweight cotton, linen, chiffon, quilting fabric, knit fabric, and heavier materials. By the end, you’ll know how to make soft gathers, full ruffles, decorative frills, and tidy edges that don’t look like they had a disagreement with your sewing machine.
What Does It Mean to Gather Fabric into Ruffles?
Gathering fabric means compressing a longer piece of fabric so it fits into a shorter space. The extra fabric creates small folds, waves, or mini pleats. When those gathers are used decoratively, we usually call them ruffles.
For example, if the hem of a skirt measures 30 inches and you want a classic ruffle, you might cut a strip of fabric 60 inches long. After gathering, that 60-inch strip shrinks down to fit the 30-inch skirt edge, creating fullness all the way around. It is simple math wearing a cute outfit.
Tools and Materials You’ll Need
- Fabric for your ruffle
- Matching thread
- Sewing machine
- Universal needle or fabric-appropriate needle
- Fabric scissors or rotary cutter
- Pins or sewing clips
- Measuring tape or ruler
- Fabric marker or tailor’s chalk
- Iron and ironing board
- Optional: seam gauge, gathering foot, ruffler foot, or serger
How Much Fabric Do You Need for Ruffles?
Before sewing, decide how full you want your ruffle to be. This is called the gathering ratio. The ratio compares the original length of the ruffle strip to the finished length after gathering.
Common Ruffle Ratios
- 1.5:1 ratio: Best for gentle gathers, heavier fabric, and subtle shaping.
- 2:1 ratio: The standard choice for most ruffles, especially cotton, linen, and medium-weight fabric.
- 3:1 ratio: Great for very full, fluffy ruffles on lightweight fabric.
- 4:1 ratio: Dramatic and theatrical, best for thin, soft fabrics that can handle lots of fullness.
For most beginner sewing projects, a 2:1 ratio is the safest starting point. If your finished edge is 20 inches long, cut your ruffle strip about 40 inches long, plus seam allowances. If you’re using thick denim or heavy upholstery fabric, reduce the fullness. If you’re using voile, chiffon, tulle, or lightweight cotton lawn, you can increase the fullness.
How to Gather Fabric into Ruffles: 8 Steps
Step 1: Measure the Area Where the Ruffle Will Go
Start by measuring the edge where the ruffle will be attached. This might be a skirt hem, sleeve edge, neckline, pillow seam, curtain panel, apron hem, or decorative trim line. Write this number down because it determines your finished ruffle length.
For example, if you are adding a ruffle to a 24-inch pillow edge, your finished ruffle needs to measure 24 inches after gathering. For a standard 2:1 ruffle, cut your fabric strip 48 inches long, plus seam allowance at each end.
Do not eyeball this part unless you enjoy surprises. Sewing surprises are rarely the fun kind. Measuring first helps your ruffles look intentional instead of accidentally ambitious.
Step 2: Cut the Fabric Strip
Next, cut your ruffle strip. The length depends on your gathering ratio. The width depends on how deep you want the ruffle to be. Remember to include seam allowance and hem allowance.
Suppose you want a finished ruffle that is 3 inches deep. You may need to cut the strip about 4 inches wide: 3 inches for the visible ruffle, 1/2 inch for the seam allowance, and 1/2 inch for the hem. Adjust these numbers based on your pattern or project.
For crisp ruffles, cut fabric on the straight grain. For softer, more fluid ruffles, bias-cut strips can drape beautifully, though they may stretch more while sewing. Beginners usually have an easier time with straight-grain strips because they behave like polite little rectangles.
Step 3: Finish the Outer Edge First
Before gathering the fabric, finish the outer edge of the ruffle. This is the edge that will remain visible after the ruffle is attached. It is much easier to hem a flat strip than a gathered one. Trying to hem a ruffle after gathering is like ironing a crumpled map during a windstorm.
You can finish the edge with a narrow hem, rolled hem, serged edge, zigzag stitch, bias binding, lace trim, or decorative stitch. For casual cotton projects, a simple double-fold hem works well. Fold the edge under 1/4 inch, press, fold again, press, and stitch close to the folded edge.
For lightweight fabric, use a narrow hem or rolled hem. For knits, consider a zigzag stitch or serger finish. For formal garments, test your hem method on a scrap first so you can check how the fabric responds.
Step 4: Set Your Sewing Machine for Gathering
To gather fabric with a sewing machine, set your machine to a long straight stitch. A stitch length between 3.5 and 5.0 usually works well, depending on your machine and fabric. Do not backstitch at the beginning or end. You need loose thread tails so you can pull the stitches later.
Some sewists like to loosen the upper thread tension slightly, while others keep the tension normal and simply use a long stitch. If your fabric is difficult to gather, test both methods on a scrap. The best setting is the one that lets you pull the bobbin threads smoothly without snapping them.
Use a fresh needle if your fabric is delicate, tightly woven, or prone to snagging. A dull needle can create puckers, skipped stitches, or tiny fabric injuries. Your ruffle deserves better than needle drama.
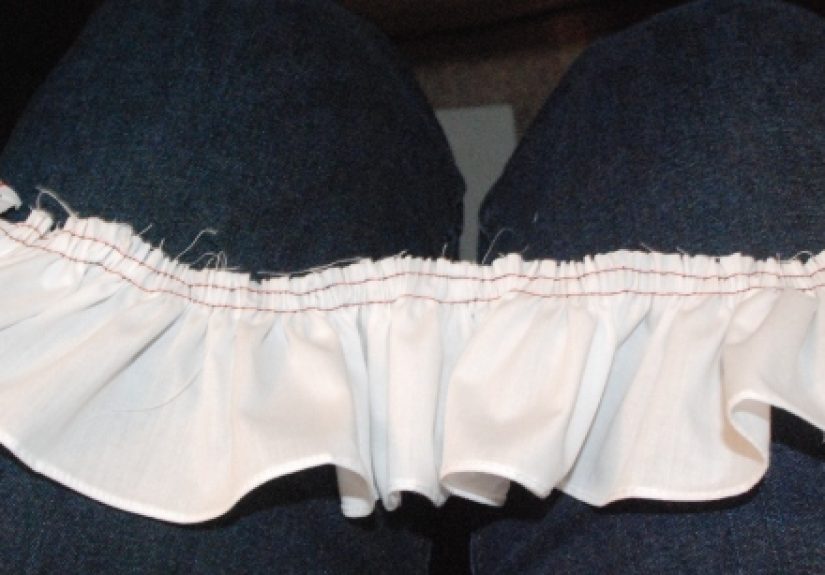
Step 5: Sew Two Rows of Basting Stitches
Sew two parallel rows of long basting stitches along the raw edge that will be gathered. Place the first row inside the seam allowance and the second row slightly closer to the raw edge. For a 1/2-inch seam allowance, you might sew one row at 3/8 inch and another at 1/4 inch from the raw edge.
Leave long thread tails at both ends. Four to six inches of thread is usually enough. Do not backstitch. Backstitching locks the threads and makes gathering harder.
Why two rows? One row can work, but two rows give more control and create smoother, more even gathers. Three rows can be useful for very fine or formal sewing, especially on lightweight fabric. Two rows are the reliable middle ground for most home sewing projects.
Step 6: Pull the Bobbin Threads to Gather
Separate the top threads from the bobbin threads at one end. Gently pull the bobbin threads while sliding the fabric along the stitches. The fabric will begin to bunch into gathers. Work slowly and avoid yanking. Broken gathering threads are not the end of the world, but they do make you question your life choices for a minute.
If your ruffle strip is very long, divide it into sections. Sew separate gathering stitches between quarter marks or side seams instead of using one continuous line around the entire piece. This gives you better control and reduces the chance of thread breakage.
Gather until the ruffle matches the length of the edge it will be attached to. Tie the thread tails loosely around a pin or knot them temporarily so the gathers stay in place while you adjust them.
Step 7: Distribute the Gathers Evenly
Even distribution is what separates a polished ruffle from a fabric traffic jam. Match the center of the ruffle to the center of the project edge. Then match quarter points, side seams, or other reference marks. Pin or clip those points first.
After the main points are pinned, spread the gathers evenly between them. Use your fingers to nudge the tiny folds until they look balanced. Avoid clumps in one area and flat patches in another. The goal is not perfection under a microscope; the goal is pleasing fullness that looks consistent to the eye.
For garment sewing, pay extra attention to visible areas such as center front, sleeve caps, necklines, and hems. On home decor projects, check corners and seams carefully because bulky gathers can make those areas hard to stitch neatly.
Step 8: Sew the Ruffle in Place
Place the gathered ruffle and the main fabric right sides together, aligning raw edges unless your pattern says otherwise. Pin or clip securely. Sew along the seam line using a regular stitch length, usually around 2.5. Stitch slowly and keep the gathers flat as they pass under the presser foot.
After sewing, check the seam from both sides. If you see puckers, folded-under fabric, or uneven sections, remove a few stitches and correct the area. Once satisfied, finish the seam allowance with a serger, zigzag stitch, pinking shears, or another seam finish. Press the seam allowance away from the ruffle if possible.
Finally, remove any visible basting stitches. If your gathering stitches are hidden in the seam allowance, you may not need to remove them. Give the ruffle a gentle press, but do not flatten all the lovely fullness you just created.
Alternative Methods for Making Ruffles
Using a Gathering Foot
A gathering foot can gather lightweight fabric as you sew. It is useful for quick decorative ruffles, but it may not offer the same level of control as hand-adjusted basting stitches. It also works best on lighter fabrics. Medium and heavy fabrics may resist the gathering foot like a cat resisting bath time.
Using a Ruffler Foot
A ruffler foot creates tiny pleats at regular intervals. It is excellent for consistent, structured ruffles, especially if you make children’s clothing, costumes, home decor, or layered trims. It can look intimidating, but once adjusted, it can save a lot of time.
Zigzag Over Cord
For long ruffles or heavier fabric, try cord gathering. Place a strong cord, dental floss, or crochet thread along the seam allowance and zigzag over it without stitching through the cord. Then pull the cord to gather the fabric. This method is strong, smooth, and less likely to snap than regular thread.
Gathering with a Serger
Some sergers can create gathers by adjusting differential feed and stitch settings. This is fast and clean, especially for long strips, but testing is essential. Every fabric behaves differently, and sergers are powerful enough to turn “just a little gather” into “surprise lettuce edge” if settings are too aggressive.
Best Fabrics for Ruffles
Different fabrics create different ruffle effects. Cotton produces crisp, cheerful ruffles. Linen gives a relaxed, natural look. Chiffon and voile create soft, airy movement. Tulle makes dramatic volume. Rayon and viscose drape beautifully but can be slippery. Denim, canvas, and upholstery fabric can be gathered, but they need less fullness and stronger stitching.
For beginners, quilting cotton is one of the easiest fabrics to practice with. It presses well, holds shape, and gathers predictably. Once you master cotton, experiment with lighter or heavier materials.
Common Ruffle Problems and How to Fix Them
The Gathering Thread Breaks
Use two or three rows of basting stitches, pull gently, and divide long ruffles into smaller sections. For stubborn fabric, try cord gathering.
The Ruffles Look Uneven
Mark the fabric into halves and quarters before gathering. Pin those points to matching marks on the main fabric, then distribute the gathers between them.
The Seam Looks Bulky
Reduce the gathering ratio, trim seam allowances carefully, and press the seam in the direction that creates the least bulk. Heavy fabric rarely needs a 3:1 ruffle.
The Fabric Puckers
Check needle size, thread tension, stitch length, and fabric handling. Do not stretch the fabric as you sew. Let the machine feed it naturally.
The Ruffle Edge Looks Messy
Finish the visible edge before gathering. A clean hem makes the entire ruffle look more professional.
Helpful Tips for Professional-Looking Ruffles
- Press fabric before cutting so measurements stay accurate.
- Use longer thread tails than you think you need.
- Gather from both ends toward the center for better control.
- Use clips instead of pins for bulky fabric.
- Test your ruffle ratio on scraps before cutting expensive fabric.
- Match thread color carefully if basting stitches might show.
- Keep gathers out of seam intersections when possible to reduce bulk.
Practical Experience: What Sewing Ruffles Teaches You
Ruffles are one of those sewing techniques that look simple on paper and then immediately remind you that fabric has opinions. The first time many beginners gather fabric, they expect the thread to glide smoothly and the fabric to scrunch into perfect little waves. Sometimes it does. Other times, the thread breaks, the gathers clump on one side, or the ruffle looks like it lost a small wrestling match. That is completely normal.
One of the biggest lessons from real sewing projects is that preparation matters more than speed. When makers rush the measuring and marking stage, the finished ruffle often ends up too short, too long, or unevenly distributed. But when the ruffle strip is measured carefully, quarter points are marked, and thread tails are left long, the whole process becomes calmer. It is not glamorous, but marking fabric is like giving your future self a tiny sewing map.
Another practical lesson is that fabric weight changes everything. A 2:1 ruffle in quilting cotton looks classic and full. The same ratio in denim can look bulky enough to qualify as furniture padding. On the other hand, a 1.5:1 ratio in chiffon may look too flat because lightweight fabric needs extra length to create visible fullness. This is why experienced sewists keep scraps nearby. A five-minute test strip can save half a yard of fabric and a surprising amount of muttering.
Long ruffles also teach patience. Gathering a 12-inch sleeve edge is easy. Gathering a 90-inch bed skirt, curtain trim, or tiered dress panel is a different sport. In longer projects, it helps to divide the fabric into sections and gather each section separately. Pulling one long thread across several feet of fabric increases the chance of breakage. Working in halves or quarters makes the gathers easier to control and keeps the fullness more even.
Many beginners also discover that two rows of basting stitches are worth the extra minute. A single row can create gathers, but it may twist or look uneven. Two rows help the fabric fold neatly and lie flatter when attached. For special garments, three rows can make delicate gathers look elegant instead of random. Think of extra basting rows as insurance. Not exciting, but very useful when things get wobbly.
Pressing is another quiet hero. Pressing the ruffle hem before gathering gives the edge a clean finish. Pressing the final seam gently helps the ruffle sit correctly. The key word is gently. Flattening a ruffle with heavy steam and pressure can crush the fullness. Use the tip of the iron, lift and press instead of dragging, and let the fabric cool before handling.
The most satisfying part of learning how to gather fabric into ruffles is how quickly the skill expands your creative options. Once you understand the basic method, you can add ruffles to pillowcases, napkins, sleeves, skirts, tote bags, baby blankets, aprons, costumes, curtains, and holiday decor. You can make them tiny and delicate or big and dramatic. You can layer them, curve them, trim them with lace, or use contrasting fabric for a playful effect.
In short, gathering fabric is not just a sewing technique. It is a confidence builder. Every ruffle teaches you how fabric moves, how stitches behave, and how small adjustments create a cleaner finish. And yes, after a few successful projects, you may start looking around your house thinking, “Would this look better with a ruffle?” The answer is not always yesbut it is yes more often than expected.
Conclusion
Learning how to gather fabric into ruffles is a small sewing skill with big creative power. With the right fabric ratio, long basting stitches, gentle thread pulling, and even distribution, you can turn a plain strip of fabric into beautiful fullness for clothing, accessories, and home decor. Start with a simple cotton ruffle, practice on scraps, and use two rows of basting stitches for control. Once you get comfortable, try gathering feet, ruffler feet, cord gathering, and different fabrics to create your own signature style.
Ruffles may look fancy, but the process is wonderfully approachable. Measure, cut, hem, baste, pull, adjust, pin, and sew. That’s the whole magic trick. No wand requiredthough a seam ripper nearby never hurts.
Note: This article is written for web publication and synthesizes practical sewing guidance commonly recommended by established sewing educators, fabric experts, and machine-sewing resources.


