
Table of Contents >> Show >> Hide
- Parallelogram basics (a cheat sheet you can keep in your head)
- Tools you might use
- Method 1: Draw a parallelogram with a ruler and protractor (two sides + included angle)
- Method 2: Draw a parallelogram using parallel lines (base + height)
- Method 3: Construct a parallelogram with a compass and straightedge (circle intersection method)
- Method 4: Draw it on the coordinate plane (fastest for graph paper)
- How to verify your drawing (quick, practical checks)
- Common mistakes and fixes
- Practice mini-challenges
- Conclusion
- Experiences related to drawing a parallelogram ( of real-world learning moments)
- SEO tags (JSON)
Parallelograms are the “leaning rectangles” of geometry. They look like a rectangle that got nudged to the side, but the shape is still playing by strict rules. Once you understand those rulesmainly parallel opposite sidesyou can draw (or construct) an accurate parallelogram on paper, on graph paper, or in a design sketch without guessing.
Below you’ll find several step-by-step methods, from quick ruler-and-protractor drawings to classic compass-and-straightedge constructions. You’ll also get verification checks, common mistakes, and a short “experience” section at the end that captures what learners typically run into when they start drawing this shape for real.
Parallelogram basics (a cheat sheet you can keep in your head)
A parallelogram is a quadrilateral with both pairs of opposite sides parallel. From that one definition, these facts are commonly used to check (and prove) the shape:
- Opposite sides are congruent (same length).
- Opposite angles are congruent.
- Consecutive angles are supplementary (they add to 180°).
- Diagonals bisect each other (each diagonal is cut into two equal halves at the intersection).
Think of these as your “quality control” list. If your drawing fails two or more of them, you probably have a different quadrilateral… and it’s not going to confess unless you measure.
Tools you might use
- Pencil (preferably sharp) and eraser
- Ruler or straightedge
- Protractor (for measured angles)
- Set square / drafting triangle (for quick parallels and right angles)
- Compass (for constructions)
- Graph paper (for coordinate methods)
Pro tip: Sketch lightly first, then darken the final edges. This isn’t cheating; it’s called “being friends with your eraser.”
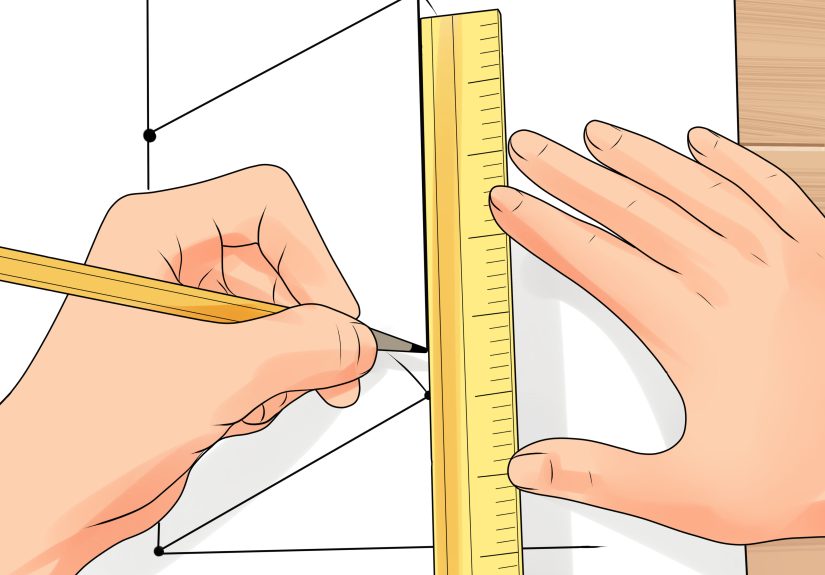
Method 1: Draw a parallelogram with a ruler and protractor (two sides + included angle)
This method is perfect when a problem gives you two adjacent side lengths and the angle between them. Example goal: draw quadrilateral ABCD with AB = 6 cm, AD = 4 cm, and ∠DAB = 60°.
Step-by-step
- Draw the base. Use your ruler to draw segment AB to 6 cm.
- Construct the angle at A. Place the protractor at A, align with AB, mark 60°, and draw a ray from A through that mark.
- Mark side AD. Measure 4 cm along the ray and label that point D.
- Through B, draw a line parallel to AD. If you have a set square, align it to AD’s direction and slide it to point B. If you don’t, copy the 60° angle at B so the new line points the same way as AD.
- Through D, draw a line parallel to AB. Keep your ruler aligned with AB’s direction and draw the parallel through D.
- Label the intersection as C. Where the two new lines meet is point C. Connect BC and DC to complete the figure.
Quick checks
- Measure BC; it should be 4 cm (matching AD).
- Measure DC; it should be 6 cm (matching AB).
- Check that ∠A matches ∠C and ∠B matches ∠D (within your measurement accuracy).
If your last point lands “somewhere else,” don’t chase it around the page. Re-check the first three steps. In geometry, small early errors become big late surprises.
Method 2: Draw a parallelogram using parallel lines (base + height)
This is the go-to method when you’re given a base and a height, especially in area problems. Reminder: the height is the perpendicular distance between the bases. It is not the slanted side length (no matter how tall that side looks when you squint).
Step-by-step (given base b and height h)
- Draw base AB with length b.
- At A, construct a perpendicular to AB (a 90° line).
- Measure h units up that perpendicular and mark point E.
- Through E, draw a line parallel to AB. This is the “top base line.”
- Choose any point D on the top base line (not directly above A unless you want a rectangle). Draw segment AD.
- Through B, draw a line parallel to AD. Where it meets the top base line is point C.
You now have a shape with both pairs of opposite sides parallel, which is exactly the definition you need.
Why teachers love this method
It quietly supports the area formula: once the height is set, the area is base × height. The slant can change while the area stays the same, as long as base and height stay fixed.
Method 3: Construct a parallelogram with a compass and straightedge (circle intersection method)
If you’re doing formal constructions, you may not be allowed to measure angles. This method avoids angle measurement by using a theorem: if a quadrilateral has both pairs of opposite sides congruent, then it is a parallelogram. So we’ll force AB = DC and AD = BC.
Step-by-step
- Draw segment AB to the desired length.
- From A, draw a ray in the direction you want side AD. Mark point D so AD has the desired length (using your compass as a measuring tool).
- Set your compass to length AD. With center at B, draw an arc (or a full circle).
- Set your compass to length AB. With center at D, draw an arc (or full circle) that intersects the first arc.
- Label one intersection point as C. (If there are two intersections, either one works; the result is mirrored.)
- Draw segments BC and DC to complete quadrilateral ABCD.
Because AB = DC and AD = BC, the figure must be a parallelogram. For an extra confirmation, draw diagonals AC and BD: the diagonals should bisect each other.
Method 4: Draw it on the coordinate plane (fastest for graph paper)
On a coordinate grid, you can use slopes, translations, or a simple coordinate formula to place the fourth vertex.
Case A: You know three vertices in order (A, B, C are consecutive)
If A, B, and C are consecutive vertices, the missing vertex D is:
D = A + C − B (do the x-coordinates together, and the y-coordinates together).
Example: A(1, 2), B(6, 3), C(8, 7). Then D = (1 + 8 − 6, 2 + 7 − 3) = (3, 6). Plot D and connect A→B→C→D→A.
Case B: You choose a “slide” vector
Pick A and B for your base, then choose a vector ⟨p, q⟩ that represents how much you want to “slide” the base to create the opposite side. Set D = A + ⟨p, q⟩ and C = B + ⟨p, q⟩. Opposite sides will be parallel and equal automatically because one is a translation of the other.
How to verify your drawing (quick, practical checks)
- Parallel check: Use a set square or measure corresponding angles to confirm both pairs of opposite sides are parallel. On a coordinate plane, check that opposite sides have the same slope.
- Length check: Measure opposite sides; they should match in length (within your tool accuracy).
- Angle check: Opposite angles should match; consecutive angles should add to 180°.
- Diagonal check: The diagonals should bisect each other. Measure the halves; they should be equal.
If your drawing passes the parallel check and at least one other check, you’re usually solid. If it fails the parallel check, the shape is not a parallelogram by definition, even if it looks close.
Common mistakes and fixes
Mistake 1: Using the slanted side as the height
Height is always measured perpendicular to the base. If your height line isn’t a right angle to the base, it’s not the height. Fix it by drawing (or imagining) a perpendicular from the top base down to the bottom base and measuring that distance.
Mistake 2: Freehand “parallel” lines
Our eyes are great at recognizing patterns and terrible at measuring angles. If accuracy matters, use a drafting triangle, copy an angle carefully, or rely on compass constructions. The goal is “parallel,” not “parallel-ish.”
Mistake 3: Starting with a messy base line
If AB is crooked or the endpoints are fuzzy, everything that depends on AB will be fuzzy too. Draw the base cleanly, mark endpoints clearly, and use light guide lines. That one minute of care saves ten minutes of fixing.
Practice mini-challenges
- Challenge 1: Draw a parallelogram with base 7 cm, side 5 cm, included angle 45°. (Use Method 1.)
- Challenge 2: Draw one with base 8 cm and height 3 cm. (Use Method 2. Don’t confuse height with side length.)
- Challenge 3: Plot A(−2, 1), B(3, 2), C(5, 6). Find D and draw the figure. (Use D = A + C − B.)
Conclusion
The secret to drawing a parallelogram is simple: you’re not “drawing a cool slanted shape,” you’re building parallel relationships. Anchor one side, create a truly parallel partner across from it, then repeat for the second pair. Whether you use a protractor, a set square, a compass, or coordinate formulas, the logic stays the same. Add a quick verification passparallel sides, equal opposite sides, and diagonals that bisectand you’ll know your figure is correct before you ever write a label next to it.
Experiences related to drawing a parallelogram ( of real-world learning moments)
Many learners describe their first attempt as “it looks right… until I measure it.” That’s normal. This shape can fool the eye, especially when the sides are only slightly off from parallel. The experience usually triggers a helpful habit: checking parallel lines with a tool instead of relying on visual judgment. Once someone tries a set square or copies an angle carefully, the drawing often improves immediately. It feels like switching from guessing to controlling the geometry, which is exactly the goal.
Another common experience appears the first time area gets involved. People often assume the slanted side is the height because it “looks tall,” and then the calculation doesn’t match the expected answer. The turning point is realizing height is perpendicular to the base, even if that perpendicular drops into the middle of the shape instead of landing at a corner. After that, the base-and-height method becomes intuitive. Many learners remember the idea best when they picture cutting a triangular wedge off one side and sliding it to the other to make a rectangle with the same area. It’s also why “slant height” is a separate idea you’ll meet with other shapes, like pyramids.
Students who like art notice a different pattern: parallelograms show up everywhere as “tilted rectangles.” Tabletops, book covers drawn at an angle, brick patterns, and floor tiles in quick perspective sketches often read as this shape. The practical experience here is learning to keep opposite edges parallel so the object looks solid and intentional. Even without full perspective math, applying the rule “opposite edges stay parallel” makes drawings look cleaner and more confident.
On graph paper, the experience tends to be more algebraic: “Wait, I can compute the fourth corner?” Plotting three points and finding the missing vertex with D = A + C − B often feels like a shortcut that shouldn’t be allowed. But it’s really the translation idea in disguiseone side is a shifted copy of the opposite side. Learners also report that slope checks feel more meaningful after this. Equal slopes aren’t just a rule to memorize; they’re the reason the shape holds together.
Compass constructions bring a surprise that sticks: sometimes there are two correct answers. When arcs intersect at two points, either intersection can produce a valid parallelogram, just reflected across a diagonal. At first this can feel confusing (“Which one is right?”), but it’s a powerful lesson about constraints and symmetry. It also helps students understand that geometry doesn’t always produce a single picture; it can produce multiple solutions that all satisfy the same measurements.
Finally, people often notice that accuracy is less about being “good at drawing” and more about being systematic. A repeatable routinedraw the base cleanly, construct an angle or a height, build parallels, and verifyturns the process into something reliable. That reliability is the payoff: once you can draw this shape on purpose, you’re better prepared for rectangles, rhombi, coordinate proofs, and any task where parallel lines need to behave. It’s one of those small skills that quietly upgrades a lot of math. Once you trust your process, you spend less time erasing and more time thinking.


