
Table of Contents >> Show >> Hide
- What Is an RJ45 Connector, Exactly?
- What You Need Before You Start
- T568A vs. T568B: Pick a Wiring Standard Before You Touch the Cable
- How to Crimp RJ45: 14 Steps
- 1. Choose the right cable and connector
- 2. Decide whether you are wiring T568A or T568B
- 3. Slide on the strain relief boot first
- 4. Cut the cable end clean and square
- 5. Strip about 1 to 2 inches of the outer jacket
- 6. Remove the rip cord, spline, or separator if present
- 7. Untwist the pairs only as much as needed
- 8. Arrange the eight conductors in the correct color order
- 9. Straighten and flatten the conductors
- 10. Trim the wires evenly
- 11. Insert the wires fully into the RJ45 plug
- 12. Double-check the order and seating
- 13. Crimp the connector completely
- 14. Test the cable
- Common RJ45 Crimping Mistakes to Avoid
- When Crimping RJ45 Makes Sense
- Quick FAQ About RJ45 Crimping
- Experience Notes: What RJ45 Crimping Feels Like in the Real World
- Conclusion
Learning how to crimp an RJ45 connector is one of those practical tech skills that makes you feel wildly competent for about ten glorious minutes. You cut cable, line up eight tiny color-coded wires, squeeze a tool like you mean it, and suddenly you have a working Ethernet cable instead of a spaghetti noodle with ambition. Better yet, you save money, build custom cable lengths, and stop pretending that the mystery drawer of random network cords is “organized.”
Whether you are wiring a home office, setting up a router across the room, building patch cables for a switch, or fixing a damaged end, this guide walks you through exactly how to crimp RJ45 connectors in 14 steps. You will also learn the difference between T568A and T568B, how to avoid the most common crimping mistakes, and why testing your cable matters just as much as crimping it in the first place.
What Is an RJ45 Connector, Exactly?
In everyday networking language, people say “RJ45” to mean the plug on the end of an Ethernet cable. Technically, the common Ethernet plug is an 8P8C modular connector, but RJ45 is the name that stuck, and at this point it is basically the networking version of calling every tissue a Kleenex. What matters for you is simple: this is the plug that terminates twisted-pair Ethernet cable so it can connect to a router, switch, patch panel, wall jack, camera, printer, or desktop computer.
Crimping an RJ45 connector means attaching that plug to the end of a cable so the metal contacts pierce the conductors properly and the strain latch grips the cable jacket. Done right, you get a clean, reliable data connection. Done wrong, you get blinking port lights, mysterious dropouts, and a deep desire to blame the internet provider for something that is absolutely happening in your own hand.
What You Need Before You Start
- Ethernet cable: Cat5e, Cat6, or Cat6A depending on your project
- RJ45 connectors that match your cable type and conductor size
- RJ45 crimping tool, preferably a quality ratcheting model
- Cable stripper or a crimper with a built-in stripping slot
- Flush cutter or scissors for trimming conductors cleanly
- Optional strain relief boots
- Network cable tester
The single biggest beginner mistake is assuming all RJ45 plugs are interchangeable. They are not. Connector fit depends on cable construction, including conductor size, insulation diameter, and whether the cable is solid or stranded. In plain English: the wrong connector can ruin the job before you even start. Match the plug to the cable, and life gets much easier.
T568A vs. T568B: Pick a Wiring Standard Before You Touch the Cable
Before you crimp anything, choose a wiring standard and stick with it on both ends of the cable. For a normal straight-through Ethernet cable, both ends must use the same pattern. The two common standards are T568A and T568B. Functionally, both can perform the same when used consistently. T568B is more common in many residential and commercial installs, while T568A is often specified in certain standards-driven environments.
T568B color order
1. White/Orange
2. Orange
3. White/Green
4. Blue
5. White/Blue
6. Green
7. White/Brown
8. Brown
T568A color order
1. White/Green
2. Green
3. White/Orange
4. Blue
5. White/Blue
6. Orange
7. White/Brown
8. Brown
For most DIY Ethernet patch cable projects, T568B is the pattern people reach for first. Just do not freestyle the colors. Ethernet is not a place for personal creativity.
How to Crimp RJ45: 14 Steps
-
1. Choose the right cable and connector
Start by matching the RJ45 plug to the cable you are terminating. If you are using shielded cable, use a shielded connector. If you are using unshielded cable, use an unshielded connector. Also confirm whether the plug is designed for solid conductors, stranded conductors, or both. This step is not glamorous, but it prevents 80 percent of the avoidable drama later.
-
2. Decide whether you are wiring T568A or T568B
Pick one standard before you cut anything. Write it down if needed. Tape a tiny note to the table. Chant it under your breath. The goal is consistency. If both ends match, your straight-through Ethernet cable has a fighting chance of being a hero.
-
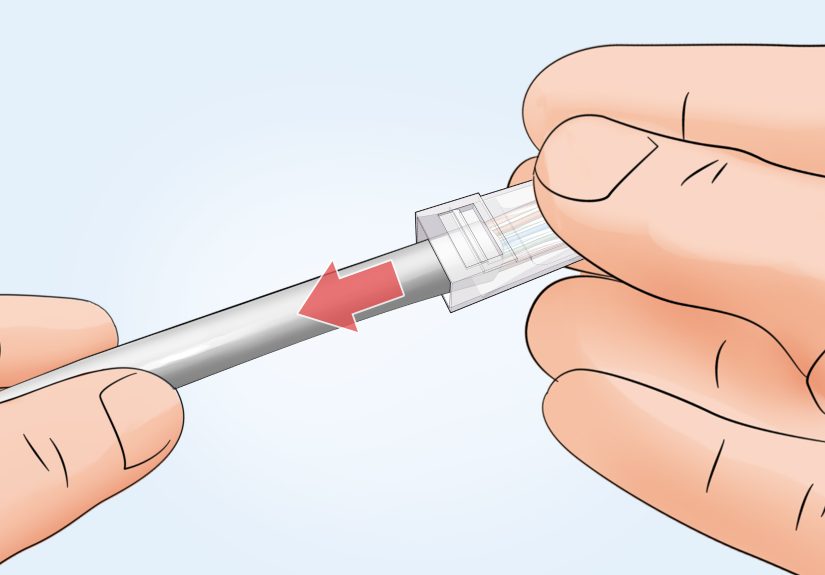
3. Slide on the strain relief boot first
If you are using a boot, slide it onto the cable before the connector. This sounds obvious until you forget and discover, several minutes later, that you have created a perfect cable end with the boot still sitting on the table like a tiny rubber insult.
-
4. Cut the cable end clean and square
Use a flush cutter or the cutting blade on your crimp tool to make a straight cut. A clean starting edge makes stripping easier and helps the conductors line up more evenly once you fan them out.
-
5. Strip about 1 to 2 inches of the outer jacket
Most RJ45 terminations call for roughly 1 to 2 inches of exposed conductor, depending on the plug design and whether it is pass-through or standard. Score the jacket gently. The goal is to remove the jacket without nicking the conductors underneath. Nicked wires are unreliable wires, and unreliable wires always wait until you tidy up before they fail.
-
6. Remove the rip cord, spline, or separator if present
Some Cat6 and most Cat6A cables include internal elements like a plastic spline, separator, foil, or rip cord. Trim them back neatly. Do not leave bulky internal material crowding the connector. You want the conductors straight, manageable, and able to seat fully inside the plug.
-
7. Untwist the pairs only as much as needed
This is where good cable jobs separate themselves from “technically it lights up” cable jobs. Untwist each pair only enough to arrange the wires in the correct order. The twists are there for a reason: they help preserve signal integrity and reduce interference. The closer you keep the twist to the plug, the better.
-
8. Arrange the eight conductors in the correct color order
Lay the wires flat in either T568A or T568B order. Most people find it easiest to fan the wires out, then press them between thumb and forefinger until they line up into a flat ribbon. Take your time here. One swapped pair can turn the whole cable into an expensive lesson.
-
9. Straighten and flatten the conductors
The straighter the wires, the easier it is to insert them cleanly into the plug. Gently pinch and smooth them so they sit side by side. You are not trying to break them into submission. You are just persuading eight tiny copper introverts to enter the connector in an orderly fashion.
-
10. Trim the wires evenly
Once the order is correct, trim the conductors straight across so they are all the same length. The cut should be clean and even. If you are using a standard non-pass-through connector, the wire length matters a lot because all eight conductors need to hit the end of the plug at the same time.
-
11. Insert the wires fully into the RJ45 plug
Push the conductors into the plug carefully, keeping them in order. The outer cable jacket should also enter the rear of the connector far enough for the strain relief tab to clamp onto the jacket, not just the individual wires. That jacket support is what keeps the connection from failing the first time someone tugs on the cable like they are starting a lawn mower.
-
12. Double-check the order and seating
Before crimping, look through the clear plug and confirm three things: the color order is correct, all eight conductors reached the front, and the jacket sits under the strain latch. This five-second inspection can save you fifteen minutes of cutting off a bad end and pretending you definitely meant to do it twice.
-
13. Crimp the connector completely
Insert the plug into the crimp tool and squeeze the handles fully through the cycle. A full crimp seats the contacts into the conductors and locks the connector onto the cable. If you stop halfway, you are not being gentle. You are manufacturing future disappointment.
-
14. Test the cable
Plug both ends into a cable tester and verify continuity, pair order, and basic connection quality. Testing is not optional if you care whether the cable actually works. A cable can look beautiful and still be wired incorrectly. The tester is the part where confidence meets reality.
Common RJ45 Crimping Mistakes to Avoid
Using the wrong connector for the cable
Cat6 cable is often thicker than Cat5e, and shielded cable is a different animal altogether. If the plug does not fit the conductor and jacket dimensions correctly, the termination may be mechanically weak or electrically unreliable.
Untwisting too much wire
The more conductor you untwist, the more you risk degrading performance. Keep the wire pairs twisted as close to the connector as practical.
Letting the jacket stop short
If only the individual conductors are inside the plug and the jacket is left outside, the strain relief cannot do its job. That is how cables pass a test at noon and fail by dinner.
Not checking the color order before crimping
One last visual check is faster than rebuilding the end. Always verify before you squeeze.
Skipping the tester
This is how innocent people lose an hour troubleshooting a switch port that was never the problem.
When Crimping RJ45 Makes Sense
Crimping your own RJ45 connectors is ideal when you need custom-length Ethernet patch cables, want a quick repair, or are creating direct device connections in a structured setup. It is especially handy in home networking, small office installations, workshop runs, cameras, access points, and lab setups.
That said, for many permanent in-wall runs, keystone jacks and patch panels are often cleaner, easier to manage, and more service-friendly over time. Crimped RJ45 plugs shine when the application calls for a plug at the end. The trick is knowing the difference between “convenient” and “I am making future me miserable.”
Quick FAQ About RJ45 Crimping
How much cable jacket should I strip?
Usually about 1 to 2 inches, depending on the connector style and tool. Follow the plug manufacturer’s instructions when available.
Is T568A better than T568B?
Not in terms of raw everyday performance for a normal straight-through cable. The main rule is to use the same standard on both ends.
Can I make my own Ethernet cable for gigabit networking?
Yes, as long as you use the right cable, right connector, correct wire order, clean termination, and a proper test afterward.
What is the maximum length for an Ethernet cable run?
The standard maximum length for a typical Ethernet run is 100 meters, or 328 feet. Beyond that, signal quality can suffer.
Are pass-through RJ45 connectors easier?
For many people, yes. They make it easier to verify wire order and can simplify termination, especially when you are still developing your cable-crimping superpowers.
Experience Notes: What RJ45 Crimping Feels Like in the Real World
Here is the part most tidy tutorials skip: crimping RJ45 connectors is easy to understand and slightly annoying to do well at first. The first cable usually goes like this. You strip the jacket. You flatten the pairs. You proudly line up the colors. Then, somehow, in the half-second between “this looks perfect” and “I am inserting the plug,” the blue and white-blue pair rebel, the brown conductor curls away like a dramatic movie exit, and suddenly your perfect sequence looks like a tiny networking mutiny.
That is normal. In fact, one of the most useful experiences you gain from making your own Ethernet cables is patience. Not abstract patience. Real, practical, fingertip patience. You learn that the quality of the cable is decided in those tiny moments when you resist the urge to rush. You keep the pairs as tight as possible. You trim more carefully. You check the wire order one more time. Then one more time again, because humility is part of the process.
After a handful of successful terminations, you also start to notice how different cables behave. Some cable jackets strip like a dream. Others feel like they were designed by a committee of angry walnuts. Some Cat6 conductors fall into line with barely any effort. Some thicker cables with splines and tighter jackets make you earn every inch. That hands-on experience teaches you something no product label ever fully explains: not all cable-and-plug combinations are equally pleasant, even when both claim compatibility.
Another real-world lesson is how much a good tool matters. Cheap crimpers tend to feel vague, flimsy, or inconsistent. A decent ratcheting tool gives you cleaner cuts, better seating, and more confidence that a full crimp really happened. That does not mean you need the fanciest tool in the universe. It just means the tool should not feel like it came free with a cereal box.
The most satisfying experience, though, is the moment a tested cable passes on the first try. It is ridiculously rewarding. Eight little lights blink in sequence, and suddenly you are no longer “someone messing around with wires.” You are now the person in the house or office who knows how to make a cable the right length, terminate it correctly, and fix a bad end without calling in backup. That is useful. It is also just plain fun.
Over time, crimping RJ45 becomes less about memorizing color order and more about rhythm. Strip, sort, flatten, trim, insert, check, crimp, test. Once that rhythm clicks, the task stops feeling fiddly and starts feeling efficient. You still respect it, because even experienced installers make a bad crimp now and then. But you stop fighting the process. And that is usually when your cables start looking cleaner, testing better, and lasting longer.
Conclusion
If you want a reliable custom Ethernet cable, learning how to crimp RJ45 connectors is worth the effort. The secret is not speed. It is consistency. Use the correct connector for the cable, choose either T568A or T568B and stick with it, keep the wire twists tight, seat the jacket properly, and always test the finished cable. Follow those rules and your homemade network cables can be neat, dependable, and ready for real-world use instead of serving as decorative blue noodles behind a desk.


