
Table of Contents >> Show >> Hide
- What Is a V Groove and Why Use It?
- Tools and Materials You’ll Need
- Step 1: Plan and Lay Out Your V Grooves
- Method 1: How to Create a V Groove with a Router
- Method 2: How to Create a V Groove with a Table Saw
- Method 3: Hand-Tool Options for V Grooves
- How to Avoid Tear-Out and Rough Edges
- Finishing Your V Grooves
- Common Mistakes When Cutting V Grooves (and How to Fix Them)
- Quick Reference: Which Method Should You Use?
- Real-World Experience: Lessons from Making V-Grooved Panels
A simple V groove in wood can do a lot of heavy lifting. It can turn plain plywood into faux
shiplap, dress up cabinet doors with shaker-style lines, or add crisp lettering to a DIY sign.
The good news: you don’t need a full furniture factory to do it. With a router, a table saw, or
even a couple of hand tools, you can cut clean V grooves that look like something straight off
a pro’s workbench.
This guide walks you, step by step, through how to create a V groove in wood the way a practical
how-to site like eHow would: clear instructions, safety first, and real-world tips from everyday
woodworking tasks. By the end, you’ll know which tools to use, how to lay out your grooves, and
how to avoid the most common mistakes that ruin a good board.
What Is a V Groove and Why Use It?
A V groove is exactly what it sounds like: a V-shaped channel cut into the surface of a board.
Picture two 45-degree cuts that meet at the center to form a neat, sharp “V.” Depending on your
tool setup, it can be shallow and decorative or deep and structural.
Common uses for V grooves
- Faux paneling: Turn a flat plywood sheet into “planked” wainscoting or beadboard.
- Cabinet and door details: Add vertical or horizontal lines to shaker-style doors.
- Sign making: Carve letters and designs with a V-groove router bit for crisp edges.
- Accent lines: Break up big, boring surfaces on tabletops, headboards, or wall art.
The exact method you use to cut a V groove in wood depends on the tools you already have in your
shop. Most DIYers reach first for a router with a V-groove bit or a
table saw set to 45 degrees.
Tools and Materials You’ll Need
You don’t need every item on this list, but you’ll want at least one main cutting tool.
Main cutting options
- Router (trim router or full-size) with a V-groove bit
- Table saw with blade tilted to 45°
- Optional: Plunge router for stopped grooves (great for panels and sign work)
Supporting tools and supplies
- Clamps to secure the workpiece to your bench
- Straightedge or guide rail to keep cuts straight
- Measuring tape, pencil, and marking knife
- Combination square or speed square
- Masking or painter’s tape (helps reduce tear-out on plywood)
- Scrap wood for test cuts
Safety gear
- Safety glasses
- Hearing protection
- Dust mask or respirator (especially for MDF or plywood)
- Push blocks or push sticks for table saw work
Before you even plug in a tool, inspect your board. Look for loose knots, cracks, staples, or
nails. Anything hiding in the wood can chip your bit, burn your blade, or launch shrapnel across
the shop.
Step 1: Plan and Lay Out Your V Grooves
A V groove is only as good as your layout. If your lines wander or your spacing is uneven, your
eyes will catch it immediatelyeven if nobody else knows what went wrong.
-
Decide on spacing.
For faux paneling or shaker details, common spacing is between 3 and 6 inches. For signs, your
groove layout follows your lettering. -
Mark centerlines.
Use a pencil and straightedge to draw the exact path of each V groove. For long boards, a long
level or chalk line works well. -
Use a marking knife for precision work.
On furniture pieces, lightly scoring the line with a marking knife can help your bit start
clean and reduce tear-out.
Take your time on this step. It takes 30 seconds to move a pencil line; it takes much longer to
fix a crooked groove.
Method 1: How to Create a V Groove with a Router
Using a router with a V-groove bit is one of the cleanest, most flexible ways to cut V grooves
in wood. You can cut straight lines, curved lines, or letters, and you can easily control depth
for subtle or dramatic effects.
1. Install and set up the V-groove bit
- Unplug the router before changing bits.
-
Insert the V-groove bit into the collet so the shank is fully engaged but not bottomed out.
Leave a small gap between the end of the bit and the bottom of the collet before tightening. - Tighten the collet firmly; a loose bit can chatter, burn the wood, or even come out mid-cut.
2. Set the cutting depth
A little goes a long way. For decorative lines, start with a depth of about 1⁄16 to 1⁄8 inch.
Deeper grooves (up to 1⁄4 inch or so) create stronger shadows but also remove more material and
put more load on the bit.
- Place the router base on the workpiece.
- Lower the bit until it just kisses the surface.
- Lock the depth stop, then adjust to your desired depth.
3. Align the router and guide
You can cut freehand, but if you want straight, crisp V grooves, use a straightedge or the
router’s edge guide.
- Clamp a straightedge parallel to your layout line so the router base rides against it.
-
Or, use the router’s fence (edge guide) and set the distance so the bit center lines up with
your pencil line.
4. Make a test cut
Always test on a scrap of the same material. Plywood, pine, and hardwood all behave differently.
A quick test lets you check:
- Depth and width of the groove
- Bit sharpness (no burning or fuzzy edges)
- Feed speed (too fast = ragged, too slow = burn marks)
5. Cut the V groove
- Clamp the workpiece securely to your bench or sawhorses.
- Stand in a stable stance with good sightlines along the cut.
-
Start the router away from the wood, let it come to full speed, then ease it into the
cut. - Move the router steadily along the guide. Don’t force it; let the bit cut at its own pace.
- At the end of the groove, gently lift the router out before turning it off.
For especially clean edges, you can make two passes: a shallow “scoring” pass, then a second
pass at full depth. This is particularly helpful on plywood and MDF where tear-out likes to
ruin the surface.
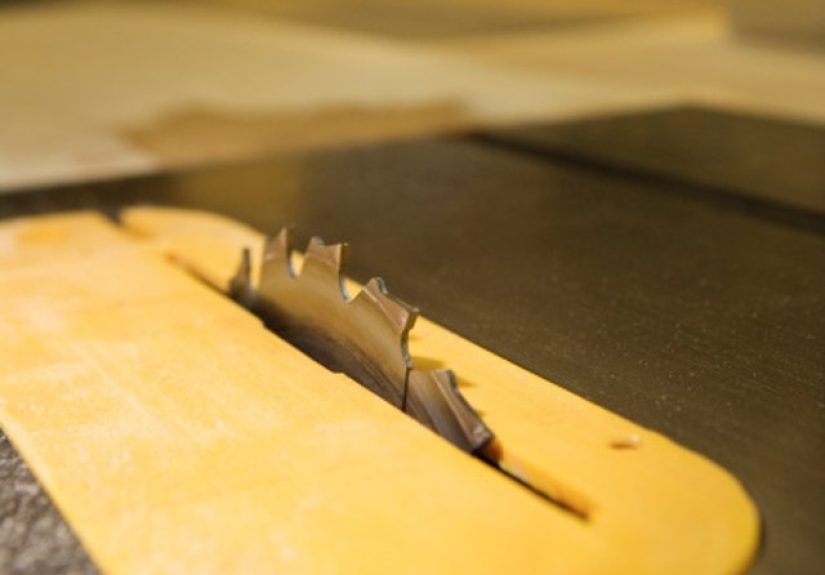
Method 2: How to Create a V Groove with a Table Saw
No router? No problem. A table saw can also create a V groove in wood by tilting the blade and
making two passes that meet in the middle. This method works best for straight grooves along the
length of a board.
1. Tilt the blade to 45 degrees
Most table saws have a bevel adjustment that lets you tilt the blade. Set it to 45°, then lock
it in place. Confirm with a digital angle gauge or a reliable square if you need a precise V.
2. Set up the fence and depth
-
Blade height: Raise the blade so the tip reaches the desired depth of the
V groove. -
Fence position: Align your first cut so that it forms one side of the V along
your marked line.
Run a test piece first. After the first cut, flip the board and make the second pass on the
opposite side, adjusting the fence so the two cuts meet perfectly at the bottom. When the tips
meet and there’s no flat left, you’ve nailed the setup.
3. Make the cuts safely
- Use push sticks or a push block to keep your hands away from the blade.
- Keep the board flat against the table and tight to the fence.
-
Make the first pass along the fence, then flip the board or adjust the fence for the second
pass to complete the V.
This method is great for long straight grooves, like faux beams, decorative ceiling boards, or
long wall panels. It’s less ideal for short, stopped grooves or curved designs.
Method 3: Hand-Tool Options for V Grooves
If power tools aren’t an option, you can still create a V groove in wood the classic way: with
a chisel, marking gauge, or specialty hand plane.
Basic hand-tool approach
- Mark your groove with a pencil and then lightly score it with a marking knife.
- Use a small chisel to deepen the scored line, forming a shallow “V” just along the mark.
-
Gradually widen and deepen the groove, pairing your chisel work with a small V-groove
carving tool or a dedicated V-groove plane.
This method is slower but offers incredible control. It’s ideal for fine details on boxes,
inlays, or areas where power tools can’t easily reach.
How to Avoid Tear-Out and Rough Edges
Tear-out happens when wood fibers break away instead of cutting cleanly, leaving a fuzzy or
chipped edge around your V groove. A few simple habits make a big difference:
- Use sharp bits and blades. Dull tools scrape and tear instead of slicing.
-
Make shallow first passes. A light scoring cut before full depth helps keep
edges crisp, especially on plywood and MDF. -
Support the fibers. Painter’s tape over the cut line or a backer board behind
the workpiece can reduce breakout. -
Mind your feed direction. With a handheld router, move against the bit’s
rotation for better control and cleaner cuts.
Finishing Your V Grooves
Once your V grooves are cut, a little finishing work takes them from “DIY attempt” to “nice
professional touch.”
-
Light sanding: Use a folded piece of sandpaper or a sanding sponge to soften
any sharp splinters without rounding everything over. -
Vacuum or blow out dust: Grooves love to hide sawdust, which can ruin paint
or stain coverage. -
Prime and paint or stain: For faux paneling, a primer helps fill open grain
and gives a cleaner painted finish in the grooves.
If you’re painting, don’t overload your brush. Thin coats help keep the V groove sharp and
defined instead of filling it in with paint.
Common Mistakes When Cutting V Grooves (and How to Fix Them)
Grooves are not straight
If your groove wanders off line, you likely cut freehand or your guide shifted. Always clamp
guides firmly and double-check that the router base or board is riding flat against them.
The bottom of the groove is flat, not sharp
This usually means your two table-saw passes didn’t perfectly meet at the center, leaving a
small flat. Adjust the fence slightly and make another light pass, or deepen the groove a hair
until the V point forms cleanly.
Burn marks in the groove
Burn marks suggest a dull bit, too slow of a feed rate, or the router staying in one spot too
long. Clean or replace the bit and keep the router moving at a steady pace.
Chipped edges around the groove
Chipping at the edges is usually tear-out. Use painter’s tape over the line, make a shallow
scoring pass, and support the fibers with a backer board where the bit exits the cut.
Quick Reference: Which Method Should You Use?
-
Router with V-groove bit: Best all-around option. Great for straight lines,
stopped grooves, and sign carving. -
Table saw: Excellent for long, straight grooves down boards or panels when
you need repeatable spacing. -
Hand tools: Ideal for fine details, small projects, or when working quietly
or without power tools.
Whichever method you pick, the core steps stay the same: plan carefully, secure your work,
make test cuts, and sneak up on perfect results with shallow passes instead of trying to do
everything in one go.
Real-World Experience: Lessons from Making V-Grooved Panels
Theory is nice, but most people really learn how to create a V groove in wood halfway through
their first projectusually right after the first mistake. Imagine a very common scenario:
turning a plain sheet of plywood into a “custom” paneled wall or headboard. The process looks
simple on paper, but a few real-world details make or break the result.
The first surprise many DIYers run into is just how sensitive long grooves are to layout and
alignment. On a small board, a slight wobble doesn’t scream for attention. On an 8-foot wall
panel, a groove that drifts even 1⁄16 inch from straight suddenly looks like it had one too many
cups of coffee. The fix is almost always more careful prep: snapping a chalk line, using a
rigid straightedge, and double-checking every clamp before turning on the router.
Another discovery happens when you switch materials. A soft pine panel might route like butter,
with virtually no tear-out. Then you move to plywood or MDF, and suddenly the edges look fuzzy
or chipped. Many people learn the “test piece” lesson here: always cut a groove in a scrap of
the exact same material first. That’s where you figure out how deep to cut, how fast to move the
router, and whether you need painter’s tape or a scoring pass to keep the edges clean.
There’s also the issue of confidence. The first time you fire up a router with a V-groove bit,
the noise and vibration can be intimidating. A helpful real-world habit is to start with
shorter, less visible groovesperhaps on the back side of a panel or on a scrap mock-up of your
design. Once you’ve made a few solid passes and seen how controllable the tool is with a good
guide, moving on to the “real” piece feels much less stressful.
On table saw projects, most practical experience comes from dialing in the fence position. The
first few test cuts often reveal a flat at the bottom of what was supposed to be a sharp V.
Adjusting the fence a tiny amount, making another test cut, and repeating until the two angled
kerfs meet perfectly is a routine part of the process. The key realization is that this is
normal, not a sign of failurefine-tuning is just part of woodworking.
DIYers also quickly learn that cleanup and finishing matter as much as cutting. V grooves trap
dust, and the first coat of paint or stain will highlight every stray chip you missed. Running a
vacuum nozzle along each groove, then following up with a folded piece of fine-grit sandpaper,
produces much more polished results. Many people find that a lightly sanded, primed, and
painted V-grooved panel suddenly looks like something that came out of a much higher-end shop.
Finally, the biggest “experience” takeaway is that V grooves are forgiving if you approach them
with patience. A slightly off groove can sometimes be disguised with filler and paint. A too
shallow groove can be deepened with another pass. The more projects you complete, the more
comfortable you’ll be experimentingadding curved grooves for decorative patterns, combining V
grooves with other bit profiles, or varying depth for shadow effects. Each project builds a bit
more skill and confidence, and before long, creating clean, professional-looking V grooves
becomes just another tool in your DIY toolbox rather than a mystery.


