Table of Contents >> Show >> Hide
- What You Need (and What You Don’t)
- Step 1: Start With the Right Cake
- Step 2: Prep the Fondant So It Behaves
- Step 3: Calculate How Much Fondant You Actually Need
- Step 4: Roll Out Fondant Without Turning It Into a Lint Magnet
- Step 5: Drape the Fondant Over the Cake (The Classic Method)
- Step 6: Get That Smooth Finish (and Optional Sharp Edges)
- Alternative Method: Paneling for Extra-Crisp Results
- Troubleshooting: Fix Common Fondant Problems Fast
- Storage and Serving Tips
- A Simple Practice Plan (Because Your First Fondant Cake Shouldn’t Be a Wedding)
- Conclusion: Smooth Fondant Is Mostly Prep, Timing, and Calm Hands
- Extra: Real-World Fondant Experiences (The Good, the Sticky, and the “Why Is It Sweating?”)
Fondant is the tuxedo of the cake world: smooth, polished, and quietly judging your buttercream swirls from across the room.
When it’s done right, a fondant-covered cake looks bakery-level fancysharp edges, clean sides, and a finish so sleek it could
audition for a smartphone commercial. When it’s done wrong… well, let’s just say fondant can go from “runway” to “wrinkly bedsheet”
in under 30 seconds.
The good news: covering a cake with fondant is absolutely learnable. The better news: most “fondant disasters” come from the same
handful of fixable issuestemperature, thickness, and not giving your cake a smooth foundation. This guide walks you step-by-step
through prepping the cake, rolling fondant, draping it cleanly, and troubleshooting like a calm, capable cake wizard.
What You Need (and What You Don’t)
Essential tools
- Turntable (or an upside-down mixing bowl that spins reasonably well)
- Offset spatula for frosting and smoothing
- Fondant smoother (two are even better for sharp edges)
- Rolling pin (plastic/silicone is great for smooth fondant; a clean wooden pin can work)
- Pizza cutter or sharp paring knife for trimming
- Cornstarch and/or powdered sugar for dusting (use a light hand)
- Ruler or thickness guides (optional, but helpful)
Nice-to-haves
- Silicone rolling mat (less sticking, easier lifting)
- Small pin/needle for popping air bubbles
- Fondant trimmer for cleaner cuts
- Bench scraper for smoothing frosting before fondant
What you don’t need: a $400 toolbox of specialty gadgets, a pastry degree, or the ability to hold your breath for seven minutes
while smoothing the sides. (You’ll be tempted. Don’t.)
Step 1: Start With the Right Cake
Fondant is honest. Brutally honest. Every bump in your frosting will show through like it’s being highlighted for a true-crime documentary.
So the real secret to a smooth fondant finish is what happens before the fondant ever touches the cake.
Cool the cake completely
Covering a warm cake is a shortcut to melting, sliding, and sadness. Let layers cool fully, then wrap and chill them if possible.
A chilled cake is sturdier, crumbs behave better, and your frosting firms up enough to support fondant without squishing.
Level, fill, and stack with intention
Trim domes so your cake is flat. Add filling between layers, then consider piping a “buttercream dam” around the edge to keep softer fillings
(like jam or curd) from squishing out under pressure. Fondant doesn’t love surprise bulges.
Crumb coat like you mean it
A crumb coat is a thin “primer” layer of frosting that traps crumbs and sets the stage for a smooth final coat.
Spread a thin layer over the entire cake, scrape it smooth, then chill until firm (often 20–30 minutes).
Choose the right under-coat: buttercream or ganache
- Buttercream is beginner-friendly and tasty. Chill it well before applying fondant.
- Ganache (especially chocolate ganache) can set very smooth and firmexcellent for sharp edges.
Whichever you choose, aim for a final coat that’s smooth, level, and chilled. Think “ice rink,” not “mountain trail.”
Step 2: Prep the Fondant So It Behaves
Knead to condition (and warm it slightly)
Fondant straight from the package is often stiff. Knead it until it’s pliable and smooth. Your hands will warm it slightly, making it easier to roll.
If it feels dry, knead in a tiny bit of vegetable shortening. If it feels sticky, let it rest briefly and dust your surface lightly.
Coloring tips
Use gel food coloring. Add a little at a time, kneading until the color is even. Gloves can prevent your hands from looking like you just lost a fight
with a highlighter set.
Roll to the right thickness
A good target is about 1/8 inch (around 3 mm). Too thick and it’s heavy and cracks at edges; too thin and it tears or shows imperfections.
If you’re aiming for ultra-sharp edges, you can go slightly thinnerbut only after you’re comfortable with the basics.
Step 3: Calculate How Much Fondant You Actually Need
Here’s the simple sizing formula for a round cake:
Fondant diameter = cake diameter + (2 × cake height) + extra allowance
Add about 1–2 inches extra to give yourself room for trimming and minor misalignment.
Example
For an 8-inch round cake that’s 4 inches tall:
8 + (2 × 4) + 2 = 18 inches
So roll your fondant into a circle about 18 inches across.
Step 4: Roll Out Fondant Without Turning It Into a Lint Magnet
Prep your surface
Lightly dust your counter or mat with cornstarch and/or powdered sugar. Go easytoo much powder can dry out fondant and cause cracking.
Some decorators prefer a very thin film of vegetable shortening to reduce dryness and prevent sticking.
Roll evenly
Start with a thick disk, then roll outward from the center, rotating frequently to keep a round shape.
Lift and turn the fondant occasionally to prevent sticking. If you see tiny cracks forming at the edges, it may be a little drypause,
knead briefly, and try again.
Check size and thickness
Use a ruler or eyeball it with confidence. (Confidence is not accuracy, but it’s emotionally supportive.)
Aim for that consistent 1/8-inch thickness across the whole sheet.
Step 5: Drape the Fondant Over the Cake (The Classic Method)
1) Make sure the cake is ready
Your cake should be smoothly frosted and chilledfirm to the touch. If the frosting is soft, you’ll dent it while smoothing, and fondant will capture
every fingerprint like a crime scene.
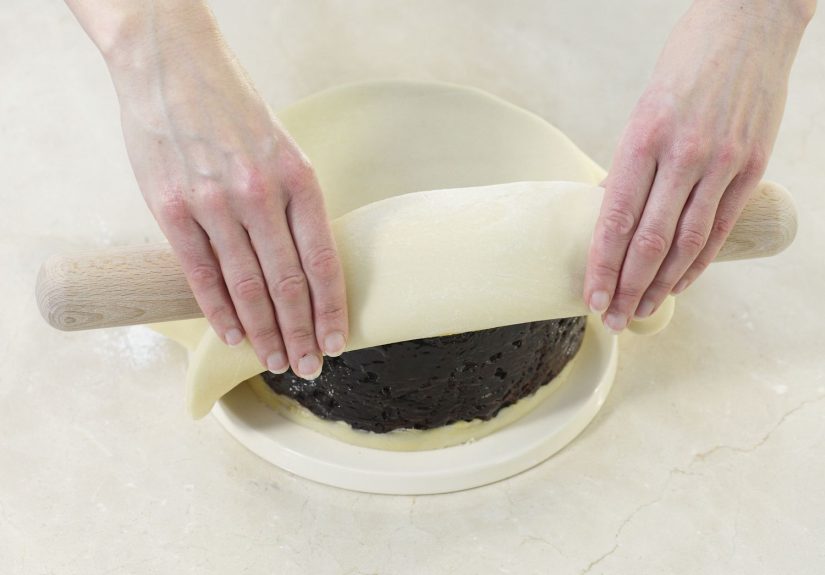
2) Lift with a rolling pin
Loosely roll the fondant onto your rolling pin (don’t stretch it). Then unroll it over the center of the cake, letting it drape evenly on all sides.
If it lands a little off-center, gently shift it while it’s still relaxed.
3) Smooth the top first
Use your hands or a fondant smoother to press the top flat from the center outward, pushing air toward the edges.
4) Work down the sides (avoid pleats)
Now the key move: lift and ease the fondant down the sides as you smooth. Don’t drag downward harddragging causes stretching and tearing.
Instead, gently pull the fondant away from the cake in small sections to release tension, then smooth downward.
5) Trim the excess
Use a pizza cutter or sharp knife to trim around the base, leaving a tiny margin if you want to tuck it neatly against the board.
If you’re using a cake board, aim for a clean seam right at the bottom edge.
Step 6: Get That Smooth Finish (and Optional Sharp Edges)
Smoothing like a pro
Use a fondant smoother on the top first, then the sides. Work in small sections while turning the cake. Your goal is to “polish” the surface,
not grind it into submission.
Sharper edges
For a cleaner top edge, use two smoothers: one holds the side steady while the other presses gently at the top edge.
The firmer and smoother your frosting underneath (often ganache or a well-chilled buttercream), the sharper your fondant edge can be.
Alternative Method: Paneling for Extra-Crisp Results
If you’ve ever tried to cover a tall cake and ended up with pleats at the bottom, paneling is your new best friend.
Instead of draping one huge sheet, you cover the top with a circle of fondant and wrap the sides with a long strip (or multiple strips).
When to use it
- Very tall cakes
- Square cakes (draping can get tricky at corners)
- When you want extremely sharp edges with less stress
The trade-off is seams. But with careful smoothing and strategic placement (back of the cake, under decorations), seams can be nearly invisible.
Troubleshooting: Fix Common Fondant Problems Fast
Air bubbles
Small bubbles can be pushed out with a smoother. Stubborn ones? Prick with a clean pin/needle, press the air out, then smooth the spot.
The hole should disappear as you polish.
Wrinkles and pleats at the bottom
This usually means the fondant is settling faster than you’re easing it. Lift the fondant gently away from the cake to release tension, then smooth again.
If the pleat is thick, you may need to lift, pinch out a tiny wedge, and smooth the seam.
Tearing near the top edge
Common causes: fondant rolled too thin, pulling down too hard, or fondant too dry. Patch by applying a tiny dab of water or edible glue, then pressing
a thin patch piece over the tear and smoothing the edges until blended.
Cracking
Cracking usually means the fondant is dry or over-dusted. Knead in a tiny bit of shortening next time and use less cornstarch/powdered sugar.
For small cracks, rub gently with a fingertip and a hint of shortening to soften and blend.
Sticky fondant
Sticky fondant often happens in humid kitchens or when it’s over-warmed. Let it rest a few minutes, dust very lightly, and avoid over-handling.
A fan or air conditioning can be your secret ingredient.
Condensation (“sweating”) after refrigeration
Fondant can sweat when moved from cold to warm air, leaving shiny or sticky spotsespecially on dark colors.
If you must refrigerate, keep the cake boxed to slow temperature changes, and let it come to room temperature gradually before opening the box.
Hands off while it dries; touching can leave marks.
Storage and Serving Tips
Room temperature is often best
Many fondant-covered cakes can sit at room temperature if the filling and frosting are not highly perishable.
Keep it covered in a cake box or under a cake dome, away from sunlight and heat.
Refrigerate only when necessary
If your cake includes perishable fillings (like whipped cream or certain dairy-heavy fillings), refrigeration may be needed.
Expect some condensation risk, and plan time for the cake to warm gently before serving.
Clean slices
For neat slices, use a long knife and wipe between cuts. A slightly warm knife can glide through fondant cleanly without dragging.
A Simple Practice Plan (Because Your First Fondant Cake Shouldn’t Be a Wedding)
Want the fastest improvement? Practice on a small cake. A 6-inch round is perfect: less fondant, less stress, quicker feedback.
Try a basic vanilla layer cake with buttercream underneath fondant. Focus on:
- Getting the frosting base smooth
- Rolling fondant evenly
- Draping without stretching
- Smoothing top-first, then sides
After one or two practice runs, your hands will “get it.” Fondant is weirdly like driving: at first everything feels impossible,
then suddenly your body knows what to do and you’re just annoyed at other people’s technique.
Conclusion: Smooth Fondant Is Mostly Prep, Timing, and Calm Hands
Covering a cake with fondant isn’t magicit’s a chain of small, smart choices. Cool and level your cake. Create a smooth frosting foundation.
Condition your fondant. Roll it evenly. Drape it gently. Smooth with purpose. And when something goes sideways, fix it quickly and move on.
The goal isn’t perfection; it’s a clean, confident finish that makes people say, “Wait… you made that?”
Extra: Real-World Fondant Experiences (The Good, the Sticky, and the “Why Is It Sweating?”)
Ask ten bakers about fondant and you’ll get twelve opinionssome enthusiastic, some skeptical, and at least one person who will whisper,
“Buttercream tastes better,” like they’re sharing forbidden knowledge. But when you talk to decorators who use fondant regularly, the stories
tend to rhyme: fondant is easy when you control the conditions, and dramatic when you don’t.
One of the most common first-timer experiences is the “I didn’t know my frosting mattered that much” moment. Someone spends an hour rolling a flawless
fondant circle, drapes it over the cake, smooths once… and suddenly every tiny frosting ridge appears like it was drawn with a Sharpie.
The lesson that usually follows is memorable: if you want a fondant cake to look like a professional fondant cake, you have to frost like you’re prepping
a stage for a spotlight. Many bakers start using a bench scraper more, chilling the cake longer, or switching to ganache for especially sharp work.
Another classic: the “humid kitchen betrayal.” The cake looks great at midnight. By morning, the fondant feels tacky, colors look a bit blotchy,
and the surface picks up lint like it’s magnetized. Bakers in humid climates learn to keep fondant handling minimal, dust lightly, and work in an air-conditioned
space when possible. Some even plan fondant work for the coolest part of the day and save decorations for later, because tiny details on sticky fondant can turn
into a fingerprint gallery fast.
Then there’s the dramatic refrigerator revealthe cake that looks perfect going in, but comes out “sweating” like it ran a marathon.
This is especially stressful with dark fondant (black, navy, deep red), where condensation can leave temporary blotches. The experience most decorators
remember is learning to keep the cake boxed while it warms gradually, resisting the urge to touch it, and trusting that the surface will dry on its own.
It feels wrong, like leaving laundry on the floor and expecting it to fold itself, but it often works.
Transport stories are their own genre. Bakers learn to love non-slip mats, level car floors, and keeping the cake out of direct sunlight.
A fondant-covered cake can handle a lotuntil it can’t. Sharp turns, warm trunks, and bumpy roads can cause shifting or subtle bulges at the base.
Many decorators develop a calm routine: chill the cake so the frosting underneath is firm, transport in a box, and carry a “repair kit” with a smoother,
a small blade, a pin for bubbles, and a little shortening. The first time you fix a tiny tear in the parking lot and nobody notices, you feel like you’ve leveled up.
Finally, there’s the moment every fondant user eventually has: the “it’s actually fun now” moment. Once your hands learn the rhythmsmooth the top, ease the sides,
release tension, polishfondant starts behaving less like a sugary tantrum and more like an edible fabric. That’s when people begin experimenting: sharp-edge cakes,
paneling, textured mats, stenciling, two-tone wraps, even mixing fondant with other mediums like modeling chocolate for flavor and flexibility.
It becomes less about fear and more about techniqueand suddenly your kitchen counter feels like a tiny cake studio.