Table of Contents >> Show >> Hide
- Before You Start: The 60-Second Safety Checklist
- What’s Actually Going Wrong in There?
- Method 1: Flashlight + Gentle Lint Removal (No Liquids)
- Method 2: Use Gentle Air (The Right Way) to Evict Dust
- Method 3: Dry Brushing (A Tiny Spa Day for Your Jack)
- Method 4: Minimal Isopropyl Alcohol (or Contact Cleaner) for Sticky Residue
- What NOT to Do (Unless You Enjoy Regret)
- Quick Troubleshooting After Cleaning
- When to Stop and Get Help
- How to Keep a Headphone Jack Clean (Without Making It a Lifestyle)
- Conclusion: Clean Smart, Not Aggressive
- Experiences People Commonly Have When Cleaning a Headphone Jack (Real-World Scenarios)
If your headphones only work when you hold the plug at a weird angle (the “left-ear-only limbo”), you’re hearing static
that sounds like a tiny thunderstorm, or your phone/laptop keeps acting like headphones are plugged in when they’re not,
there’s a good chance your headphone jack is simply… gross. The good news: most “broken” headphone jacks are just full
of lint, dust, pocket crumbs, or a mystery fuzz that definitely did not pay rent.
The better news: you can clean a 3.5mm headphone jack safely without turning your device into a science experiment.
This guide walks you through four easy methodsstarting with the gentlest, ending with the “okay, now we mean business”
optionplus what not to do if you’d like to avoid accidentally inventing the world’s smallest repair bill.
Before You Start: The 60-Second Safety Checklist
- Power down the device (and unplug it from power). For laptops/desktops, unplug accessories too.
- Work in bright light. A flashlight helps you see lint clumps hiding at the bottom of the jack.
- Use non-metal tools whenever possible. Metal can scratch contacts or short things out.
- Don’t spray liquids directly into the jack. If liquid is involved, it should be minimal and controlled.
- Be gentle. Headphone jacks have springy contacts inside. If you bend them, audio problems get worsenot better.
What’s Actually Going Wrong in There?
A headphone jack is a small port with metal contacts that press against your headphone plug (TRS/TRRS). When debris gets
between the plug and the contacts, the connection becomes inconsistent. That can cause:
- Crackling or popping when you move the plug
- Audio cutting out in one ear (or both) unless the plug is held “just so”
- Muffled sound due to poor contact
- Device stuck in headphone mode (especially on phones) because the jack’s detection switch is confused
Most of the time, the villain is lintespecially if your device lives in a pocket, purse, backpack, gym bag, or
the chaotic dimension known as “my car’s center console.”
Method 1: Flashlight + Gentle Lint Removal (No Liquids)
Best for: Visible lint/dust, headphone plug not seating fully, intermittent sound.
What you’ll need
- A flashlight (phone flashlight works)
- A wooden toothpick, plastic dental pick, or a soft plastic interdental brush
- (Optional) A magnifying glass if you want to feel like a very serious audio detective
Steps
- Inspect the jack. Shine the light into the port and look for fuzzy buildup or compacted lint.
- Use a non-metal pick. Gently insert the wooden/plastic tool just inside the jack.
- Hook, don’t stab. Angle toward the side walls and lightly drag lint outward. Avoid jamming downward.
- Work slowly. Pull out debris in small bits instead of trying to excavate a whole sweater at once.
- Test the fit. Plug in your headphones to see if the plug seats fully and audio improves.
Pro tip: If you find a stubborn lint “carpet” at the bottom, don’t force it. Move to Method 2 or 3 to loosen it first.
The goal is to remove debris without bending the internal contacts.
Method 2: Use Gentle Air (The Right Way) to Evict Dust
Best for: Loose dust, light lint, sand-speck situations, or after Method 1 loosened debris.
What you’ll need
- A rubber bulb blower (like a camera lens blower) or an electronics-safe air puffer
- (Optional) A can of compressed air used carefully and only if your device maker doesn’t discourage it
Steps
- Angle the device so the jack faces downward. Gravity is your helpful (and quiet) assistant.
- Puff air into the jack in short bursts. Aim slightly off-center so debris has somewhere to exit.
- Don’t use your mouth. Your breath adds moisture, and moisture + contacts = sadness.
- Re-check with a flashlight. If debris shifts but doesn’t leave, move to Method 3.
Important: Some manufacturers caution against using compressed air on certain devices or openings.
When in doubt, a bulb blower is the safer “air” option because it’s gentler and less likely to blast debris deeper.
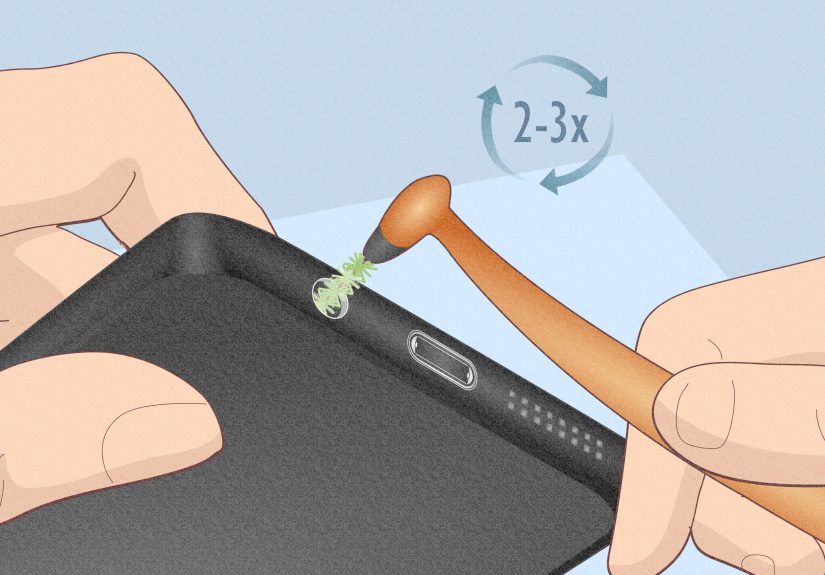
Method 3: Dry Brushing (A Tiny Spa Day for Your Jack)
Best for: Clumped lint, stubborn debris, crackle that improves when you wiggle the plug.
What you’ll need
- A clean, dry, soft-bristle toothbrush or a small anti-static electronics brush
- A bulb blower (or gentle air) to remove loosened debris
Steps
- Insert the brush tip just into the opening. Don’t jam it deep like you’re trying to brush the jack’s teeth (it doesn’t have any).
- Rotate lightly in small circles to break up compacted lint.
- Pull out and blow out. Remove the brush, then puff air to clear loosened debris.
- Repeat a couple of times. Most gunk comes out in rounds, not miracles.
- Test with multiple headphones if possible. A worn plug can mimic a dirty jack.
If your audio improves after brushing but still crackles occasionally, you may have residue on the contacts.
That’s where Method 4 comes incarefully.
Method 4: Minimal Isopropyl Alcohol (or Contact Cleaner) for Sticky Residue
Best for: Crackle that persists after dry cleaning, oily residue, oxidation-related noise, or a jack that “kind of works” but sounds crunchy.
What you’ll need
- High-percentage isopropyl alcohol (ideally 90%+ for electronics cleaning)
- A very small cotton swab (or a tightly wrapped micro-swab)
- (Optional) A purpose-made electronics contact cleaner used sparingly and only as directed
Steps
- Power off the device and keep it unplugged.
- Dampendon’t soak the swab. You want it barely moist, not dripping.
- Twist gently inside the jack. Think “polish,” not “scrub.” A light back-and-forth twist is enough.
- Let it dry fully. Give it several minutes (longer if you used more than a whisper of liquid).
- Test audio with a known-good pair of headphones.
When should you use contact cleaner? If you’re dealing with oxidation or persistent crackle on metal contacts,
a small amount of an electronics contact cleaner can helpbut only if it’s appropriate for your device and used minimally.
Avoid saturating the jack. “More” does not mean “cleaner”; it means “more liquid inside your device,” which is rarely a good plan.
What NOT to Do (Unless You Enjoy Regret)
- Don’t use metal objects like paper clips, pins, SIM tools, or tiny swords from action figures. You can scratch or bend contacts.
- Don’t flood the jack with alcohol, water, cleaner, or anything else you’d pour on a sandwich.
- Don’t blow with your mouth. Moisture from breath can corrode contacts and create new issues.
- Don’t “drill” with a swab. Cotton can snag and leave fibers behindcongrats, you just made more lint.
- Don’t assume it’s always dirt. If the jack feels loose, the plug won’t click in, or audio cuts out no matter what, the port may be worn or damaged.
Quick Troubleshooting After Cleaning
Try this simple test sequence
- Test two different headphones (a damaged plug can cause the same symptoms).
- Test while stationary. If audio is stable until you move, you’re still dealing with contact issues (dirt or wear).
- Restart the device. Some phones/laptops need a quick reset to “forget” headphone mode.
- Check settings (computer audio output device, phone accessibility audio settings, etc.).
If your device still thinks headphones are plugged in after cleaning, repeat the dry methods first (air + brush), then try a tiny alcohol swab againonly if needed.
If nothing changes, the detection mechanism may be damaged and it’s time for repair.
When to Stop and Get Help
Cleaning is great, but it’s not magic (ironically, unlike some of the internet). Consider professional service if:
- The headphone plug feels loose or never seats correctly
- Audio cuts out even after repeated careful cleaning
- You see signs of liquid damage (corrosion, discoloration, a “been through a storm” smell)
- The device was recently dropped and the port may be physically damaged
How to Keep a Headphone Jack Clean (Without Making It a Lifestyle)
- Keep devices out of lint-heavy pockets (hoodie pockets are basically lint factories).
- Store headphones in a case instead of letting the plug roll around collecting debris like a magnet.
- Do a quick monthly “flashlight check” if you use the jack dailyespecially on laptops and gym devices.
- Insert plugs straight. Angled insertion wears contacts and invites connection problems.
Conclusion: Clean Smart, Not Aggressive
A properly cleaned headphone jack is usually the difference between crisp audio and the sound of a robot chewing tinfoil.
Start with dry inspection and non-metal lint removal, then use gentle air, then a soft brush. Only graduate to minimal
isopropyl alcohol (or a carefully chosen contact cleaner) if dry methods don’t do the trick. The theme here is simple:
be gentle, be patient, and don’t introduce a lake into your device.
Experiences People Commonly Have When Cleaning a Headphone Jack (Real-World Scenarios)
Most people don’t realize their headphone jack is dirty until it turns everyday listening into a puzzle. One of the most
common “aha” moments happens when the headphone plug suddenly won’t seat all the way in. The user swears the jack “got
smaller,” but what actually happened is that pocket lint compacted into a dense pad at the bottom. It’s like a tiny felt
coaster living inside the port. In this situation, Method 1 usually wins: a flashlight reveals the fuzzy culprit, and a
wooden toothpick can pull out surprising amounts of lintoften enough to restore a satisfying click when the plug goes in.
Another classic scenario: the sound crackles only when the plug moves, like when you’re walking or the cable brushes your
jacket. People often assume the headphones are failing (and sometimes they are), but the real issue can be a “half-contact”
connection caused by grime on the side contacts. Here, Method 3 (dry brushing) is the hero. A few gentle rotations with a
soft brush can break up the clump that’s preventing full contact. The funny part is the post-clean test: users plug in the
same headphones and suddenly look personally offended that sound quality was this good the whole time.
Then there’s the “beach day disaster.” Sand is tiny, stubborn, and determined to become one with your electronics.
If sand gets into a headphone jack, aggressive poking usually makes it worsegrains can scratch contacts or get driven deeper.
People who have the best results treat it like a careful cleanup: device angled downward, gentle bulb-blower puffs, then a light brush
to loosen whatever is clinging. The goal isn’t to excavate every grain immediately; it’s to remove the bulk safely so the plug can seat
and audio can flow again.
A more frustrating experience is when the jack “mostly works” but still sounds crunchyespecially on older laptops, car AUX ports,
or devices that sit unused for long stretches. This is where residue and oxidation can enter the chat. Many users report that dry cleaning
helps a little but doesn’t fully fix the crackle until they use a tiny amount of isopropyl alcohol on a micro-swab (Method 4). The key lesson
people learn the hard way: the swab should be barely damp, not wet. Overdoing it can leave moisture in the jack and create new issues, including
temporary audio dropouts until everything dries.
Finally, there’s the “I tried a paperclip and now it’s worse” story. It’s incredibly common because it feels intuitive: thin, metal, fits in the hole
what could go wrong? Unfortunately, metal tools can bend the internal contacts, scratch them, or short something if the device is powered. People who
run into this often describe a new symptom after their paperclip adventure: the plug feels loose, audio cuts out more easily, or one channel is permanently
weaker. The takeaway: if you’re going to poke around inside a headphone jack, non-metal tools and gentle methods are the difference between a quick fix and a
repair appointment.
Across all these scenarios, the most consistent “experience-based” advice is simple: go slow, start dry, and escalate in small steps. When users follow that
progression, cleaning a headphone jack feels less like risky DIY and more like basic maintenancekind of like cleaning your glasses, except the glasses are
inside your phone and invisible and full of lint that somehow came from a parallel universe.