
Table of Contents >> Show >> Hide
- Why Raised Garden Beds Work So Well
- Plan First: Location, Sun, and a Path You Can Actually Walk
- Choose the Best Raised Bed Size (The “Reach Test”)
- Pick Materials That Last (Without Overcomplicating Your Life)
- Tools and Materials Checklist
- Step-by-Step: Build a Sturdy Raised Garden Bed
- Step 1: Decide your exact dimensions
- Step 2: Cut boards (or have them cut)
- Step 3: Prep and level the site
- Step 4: Assemble the frame corners
- Step 5: Add bracing so the sides don’t bow
- Step 6: Install a bottom layer (optional but often worth it)
- Step 7: Consider a side liner (optional)
- Step 8: Fill with the right soil mix (and save yourself a season of disappointment)
- Raised Bed Soil Mix Recipes (Pick One That Fits Your Budget)
- Planting Tips That Make Raised Beds Feel Like a Cheat Code
- Watering, Mulch, and the Mystery of the Constantly Thirsty Bed
- Maintenance: Keep Your Raised Bed Productive Year After Year
- Common Mistakes (So You Don’t Have to Learn the Hard Way)
- Real-World Raised Bed Lessons (Experience Section)
- Conclusion
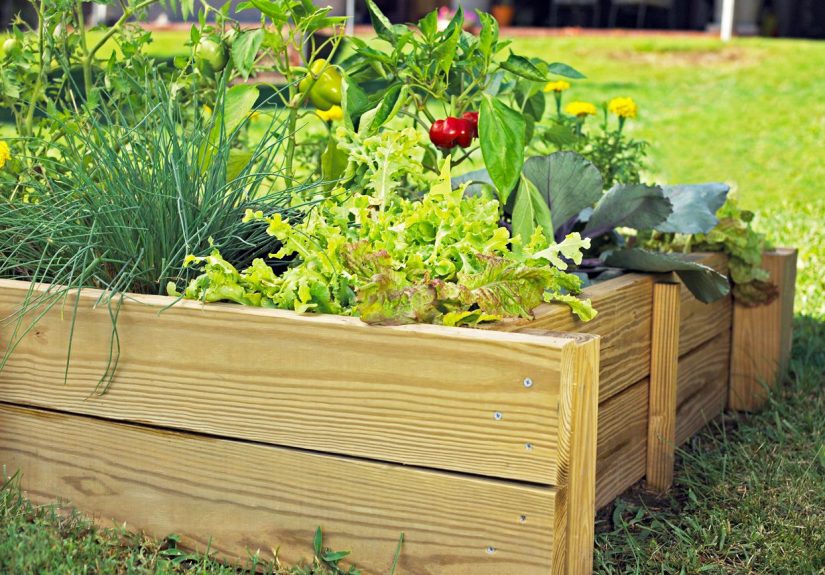
If you’ve ever tried to plant a tomato while doing a full squat like you’re training for the Olympics, a raised garden bed might be your new best friend. Raised beds make veggie and flower planting easier on your back and knees, help you control soil quality, improve drainage, warm up faster in spring, and keep your garden looking a little more “intentional” and a little less “I dropped a seed packet and hoped for the best.”
This guide walks you through building a sturdy, long-lasting raised garden bed (the classic 4′ x 8′ style, with options to customize). You’ll get practical sizing advice, smart material choices, step-by-step building instructions, soil recipes, and planting tipsplus a longer, real-world “what I learned the hard way” section at the end.
Why Raised Garden Beds Work So Well
Raised bed gardening shines because it lets you start with great soil instead of wrestling with compacted clay, sand, or mystery-fill left by previous homeowners. You can also tailor the bed depth and layout to what you’re growingshallow-rooted lettuces and herbs, deep-rooted carrots, or tall flowers that need stable footing.
- Better soil control: You choose the mix, the nutrients, and the texture.
- Improved drainage: Water moves through more evenly, especially in heavy soils.
- Fewer weeds: Defined edges and a smart base layer reduce weed pressure.
- Earlier planting: Soil in raised beds warms sooner in spring.
- Easier access: Less bending, fewer aches, more “I can do this again tomorrow.”
Plan First: Location, Sun, and a Path You Can Actually Walk
Before you buy boards, choose your bed location like you’re picking real estate (because you are… for lettuce). A great raised bed placed poorly is still a poorly placed raised bed.
Pick a spot with the right sunlight
Most vegetables and many sun-loving flowers want 6–8 hours of direct sun. If you’re growing leafy greens, you can get by with less, but fruiting crops like tomatoes and peppers really want that bright exposure.
Stay near water (future-you will send thank-you notes)
Raised beds drain wellwhich also means they can dry out faster than in-ground gardens. Put beds where a hose reaches comfortably, or plan for drip irrigation.
Make room for paths
Give yourself enough walkway space to kneel, harvest, and roll a wheelbarrow without doing a tightrope act. As a general guideline, aim for about 18–24 inches for simple foot traffic, and more if you want cart or accessibility-friendly paths.
Choose the Best Raised Bed Size (The “Reach Test”)
The most common beginner mistake is building a bed that’s too wide. It looks great on paper… until you’re leaning over it, stretching like a yoga instructor to weed the middle.
Recommended width
- 3–4 feet wide is the sweet spot.
- If you can access the bed from both sides, 4 feet is usually perfect.
- If access is only from one side (against a fence/wall), keep it closer to 2–3 feet.
Recommended length
Length is flexible. Many people use 6–8 feet because boards are commonly sold in those lengths and it’s easy to scale planting plans. Longer beds can work, but they need extra bracing so the sides don’t bow.
Recommended height/depth
A bed that’s 10–12 inches tall works for many vegetables if your ground soil underneath is decent. If you want truly easy access (less bending) or you’re gardening over hard surfaces, a taller bed18–24 inchescan be far more comfortable. Just remember: taller beds require more soil, which affects cost.
| Bed Depth | Best For | Notes |
|---|---|---|
| 8–12 inches | Herbs, lettuce, many flowers | Works best if the soil underneath drains well. |
| 12–18 inches | Most vegetables | Great all-around depth without huge soil costs. |
| 18–24 inches | Easy access, patios, mobility-friendly gardening | More soil needed; stronger boards/bracing recommended. |
Pick Materials That Last (Without Overcomplicating Your Life)
Your raised bed frame is basically an outdoor box that’s constantly exposed to moisture. Rot resistance and sturdy construction matter more than fancy joineryunless you’re trying to impress someone named “Chip” at the hardware store.
Common frame materials
- Naturally rot-resistant wood: Cedar and redwood are popular because they hold up well outdoors without chemical treatment.
- Other wood options: Some softwoods can work if thicker boards and good bracing are used, but they may not last as long.
- Pressure-treated lumber: Modern residential treatments are widely used. If you’re cautious (especially for food crops), consider a barrier liner between wood and soil and avoid older reclaimed treated lumber of unknown type.
- Metal kits: Long-lasting and neat-looking; can heat up more in full sun.
- Composite/recycled plastic lumber: Durable and rot-proof, usually higher cost.
- Block/stone/brick: Very durable, but heavier and more work to level properly.
A note on fasteners (don’t sabotage yourself with the wrong screws)
Use exterior-rated fasteners. Coated deck screws, stainless steel, or hot-dipped galvanized options last better outdoors than standard indoor screws (which rust and snap like they’re auditioning for a drama series).
Tools and Materials Checklist
You don’t need a full workshop. You do need a few basicsand you’ll want to follow tool safety instructions carefully. If you’re new to power tools, ask an experienced adult to help with cutting and drilling.
Tools
- Measuring tape
- Carpenter’s square (or a speed square)
- Level
- Drill/driver + bits (including a pilot bit)
- Saw (or have boards cut at the store)
- Shovel and rake
- Staple gun (optional, for attaching mesh/liner)
Materials (example for a basic 4′ x 8′ x ~12″ bed)
- Boards for the sides (commonly 2×8, 2×10, or 2×12 depending on desired depth)
- Corner posts or corner bracing (optional but helpful)
- Exterior-rated screws (often 2.5″ for attaching boards; longer if fastening into posts)
- Optional mid-span braces (recommended for long sides and taller beds)
- Optional hardware cloth (to block burrowing pests)
- Optional cardboard (weed-smothering base layer)
- Soil components: topsoil, compost, and an aeration component (like peat/coir/perlite)
Step-by-Step: Build a Sturdy Raised Garden Bed
This method is beginner-friendly, strong, and easy to customize. The core idea: build a square frame, brace it, level it, protect the bottom, then fill with a high-quality soil mix.
Step 1: Decide your exact dimensions
A classic size is 4′ x 8′ because it’s reachable and efficient. Pick your height based on what you grow and how much bending you want to avoid.
Step 2: Cut boards (or have them cut)
Many stores will cut boards for you. For a simple 4′ x 8′ frame, you’ll typically need:
- Two long sides: 8-foot boards
- Two short sides: 4-foot boards (or cut from an 8-foot board)
Step 3: Prep and level the site
Remove rocks, sticks, and tall weeds. If the bed will sit on grass, you can remove the sod or smother it with a thick cardboard layer (no glossy print). The key is getting the frame reasonably level so water doesn’t run to one end.
Step 4: Assemble the frame corners
- Lay boards out in a rectangle.
- Pre-drill pilot holes to prevent splitting.
- Screw the short sides into the long sides (or into corner posts if you’re using them).
Pro tip: To check if the frame is square, measure diagonally from corner to corner. If the diagonal measurements match, the frame is square. If they don’t, nudge until they do.
Step 5: Add bracing so the sides don’t bow
Soil is heavy. Wet soil is heavier. A long bed filled with wet soil can push boards outward over time. Add a mid-span brace on long sides (and additional bracing for beds taller than 12 inches). This is one of those “boring steps” that quietly prevents future heartbreak.
Step 6: Install a bottom layer (optional but often worth it)
What goes under a raised garden bed depends on your situation:
- To block weeds: Use cardboard or several layers of newspaper, then wet it down so it stays put.
- To stop burrowing pests: Staple hardware cloth to the bottom before filling (especially in areas with gophers/voles/groundhogs).
- To separate from questionable soil: Consider a barrier layer, but make sure drainage still works and avoid trapping water.
Step 7: Consider a side liner (optional)
A liner is not mandatory for most beds, but it can help in specific cases:
- If you’re using pressure-treated lumber and want extra peace of mind, a heavy-duty plastic liner between wood and soil can reduce direct soil contact.
- If your bed is very tall, a liner can help keep soil from washing out through gaps and protect paths.
If you use plastic, avoid sealing the bottomyour bed needs to drain.
Step 8: Fill with the right soil mix (and save yourself a season of disappointment)
Raised beds do best with a mix that holds moisture and drains well. Straight “dirt” often compacts. Straight compost can be too rich and may settle unevenly. Aim for balanced structure.
Raised Bed Soil Mix Recipes (Pick One That Fits Your Budget)
Recipe A: The “Balanced and Beginner-Friendly” Mix
- 40% screened topsoil
- 40% compost
- 20% aeration component (coir, peat, perlite, or fine pine bark)
This mix drains well, feeds plants, and stays workable.
Recipe B: The “Deep Bed” Mix (lighter, great for taller beds)
- About 50% compost
- About 50% soilless growing mix
- Optional: add up to 20% topsoil in beds 16 inches or deeper for extra mineral content and weight
Recipe C: The “Soil + Compost” Extension-Style Blend
- About 70% soil
- About 30% compost
This is a classic approach that keeps organic matter in a sensible range while maintaining mineral soil structure.
How much soil do you need?
Calculate volume in cubic feet:
Length (ft) × Width (ft) × Height (ft) = Cubic feet
Example: A 4′ × 8′ bed that’s 12″ tall (1 ft) needs:
4 × 8 × 1 = 32 cubic feet
Add about 10% extra for settling, so plan for roughly 35 cubic feet.
If buying in bulk by the cubic yard, remember:
1 cubic yard = 27 cubic feet
So 35 cubic feet is about 1.3 cubic yards.
Planting Tips That Make Raised Beds Feel Like a Cheat Code
Raised beds aren’t just easier to work inthey’re easier to organize. A little planning makes your first season dramatically more satisfying.
Simple veggie layout example (4′ x 8′)
- North side: Trellis crops (cucumbers, pole beans) so they don’t shade everything else.
- Middle: Peppers, bush beans, basil, or compact tomatoes with cages.
- South edge: Lettuce, radishes, green onionsquick crops you can harvest often.
Flower bed layout example (pollinator-friendly and cut-flower ready)
- Back row: Taller flowers like cosmos or snapdragons (depending on your climate).
- Middle: Zinnias for color and cutting.
- Front edge: Marigolds or alyssum to fill gaps and attract beneficial insects.
Watering, Mulch, and the Mystery of the Constantly Thirsty Bed
Raised beds often need more frequent watering than in-ground bedsespecially in hot, windy weather. The good news: consistent watering is easier when you plan for it.
- Mulch matters: Add straw, shredded leaves, or bark mulch to reduce evaporation.
- Water deeply: Light sprinkles encourage shallow roots. Deep watering encourages stronger plants.
- Consider drip irrigation: A simple drip line or soaker hose can be a game-changer.
Maintenance: Keep Your Raised Bed Productive Year After Year
Raised beds settle over time. That’s normal. Each season, top off with compost and keep an eye on soil structure.
- Add 1–2 inches of compost each season to refresh nutrients.
- Rotate crops (even in small spaces) to reduce pest and disease pressure.
- Check screws/bracing annually and tighten if needed.
- Keep pathways covered (mulch, gravel, or weed-suppressing material) to reduce mud and weeds.
Common Mistakes (So You Don’t Have to Learn the Hard Way)
- Making the bed too wide: If you can’t reach the center comfortably, maintenance becomes a chore.
- Skipping bracing: Bowed sides happen slowlythen suddenly you notice your bed looks like it’s exhaling.
- Filling with straight compost: It can be too nutrient-rich and may shrink a lot as it breaks down.
- Using a “sealed” plastic bottom: Raised beds need drainage, or roots will suffer.
- Forgetting the path: Muddy, cramped paths make gardening feel like an obstacle course.
Real-World Raised Bed Lessons (Experience Section)
My first raised bed was a classic beginner move: I built it fast, felt proud, and then spent the next season discovering all the ways “fast” can become “annoying.” I used thinner boards because they were cheaper, skipped serious bracing because the bed looked sturdy enough, and made it just wide enough that the center was technically reachableif I leaned in like I was trying to hear a secret. By mid-summer, I was doing that awkward half-lunge, half-stretch every time I needed to weed. The bed didn’t just grow vegetables; it grew a daily reminder that design is a form of kindness to future-you.
The next lesson showed up after the first few heavy rains. Soil is heavy, but wet soil is the kind of heavy that makes you rethink physics and your life choices. The long sides of my bed started to bow outward slightly, not dramaticallyjust enough that the top edge looked less like a rectangle and more like a gentle smile. That “smile” cost me an afternoon of adding braces later. Now I brace from the start, especially on beds longer than 6 feet or taller than a foot. It’s not the glamorous part of the build, but neither is rebuilding a bed while your tomatoes watch silently.
Then there was the soil settling. I filled the bed to the top, planted right away, and felt like a gardening geniusuntil the soil dropped several inches over the next couple of weeks. It wasn’t a disaster, but it did mean my seedlings were suddenly sitting lower than planned and the bed looked half-empty. These days, I lightly water in layers as I fill, then expect settling. If I’m planting right away, I top off after a week or two. It’s normal for organic matter to compress and break down. The trick is planning for it instead of acting surprised like the soil pulled a prank.
Watering taught me the most. Raised beds drain beautifully, which is greatunless it’s July, the sun is doing its absolute most, and your bed dries out faster than you can say “mulch.” I learned to stop guessing and start checking moisture a few inches down. I also learned that mulch is not optional decoration; it’s the difference between steady moisture and daily panic. Once I added a simple soaker hose setup and a thick mulch layer, my plants stopped acting like I was neglecting them (and I stopped hovering over the bed like a worried stage parent).
I also learned to build for the garden I actually have, not the garden I imagine in a daydream. If your yard has a slight slope, leveling matters. If you’re placing beds near trees, roots will compete for water. If you’re gardening on a patio, depth and drainage become everything. And if burrowing pests are common where you live, hardware cloth on the bottom is an “install once, thank yourself forever” upgrade. The most satisfying builds are the ones that match your reality: your climate, your pests, your budget, your time, and your tolerance for fixing things mid-season.
Finally, the best surprise: once the bed was built well, gardening felt easier in a way that’s hard to describe until you experience it. Weeding took minutes instead of forever. Harvesting didn’t hurt. Planting felt organized. The bed became a small, manageable ecosystem instead of a battle with the ground. And yes, I still make mistakeslike planting more zucchini than any household should legally be allowed to growbut now the mistakes happen in a system that’s easier to adjust. A solid raised bed doesn’t guarantee a perfect garden. It just makes the learning curve friendlier… and your knees significantly happier.
Conclusion
Building a raised garden bed is one of the most practical DIY upgrades you can make for easier veggie or flower planting. Start with a smart size you can reach, use durable materials, brace your frame, protect the bottom if needed, and fill with a balanced soil mix that supports healthy roots. After that, it’s just you, the seasons, and the delightful chaos of growing thingspreferably with fewer aches and far more basil than you thought you’d need.


