Table of Contents >> Show >> Hide
- Why a Popsicle Stick Tower Is a Great STEM Project
- What You Need
- How to Build a Popsicle Stick Tower: 13 Steps
- Step 1: Decide on the Tower Goal
- Step 2: Sketch a Simple Design First
- Step 3: Build a Wide, Stable Base
- Step 4: Make Matching Side Panels
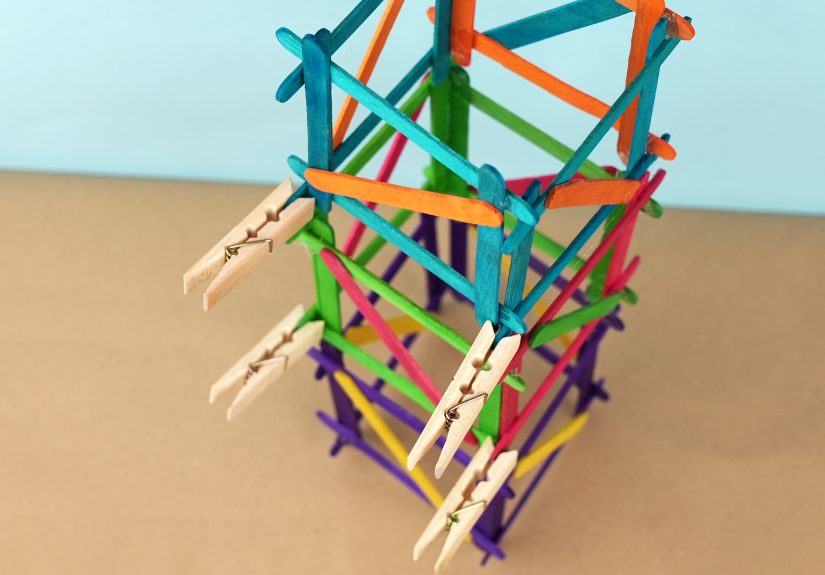
- Step 5: Use Triangles, Not Just Squares
- Step 6: Glue Joints Carefully and Consistently
- Step 7: Let Early Sections Dry Flat
- Step 8: Assemble the Tower Core
- Step 9: Add Cross-Bracing on Every Side
- Step 10: Build Upward in Light, Even Layers
- Step 11: Reinforce the Middle and the Top
- Step 12: Test, Observe, and Redesign
- Step 13: Measure the Final Tower and Record What Worked
- Common Mistakes to Avoid
- How to Make Your Popsicle Stick Tower Stronger
- Conclusion
- Experiences and Lessons From Building Popsicle Stick Towers
- SEO Tags
If you have ever looked at a pile of popsicle sticks and thought, “Yes, obviously this is how skyscrapers begin,” you are in the right place. Building a popsicle stick tower is one of those deceptively simple projects that starts as a fun craft and ends as a full-blown engineering drama. One minute you are stacking sticks like a genius. The next minute your tower folds like a lawn chair in a windstorm. That, oddly enough, is the magic of it.
A popsicle stick tower challenge is part craft, part physics, part patience, and part emotional growth exercise for anyone who has ever whispered, “Why are you leaning?” to an inanimate object. Whether you are doing this for a classroom STEM activity, a science fair, a family project, or pure competitive glory, the goal is the same: build a tower that is tall, sturdy, and able to stand on its own without behaving like a sleepy flamingo.
This guide walks you through 13 practical steps for making a better tower, not just a taller one. You will learn how to plan your design, glue smarter, brace the structure, and test it without turning your dining table into an engineering disaster zone. By the end, you will have a stronger understanding of popsicle stick tower design, STEM building challenges, and the simple structural ideas that help a lightweight tower stay upright.
Why a Popsicle Stick Tower Is a Great STEM Project
A popsicle stick tower is a terrific beginner engineering project because it turns abstract ideas into something you can hold, measure, and occasionally rebuild after a spectacular collapse. You get to explore structural stability, load distribution, geometry, balance, and the all-important lesson that “taller” and “better” are not always the same thing.
It is also wonderfully budget-friendly. You do not need a fancy lab, rare materials, or a hard hat with your name on it. A stack of craft sticks, glue, and a simple plan can take you surprisingly far. Better still, mistakes are part of the process. Engineers prototype, test, redesign, and improve. Your first tower does not need to be perfect. It just needs to teach you something useful before it tries to tip over.
What You Need
- Popsicle sticks or wooden craft sticks
- School glue, tacky glue, or a hot glue gun if adult supervision is available
- Wax paper or parchment paper to protect your work surface
- A ruler or measuring tape
- A pencil
- Paper for sketching your design
- Binder clips or clothespins for holding glued joints in place
- Optional: small weights, coins, or a fan for testing stability
Before you begin, decide what counts as success. Are you trying to build the tallest popsicle stick tower, the strongest one, or the best-looking structure that also does not collapse in five seconds? Setting a clear goal helps every design decision make more sense.
How to Build a Popsicle Stick Tower: 13 Steps
Step 1: Decide on the Tower Goal
Start by defining the challenge. Maybe your tower must be freestanding, maybe it must support weight, or maybe it has to survive a breeze from a fan. These rules matter because they shape the design. A tower built only for height will look different from one built for strength. If you skip this step, you may end up building the world’s most elegant useless object.
Step 2: Sketch a Simple Design First
Do not go straight from “I have sticks” to “I am an architect.” Spend a few minutes sketching your tower. Draw the base, the side panels, and the top. Think about symmetry. The more balanced your tower is from side to side, the less likely it is to lean. Your sketch does not need to be museum-worthy. It just needs to stop you from improvising your way into structural chaos.
Step 3: Build a Wide, Stable Base
The base is everything. A narrow base may look sleek, but it often creates a tower that becomes unstable as it grows taller. Start with a square or rectangular footprint that gives the structure enough support. If you are not sure how wide to go, remember this simple rule: the taller the tower, the more your base needs to resist tipping.
A good base should sit flat on the table without wobbling. If one corner lifts even a little, fix it now. Tiny flaws at the bottom become big headaches at the top.
Step 4: Make Matching Side Panels
Instead of building upward one random stick at a time, create matching wall panels or frame sections. For example, make four similar sides and connect them later. This approach keeps the tower more even and makes assembly easier. Uniform parts also help you spot problems early. If one side is shorter, weaker, or shaped differently, your tower will absolutely notice.
Step 5: Use Triangles, Not Just Squares
This is one of the biggest secrets in any popsicle stick tower STEM challenge. Squares can twist. Triangles resist twisting much better. So if you build a square frame, add a diagonal brace across it to create two triangles. That small change can make a huge difference in stability.
Think of a plain square as polite but unreliable. Add a diagonal stick, and suddenly it has backbone. Triangular bracing is what turns a flimsy tower into something that actually behaves like a structure.
Step 6: Glue Joints Carefully and Consistently
Too little glue and your joints pop apart. Too much glue and everything slides around like the sticks are skating. The sweet spot is a small, controlled amount that fully covers the contact point without creating a soggy mess. Press the sticks together firmly and keep the joint aligned while it sets.
If you are using white glue or tacky glue, patience matters. Let the bond form before moving on. If you are using hot glue, work quickly but neatly. A lumpy glue blob is not a reinforcement strategy. It is a confession.
Step 7: Let Early Sections Dry Flat
One of the easiest ways to ruin a tower is to rush the drying stage. Build your base and side panels on a flat surface lined with wax paper, then let them dry completely before lifting them. If you move parts too early, the joints may shift, and that tiny misalignment can throw off the entire tower.
This step feels boring, which is how you know it is important. Towers love patience. Gravity loves impatience.
Step 8: Assemble the Tower Core
Once your main panels are dry, connect them to form the body of the tower. Keep the tower upright on a flat table while joining the sides. Check that corners meet at even angles and that the structure is standing straight as you go. Use clips or temporary supports if needed.
At this point, resist the urge to keep adding height immediately. First, make sure the core structure stands on its own and does not sway too much when gently touched.
Step 9: Add Cross-Bracing on Every Side
Now strengthen the tower with cross-bracing. Add diagonal sticks across the faces of the tower, especially in the lower and middle sections. Cross-bracing helps resist sideways movement from bumps, air currents, and the general chaos of real life. If your tower has tall open rectangles with no diagonals, it is basically asking to twist.
Many builders focus so hard on going upward that they forget to strengthen the sides. That is like putting a penthouse on a shopping cart. Ambitious, yes. Wise, no.
Step 10: Build Upward in Light, Even Layers
When adding height, keep the structure as balanced as possible. Add similar pieces to opposite sides so the weight stays centered. Avoid making one side taller or heavier than the others for too long. That creates a lean, and once a tower starts leaning, it is usually only a matter of time before you begin bargaining with physics.
If your design includes several levels, think of each level as a repeatable module. Repetition makes construction cleaner and helps the tower distribute weight more evenly from top to bottom.
Step 11: Reinforce the Middle and the Top
The middle of the tower often carries the most structural stress, so do not leave it weak. Add extra braces, horizontal supports, or layered joints where sections connect. The top also matters because a heavy or uneven upper section can make the entire build top-heavy.
A smart approach is to use fewer sticks near the top so the structure stays lighter as it rises. Tall towers are impressive, but tall towers with heavy crowns tend to make brief, dramatic careers.
Step 12: Test, Observe, and Redesign
Once the tower is dry, test it gently. Start by tapping the table lightly or blowing on the sides. If your challenge involves weight, add small loads carefully. Watch where the movement begins. Does the base wobble? Does one side twist? Does the top shift first? Those clues tell you what needs reinforcement.
This is where engineering becomes fun. Instead of seeing failure as failure, treat it as data. A leaning tower is not insulting you personally. It is giving feedback, albeit a bit dramatically.
Step 13: Measure the Final Tower and Record What Worked
Measure the final height, note how many sticks you used, and write down what made the design successful or unstable. If you are doing this as a class or science project, include observations about base width, bracing, glue drying time, and load-bearing performance. Good notes make your next attempt much better.
And yes, there should be a next attempt. Almost nobody builds the best version on the first try. The first build teaches the second build, and the second build teaches the third. That cycle is the heart of engineering.
Common Mistakes to Avoid
- Using a base that is too narrow: A skinny tower base often leads to tipping.
- Skipping diagonal braces: Without triangles, the frame can twist out of shape.
- Rushing the glue: Weak joints make even good designs fail.
- Building too much height too fast: Stability should grow with the tower.
- Ignoring symmetry: Uneven sides create stress points and leaning.
- Adding too much weight at the top: A top-heavy tower is a short-lived tower.
How to Make Your Popsicle Stick Tower Stronger
If your first design stands but still feels shaky, there are a few easy ways to improve it. Widen the base slightly. Add more triangular supports near the bottom. Reinforce connections where vertical sticks meet horizontal ones. Use layered sticks in high-stress areas instead of making every part equally thick. Strong towers are not just bigger. They are smarter.
You can also turn the project into a real experiment. Build multiple towers with different designs and compare them. Try one with square frames, one with diagonal braces, and one with a wider base. Measure which tower is taller, which holds more weight, and which handles side-to-side movement best. That is where a fun craft becomes a serious engineering design challenge.
Conclusion
Building a popsicle stick tower is a hands-on way to learn the real logic behind structures: stable foundations, balanced weight, careful joints, and smart bracing. The 13 steps above are simple enough for beginners but practical enough to make a real difference in your final design. Whether your goal is a classroom win, a better science fair project, or just the personal satisfaction of defeating gravity with dessert sticks, the lesson is the same: plan a little, test a lot, and never trust an unbraced square.
A great tower is not the one that looks impressive for three seconds. It is the one that stays standing long enough to make everyone else nervous.
Experiences and Lessons From Building Popsicle Stick Towers
One of the most interesting things about this project is how quickly it teaches humility. People often begin with total confidence. They stack a few sticks, make something tall and narrow, and admire it like they have just invented modern architecture. Then someone walks by, the air shifts, and the whole thing collapses with the emotional timing of a movie scene. It is funny, but it is also memorable. That kind of immediate feedback teaches more than a page of theory ever could.
In classrooms and at kitchen tables, builders usually discover the same pattern. The first tower is built for height. The second tower is built for survival. By the third attempt, people start thinking like engineers. They ask better questions. Where is the weight going? Which joints are weak? Why does one side sway more than the other? What happens if the base is wider? The project changes from “Can I build something tall?” to “Can I build something tall that deserves to stay standing?” That shift in mindset is where the real learning happens.
There is also something oddly satisfying about watching design ideas evolve in real time. A builder who begins with simple square frames often becomes a convert to diagonal bracing after one spectacular twist-and-collapse moment. Someone else learns that more glue is not the same as better glue. Another person realizes that letting the structure dry completely is not optional if they want it to survive testing. These are small discoveries, but together they create a much deeper understanding of structural design, patience, and problem-solving.
Group builds add another layer of experience. One person wants a bold, dramatic tower. Another wants a boring but sensible tower that actually remains upright. This is basically the history of architecture in miniature. Team members negotiate, revise, and compromise. They measure, hold pieces in place, and try not to blame each other when the top section starts tilting like it has somewhere else to be. In that sense, the project is not just about construction. It is also about communication, planning, and learning how to adapt when the original idea turns out to be less “visionary” and more “structurally suspicious.”
Perhaps the best experience this challenge offers is the moment when a redesigned tower finally works. It stands straighter. It feels sturdier. It survives the little shake test. Maybe it even holds a small load without complaint. That success feels earned because it usually comes after mistakes, revisions, and at least one dramatic failure. And that is why the popsicle stick tower project remains such a strong STEM activity. It is playful, affordable, and surprisingly deep. It turns trial and error into a visible process. It rewards observation instead of guesswork. Most of all, it proves that even simple materials can teach big lessons when you build, test, rethink, and build again.