
Table of Contents >> Show >> Hide
- Turn Your Fireplace Into a Focal Point (Without Torching Your Budget)
- Plan First: Safety, Style, and Size
- What You’ll Need (Typical Box-Style Mantel)
- Step-by-Step: Build a Classic DIY Wood Mantel
- Pro Tips for a Mantel That Looks High-End
- Common DIY Mantel Mistakes to Avoid
- Styling & Maintenance
- Conclusion
- Real-World DIY Mantel Experiences & Lessons Learned
Turn Your Fireplace Into a Focal Point (Without Torching Your Budget)
A good wood fireplace mantel is like a well-cut suit: it doesn’t change what’s underneath,
but it instantly makes everything look sharper. The right mantel adds warmth, frames your
firebox, gives your decor a home, and bumps up your home’s valueall without requiring a
second mortgage or a professional carpentry crew.
In this guide, you’ll learn how to design, build, and install a classic wood mantel that
looks custom, follows key safety rules, and works for real-world living roomskids, pets,
holiday chaos and all. We’ll walk through planning, materials, a proven box-style mantel
build, installation, finishing, styling tips, plus hands-on lessons from DIYers who’ve
already done it.
Plan First: Safety, Style, and Size
1. Know Your Fireplace Type (Non-Negotiable)
Before you touch a 2×4, confirm what you’re working with:
- Masonry fireplace: Brick or stone built-ins can usually handle a wood mantel anchored directly into the masonry with proper fasteners.
- Prefab / factory-built unit: These come with specific manufacturer clearance requirements. Your mantel design must follow that manual. No guessing here.
- Gas or electric insert: Same deal: read the manual. Many have stricter rules for heat and mantle placement.
2. Follow Clearance Rules (Where Most DIY Mantels Go Wrong)
For wood mantels, U.S. codes and fire-safety guidelines generally require:
- No combustible material (that includes your wood mantel) within 6 inches of the firebox opening.
- If the mantel projects more than 1.5 inches from the face, increase clearance above the opening (commonly around 12 inches or more, adjusted by projection).
- Factory-built units: follow the exact diagram from the manufacturer, even if it’s stricter than generic code.
Treat these as minimums, not targets. When in doubt, go a bit higheryour decor, drywall, and insurance policy will all be happier.
3. Choose a Style That Actually Fits Your Room
Pull cues from your home’s architecture instead of forcing a random Pinterest dream:
- Modern / minimal: Clean box beam, squared edges, smooth stain or paint.
- Farmhouse / rustic: Chunky faux beam, knotty or distressed wood, warm stain.
- Traditional: Box mantel with simple trim, crown molding, maybe corbelsnothing fussy, just balanced.
- Transitional: Slimmer profile, subtle detail; plays nice with nearly everything.
Visually, aim for a mantel that extends a few inches past each side of the firebox or surround and projects
roughly 6–8 inches from the wall. Thick enough to feel substantial, not so massive it looks like a train shelf bolted to your chimney.
4. Measure Like a Pro (This Is Your “No Regrets” Step)
- Measure firebox width, surround width, and total wall space.
- Mark the current and planned mantel height on the wall using painter’s tape.
- Check level twice: most walls are lying to you. Believe the level, not your eyes.
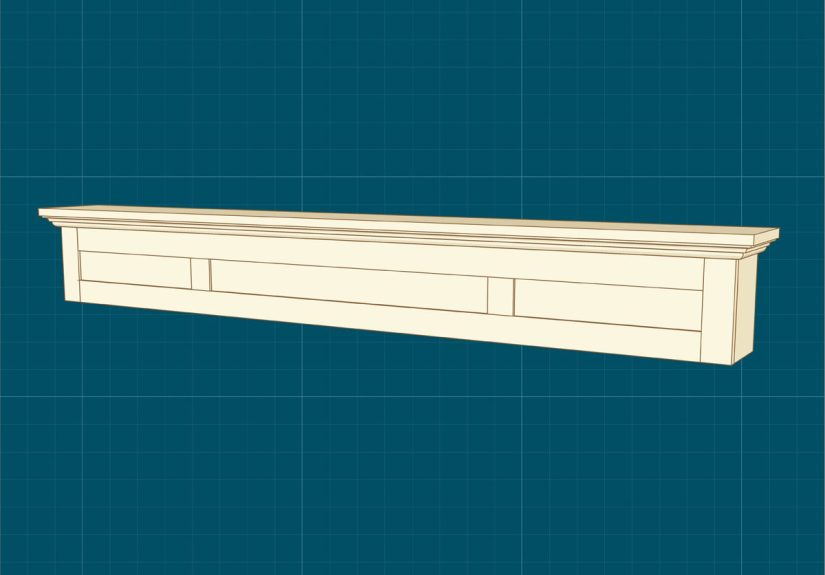
What You’ll Need (Typical Box-Style Mantel)
This build assumes a hollow “box beam” mantel mounted to a hidden cleata popular, sturdy method used by many pros and DIYers.
- 1×8 or 1×10 boards (front and bottom)
- 1×6 or 1×8 board (top)
- 1x material or plywood scraps for end caps and blocking
- 2×4 lumber for the wall cleat / ledger
- Construction adhesive and wood glue
- 2″–2½” wood screws, 1¼” brad nails (or trim screws)
- Stain or paint, wood conditioner (for softwoods), clear topcoat
- Sandpaper (120–220 grit), tack cloth
- Drill/driver, miter saw or circular saw, level, stud finder, tape measure, clamps
- Masonry anchors or sleeve anchors (for brick/stone) or heavy-duty structural screws (for framed wall)
- Safety gear: eye protection, hearing protection, dust mask
Step-by-Step: Build a Classic DIY Wood Mantel
Below is a streamlined version of the method commonly used by experienced DIY builders and contractors:
a hollow beam mantel that slides over a solid cleat.
Step 1: Cut the Mantel Pieces
- Cut the front board to your full mantel length.
- Cut the top and bottom boards to the same length.
- Rip or select board widths so, when assembled, you get your desired thickness (e.g., a 6″–8″ tall face with a 6″–8″ deep top).
- Cut end caps to close each side of the box.
Dry-fit the box on the floor. If it already looks good down there, you’re on the right track.
Step 2: Assemble the Mantel Box
- Lay the front board face down on a flat surface.
- Apply wood glue along the edges where the top and bottom will meet.
- Attach the top and bottom boards to the front with brad nails or trim screws, keeping all faces flush.
- Glue and nail the end caps in place to close the box.
- Add interior blocking (short scrap pieces) along the inside top if you want extra stiffness and more meat to grab screws later.
Wipe away squeeze-out immediately. Future-you does not enjoy sanding dried glue lumps.
Step 3: Build and Install the Cleat
The cleat is the hidden hero that keeps your mantel from sagging, tilting, or launching your Christmas stockings.
- Cut a 2×4 ledger slightly shorter than the inside length of your mantel box.
- Locate studs (or solid masonry). Mark level line at your planned mantel height, respecting all clearances.
- Fasten the 2×4 cleat securely:
- Into studs: use structural screws.
- Into masonry: pre-drill and use sleeve anchors or masonry screws.
- Give the cleat a firm shake. If it moves, you’re not done.
Step 4: Mount the Mantel
- Slide the hollow mantel box over the cleat.
- Check for level (again). Adjust with shims if needed.
- From inside the box (up through the top or back), drive wood screws into the cleat and any blocking.
Now it should feel like part of the house, not a floating shelf living in fear.
Step 5: Sand, Stain, and Seal
- Sand all exposed faces smooth, easing sharp edges for a more polished look.
- If using pine or other softwood, apply wood conditioner before stain for an even finish.
- Apply stain in thin coats; wipe off excess for a natural grain reveal.
- Seal with a clear polyurethane or similar finish rated for interior wood (avoid super glossy if you want a high-end look).
Pro Tips for a Mantel That Looks High-End
- Hide your seams: Use mitered corners on the box so the edges read like a single beam.
- Scale smart: Oversized room? Go chunkier and slightly longer. Small room or low ceiling? Slim the profile to avoid visual heaviness.
- Integrate with the surround: Align mantel thickness with tile, shiplap, or stone transitions so everything looks intentional.
- Think decor load: If you’re planning big mirrors or a TV above, overbuild your cleat and use serious fasteners.
Common DIY Mantel Mistakes to Avoid
- Ignoring clearances: A gorgeous mantel installed too low is a code and safety fail. Always measure from the firebox opening, not from memory.
- Anchoring into drywall only: If your fastener doesn’t hit a stud or masonry, it’s decoration, not structure.
- Using twisted or wet lumber: It will warp, gap, or cup once it dries. Choose straight, kiln-dried boards.
- Skipping surface prep: Dust, glue, or uneven sanding will ruin an otherwise perfect build once the stain hits.
- Over-decorating: Mantels overloaded with heavy or flammable pieces right over open flame are both risky and visually noisy.
Styling & Maintenance
Once installed, your mantel becomes a rotating stage: artwork, mirrors, candles (safe ones), greenery, seasonal decor.
Keep a few simple rules:
- Use a tall anchor piece (art or mirror), then layer lower items for balance.
- Mix textureswood, ceramic, metal, greeneryfor depth.
- Dust regularly and check fasteners annually, especially if you hang stockings, garlands, or heavy decor.
- For real wood, refresh the topcoat every few years if it shows wear.
Conclusion
Building your own wood fireplace mantel isn’t just a weekend flexit’s a smart, budget-friendly upgrade that
turns your firebox into a true focal point. With solid planning, respect for safety clearances, a sturdy cleat,
and clean finishing, your DIY mantel will look custom-built, handle real-life use, and stay timeless long after
the seasonal decor changes.
sapo:
Want a fireplace that finally looks intentional? This in-depth DIY guide shows you how to design, measure, and
build a custom wood mantel that fits your space, respects safety codes, and looks professionally craftedwithout
professional prices. From smart planning and must-have tools to a proven box-beam build, secure installation, and
decorator-approved styling tips, you’ll have everything you need to turn a plain firebox into the warm, polished
focal point of your home.
Real-World DIY Mantel Experiences & Lessons Learned
Talk to enough DIYers who’ve built their own mantels and a few themes repeat themselves (right after, “I should’ve
done this years ago”). Here are practical, experience-based insights you can use before you cut the first board.
1. Walls and Brick Are Never as Straight as You Think
Many homeowners discover their brick or drywall waves, bows, or leans. A perfectly straight mantel against a not-so-straight wall
can leave tiny gaps that suddenly look huge at eye level. The pro move is to:
- Dry-fit your mantel box before finishing.
- Scribe the back edge (lightly trim to match the wall contour) if gaps are obvious.
- Use color-matched caulk at the top and sides to visually blend small gaps once installed.
2. Test Your Finish on Scrap First (Seriously)
Online photos make it look like “one coat of X stain” is all it takes. In reality, wood species, grain, and lighting
change everything. Seasoned DIYers always:
- Keep offcuts from the same boards and test multiple stain colors.
- Try stain over pre-stain conditioner vs. bare wood to compare blotching.
- Check samples in both daylight and evening lightthe mantel lives in both.
This 15-minute step saves you from living with “accidental orange” or “mysterious green cast” for the next decade.
3. Overbuild the Cleat If You Love Heavy Decor
One common regret: underestimating how much weight ends up on the manteloversized mirrors, framed photos, greenery,
maybe a speaker or two. Experienced builders:
- Use a full-length 2×4 cleat or even twin ledgers for extra grip.
- Hit as many studs as possible or use serious masonry anchors.
- Drive multiple screws from the mantel box into blocking and cleat, not just a couple near the center.
The goal is a mantel that doesn’t flinch when someone leans on it during game night.
4. Respect Heat (Future You Will Thank You)
Many DIYers admit they initially eyeballed the heightthen later measured and realized they were flirting with
clearance rules. Don’t rely on vibes:
- Measure from the actual firebox opening, not tile edge or hearth.
- Give yourself a little safety buffer above minimums in case you add a thicker top or decor later.
- If something feels too close when the fire’s roaring, trust your instincts and adjust.
5. The Payoff: A Mantel That Feels Personal
The best part of a DIY wood mantel isn’t just saving moneyit’s standing back and knowing the scale, color,
and character were made for your home, not pulled from a random catalog. Add a simple seasonal styling rotation,
keep an eye on those clearances, and your mantel becomes less of a “project” and more of the quiet star of your living room.
Build it once, build it right, and every time someone asks, “Where did you get that mantel?” you get to smile and say,
“Oh, that? I built it.”


