Table of Contents >> Show >> Hide
- Step 1: Map the Light Like You’re Planning a Heist
- Step 2: Pick Your “Plant Style” So the Room Doesn’t Look Accidental
- Step 3: Use the “Three-Layer” Method for Instant Designer Energy
- Step 4: Anchor Plants Where the Room Already Has Visual Weight
- Step 5: Group Plants Like You Mean It (Yes, Odd Numbers Help)
- Step 6: Scale MattersMatch Plant Size to Furniture Size
- Step 7: Use Vertical Space When Floor Space Is Limited
- Step 8: Pot Choice Is Half the Look (and Drainage Is Half the Survival)
- Step 9: Arrange for Real LifeTraffic, Pets, Kids, and Your Knees
- Step 10: Create One “Plant Moment” First, Then Expand
- Step 11: Match Plants by Care Needs, Not Just by “Vibes”
- Step 12: Maintenance Tricks That Keep Arrangements Looking Styled
- Common Mistakes (So You Can Skip the Painful Part)
- Bring It All Together: A Simple “Living Room Plant Plan”
- Extra: of Real-World Experiences (So You Feel Less Alone)
- Conclusion
Your living room is basically your home’s handshake: it greets guests, hosts snacks, and quietly witnesses your “I’ll fold laundry while I watch one episode” lies. Adding plants makes that space feel warmer, fresher, and more alivewithout requiring you to knock down a wall or learn what “wainscoting” means.
But here’s the plot twist: a random plant plopped in a random corner can look like it’s in time-out. The goal is to arrange plants so they look intentional, match your style, andmost importantlyactually thrive. Let’s build you a living room that looks like a designer stopped by… and your plants are still alive two months later.
Step 1: Map the Light Like You’re Planning a Heist
Before you buy a single leaf, do a quick “light audit.” Stand in your living room at different times of day and notice where sunlight lands and how intense it is. Designers can fake a lot, but they can’t fake photosynthesis.
Quick light cheat sheet (practical, not precious)
- Bright/direct light: Sunbeams hit leaves for hours. Great for cacti, many succulents, and some sun-loversdangerous for delicate foliage.
- Bright/indirect light: The sweet spot for many popular houseplants. Lots of light, but no scorching spotlight.
- Medium light: Near a window but not in the “front row.” Good for many sturdy, adaptable plants.
- Low light: Far from windows or in shaded rooms. Choose true low-light performers (and manage expectations).
If your living room has tricky light (hello, apartment life), consider a simple grow light. It’s basically a plant’s emotional support lampminus the drama.
Step 2: Pick Your “Plant Style” So the Room Doesn’t Look Accidental
Plants can fit any vibe, but your arrangement should match the room’s personality. Think of them as décor that happens to breathe.
Three living room plant vibes that always work
- Organic modern: Fewer plants, bigger impact. One statement tree + a couple sculptural pots. Clean lines, natural materials.
- Cozy layered: A mix of floor plants, tabletop plants, and a trailing plant or two. Looks collected over time (even if you bought them last weekend).
- Indoor jungle: Lush, abundant, and proud of it. Layer heights, fill corners, go vertical, and embrace the “botanical maximalist” energy.
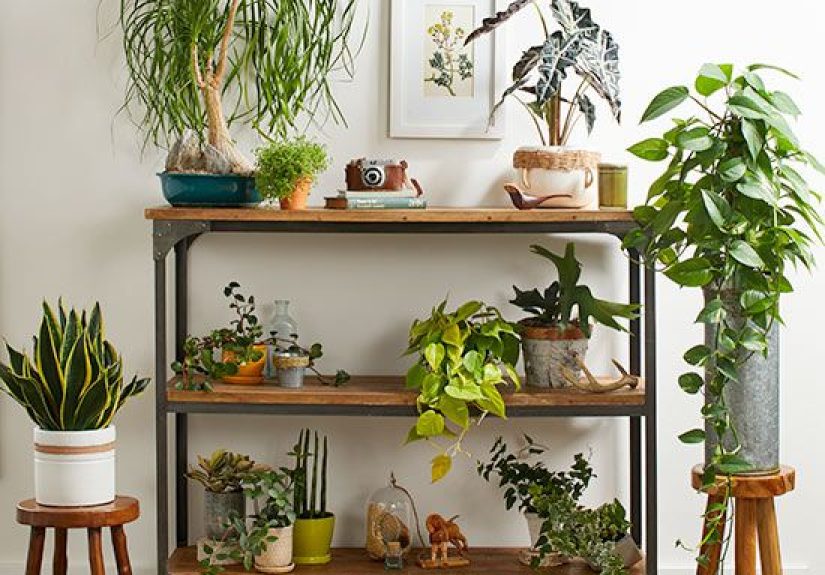
Step 3: Use the “Three-Layer” Method for Instant Designer Energy
Want arrangements that look styled, not scattered? Build in layerslike your outfit, but with fewer questionable hats.
The easiest layering formula
- High layer: Hanging or wall-mounted plant (trailing pothos alternatives, hoya, spider plant) or a shelf plant.
- Mid layer: Tabletop plant on a side table, console, or plant stand (pothos-like trailing plants, peperomia, philodendron types, small ferns).
- Low layer: Floor plant that anchors the space (rubber plant, dracaena, bird of paradise, palms, fiddle-leaf fig if you enjoy living on the edge).
Even one corner can look “finished” with one tall plant, one trailing plant, and one smaller accent plant. It’s the plant version of a good trio: funny friend, responsible friend, and the one who owns a label maker.
Step 4: Anchor Plants Where the Room Already Has Visual Weight
In living rooms, the eye naturally goes to a few “heavy” zones: the sofa wall, the TV/media console, the fireplace, and any big windows. Place plants near these areas so they feel integratednot like they wandered in looking for the kitchen.
Best anchoring spots (and why they work)
- Beside the sofa: A tall plant softens hard edges and adds height without new furniture.
- Near a window: The plant gets light, and the room looks brighter and more inviting.
- By the fireplace or built-ins: Green breaks up all that structure. Use one or two plants, not a full rainforest competition.
- At the edge of a seating area: Plants can “frame” the conversation zone like a subtle room divider.
Step 5: Group Plants Like You Mean It (Yes, Odd Numbers Help)
If you’ve ever put two plants side-by-side and felt like you accidentally created a solemn plant wedding… you’re not alone. Grouping in odd numbers (especially 3) tends to look more relaxed and natural. It keeps the eye moving and prevents symmetry from feeling stiff.
How to group without clutter
- Start with 3: One tall, one medium, one small. Vary height, leaf shape, and texture.
- Use one “hero” plant: Let one plant be the star (big leaves, tall structure), and keep the others supporting actors.
- Repeat a detail for cohesion: Same pot color family, similar material, or a repeating shape (round pots, matte ceramic, woven baskets).
- Give them breathing room: A cluster can still look airy if you leave negative space around it.
Step 6: Scale MattersMatch Plant Size to Furniture Size
A tiny plant next to a giant sectional can look like it’s trying to whisper motivational quotes into the void. Scale your plants to the room.
Simple scale rules
- Big room or tall ceilings: Use at least one larger floor plant (or an indoor tree) to match the volume of the space.
- Small living room: Go vertical with shelves or hangers; choose slimmer plants that don’t eat your walking path.
- Long console or media unit: Use a pair of medium plants (or one medium + one sculptural object) to balance the length.
- Low coffee table: Keep it simple: one low plant or a small group on a tray so it looks intentional (and you can still set down snacks).
Step 7: Use Vertical Space When Floor Space Is Limited
If your living room is short on floor space, stop fighting physics and start using walls. Hanging plants, wall planters, and shelves can create “living art.”
Vertical options that look polished
- Hanging planters: Great near windows; choose trailing plants for movement.
- Wall-mounted planters: Keep them secure and avoid placing them directly above anything you’d cry about if watered on (like electronics).
- Plant shelves: Stagger heights, mix leaf shapes, and avoid lining pots up like a school photo.
- Rolling cart: A moveable plant station is perfect if your light changes or you like rearranging seasonally.
Step 8: Pot Choice Is Half the Look (and Drainage Is Half the Survival)
Pots are not just containers; they’re part of your living room’s design language. A gorgeous plant in a sad plastic nursery pot is like wearing a tuxedo with gym socks. (Sometimes it’s a vibe, but usually it’s not.)
Make pots look cohesive without matching everything
- Pick a palette: For example, warm neutrals + black accents, or white ceramic + natural woven baskets.
- Mix textures: Matte ceramic, rattan, terracotta, and stone-like finishes add depth.
- Repeat one material: Two planters in the same texture instantly creates unity.
Drainage: the unglamorous hero
Plants generally do best with pots that have drainage holes. If you love a decorative pot without drainage, use it as a cachepot: keep the plant in a plastic pot with holes and slip it inside. Add a saucer, or remove the inner pot to water in the sink, then return it once it stops dripping. Root rot is not a cute aesthetic.
Step 9: Arrange for Real LifeTraffic, Pets, Kids, and Your Knees
A plant arrangement should work with your living room, not against it. If you’re constantly dodging a pot like it’s a rogue coffee table, it’s time to edit.
Real-life placement rules
- Keep walkways clear: Don’t place plants where people naturally turn corners or enter the room.
- Stabilize tall plants: Use heavier planters or stands so they don’t wobble.
- Watch vents and drafts: Many houseplants hate blasting heat/AC like we hate group texts that never end.
- If you have pets: Place plants higher (shelves, hangers) and double-check toxicity for cats/dogs before you bring a plant home.
If you share your home with curious pets, treat “out of reach” as a strategynot a guarantee. Cats, especially, view gravity as a suggestion.
Step 10: Create One “Plant Moment” First, Then Expand
The easiest way to avoid the dreaded clutter-jungle is to start with one intentional focal pointone corner, one shelf, or one console arrangementthen build slowly.
Three beginner-friendly layouts you can copy
Layout A: The Sofa Corner Stack
- One tall floor plant (corner, slightly behind the sofa line)
- One medium plant on a stand (in front of or beside it)
- One small plant on a side table (repeat pot color for cohesion)
Layout B: The Window “Green Frame”
- One statement plant near the window (not blocking blinds/curtains)
- One hanging plant near the top corner of the window area
- One low plant on a bench or low stand beneath (leave space for airflow and cleaning)
Layout C: The Media Console Softener
- One medium upright plant on one end of the console
- One trailing plant (or sculptural vase) on the other end
- Optional: one small plant on a tray to keep cords and clutter visually calm
Step 11: Match Plants by Care Needs, Not Just by “Vibes”
Grouping plants with similar light and watering needs makes care easierand makes your arrangement last. A thirsty fern beside a drought-tolerant succulent is like pairing a marathon runner with someone who considers walking to the mailbox cardio.
Easy “care clusters” for living rooms
- Bright/indirect cluster: rubber plant, monstera-type plants, many dracaenas, pothos-like trailers
- Low/medium cluster: ZZ plant, cast-iron plant, some dracaenas, certain snake plant varieties (also note pet considerations)
- Sunny window cluster: succulents, cacti, sun-loving herbs (if you’ve got the light and the patience)
Step 12: Maintenance Tricks That Keep Arrangements Looking Styled
A well-arranged living room can fall apart visually when plants get leggy, lean hard toward the window, or drop leaves everywhere like they’re making a point. A few tiny habits keep the look crisp.
Five-minute routines that make a big difference
- Rotate weekly or biweekly: Helps plants grow more evenly and prevents the “leaning tower of foliage” situation.
- Dust leaves monthly: Cleaner leaves look better and can help plants function more efficiently.
- Prune strategically: Remove yellow leaves and trim leggy growth to encourage fuller shapes.
- Use saucers and trays: Protect floors and make watering less stressful.
- Check soil before watering: Overwatering is the #1 heartbreak story in plant world.
Common Mistakes (So You Can Skip the Painful Part)
- Too many identical plants: Variety in leaf size/shape/texture is what makes arrangements look rich.
- Ignoring vertical space: If everything is on the floor, the room can feel bottom-heavy.
- Mismatched planters with no repeating element: A little coordination goes a long way.
- Plants blocking function: If it interferes with seating, walking, or cleaning, it won’t last.
- Forgetting the light reality: The prettiest plant won’t stay pretty in the wrong spot.
Bring It All Together: A Simple “Living Room Plant Plan”
- Audit light (morning, midday, afternoon).
- Choose one focal zone (sofa corner, window, console).
- Pick your anchor plant (tall floor plant or indoor tree).
- Add a mid and a small plant (vary height + texture).
- Decide your pot palette (2–3 materials/colors).
- Add one vertical element (hanger, shelf, wall planter) if space is tight.
- Set a maintenance rhythm (rotate, dust, check soil).
Extra: of Real-World Experiences (So You Feel Less Alone)
Most people don’t “nail” plant styling on the first try. What usually happens is a sequence of tiny experiments, mild obsession, and at least one dramatic moment where you stare at a leaf like it personally betrayed you. Here are a few common living-room plant experiences people run intoplus what tends to fix them.
Experience #1: The “One Big Plant Will Do Everything” Fantasy
A lot of folks start with a single statement plantmaybe a fiddle-leaf fig, a bird of paradise, or a tall dracaenabecause it looks amazing online and feels like the fastest way to upgrade a room. And honestly? It can work. The common surprise is that one big plant often looks a little lonely unless it’s “anchored” with smaller companions. The fix is simple: add a medium plant on a stand and a smaller plant on a table. Suddenly the corner looks curated, not abandoned. Also, people learn quickly that the “perfect spot” is usually near a window, not in that dark corner where you wanted it to match the rug. Style is negotiable; light is not.
Experience #2: The “Why Does My Plant Collection Look Messy?” Phase
This phase typically hits after plant #4. You’ve got greenerygreat!but it looks like a casual garden center pop-up. The most common fix is choosing a planter strategy. People who feel stuck often switch from random pots to a simple palette: maybe warm terracotta + woven baskets + one black accent, or creamy ceramics + natural wood stands. The plants themselves can be different, but repeating a few pot colors/materials makes the arrangement look intentional immediately.
Experience #3: The Low-Light Living Room Reality Check
Many living rooms don’t get abundant sun, especially if buildings block windows or you prefer curtains for privacy. The usual experience: a plant looks fine for a few weeks, then gets leggy, pale, or stops growing. People often solve this by moving plants closer to windows, grouping them where the light is best, and using vertical solutions (shelves, hangers) to put plants into brighter zones without sacrificing floor space. Some add a grow light and treat it like part of the décorbecause it can be. The biggest lesson: low light doesn’t mean “no light,” and “tough plant” doesn’t mean “thrives in a cave.”
Experience #4: The Pet Parent Shuffle
If you have cats or dogs, plant styling becomes part interior design, part obstacle course. Many people discover that floor plants near entryways or tight corners are basically bumper-car targets. Others learn (sometimes the hard way) that some popular plants can be irritating or toxic if chewed. The most common solutions are elevating plants with sturdy stands, using hanging planters near windows, and reserving floor space for heavier, stable planters that won’t tip easily. The lived-in truth: your home’s “best plant spot” is the intersection of light, safety, and traffic flownot just the prettiest empty corner.
Experience #5: The “Now It’s a Lifestyle” Moment
Eventually, people notice something funny: once one area looks good, the rest of the room starts asking for help. That’s when you add a small plant to the media console, a trailing plant on a shelf, and maybe a “plant moment” by the window. The best outcomes usually come from slow additions. You live in the room; you watch how the light shifts; you adjust. Plant styling turns into a gentle, ongoing editlike rearranging throw pillows, but with more watering and fewer arguments about whether beige is “a color.”
Conclusion
Arranging plants in your living room isn’t about stuffing every surface with greenery. It’s about making smart placements based on light, building visual layers, choosing pots that fit your style, and creating one strong plant focal point before you expand. Start small, group thoughtfully, go vertical when you need to, and keep the setup realistic for your actual life. Natural style should feel calm, not like a second job.