
Table of Contents >> Show >> Hide
- Why the Double Bass Bridge Matters So Much
- Before You Start
- How to Adjust a Double Bass Bridge: 13 Steps
- 1. Put the bass in a safe, stable position
- 2. Check whether this is actually a DIY-safe problem
- 3. Loosen the strings slightly
- 4. Find the correct bridge line
- 5. Make sure the bridge is centered
- 6. Inspect the bridge feet for full contact
- 7. Straighten a leaning bridge with both hands
- 8. Check the bridge angle from the side
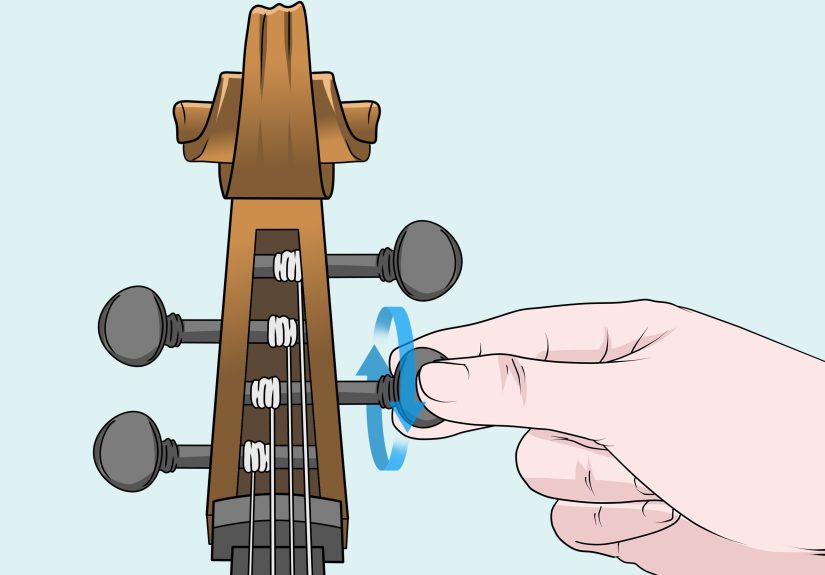
- 9. Adjust height only if your bridge has adjusters
- 10. Lubricate the string grooves with a soft pencil
- 11. Bring the strings back to pitch slowly
- 12. Test the bass and listen for clues
- 13. Know when to stop and book a luthier
- Common Mistakes to Avoid
- How Humidity Affects Upright Bass Bridge Adjustment
- When a New Bridge or Professional Setup Is the Better Answer
- Quick FAQ
- Conclusion
- Real-World Experiences Players Often Have When Adjusting a Double Bass Bridge
Note: Web-ready HTML body only. Source-code artifacts and citation placeholders removed for publishing.
If your upright bass suddenly feels harder to play, sounds a little off, or looks like the bridge is leaning forward as if it is trying to escape rehearsal, do not panic. A double bass bridge can shift gradually from tuning, weather changes, string changes, or the occasional doorway incident. The good news is that minor bridge adjustment is something many players can learn to handle. The important part is knowing the difference between a small correction and a job for a luthier.
This guide walks through how to adjust a double bass bridge in 13 clear steps, using safe, practical habits that protect tone, playability, and your instrument’s structure. You will also learn when bridge adjusters can help, why humidity matters more than most players expect, and why “I’ll just file this a little” is often the first sentence in a very expensive story.
Why the Double Bass Bridge Matters So Much
The double bass bridge is not just a piece of maple holding up strings. It helps set your string height, transfers vibration into the top of the bass, affects response and tone, and has to sit in exactly the right place to work properly. If it leans, shifts off center, or no longer sits flat on the top, your bass may feel stiff, buzz, lose power, or start sounding strangely grumpy.
A healthy bridge should stand upright, sit on the proper line between the inner notches of the f-holes, and make full contact with the top through both feet. If it is warped, deeply grooved, badly cut, or poorly fitted, that is no longer a quick adjustment. That is a “call the shop” situation.
Before You Start
For a routine upright bass bridge adjustment, keep these basics nearby:
- a soft cloth or non-slip mat
- a soft pencil for a little graphite in the string grooves
- a tuner
- good lighting
- a calm attitude
That last item matters. You do not need superhero strength to move a bridge. In fact, brute force is the worst possible method. Think “precise,” not “wrestling match.”
How to Adjust a Double Bass Bridge: 13 Steps
-
1. Put the bass in a safe, stable position
Set the bass where it cannot slide or tip. Many players do this with the instrument resting gently on its back or side on a carpet, rug, or padded surface. You want full control and zero wobble. A bridge adjustment is not the moment to discover your floor is slipperier than it looked.
-
2. Check whether this is actually a DIY-safe problem
Look for red flags before touching the bridge. Stop and call a luthier if the bridge is badly warped, a foot does not match the top, the bridge fell completely over, the top looks stressed, or the soundpost appears to be missing or out of place. Never tune the bass to full pitch if the soundpost has dropped. That is structural-risk territory, not a casual afternoon fix.
-
3. Loosen the strings slightly
Bring the strings down a little, usually about a third or fourth lower than pitch. You are not trying to create total slack. You just want less tension so the bridge can move safely and predictably. Leaving some string tension helps keep the bridge controlled while you work.
-
4. Find the correct bridge line
Look at the f-holes. Your reference is the imaginary line between the two inner notches. The bridge should sit on that line. This is the right starting point for normal setup. Moving the bridge away from that line to “cheat” the action is usually a bad idea because it can affect tone, response, and the way the bass handles tension.
-
5. Make sure the bridge is centered
Sight down the fingerboard and check that the strings run straight. The bridge should not look shoved to one side. You can also compare the bridge position relative to the f-holes. If one side is noticeably farther away than the other, the bridge is off center. A centered bridge helps the strings feel normal under the left hand and keeps the instrument sounding more balanced.
-
6. Inspect the bridge feet for full contact
The bridge feet should sit evenly on the top of the bass with no obvious gaps. If the bridge rocks, tilts, or touches only part of the surface, do not try to “make it work.” A proper bridge fit is carved to the arch of that specific bass. If the feet are not sitting squarely, the solution is not extra courage. The solution is professional fitting.
-
7. Straighten a leaning bridge with both hands
If the bridge is leaning toward the fingerboard, use both hands to guide it back gently. Move the top of the bridge only a little at a time. The goal is to return it to an upright position, not to yank it into a dramatic new life philosophy. Work slowly and check often. Small, controlled movement is the secret.
-
8. Check the bridge angle from the side
When viewed from the side, the bridge should stand essentially perpendicular to the top. A practical way to judge this is to look for a clean, upright stance and verify that both feet still sit flat. If the bridge keeps drifting forward every time you tune, that usually means friction in the grooves or a habit of tuning without watching the bridge.
-
9. Adjust height only if your bridge has adjusters
If your bass has bridge adjusters, you can raise or lower the action in small increments. Turn both sides evenly so the bridge does not twist. Adjustable bridges are handy because weather changes can alter string height, and many players like different action for jazz, arco, bluegrass, or slap styles. But keep this change modest. If your action problem is severe, the bridge, fingerboard, or nut may need real setup work instead.
-
10. Lubricate the string grooves with a soft pencil
Rub a little graphite from a soft pencil into the string notches on the bridge and nut. This reduces friction so the strings slide more smoothly during tuning rather than dragging the bridge forward. Also, remember that the grooves should be shallow indentations, not deep trenches. If the grooves look pinched, jagged, or overly deep, that is another job for a luthier.
-
11. Bring the strings back to pitch slowly
Tune up gradually, checking the bridge as you go. This is the part where many bridges begin leaning again because the strings pull as tension increases. Tune one string a little, then the next, and keep glancing at the bridge. Do not race straight to pitch like you are in a tuning Olympics. Slow tuning prevents surprise movement.
-
12. Test the bass and listen for clues
Play open strings, then a few notes in lower and middle positions. Listen for new buzzes, rattles, or a suddenly thin tone. Check whether the bass feels more comfortable and whether the strings track evenly over the fingerboard. A successful double bass bridge adjustment should improve feel without introducing weird side effects.
-
13. Know when to stop and book a luthier
If the bridge will not stay upright, will not center properly, sits unevenly, has warped visibly, or your action still feels wrong after a careful adjustment, stop there. A luthier may need to fit a new bridge, dress the fingerboard, correct nut height, or check the soundpost and setup. Lowering the bridge alone does not solve every playability issue, especially near the nut end of the fingerboard.
Common Mistakes to Avoid
- Do not move the bridge off the notch line just to lower the strings.
- Do not file the bridge feet at home unless you are trained to fit bridges.
- Do not cut deep string slots; the bridge should hold the string, not swallow it.
- Do not crank one adjuster way more than the other, or the bridge can twist.
- Do not replace all strings at once unless you know exactly how to keep the bridge and post stable.
- Do not ignore humidity, especially with carved or hybrid basses.
How Humidity Affects Upright Bass Bridge Adjustment
Seasonal weather changes are a sneaky part of double bass setup. As humidity shifts, the wood moves, the top changes slightly, and the string height can change with it. That is why some bassists love adjustable bridges and why some players even keep different seasonal setups. If your bass feels totally different in winter than it did in summer, you are not imagining it. Your instrument is responding to the environment like a very expensive weather app.
Use a humidity monitor where the bass is stored, and aim for stable room conditions whenever possible. Sudden dryness can affect playability and even increase the chance of damage. A small adjustment at the bridge may help with seasonal action changes, but chronic extremes in humidity can create bigger problems than any adjustment wheel can solve.
When a New Bridge or Professional Setup Is the Better Answer
Sometimes the bridge is not the real problem. If the bass still feels hard to play after careful adjustment, the issue may be:
- poor nut height
- an uneven or improperly dressed fingerboard
- a badly fitted or low-quality bridge
- incorrect string spacing
- a soundpost issue
- seasonal movement that needs full setup correction
A well-cut bridge is fitted to the top, shaped for accurate spacing and height, and trimmed for flexibility and tone. That is why a professional bridge is not just “a piece of wood with holes in it.” It is more like tailored clothing for your bass. Yes, tailored maple. Your bass deserves nice things.
Quick FAQ
Can I adjust my upright bass bridge myself?
Yes, for small corrections like straightening a lean, recentering slightly, or making minor height changes with bridge adjusters. No, for carving, cutting feet, deepening grooves, or reinstalling the bridge when the soundpost has fallen.
How do I know if my bridge is too low?
If the strings buzz excessively, feel too close to the fingerboard, or the instrument loses clarity and room for vibration, the bridge may be too low. But fingerboard condition and nut height also matter, so do not blame everything on the bridge.
Why does my bridge keep leaning forward?
Usually because tuning creates friction in the string grooves. Graphite in the grooves, slower tuning, and regularly checking alignment can help prevent the problem.
Should I install a new bass bridge by myself?
In most cases, no. A new bridge normally needs fitting, shaping, and final setup work by a trained luthier.
Conclusion
Learning how to adjust a double bass bridge is one of those practical skills that makes you a more confident bassist. The bridge should stand straight, stay centered, sit on the correct line, and make clean contact with the top. If your bass has adjusters, you can fine-tune string height in small, even changes. If the bridge is warped, poorly fitted, or tied to a bigger setup issue, do not force the fix. Get a professional involved.
In other words: respect the bridge, watch it while tuning, keep humidity under control, and remember that gentle hands usually beat heroic improvisation. Your bass will sound better, play better, and remain much less likely to develop expensive opinions.
Real-World Experiences Players Often Have When Adjusting a Double Bass Bridge
For many bassists, the first bridge adjustment feels way more dramatic than it actually is. The bridge looks tall, the strings feel powerful, and the whole instrument seems to whisper, “Please do not mess this up.” That tension is normal. A lot of players describe the first correction as a slow-motion moment where they are convinced the bridge will either refuse to move or instantly launch into chaos. In reality, a minor adjustment is usually calm and controlled when the strings are loosened slightly and the bass is stable.
Another common experience is realizing that the bridge did not suddenly go crooked overnight. It often happens gradually. A player tunes every day, the strings tug a little each time, and one day the bass starts feeling stiff or looking odd. Then comes the classic thought: “Was it always leaning like that?” Probably not. But it may have been drifting for weeks. Once players learn to check the bridge before or after tuning, they usually start catching problems early, which makes future adjustments much easier.
Players who use bridge adjusters often report a different kind of relief. Instead of fighting seasonal action changes for months, they can make a small height correction and get back to playing. Jazz bassists sometimes like the action a bit lower for comfort and speed, while arco players may want a little more room for clean string response. Bluegrass and slap players may go higher still. The shared experience is not that one height is magically perfect, but that controlled, even adjustments make the bass feel more cooperative and less like a moody roommate.
Humidity is another huge part of the experience. Many bassists notice that the same instrument can feel wonderfully easy in one season and stubborn in another. Winter dryness, summer stickiness, travel, and rehearsal spaces with mystery climate control can all affect the setup. Some players first discover this after thinking their technique suddenly got worse. Then the weather changes, the bridge height shifts, and everything makes sense again. It is a humbling reminder that the bass is made of wood, not steel-reinforced emotional stability.
Perhaps the most useful experience players gain is learning when not to continue. Experienced bassists often say confidence comes not just from moving the bridge, but from recognizing when the problem is bigger than a quick fix. If the bridge will not stay straight, the feet do not sit properly, or the soundpost is missing, smart players stop. That instinct saves instruments. In the long run, the best bridge-adjustment experience is not “I did everything myself.” It is “I knew what I could do safely, and I knew when to call a pro.” That is real bass wisdom.


