
Table of Contents >> Show >> Hide
- Why Shutters Make Surprisingly Great Headboards
- Before You Buy: How to Choose the Right Garage Sale Shutters
- DIY Shutter Headboard: Tools and Materials
- Step-by-Step: Turning Shutters Into a Headboard
- Step 1: Plan the look (and pick a “done on purpose” color)
- Step 2: Clean first, always
- Step 3: Prep safely (especially if the shutters are older)
- Step 4: Prime where it matters
- Step 5: Paint in thin coats
- Step 6: Add character with distressing (without overdoing it)
- Step 7: Arrange multiple shutters into one headboard
- Mounting Options: Make It Beautiful and Secure
- Hometalk-Inspired Upgrade: Add Sconce Holders (The “Wow, You Made That?” Feature)
- Design Ideas: Make Your Shutter Headboard Look Custom
- Common Mistakes (So You Don’t Have to Learn the Hard Way)
- Experience Notes: What DIYers Learn When Making a Garage Sale Shutter Headboard
- Conclusion: A Headboard with a Story Beats a Headboard with a Receipt
Some people go to garage sales looking for practical stufflike a working lamp, a complete set of dishes, or a chair that doesn’t creak like it’s auditioning for a haunted house. Other people (hi, it’s us) spot a stack of old shutters and immediately think, “That would look amazing behind a bed.”
A DIY shutter headboard is the sweet spot between budget-friendly and boutique-looking. It brings texture, height, and “I totally meant to do that” character to your bedroomwithout paying custom-headboard prices. The Hometalk-style twist? Turning those garage sale shutters into a headboard and adding clever extras like sconce holders, side accents, or a built-in ledge for your midnight water and your “I’ll read one chapter” book.
Why Shutters Make Surprisingly Great Headboards
Old shutters work so well as a repurposed headboard because they already have what most headboards need: vertical lines (instant height), visual rhythm (those slats!), and built-in charm from years of real-life wear. Whether your vibe is farmhouse bedroom, coastal cottage, or modern vintage, shutters can be painted, stained, or left perfectly imperfect for that upcycled headboard look.
- They’re usually inexpensive: Garage sales, flea markets, salvage yards, and online marketplaces often have shutters for cheap.
- They’re customizable: One shutter can be minimalist; multiple shutters can create a wide statement wall.
- They add texture fast: Even a plain room looks designed when you add architectural salvage behind the bed.
Before You Buy: How to Choose the Right Garage Sale Shutters
1) Size and layout (aka “Will this look intentional?”)
Measure your bed width first. Then decide if you want a headboard that’s narrower than the mattress (tidy and tailored), the same width (classic), or wider (dramatic and designer). Many DIYers use two or three shutters side-by-side for a queen or king.
2) Condition (charm is good; crumbling is not)
Look for shutters that are solid enough to mount. A little warp is fine (we call that “character”), but avoid wood that’s soft, rotting, or splitting badly where screws need to hold.
3) Material check
Wood shutters are easiest to modify, paint, and screw into. Some composite or vinyl shutters can work, but mounting and finishing can be trickier. If you’re planning to attach lighting or hardware, wood makes life simpler.
4) Paint safety note for older pieces
If the shutters are truly vintage, assume old paint layers may need careful handlingespecially if you’re sanding or scraping. Plan for safe prep (more on that below), and choose low-dust methods when possible.
DIY Shutter Headboard: Tools and Materials
Here’s a practical checklist you can adapt to your design:
Core materials
- Garage sale shutters (one large, or 2–4 smaller shutters)
- Wood screws (various lengths)
- Wall mounting hardware (French cleat, heavy-duty brackets, or direct-to-stud screws)
- Optional: 1×4 boards for a simple frame or “legs” that rest on the floor
- Felt pads or rubber bumpers (keeps the headboard from scuffing the wall)
Finishing supplies
- Cleaner/degreaser and a damp rag
- Sandpaper or sanding sponge (light scuff sanding)
- Primer (especially if paint is glossy, stained, or knotty)
- Paint (chalk-style paint, satin enamel, or matte wall paintyour call)
- Distressing tools (dry brush, sanding block, wax for resist, or glaze)
- Topcoat/sealer (optional but helpful for durability)
Tools
- Drill/driver + bits
- Level
- Stud finder
- Measuring tape
- Safety gear: eye protection, a good dust mask/respirator, gloves
Step-by-Step: Turning Shutters Into a Headboard
Step 1: Plan the look (and pick a “done on purpose” color)
Decide whether you want your DIY shutter headboard to be:
clean and modern (smooth paint, minimal distressing),
farmhouse (white/cream with worn edges), or
moody vintage (deep color with rubbed highlights).
A pale “icy” white with dry-brushed distressing is a popular choice because it reads fresh while still showing texture.
Step 2: Clean first, always
Garage sale finds come with a free bonus: mystery grime. Wipe everything down thoroughly so your primer and paint actually stick. If the shutters lived outdoors, expect dust in every slat like it’s paying rent.
Step 3: Prep safely (especially if the shutters are older)
If you’re sanding, keep it lightscuff sanding is usually enough for adhesion. If the shutters are old enough to possibly have lead-based paint, avoid aggressive sanding/scraping that creates dust. When in doubt, treat the surface carefully and follow lead-safe renovation guidance (including containment and cleanup).
Step 4: Prime where it matters
Primer helps block stains, knots, and “why is the paint peeling already” heartbreak. Prime especially if:
the existing paint is glossy,
the wood is dark,
or you’re switching from stained wood to a light color.
Step 5: Paint in thin coats
Two light coats usually beat one thick coat. Thick paint loves to pool in shutter grooves, and then you’re left picking drips like you’re defusing a tiny paint bomb. Let each coat dry fully.
Step 6: Add character with distressing (without overdoing it)
Distressing should look accidentallike a well-loved antiquenot like a bear tried to open it. A dry brush technique is beginner-friendly: use very little paint on the brush and skim raised edges so the base color peeks through.
- Dry brush: Lightly graze edges and slats for natural wear.
- Sand-through: After paint dries, gently sand corners and high points.
- Resist method: Wax a few spots before the top coat so it rubs away easily later.
Step 7: Arrange multiple shutters into one headboard
If you’re using more than one shutter, lay them on the floor and decide spacing:
flush together for a seamless panel,
or a small gap for a more architectural look.
You can connect shutters using mending plates, a simple 1×4 brace across the back, or a full frame built from 1x boards.
Mounting Options: Make It Beautiful and Secure
A headboard is not the place for “probably fine.” It sits where your head goesso secure mounting matters.
Option A: French cleat (strong, sleek, removable)
A French cleat is a classic way to hang heavy items: one beveled strip attaches to the wall (into studs), the matching strip attaches to the headboard, and they lock together. This method keeps the headboard close to the wall and makes it easier to remove if you repaint or rearrange.
Option B: Brackets into studs
Heavy-duty L-brackets or headboard brackets can work well when anchored into studs. This option is straightforward and beginner-friendly.
Option C: Add “legs” that rest on the floor (extra stability)
For heavier shutters or for renters who want fewer wall attachment points, adding simple legs (like 1×4 boards on the back) lets the headboard rest on the floor while still being secured to the wall for stability. This can reduce wobble and make the whole piece feel sturdier.
Important safety tips
- Find studs: Whenever possible, anchor into wall studs rather than relying only on drywall anchors.
- Use weight-rated hardware: If studs aren’t available where you need them, choose anchors rated for the load and wall type.
- Prevent tip hazards in kid-friendly homes: Secure tall/heavy pieces and keep climbing temptations away from the bed area.
Hometalk-Inspired Upgrade: Add Sconce Holders (The “Wow, You Made That?” Feature)
One of the most eye-catching variations is adding sconces to the shutterseither mounted directly to the shutter face or attached to small side panels that act like sconce holders. The look is equal parts cozy and polished, and it frees up nightstand space.
How to do it safely
- Use plug-in wall sconces (simpler than hardwired) and follow the manufacturer’s instructions.
- Plan the height so the light hits your reading zone without shining directly into your eyes.
- Use grommets or protective bushings where cords pass through holes so cords don’t rub on sharp edges.
- Keep cords tidy with discreet clips or channels on the back.
Design Ideas: Make Your Shutter Headboard Look Custom
Farmhouse classic
Paint shutters a warm white, distress lightly on corners, and pair with black hardware (or leave the original hinges if they’re in good shape). Add linen bedding and you’ve got that “magazine farmhouse” feel without the magazine budget.
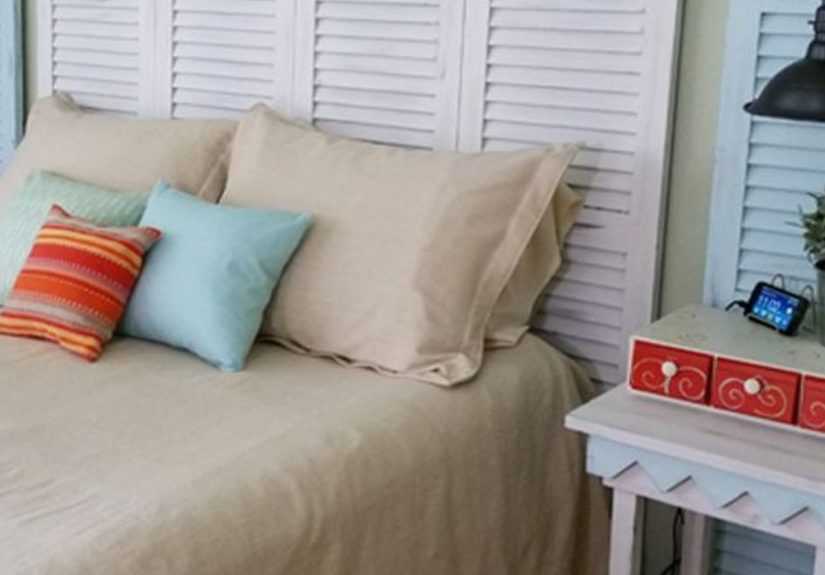
Coastal calm
Try pale blue, sea glass green, or sun-washed beige. A matte finish looks soft and beachy. Bonus points if the shutters have subtle weatheringnature’s distressing is hard to fake.
Modern vintage
Go bold: charcoal, olive, or navy with minimal distressing. Keep lines crisp and pair with simple bedding to let the texture do the talking.
Extra function
- Add a narrow shelf across the back/top edge for art, a small plant, or framed photos.
- Install small hooks on the side for headphones, a sleep mask, or a robe (hotel energy, but make it DIY).
- Attach a thin LED strip behind the shutters for a soft halo glow.
Common Mistakes (So You Don’t Have to Learn the Hard Way)
Mistake 1: Painting before cleaning
Paint does not bond well to garage sale mystery oils. Clean first. Always.
Mistake 2: Over-distressing
If your headboard looks like it survived a pirate battle, dial it back. Aim for subtle wear on edges and raised areas.
Mistake 3: Weak mounting
This is the big one. Headboards should be secure and stable. Use studs, proper hardware, and a mounting method appropriate for the weight and your wall type.
Mistake 4: Ignoring paint dust risks on older pieces
If the shutters are older, avoid creating dust. Use safer prep methods and clean up thoroughly. Your lungs will thank you, even if they don’t send a thank-you card.
Experience Notes: What DIYers Learn When Making a Garage Sale Shutter Headboard
DIY shutter headboards are one of those projects that look simple (and they can be), but the best results come from a few real-world lessons that DIYers tend to discover along the way. Here are common experiences people report after doing a “garage sale shutters turned headboard” projectespecially the Hometalk-inspired versions with extra flair like sconces.
First: the hunt is half the funand half the challenge. Many DIYers say they visited a few garage sales or thrift spots before finding shutters with the right width, sturdiness, and “this has potential” vibe. The winning set is usually not the prettiest at first glance. It’s the one that’s straight enough to mount, solid enough to screw into, and interesting enough that paint will make it shine. People often bring a tape measure and quick photos of their bed wall so they can judge scale on the spot (because “I eyeballed it” is how you end up with a headboard that fits a dollhouse).
Second: prep work is the secret sauce. The difference between “cute DIY” and “wow, where did you buy that?” usually comes down to cleaning, sanding lightly, and using the right primer. DIYers often mention that shutters have hidden dust in every groove, and skipping the cleaning step can lead to peeling paint later. Many also find that thin coats of paint look more professional than one heavy coatespecially around slats where drips love to gather like they’re forming a paint-drip support group.
Third: distressing is easier to add than to undo. A lot of people start out excited and go a little too hardthen realize that “aged” can turn into “attacked.” The most successful DIYers do a test run on the back or on a scrap board. Dry brushing and gentle sanding on edges tends to create a natural look, while heavy distressing can read as forced. A common tip is to step back every few minutes and look at it from across the room (the “distance test”) before adding more wear.
Fourth: mounting is where confidence meets reality. DIYers often feel great until it’s time to put a heavy piece on the wall. Many say the project became dramatically less stressful once they used a stud finder, pre-drilled holes, and chose a strong mounting method like a French cleat or stud-anchored brackets. People who added “legs” (simple boards attached behind the shutters that rest on the floor) often report that the headboard felt more stable and forgiving, especially if their walls weren’t perfectly flat.
Fifth: adding sconces is the upgrade that makes people talk. DIYers who attach plug-in sconces or lights say it immediately elevates the project, but it also adds planning: cord routing, hole placement, and making sure the light is positioned for reading. The best outcomes happen when the wiring plan is decided before the shutters go on the wall. A recurring experience is realizing you need one extra detailcord clips, grommets, or a small channelso the setup looks intentional instead of “I hid the cord behind hope.”
Finally, many DIYers say this project changes how they shop forever. Once you turn garage sale shutters into a headboard, you start seeing “future projects” everywhere: doors that could be a table, drawers that could be shelves, and windows that could be wall art. It’s a slippery slopein the best way.
Conclusion: A Headboard with a Story Beats a Headboard with a Receipt
A “Garage Sale Shutters Turned Headboard” project is more than a weekend DIYit’s a style upgrade with personality. With thoughtful prep, a finish that fits your space, and secure mounting, you can create a DIY shutter headboard that looks custom, feels cozy, and makes your bedroom instantly more interesting. And if you add sconces? Congratulations. You’ve officially built something that looks like it came from a boutique, not the end-of-driveway bargain zone.


