Table of Contents >> Show >> Hide
- Quick Vocabulary That Makes Measuring 10x Easier
- Plan First: The Two Measurements That Decide Everything
- Face Frame Sizing: The “Opening-First” Method
- Measurement Tricks That Prevent “Why Is This 1/8" Off?”
- Face Frame Joinery: Strong Enough Without Becoming a Thesis
- Attaching the Face Frame to the Cabinet Box: Alignment First, Fasteners Second
- Door & Drawer Math That Actually Works
- Hardware Clearances: The Stuff That Ruins a Saturday
- Installation & Scribing: The Wall Is Lying to You
- Mini Case Study: Designing a 24" Base Cabinet Face Frame
- Quality-Control Checklist Before You Call It “Done”
- Conclusion: Build Like a Cabinetmaker, Measure Like a Paranoid Optimist
- Experience Notes: of “I Learned This the Hard Way”
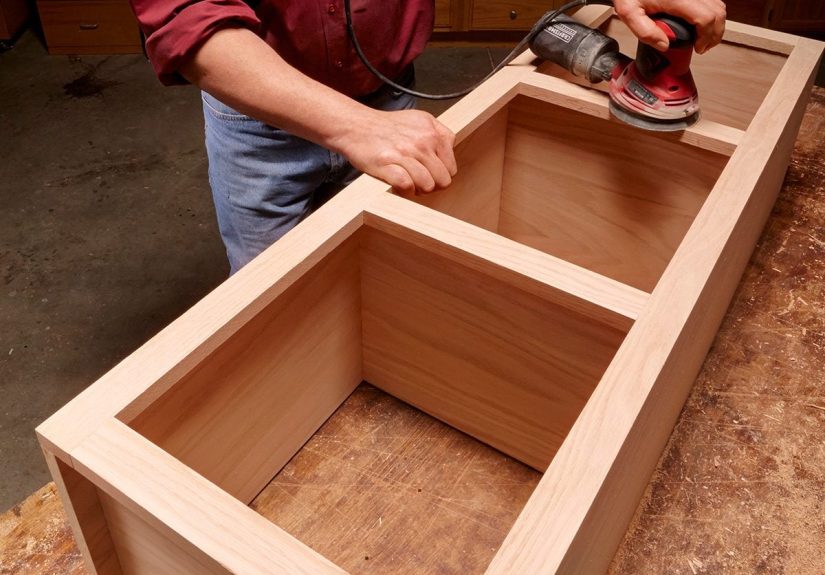
Face-frame cabinets are basically the “skeleton + suit jacket” of cabinetmaking: the plywood box does the heavy lifting,
and the hardwood face frame makes everything look crisp, hides tiny sins, and gives you a solid place to hang doors.
The catch? Face frames reward careful measuring and punish “close enough” like a toddler with a marker and a white sofa.
This guide walks through the building tips and measurement tricks that keep face-frame cabinets square, doors even,
drawers smooth, and reveals consistent. We’ll cover sizing the frame, avoiding cumulative errors, dialing in overlays,
and installing/cribing so the finished run looks custom instead of “I fought the wall and the wall won.”
Quick Vocabulary That Makes Measuring 10x Easier
- Face frame: the hardwood “picture frame” attached to the front of the cabinet box.
- Stiles: vertical frame parts.
- Rails: horizontal frame parts (top, bottom, and sometimes intermediate).
- Opening: the clear space inside the face frame (where doors/drawers “live”).
- Reveal: the intentional gap line around inset doors/drawers, often ~1/16"–1/8".
- Overlay: how much the door covers the face frame (partial or full overlay).
Plan First: The Two Measurements That Decide Everything
1) Decide your cabinet style: inset, partial overlay, or full overlay
Your door/drawer math depends on this choice. Inset looks tailored but demands accuracy. Overlay is more forgiving and
popular for DIY builds. If you haven’t chosen yet, pick the hardware firsthinges and slides often “tell you” what clearances
you actually need.
2) Choose a face-frame system and stick to it
Consistency beats creativity here. A common approach is stiles around 1-1/2" to 2" wide.
Rails can match the stiles, or go a little wider on the bottom for visual weight. What matters most is that your frame layout
is predictable so openings are predictableand openings are what doors and drawers are sized from.
Face Frame Sizing: The “Opening-First” Method
Many beginners measure the plywood box, then try to “figure out” the face frame. That works… until you start stacking cabinets,
sharing stiles, and realizing your drawer slide clearance has opinions.
A cleaner approach is to design around the openings you want (for drawers, doors, trash pull-outs, etc.)
and build the face frame to create those openings. Then size the box to support the frame.
Common face-frame layouts
- Single cabinet face frame: a frame for one box (easy for standalone cabinets, simple installs).
- Run-style face framing: cabinets share stiles between boxes, creating a seamless line (clean look, more planning).
- Hybrid: build single frames, then connect cabinets tightly and add a scribe/end panel to “finish” the run.
Measurement Tricks That Prevent “Why Is This 1/8" Off?”
Use a story stick for repeatable cabinet parts
A story stick is a scrap strip marked with your real project dimensionsopenings, rail locations, hinge positions,
and even toe-kick heights. It reduces tape-measure errors and makes repeat work fast. Mark it once, use it 20 times,
and your cabinets will start acting like they were built by a calm person. (We’re aiming for “calm.”)
Pick one reference edge and treat it like a sacred artifact
When you measure from different edges, tiny thickness variations and saw kerf errors stack up. Choose a reference edge for
each part (usually the factory edge of plywood, or a jointed edge of hardwood) and measure/mark from that edge every time.
Confirm squareness with diagonals (and don’t ignore what they tell you)
For a rectangular frame or cabinet box, measure corner-to-corner diagonals. If they match, you’re square. If not, your cabinet is
politely informing you that drawers will be grumpy later. Clamp and rack the assembly until diagonals match, then fasten.
Build a “reveal gauge” out of scraps
If you want a 1/16" gap, don’t eyeball it. Make a tiny gauge from 1/16" hardboard, laminate, playing cards, or thin plywood.
Use it when spacing drawer fronts or inset doors. It’s faster than measuring each gapand more accurate than “looks good from here.”
Face Frame Joinery: Strong Enough Without Becoming a Thesis
Pocket screws (fast, common, very DIY-friendly)
Pocket-screw face frames are popular because they’re quick, align well with clamps, and hold up when paired with glue.
The key tricks:
- Clamp the joint flush before driving screws so the face stays flat.
- Use glue for rigidity; pocket screws act like clamps while it dries.
- Avoid splitting by using correct screw length and proper pilot settings for hardwood.
Mortise-and-tenon / loose tenon / dowels (slower, very strong)
Traditional joinery shines when you’re making high-end cabinetry or very wide/tall frames. The measurement trick here is
to layout all mortises from a story stick or a common reference line so rails land perfectly across multiple frames.
Attaching the Face Frame to the Cabinet Box: Alignment First, Fasteners Second
A face frame can hide small box imperfections, but only if you attach it thoughtfully:
- Dry-fit and check overhangs (if any) on both sides.
- Clamp the frame so it’s flush to the box front and square to the cabinet.
- Glue + pin nails/brads to hold position, then reinforce from inside with screws if desired.
A practical trick: if you expect a wall to be out of plumb, you can leave an end stile off during install,
then scribe that stile to the wall and attach it last. This creates a tighter “built-in” look without heroic drywall work.
Door & Drawer Math That Actually Works
Doors and drawer fronts are where cabinet projects win heartsor earn nicknames. Below are practical sizing patterns.
Always verify hinge specs and overlay requirements for your exact hardware.
Inset doors/drawers (clean look, requires consistent reveals)
A common approach is to subtract a reveal gap from each side of the opening.
Example using a 1/8" reveal around all edges (so 1/8" per side):
For a tighter look (1/16" reveal), substitute 1/16" instead. The tradeoff: the tighter the reveal, the more perfect your box,
frame, hinges, and installation must be.
Overlay doors (more forgiving)
Overlay depends on hinges and design goals. Typical overlays vary, but your sizing logic looks like this:
Example: A single door covering an opening (no meeting gap), using 1/2" overlay on all sides:
Two doors in one opening (avoid the “door collision Olympics”)
If two doors meet in the middle, plan a small gap (often 1/16"–1/8" total) so seasonal movement and hinge adjustment don’t create
a daily door jam. One simple method:
The trick is consistency: use a gap gauge and keep the same center gap across the whole kitchen run.
Drawer fronts: keep it simple with a “grid” mindset
If you want drawers to look crisp, treat the cabinet front like a grid: consistent gaps, consistent margins, and drawer front sizes
that add up cleanly. A reliable method:
- Decide your vertical gap between drawer fronts (often 1/16"–1/8").
- Lay out the stack on paper or with painter’s tape on the cabinet face.
- Use spacers during install so gaps stay even even if your hands are shaky from too much coffee.
Hardware Clearances: The Stuff That Ruins a Saturday
Drawer slides in face-frame cabinets
Many side-mount slides want 1/2" clearance per side (check your slide spec). With face frames, the slide needs a straight mounting plane.
Solutions include:
- Build the box to accommodate slides (ideal during planning).
- Add face-frame spacers at the front so slides mount square.
- Use slides designed for face frames or compatible brackets when needed.
Hinges: face-frame vs frameless matters
Hinges are not “one-size-fits-all.” Face-frame cabinetry often uses different mounting plates or hinge types than frameless.
Choose hardware based on your overlay/inset decision, then size doors accordingly.
Installation & Scribing: The Wall Is Lying to You
Most walls are not straight, plumb, or interested in your dreams. That’s why scribing exists.
Shim first, then fasten (and re-check constantly)
Set cabinets at the high spot of the floor, shim until level and plumb, and clamp adjacent face frames flush before fastening.
Re-check after each cabinet. Small shifts add up fast in a long run.
Scribe end panels and stiles for a built-in look
If a cabinet side or face frame meets a wavy wall, a scribe cut makes it look custom. Basic approach:
- Set the cabinet where it belongs, shim it level and plumb.
- Hold the stile/panel slightly proud of the wall.
- Use a compass/scribing tool to transfer the wall contour to the stile/panel.
- Trim to the line (jigsaw, plane, or belt sander), test-fit, repeat until the gap disappears.
Leave yourself “scribe insurance”
A practical trick is to allow extra material at the end of a runeither with a wider stile, a scribe strip, or an applied filler.
That way, you can trim to match the wall without shrinking your openings unexpectedly.
Mini Case Study: Designing a 24" Base Cabinet Face Frame
Let’s say you’re building a simple 24" wide base cabinet with two doors (overlay style), and you like 1-1/2" stiles and rails.
Your frame might look like this:
- Left stile: 1-1/2"
- Right stile: 1-1/2"
- Center stile (between doors): 1-1/2"
- Top rail: 1-1/2"
- Bottom rail: 1-1/2" (or a touch wider if you like)
Your opening width is the cabinet width minus the stiles that define it. If the two doors share a center stile,
you effectively have two openings. This is where planning on paper (or in a sketch app) helpsbecause once you commit to stile widths,
your openings become fixed, and door math becomes easy.
Quality-Control Checklist Before You Call It “Done”
- Face frame flat? Lay it on a known-flat surface; fix any twist before attaching.
- Box square? Diagonals match; clamps stay on until fasteners lock it in.
- Openings consistent? Measure multiple points (top/middle/bottom) to catch taper.
- Doors planned from hardware? Confirm overlay/inset requirements before cutting doors.
- Install sequence? High spot first, shim, clamp faces flush, fasten carefully.
Conclusion: Build Like a Cabinetmaker, Measure Like a Paranoid Optimist
Face-frame cabinets aren’t hardthey’re just picky in the way that good-looking things tend to be. The big wins come from
designing around openings, using repeatable layout tools (story sticks and spacer gauges), and treating installation like
a precision task rather than a “close enough” adventure. Plan your reveals and overlays, select hardware early, square everything
with diagonals, and give yourself scribe insurance for real-world walls.
Do that, and your cabinets won’t just functionthey’ll look intentional. And you’ll avoid the classic DIY moment where you stare at a
3/16" gap whispering, “Maybe the wall will move overnight.”
Experience Notes: of “I Learned This the Hard Way”
The first face-frame cabinet I ever built taught me a powerful truth: plywood is honest, but drywall is a comedian. I started with
a perfectly square box on the benchdiagonals matched, edges were flush, and I felt unstoppable. Then I carried it to the wall,
and suddenly my “square” cabinet looked like it was leaning into a strong breeze. The floor had a high spot, the wall had a belly,
and my confidence had an appointment with reality.
The fix wasn’t magicit was process. I learned to find the high spot on the floor first and set the cabinet there, because shimming up
is predictable, while trying to “shim down” is just a fancy way of saying “I’m going to cut something I’ll regret.” Once the cabinet was
level, I stopped trying to force the back tight to the wall. Instead, I shimmed at stud locations and focused on the face: plumb, level,
and in line with its neighbor. That’s when the face frame earns its paycheckbecause the front matters most visually, and a consistent plane
across multiple cabinets is what makes an installation look professional.
I also learned the value of leaving an end stile off. On my first run, I installed a cabinet with a full face frame already attached.
The wall bowed inward near the front, leaving a gap that screamed “DIY!” from across the room. The next time, I left the end stile off,
installed the cabinet, then scribed and trimmed a fresh stile to match the wall’s curve. When I pinned it on, the gap disappeared and the cabinet
instantly looked custom. Same cabinet, different sequencing.
Door math was another humbling chapter. I once cut overlay doors based on the outer cabinet width instead of the opening, and the result was a pair
of doors that overlapped where they metlike two people trying to walk through a doorway at the same time while both insisting, “No, you go.” The lesson:
calculate doors from the opening and overlay values, and always account for the center gap on double doors. Now I mock up the front layout with painter’s tape
or a quick cardboard template before cutting the real parts. Cardboard is cheap. Hardwood is… emotionally expensive.
Finally, I became a believer in spacer gauges. When installing drawer fronts, I used to measure each gap with a tape, which is basically inviting
cumulative error to a party and then acting surprised when it shows up. Now I use consistent spacersthin plywood strips or playing cardsto set gaps,
clamp the fronts, then fasten from inside. The drawer stack ends up looking intentional, and I end the day with fewer “Why is this one different?”
conversations with myself.
If you take one thing from my cabinet-building scars, let it be this: measure from references, not from hope. Use story sticks. Use spacers.
Plan for walls to misbehave. And remember: the goal isn’t perfectionit’s consistency. Cabinets forgive a lot when everything matches on purpose.