
Table of Contents >> Show >> Hide
- Why Vintage Trough Planters Work So Well
- How to Choose the Right Trough
- Step-by-Step: How to Turn a Vintage Trough Into a Planter
- Best Planting Ideas for Vintage Troughs
- How to Keep a Vintage Trough Planter Thriving
- Mistakes to Avoid
- The Real Joy of DIY Vintage Trough Planters
- Experience: What I Learned From Using Vintage Troughs as Planters
- SEO Tags
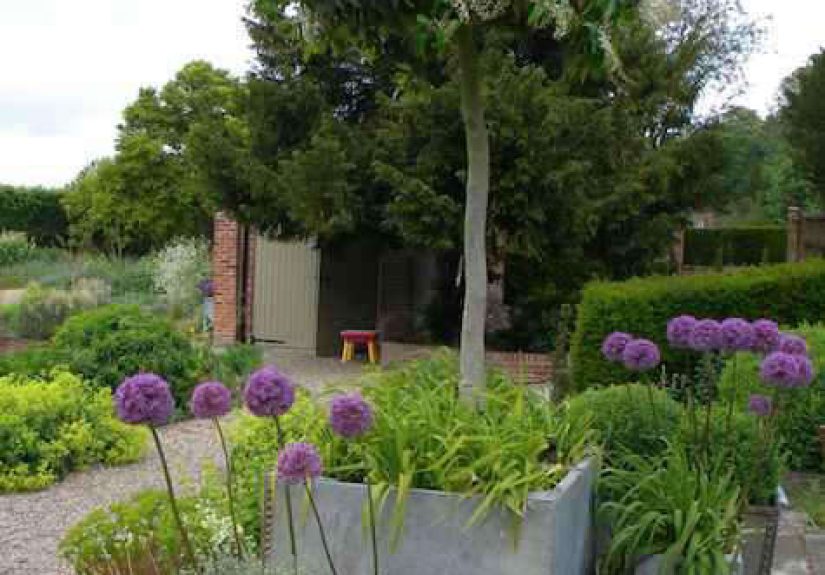
Some garden projects feel suspiciously wholesome. This is one of them. You find a vintage trough at a flea market, estate sale, barn, or that mysterious corner of the internet where old farm things go to begin their second act. It’s scratched, weathered, a little dramatic, and somehow still full of charm. Then you turn it into a planter and suddenly your patio looks like it belongs in a magazine spread titled Effortlessly Stylish People Who Definitely Remember to Water Their Herbs.
That’s the magic of using vintage troughs as planters. They bring age, texture, and personality to a garden in a way brand-new containers rarely do. They can lean farmhouse, cottage, rustic, French country, or even modern depending on what you plant in them. Better yet, they’re practical. A roomy trough gives roots more space, makes a stronger visual statement, and can hold everything from basil and lettuce to sedum and trailing flowers.
But before you toss in some potting mix and call it a day, there are a few things worth getting right. Drainage matters. Soil choice matters. Plant selection matters. And yes, your gorgeous old trough still needs basic prep unless you want your plants to stage a very soggy protest.
Why Vintage Trough Planters Work So Well
Vintage troughs have three big advantages: size, style, and versatility. First, they usually offer more planting space than standard pots. That extra room helps roots spread out and gives the soil a bit more buffering power against heat and drying. Second, the patina is half the point. Galvanized tubs and old troughs naturally bring a weathered, collected-over-time look that can soften a new patio or make an established garden feel richer and more layered.
Third, they play well with almost any planting style. Want a kitchen-garden feel? Fill one with thyme, parsley, oregano, and basil. Prefer flowers? Mix upright, mounding, and trailing plants for a lush display. Love low-maintenance gardening? Go with sedums and other drought-tolerant plants that appreciate sharp drainage and a little benign neglect.
In short, a vintage trough is not just a container. It’s garden decor with work ethic.
How to Choose the Right Trough
Not every old trough deserves a starring role. When shopping, look for a piece that is structurally sound enough to hold soil and water without collapsing into a rusty identity crisis. Surface rust, scratches, dents, and fading are usually fine. In fact, they add character. What you want to avoid are deep rust-through holes, sharp dangerous edges, or weak seams that could split once the trough is filled.
Size matters too. A large trough creates a dramatic focal point and gives you more design freedom, but it also becomes very heavy once filled. If you want something movable, choose a smaller vessel or place a larger one on a rolling plant caddy rated for the weight.
Most importantly, be careful with provenance. If a trough once held toxic substances, skip using it for edible plants and, honestly, consider skipping it altogether. Old containers are charming; mystery chemicals are not.
Step-by-Step: How to Turn a Vintage Trough Into a Planter
1. Clean it first
Give the trough a thorough scrub with soap and water to remove grime, dust, and leftover debris. If it’s especially funky, rinse well and let it dry fully. For vintage metal, avoid aggressive soaking treatments that can damage the finish or encourage corrosion. The goal is clean and garden-ready, not “restored to spaceship condition.”
2. Deal with drainage before you do anything else
This is the non-negotiable step. Plants need drainage holes so water can move out freely and roots can get oxygen. Without that, the trough becomes a decorative swamp. Drill several holes in the bottom, especially if the trough is large. For many planters, holes around 1/4 inch to 1/2 inch work well. Bigger troughs need multiple holes, not one sad token hole in the middle pretending to be helpful.
3. Smooth or cover sharp edges
If the metal around drilled holes or old seams feels sharp, file it down or cover it safely so you don’t slice your hands open during planting day. Gardening should involve dirt under your nails, not an unexpected tetanus monologue.
4. Elevate the trough
Set the planter on bricks, pot feet, or a sturdy stand. This helps water escape instead of pooling beneath the container, improves airflow, and can reduce winter damage in cold conditions. It also makes the trough look intentional rather than like you dropped it in place during a mild landscaping emergency.
5. Use the right filler, if needed
If the trough is very deep, you do not have to fill the whole thing with potting mix. To reduce cost and weight, fill the bottom quarter to one-third with inert, non-biodegradable filler such as clean plastic jugs or crushed cans, then place landscape fabric above that layer before adding soil. This creates volume without wasting premium potting mix where roots may never reach.
6. Add potting mix, not garden soil
Use a high-quality potting mix designed for containers. This is crucial. Garden soil compacts too easily in containers, drains poorly, and can suffocate roots. Potting mixes are lighter and built to balance moisture retention with airflow. Leave about an inch between the soil line and the rim so watering doesn’t spill over like a tiny muddy waterfall every time.
7. Skip the rocks-in-the-bottom myth
This old tip refuses to retire, but it should. Gravel, pebbles, or broken pottery at the bottom of an individual planter do not improve drainage. In many cases, they make the soil stay wetter near the roots. The smarter move is simple: use proper drainage holes and a good potting mix.
8. Plant with a design plan
A classic formula for container design is “thriller, filler, spiller.” Use one taller focal plant, surround it with fuller companions, and soften the edges with trailing plants. It works beautifully in troughs because the long shape naturally lends itself to layered planting.
Best Planting Ideas for Vintage Troughs
Herb Trough
This is one of the easiest and most rewarding options. Combine basil, thyme, parsley, oregano, chives, or sage depending on your light. A sunny vintage trough near the kitchen door makes you feel like the kind of person who casually harvests herbs before dinner instead of frantically opening a dried-oregano jar from 2023.
Edible Patio Trough
Vintage troughs are excellent for compact vegetables. Lettuce, radishes, dwarf carrots, peppers, and even tomatoes can work if the trough is roomy enough and gets enough sun. Just remember that vegetables in containers dry out faster than in-ground beds, so watering needs will be more frequent.
Cottage-Style Flower Trough
If you want romance and color, pair upright bloomers with softer fillers and trailing plants. Think geraniums, petunias, marigolds, calibrachoa, or whatever suits your region and season. The old-metal-meets-soft-flowers contrast is hard to beat.
Succulent or Sedum Trough
This is ideal for a dry, sculptural look. Sedums and similar plants are especially happy in well-drained conditions and can tolerate heat and drought once established. If your trough gets blazing sun and you’d rather not water twice a day in July, this is a smart choice.
Shade Trough
Not every vintage trough belongs in full sun. In part shade or bright shade, try ferns, caladiums, impatiens, creeping plants, or other shade-friendly choices suited to your climate. The metal container adds structure while the foliage softens the whole look.
How to Keep a Vintage Trough Planter Thriving
Water thoroughly until water drains from the bottom, then let the potting mix begin to dry according to the needs of your plants. Check containers often, especially in heat, because metal troughs can warm up quickly. For thirsty crops like peppers and tomatoes, consistency is key. For sedums and other drought-tolerant plantings, resist the urge to over-love them with the hose.
Fertilizer matters too. Potting mix does not feed plants forever. Repeated watering gradually washes nutrients out, so plan to fertilize regularly during the growing season. A balanced all-purpose fertilizer is a solid place to start. If you are growing flowering or fruiting plants, they may benefit from a formula tailored to blooms or vegetables.
Mulch can help reduce evaporation, especially in sunny troughs. A light topdressing of fine bark, gravel for succulent arrangements, or another appropriate mulch can make watering easier and give the planter a more polished finish.
In winter, pay attention to protection. Containers are more exposed than garden beds, and freezing moisture can damage both roots and containers. Elevate the trough, keep drainage open, and in colder climates move planted troughs to a sheltered area if possible. If the container is too heavy to move, consider insulating around it.
Mistakes to Avoid
- Using garden soil: It compacts, drains poorly, and turns your charming trough into a root prison.
- Forgetting drainage holes: Pretty planter, miserable plants.
- Adding rocks at the bottom: This steals root space and does not solve drainage problems.
- Overcrowding plants: A lush trough is lovely; a plant mosh pit is less so.
- Ignoring light conditions: Sun-loving herbs in deep shade will sulk. Shade plants in all-day sun will crisp up like salad left on a dashboard.
- Skipping fertilizer: Containers lose nutrients fast, and hungry plants show it.
- Planting edibles in questionable containers: If the trough’s history is murky, don’t risk it.
The Real Joy of DIY Vintage Trough Planters
The best part of this project is that it combines creativity with usefulness. A vintage trough does not need to be perfect. In fact, perfection would ruin it a little. The scratches, patina, and dents give the planter a story before you even add the first plant. Once planted, it becomes something even better: a living object that changes through the season.
That’s why this project keeps showing up in beautiful gardens. It feels collected, personal, and flexible. You can replant it every season, use it for herbs one year and flowers the next, or make it the permanent home for a low-water planting that asks very little of you beyond occasional admiration.
If you ask me, that’s a pretty good retirement plan for an old trough.
Experience: What I Learned From Using Vintage Troughs as Planters
The first time I used a vintage trough as a planter, I made the classic beginner mistake: I fell in love with the container before I thought about the logistics. It was handsome, weathered, and just rusty enough to look expensive in that “I casually found this at a barn sale” kind of way. I brought it home, filled it with soil, planted a mix of herbs and flowers, stepped back to admire it, and realized I had forgotten drainage holes. The trough looked fantastic for exactly three days. Then the basil started pouting, the parsley turned moody, and the whole thing had the energy of a wet sock.
Once I fixed the drainage and replanted it properly, everything changed. That one container became the thing visitors noticed first. It had more personality than the neat rows of standard pots around it. The metal caught the light in the morning, the herbs spilled over the edges by midsummer, and the whole arrangement looked better with time rather than worse. That’s the special trick vintage troughs pull off: they age beautifully while the plants fill in.
I also learned that troughs make gardening feel more approachable. A long container invites experimentation. You can try a mini kitchen garden, a monochrome flower scheme, a succulent composition, or a messy cottage mix without committing a huge section of yard. If something flops, you replant. If something thrives, you pretend that was the plan all along.
Another surprise was how practical they are for everyday gardening. A waist-high or raised trough is easier on the back than bending into beds. Harvesting thyme or snipping lettuce from a container near the door is absurdly convenient. And because the planting area is contained, maintenance feels less overwhelming. Weeding takes minutes, not an entire Saturday and a small emotional support snack.
Of course, vintage troughs also teach humility. Metal containers heat up, thirsty plants dry out faster in summer than you expect, and a trough that seems “not that heavy” becomes permanently stationed the second you fill it. I now choose the location first, then plant. That lesson came to me after attempting to drag a fully planted trough across a patio with all the grace of a raccoon moving a refrigerator.
Still, I keep coming back to them because they offer that rare combination of utility and character. They are useful enough for serious gardening and beautiful enough to feel decorative year-round. Even in the off-season, an empty trough has presence. Planted up, it becomes a centerpiece.
And maybe that’s why people love them so much. A vintage trough planter feels a little resourceful, a little nostalgic, and a little rebellious in the best way. It says you don’t need a perfect garden-center setup to create something memorable. Sometimes all you need is an old vessel, the right soil, a drill, and a willingness to learn from a few muddy mistakes.


