
Table of Contents >> Show >> Hide
- Why Wooden Floor Panels Make an Awesome Tabletop
- Project Overview: What You’re Building
- Materials and Tools
- Step 1: Choose and Prep Your Floor Panels
- Step 2: Glue Up a Flat Panel (The “Make It Not Wavy” Phase)
- Step 3: Flatten and Square the Panel
- Step 4: Cut the Tabletop Shape (Round Is the Compass Classic)
- Step 5: Create the Compass Rose Design
- Step 6: Attach the Base Without Fighting Wood Movement
- Step 7: Finish Like a Pro (So It Survives Real Life)
- Budget and Time Estimate
- Troubleshooting: Common Problems and Easy Fixes
- Real-World “Builder Experiences” and Lessons Learned (Extra)
If you’ve ever ended up with leftover hardwood flooring after a remodel, you already know the two truths of
“extra floor panels”: (1) they’re too nice to toss, and (2) they are definitely going to live in your garage
until the end of time unless you give them a new destiny.
Enter the DIY compass tablepart furniture, part conversation starter, part “yes, I made that” flex.
In this guide, you’ll turn wooden floor panels (solid or engineered hardwood planks) into a sturdy tabletop,
then add a compass rose design (stencil, veneer, paint, or wood-burningyour call). The result is a table that
looks like it wandered out of a coastal boutique… without the boutique price tag.
Why Wooden Floor Panels Make an Awesome Tabletop
Hardwood flooring is designed to survive heavy foot traffic, chairs scooting, and the occasional “who spilled
coffee?” panic. That durability translates beautifully to furnitureespecially a small side table, entry table,
or coffee table.
Pros of using hardwood flooring planks
- Dense, wear-resistant wood (often oak, maple, hickory, or acacia) that holds up well over time.
- Consistent millingmany planks are straight, uniform, and easy to align.
- Built-in characternatural grain, knots, color variation, and sometimes a lightly weathered look.
- Budget-friendlyleftovers or reclaimed flooring can cost little (or nothing).
Watch-outs (so your table doesn’t get weird later)
- Prefinished boards need prep for glue to bond well (you’ll remove finish where boards meet).
- Tongue-and-groove edges can create gaps unless you trim tongues/grooves or fill strategically.
- Wood movement still existsespecially with solid hardwood. Use a base attachment method that allows seasonal expansion.
Project Overview: What You’re Building
This tutorial assumes a round compass table (classic compass vibe), but the same method works for a square,
octagon, or “whatever shape my tools can handle without drama” top.
Suggested dimensions
- Side table: 18–22 inches diameter, 18–24 inches tall
- Coffee table: 30–36 inches diameter, 16–18 inches tall
- Entry table top (rectangular): ~10–14 inches deep by 36–48 inches long
Materials and Tools
Materials
- Wooden floor panels (hardwood flooring planks)
- Wood glue (PVA wood glue is the usual go-to)
- Clamps (bar clamps, pipe clamps, or panel clamps)
- Cauls (straight boards used to keep the glue-up flat) + packing tape (so they don’t stick)
- Wood filler (optional, for small gaps)
- Compass rose design method (choose one): stencil + paint, vinyl stencil, veneer inlay, wood-burning, or decal under finish
- Finish (water-based polyurethane, oil-based polyurethane/varnish, or a hardwax oilmore on this below)
- Table base: hairpin legs, pedestal base, or a repurposed table base
- Fasteners for the base: figure-8 fasteners, Z-clips, or elongated screw holes (to allow movement)
Tools
- Measuring tape, pencil, straightedge
- Table saw or circular saw (for trimming tongues/grooves if needed)
- Random orbital sander + sandpaper (80/120/180/220 grit)
- Router + circle-cutting jig or jigsaw (router gives a cleaner circle)
- Drill/driver
- Safety gear: eye protection, ear protection, and a respirator when sanding old finishes
Safety note: Old finishes and wood dust are not a smoothie ingredient. Wear a respirator when sanding,
and use good ventilation when applying finishes. Your future lungs will send you a thank-you card.
Step 1: Choose and Prep Your Floor Panels
Pick boards that play nicely together
Lay the planks on the floor and experiment like you’re assembling a giant hardwood charcuterie board.
Alternate tones and grain so the top looks intentional (not like you lost a fight with a flooring sample rack).
Deal with tongue-and-groove edges
Flooring often has a tongue on one side and a groove on the other. For a tabletop glue-up, you have three common options:
- Trim the tongues and grooves off so each plank has square edges for clean glue joints.
- Keep the groove, remove the tongue (or vice versa), then gluethis can reduce gaps but may still need finesse.
- Leave the profile and fill later (works best for rustic looks, but can trap crumbs if gaps remain).
If the boards are prefinished, prep the glue surfaces
Glue doesn’t bond well to glossy factory finish. You don’t need to strip the entire plank before glue-up,
but you do want bare wood at the edges that will be glued together. Lightly sand or plane the joint edges
to fresh wood so the glue can actually do its job instead of sliding around like it’s on an ice rink.
Step 2: Glue Up a Flat Panel (The “Make It Not Wavy” Phase)
Dry fit first
Arrange your planks, check the seams, and make sure the top will be wider than your final tabletop size.
Mark the boards with a big triangle across the facesthis helps you reassemble in the same order after you add glue.
Glue and clamp
- Apply a thin, even layer of wood glue along the joint edges.
- Clamp across the width to pull seams tight. Use enough clamps that pressure is even from end to end.
- Use cauls across the top (near both ends and optionally the middle) to keep boards flush and the panel flat.
- Wipe away squeeze-out with a damp rag while it’s still soft, or let it gel and scrape later.
Pro tip: Over-tightening clamps can cause boards to bow or shift. You want snug and aligned,
not “I’m trying to compress wood into a new element.”
Let it cure like you mean it
Keep the panel clamped long enough for a strong bond, then avoid stressing it for a full day.
Yes, patience is annoying. No, your tabletop doesn’t care.
Step 3: Flatten and Square the Panel
Once the glue is cured, remove clamps and check for uneven seams. If you have a planer, greatsend it through in light passes.
If you don’t, a random orbital sander and some persistence will get you there.
Sanding sequence
- 80 grit to level ridges or old finish (go easythis is not a race).
- 120 grit to refine.
- 180 grit for smoothing.
- 220 grit before finish (especially if you want a slick top).
If there are small gaps, you can fill them with color-matched wood filler or a mix of fine sanding dust + compatible filler.
Keep it subtleunless you’re going for “cracked desert aesthetic,” which is… a choice.
Step 4: Cut the Tabletop Shape (Round Is the Compass Classic)
Option A: Router + circle jig (cleanest result)
Mark the center of your panel. Attach a circle-cutting jig to your router, set your radius, and cut in shallow passes.
Don’t try to route the full thickness in one gomultiple shallow passes are safer and cleaner.
Option B: Jigsaw (still works, just needs extra sanding)
Draw your circle using a string-and-pencil compass trick (pin at center, string to pencil, draw).
Cut slightly outside the line, then sand down to perfection.
Ease the edge
A small round-over router bit or a gentle hand-sanded bevel makes the top feel finished and less prone to splintering.
Step 5: Create the Compass Rose Design
This is where your table goes from “nice reclaimed wood top” to “whoa, did you buy that at a fancy shop?”
Pick a method that matches your tools, patience level, and willingness to redo things after stepping back and saying,
“Huh. That looks… not symmetrical.”
Method 1: Stencil + paint (high impact, low drama)
- Lightly sand the top to remove dust nibs and ensure paint adhesion.
- Find the center point and align the stencil carefully (measure twice, eyeball once).
- Use painter’s tape to secure edges. Burnish the stencil so paint doesn’t bleed under.
- Apply paint with a foam pouncer or nearly-dry brush in light layers. Multiple thin coats beat one gloopy coat.
- Peel stencil while paint is slightly tacky for crisp edges.
Design idea: Keep the compass rose a single bold color for modern style, or use two tones
(dark points + lighter inner star) for more nautical flair.
Method 2: Veneer inlay (fancier, but worth it)
For a classic mariner’s compass look, cut veneer pieces (contrasting light/dark) and glue them into a routed recess.
This is more advanced, but it creates a “built-in” look that paint can’t quite replicate.
Method 3: Wood-burning or pyrography (warm and handmade)
Transfer your compass design with graphite paper, then burn lines carefully. Seal afterward with a clear finish.
This method is forgiving because the “imperfections” read as artisan charm, not “oops.”
Method 4: Decal under clear coat (fastest)
If you want crisp detail without artistic panic, use a high-quality decal centered on the tabletop,
then bury it under several coats of clear finish. It’s essentially “cheat mode,” and we love that for you.
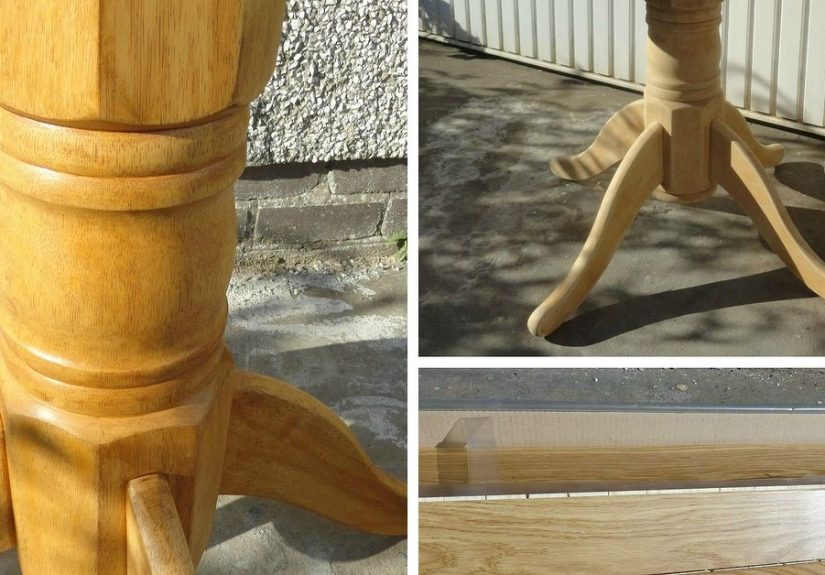
Step 6: Attach the Base Without Fighting Wood Movement
Wood expands and contracts across the grain with humidity changes. If you screw the base on in a way that locks
the top rigidly, the wood may crack or warp later. The solution: attach the base so the top can move a little.
Good attachment methods
- Figure-8 fasteners (easy, common, reliable)
- Z-clips (great if your base has an apron)
- Elongated screw holes in the base (screws can shift slightly as the top moves)
If you’re using hairpin legs, you can often attach with screws through the mounting plates, but still consider
elongated holes (or slightly oversized pilot holes) for solid-wood tops.
Step 7: Finish Like a Pro (So It Survives Real Life)
A compass table is a high-touch surface: keys, cups, elbows, maybe a dramatic novel tossed down with feeling.
Pick a finish that matches how the table will be used.
Finish options (and what they’re best at)
-
Water-based polyurethane: Clear, low odor, dries faster, less yellowinggreat for light woods
and indoor projects. -
Oil-based polyurethane/varnish: More amber warmth, very durable, longer dry time, stronger fumes.
Great if you want that classic rich tone. - Hardwax oil: Natural look, easy spot repair, but can require more maintenance on heavy-use tabletops.
A simple, durable finishing routine
- Final sand to 220 grit and remove dust thoroughly.
- Apply thin coats. Thick coats are where brush marks and regret live.
- Lightly scuff-sand between coats (when fully dry) for smoothness and adhesion.
- Build enough coats for a protective filmespecially for coffee/side tables that see daily action.
- Let the finish cure before heavy use. “Dry to touch” is not the same thing as “ready for a pizza box.”
Tip for painted/stenciled designs: Use a clear topcoat compatible with your paint (water-based over fully cured acrylic paint is common).
Always test on scrap firstbecause your tabletop should not be your science fair.
Budget and Time Estimate
- Time: 1–2 weekends (glue-up day + finishing days)
- Cost: Often $40–$150 depending on legs/base and finish (flooring leftovers can make this wildly affordable)
Troubleshooting: Common Problems and Easy Fixes
My glue-up isn’t perfectly flat
Next time, use cauls and check alignment while tightening clamps. For now, flatten with sanding or a hand plane.
Small variations are normaljust don’t leave it “wavy chip” level.
I got tiny gaps between boards
If the gaps are hairline, a tinted filler can disappear nicely. If they’re larger, consider a narrow inlay strip
or embrace a rustic look and call it “reclaimed character” (which is adult for “I’m moving on”).
Paint bled under the stencil
Use less paint and apply in dabs, not swipes. A light seal coat of clear finish before stenciling can also help,
as can burnishing the stencil edges.
My finish feels rough
That’s usually dust nibs. Light scuff-sand with fine grit and apply another thin coat.
You’re not failingyou’re just discovering why finish work is 40% technique and 60% patience.
Real-World “Builder Experiences” and Lessons Learned (Extra)
Here’s what most people experience when they actually build a compass table from wooden floor panelsbecause the internet
sometimes makes woodworking look like you sneeze and a perfect table appears.
1) The layout stage takes longer than expectedand that’s normal. You’ll start by tossing planks on the floor,
thinking, “Easy.” Then you’ll notice two boards that are slightly different in tone. Then you’ll see a knot that looks like
a surprised face. Then you’ll rotate one plank and suddenly the grain flows better. This is not wasted time. This is you
doing the design work that makes the final top look intentional instead of accidental.
2) Flooring edges love to misbehave. Tongue-and-groove profiles can be helpful for floors and annoying for furniture.
You may discover that “they fit together” doesn’t automatically mean “they glue into a seamless panel.” The big lesson:
glue wants wood-to-wood contact. If finish or profile prevents that, you’ll get gaps. Most builders end up trimming
tongues/grooves or at least sanding joint edges to bare wood. It feels like extra work, but it’s the difference between a
tabletop you’re proud of and a tabletop you constantly apologize for.
3) Clamps reveal your soul. The first time you clamp a panel, boards may slide around like they’re trying to escape
into another dimension. People often learn two things quickly: add cauls to keep the top flush, and tighten clamps gradually
(alternating sides) so pressure stays even. The “aha” moment is realizing you’re not just squeezing boards togetheryou’re
persuading them into alignment. Gentle persuasion wins.
4) Cutting a circle is oddly emotional. When you mark a perfect circle and start cutting, you will feel confident.
Halfway through, you may feel suspicious. At the end, you’ll either feel triumphant or stare at a slightly lumpy edge and
wonder if anyone will notice. Good news: a router + circle jig makes this dramatically easier, and even a jigsaw cut can look
great after careful sanding. Also: once the edge is eased (round-over or bevel) and finished, minor imperfections become
much less obvious. The finish is basically furniture’s “good lighting.”
5) The compass design is where perfectionism goes to negotiate. If you stencil, you’ll probably adjust the placement
five times. If you do veneer, you’ll test-fit pieces and mutter “why are triangles so emotional?” If you wood-burn, you’ll learn
that slow hands make clean lines. Nearly everyone ends up doing a small practice run on scrapthen feels relieved they did.
The practical takeaway: treat the compass rose like its own mini-project. Practice, commit, and remember that handmade charm is
part of the point.
6) Finish patience is the real “skill level.” Many builds look great before finish and then get rushed at the end.
Real-life experience says: thin coats, good ventilation, and enough cure time for your lifestyle. If the table is going in a busy
spot (entryway or living room), durability matters more than speed. Builders who let the finish cure properly get a top that
resists rings and scratches longer. Builders who rush sometimes get a top that feels tacky, fingerprints easily, or dents before
it fully hardens.
7) The best part is how “custom” it feels. Once the legs go on and the compass rose is centered, the table stops looking
like reclaimed flooring and starts looking like a purposeful piece of furniture. People will ask where you bought it. You’ll say,
“Oh, this? I made it from leftover floor panels.” And that sentence will be satisfying every single time.


