Table of Contents >> Show >> Hide
- Why a Curvy Reclaimed Wood Headboard?
- Plan Before You Cut (Future You Will Send Thank-You Notes)
- Tools and Materials
- Step 1: Source and Prep Reclaimed Wood (The “Don’t Destroy Your Saw Blade” Step)
- Step 2: Build the Curved Backing Panel (Kerf-Bent Plywood Method)
- Step 3: Add Structure (So It Doesn’t Wobble Like a Haunted Door)
- Step 4: Lay Out the Reclaimed Planks (Design First, Glue Second)
- Step 5: Attach the Reclaimed Wood to the Curved Panel
- Step 6: Make It “Curvy” on Top Too (Optional, But Beautiful)
- Step 7: Edge Treatment (So It Looks Finished From the Side)
- Step 8: Sanding, Filling, and Finishing (Where Patience Becomes a Superpower)
- Step 9: Install It Safely
- Common Mistakes and Quick Fixes
- Experience Notes From Real Builds (The “Stuff Nobody Mentions Until It Happens” Section)
- Conclusion
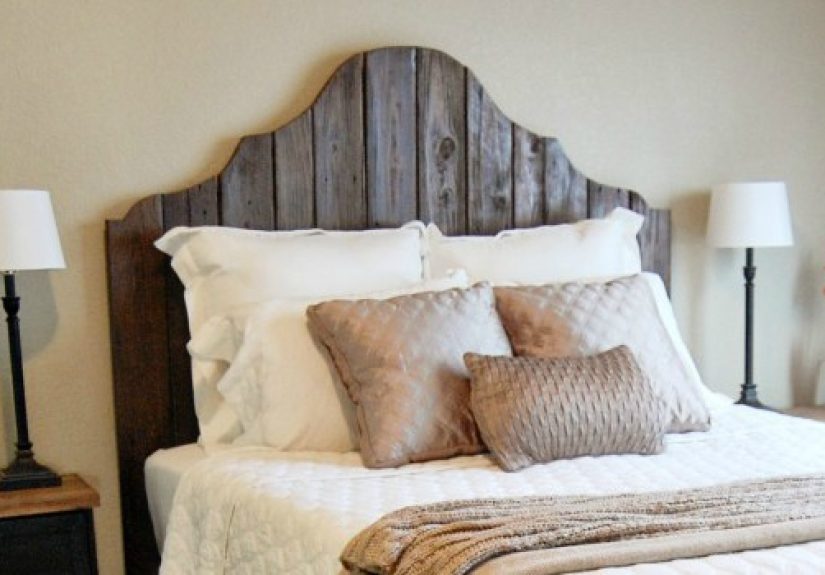
If your bedroom feels a little “two pillows and a whole lot of blank wall,” a headboard fixes that fast. But a curvy reclaimed wood headboard? That’s not just décorit’s a personality. The curve softens the room (and makes it look more custom), while reclaimed boards bring texture, history, and the kind of character you can’t fake with “distressed” paint that was distressed… yesterday.
This tutorial shows you how to build a gently curved headboard using real reclaimed wood, plus a reliable method for forming the curve with kerf-bent plywood (translation: you cut a bunch of slots so the panel bends like it’s finally doing yoga). We’ll cover planning, prep, structure, finishing, and installation with practical tips so your project looks intentional, not “I panicked and added more nails.”
Why a Curvy Reclaimed Wood Headboard?
A straight headboard is classic. A curved one looks custom. That gentle bow creates depth, breaks up all the rectangles in the room, and makes the headboard feel “built-in” even if it’s removable. Reclaimed wood adds natural color variationgrain, saw marks, weathering, old nail holesso the finished piece has instant warmth. You’re basically giving your bed a rustic crown without paying “handcrafted artisan” prices.
Plan Before You Cut (Future You Will Send Thank-You Notes)
1) Pick your curve: subtle is the move
For a headboard, a gentle curve looks best and is easier to build. Aim for a bow that comes forward 3–6 inches at the center. That’s enough to read as “designer” without turning your bed into a wooden wave pool.
2) Choose your size
Standard mattress widths are a good starting point: Twin (38″), Full (54″), Queen (60″), King (76″), Cal King (72″). For a built-in look, make your headboard 2–4 inches wider than the mattress. Height is personal, but 40–55 inches tall is a comfortable range for most rooms.
Example (Queen): build the headboard about 64″ wide and 48″ tall, with a 4–5″ bow at the center. That gives you presence without blocking art, windows, or your dreams of someday having a perfectly styled bedside lamp.
3) Decide how you’ll mount it
- Wall-mounted (French cleat): clean look, very stable.
- Bed-frame mounted (bolts): moves with the bed, no wall holes beyond anchors for safety if needed.
- Floor-standing legs: simplest to build, but heavier and can shift unless secured.
Tools and Materials
Tools
- Measuring tape, pencil, long straightedge
- Circular saw or track saw (or table saw) for panel cuts
- Jigsaw (for curvy top profile) + sanding block or rasp
- Drill/driver + bits, countersink bit
- Orbital sander + sandpaper (80/120/180/220)
- Clamps (more than you think; then add two)
- Pliers/nail puller, small punch (for old nails)
- Stud finder (if wall-mounting)
- Safety gear: eye protection, hearing protection, dust mask/respirator
Materials
- Reclaimed boards (pallet wood, fence pickets, barn wood, etc.)
- Plywood backing: 3/4″ plywood for structure OR 1/2″ for lighter build
- Optional “lock-in” backer: 1/8″ hardboard or thin plywood to stiffen the kerf-bent panel
- 2×3 or 2×4 lumber for internal braces/cleats
- Wood glue + construction adhesive (for planks)
- Brad nails or trim screws (plus wood filler if needed)
- Finish: stain (optional), and a clear topcoat (polyurethane or water-based clear coat)
- Mounting hardware: French cleat, or bed-frame bolts, or heavy-duty wall screws into studs
Step 1: Source and Prep Reclaimed Wood (The “Don’t Destroy Your Saw Blade” Step)
Reclaimed wood is awesome… and also full of surprises. Your first job is to make sure those surprises aren’t metal. Even one hidden nail can ruin your day, your blade, and possibly your vocabulary.
Inspect, de-nail, and de-metal
- Look for nails, staples, screws, and embedded wire. Pull what you can with pliers or a nail puller.
- If a nail won’t budge, clip it flush and punch it through (then fill the hole later).
- Use a magnet or (even better) a handheld metal detector if you’ve got one.
Clean without erasing the character
Scrub boards with a stiff brush to remove grit (sand in the wood becomes sand in your sanderforever). If boards are grimy, wipe with a mild cleaner and let them dry fully. Avoid soaking, because wet boards can cup and twist while drying.
Flatten and size the boards
You don’t need furniture-grade perfection, but you do need boards that sit flat enough to attach cleanly. If you have a planer or jointer, use it lightly. If you don’t, no problem: trim edges straight, sand high spots, and sort boards so the worst warps go near the ends (where they’re easier to persuade with clamps).
Step 2: Build the Curved Backing Panel (Kerf-Bent Plywood Method)
Here’s the core trick: kerf bending. You cut a series of closely spaced slots (kerfs) on the back side of a plywood panel so it can flex into a curve. Kerf spacing affects how tight the curve can beand tighter spacing usually makes a smoother curve with fewer “flat spots.”
2A) Make a simple bending form (your curve’s “trainer wheels”)
- Cut a piece of MDF or plywood slightly smaller than your final headboard width and about 12–18″ deep. This will become your form base.
- Draw an arc for your desired bow. A simple way: mark the center, measure 3–6″ forward at the center point, and sketch a smooth curve from end to end using a flexible strip of wood as a “batten.”
- Cut the curve with a jigsaw or bandsaw, then sand smooth. Any bump in the form becomes a bump in your headboard.
Tip: Make two identical curved ribs (a left and right “rail”), then connect them with a few straight 2x scraps so you have a shallow curved cradle to clamp against.
2B) Kerf the plywood panel
- Cut your plywood backing to rough size (a couple inches oversized is fine for now).
- On the back side, mark a kerf zone across the width where the curve will happen (usually centered).
- Use a table saw (or circular saw with a guide) to cut kerfs across the panel. Keep them straight and evenly spaced. Cut almost throughleave a thin “skin” on the front face so it stays intact.
- Start with kerfs 1/2″ to 3/4″ apart for a gentle curve. If the panel fights you, add more kerfs between existing ones rather than cutting deeper.
Reality check: Don’t guess the final spacing on your main panel. Kerf a scrap strip first, bend it by hand, and see how it behaves. Plywood thickness, glue layers, and species vary, so a quick test saves a lot of regret.
2C) Bend and clamp
- Place the kerfed panel onto your curved form with the kerfs on the inside of the bend.
- Clamp from the center outward to avoid gaps and lopsided curves.
- If you hear tiny cracking sounds, stop and add kerfs (or reduce your curve). Wood whispers. Sometimes it yells.
2D) Lock the curve permanently
Kerf bending is fast, but the panel needs reinforcement so it doesn’t slowly relax back into “flat board mode.” The simplest method is to glue a thin backer (like 1/8″ hardboard or thin plywood) onto the kerfed side while it’s clamped in the form. That creates a rigid sandwich.
- With the panel clamped in the form, spread wood glue across the kerfed area.
- Lay the thin backer on top, align it, and clamp firmly.
- Let it cure fully (overnight is ideal) before removing clamps.
Step 3: Add Structure (So It Doesn’t Wobble Like a Haunted Door)
Now build the “skeleton” on the back: braces keep the panel flat (in the vertical sense), add mounting points, and prevent the curve from twisting. You can use 2x3s or 2x4s depending on thickness and mounting style.
- Cut a top brace and bottom brace about 1″ shorter than the headboard width.
- Add one or two vertical braces in the middle.
- Glue and screw braces to the back of the panel, pre-drilling to avoid splitting.
If you’re doing a French cleat, attach the cleat to a brace (not just plywood). If you’re bed-frame mounting, install solid blocks where bolts will pass through.
Step 4: Lay Out the Reclaimed Planks (Design First, Glue Second)
This is where reclaimed wood shines. Lay boards across the front and play with the pattern: mix tones, rotate grain directions, and decide whether you want tight seams or small gaps.
Layout options that look intentional
- Horizontal planks: classic rustic, easy to build, great for color variation.
- Herringbone/chevron accents: bold, more cuts, more measuring (still doable).
- Mixed-width planks: hides “reclaimed imperfections” in a very flattering way.
Pro move: Stagger end joints like flooring. Start each row with the offcut from the previous row so the joints look randombut in a “planned random” way, like a good playlist.
Step 5: Attach the Reclaimed Wood to the Curved Panel
Because your face panel is curved, thin(ish) boards behave better. If your reclaimed boards are thick and stubborn, you can rip them into narrower strips (2–4″ wide) so they flex more easily across the curve.
- Starting at the bottom, apply a bead of construction adhesive to the back of a plank.
- Press it onto the curved panel and clamp if needed. Add a few brad nails to hold it while the adhesive cures.
- Work upward, checking alignment and keeping seams consistent. Don’t rushyour eyes will notice a crooked line every single night at 2:00 a.m.
- If you want small gaps for a shadow effect, paint the front face of the plywood black first so the gaps look intentional and deep.
Step 6: Make It “Curvy” on Top Too (Optional, But Beautiful)
The panel can be curved across the width, but you can also give the headboard a curved top profile (an arch or soft wave). This is the easiest “wow” upgrade.
- Measure and mark the headboard center.
- Decide your arch height (try 2–5″). Mark that rise at the center.
- Use a flexible batten (thin strip of wood) to draw a smooth arc from corner to corner.
- Cut the line with a jigsaw and sand smooth.
Optional upgrade: Add a separate curved top rail (bent lamination) for a clean, furniture-style edge. That technique uses thin strips glued around a form, then clamped until cured. It’s extra workbut it looks very custom.
Step 7: Edge Treatment (So It Looks Finished From the Side)
A curved face panel can expose plywood edges and plank ends. You’ve got a few options:
- Return sides: add short side panels that wrap back toward the wall 3–5″.
- Edge banding: veneer edge banding for a clean modern look (less rustic).
- Frame it: add a simple perimeter frame from reclaimed strips.
If you do returns, keep them narrow so they follow the curve easily. Clamp well and let adhesive fully cure.
Step 8: Sanding, Filling, and Finishing (Where Patience Becomes a Superpower)
Reclaimed wood can splinter, snag fabric, and generally act like it’s trying to protect its ancient secrets. Sand enough that it’s comfortable to lean against, but not so much that you erase the character.
Sanding strategy
- Start at 80–120 grit for rough spots and splinters.
- Move to 180 for smoothing.
- Stop at 220 if you want a softer hand feel (especially for a headboard you’ll touch).
Fill (only what you need)
Fill sharp voids, deep cracks that catch sheets, and any visible screw holes. Leave small nail holes if you like the story they tellthis is reclaimed wood, not a museum restoration.
Stain (optional) + clear coat (highly recommended)
You can skip stain if you love the natural color. Either way, a clear protective finish makes cleaning easier and reduces the “reclaimed dust sparkle” effect over time.
For polyurethane and many clear finishes: stir well (don’t shake), apply thin coats with the grain, let dry, sand lightly between coats, remove dust, and apply a second (or third) coat for durability. Give it time to cure before heavy use your finish needs time to harden, not just “feel dry.”
Step 9: Install It Safely
Option A: French cleat (recommended)
- Mount one cleat piece to studs on the wall (level matters).
- Mount the matching cleat to the headboard braces.
- Hang it and check for movement. Add felt pads where it touches the wall.
Option B: Bed-frame bolts
- Locate the bed-frame mounting holes (or create a bolt pattern that matches your frame).
- Install solid blocking behind those locations.
- Bolt the headboard on with washers so the wood doesn’t crush.
Option C: Legs
Add two legs that sit on the floor behind the bed and screw into the headboard braces. If you do this, consider anchoring the top to the wall for anti-tip safety (especially in homes with kids, pets, or enthusiastic pillow fights).
Common Mistakes and Quick Fixes
- Curve looks lumpy: your kerf spacing is too wide or uneven. Add kerfs between existing cuts and re-bend.
- Boards won’t follow the curve: rip boards narrower or use thinner stock for the face layer.
- Gaps appear after curing: clamp sequence mattersstart at center and work outward; also check for twisted boards.
- Finish looks bubbly: you probably shook the can or applied too thick. Sand smooth and recoat thinly.
- Headboard rocks: add braces or mount via cleat into studs for stability.
Experience Notes From Real Builds (The “Stuff Nobody Mentions Until It Happens” Section)
Below are the most common “experiences” DIYers report when building a curvy reclaimed wood headboard. Think of these as friendly warnings from the futuredelivered with love, sawdust, and a suspiciously large collection of half-used sandpaper sheets.
1) Nail hunting becomes a mini sport. People usually start optimistic: “I pulled all the nails!” Then the saw finds the one tiny brad hiding like it pays rent. The best workaround is to do two passes: a visual scan under bright light, then a magnet sweep. If you don’t have a metal detector, run your hand (carefully) along the board edgesyou’ll often feel sharp metal before you see it. This one habit saves blades and keeps your project from turning into a rage craft.
2) The curve feels easy… until you try to keep it symmetrical. A gentle kerf-bend is surprisingly doable, but many builds get a tiny “lean” because clamps weren’t applied evenly. A trick that helps: mark a centerline on the panel and on your form, then always clamp the center first. Add clamps in pairsone left, one rightlike you’re tightening lug nuts on a wheel. It sounds dramatic, but it keeps the curve centered instead of drifting.
3) Reclaimed boards argue with your tape measure. Pallet boards and old fence pickets are rarely straight, consistent, or interested in being “standardized.” Most builders end up sorting boards into categories: “good and flat,” “usable with persuasion,” and “accent piece that will be cut into short sections.” The magic move is ripping warped boards into narrower stripssuddenly they behave, and the curve becomes much easier to skin.
4) Adhesive timing is real. On a curved surface, boards like to spring back. DIYers who enjoy peaceful afternoons usually do this in short sessions: attach 3–5 boards, clamp, walk away, repeat. If you try to glue the whole face at once, you’ll be juggling clamps like a circus act, except the audience is just your dog judging you silently.
5) The finish is where “rustic” can accidentally become “sticky.” Reclaimed wood’s texture traps dust. People often learn (the hard way) to vacuum thoroughly, wipe with a tack cloth or damp microfiber, and apply thin coats. If you apply a thick coat to a rough board, it can pool in low spots and feel tacky for longer. Thin coats plus patience wins hereespecially because headboards live near pillows, hair, and all the little fibers you didn’t know you owned.
6) The final moment of truth is installation. Many DIYers love the headboard… until they realize their wall isn’t as straight as the headboard. Small felt pads, a level, and mounting into studs (not just drywall anchors) solve most of the “why is it doing that?” questions. Once it’s hung solidly, the project instantly looks like a built-in feature, not a weekend experiment.
Conclusion
A curvy reclaimed wood headboard is the perfect blend of practical woodworking and high-impact style: the curve adds softness and dimension, and reclaimed boards bring texture you can’t buy off a shelf. Build it with a kerf-bent plywood backing, reinforce it with braces, skin it with reclaimed planks, then finish it with a clear coat that keeps the character but makes it livable. The end result is cozy, custom, and durableexactly what a bedroom centerpiece should be.