Table of Contents >> Show >> Hide
- Why a Paver Firepit Is Such a Great DIY Project
- Before You Start: A Few Smart Things to Know
- Tools and Materials
- How to Make an Easy Firepit from Pavers: Step by Step
- Common Mistakes to Avoid
- How Much Does an Easy Firepit From Pavers Cost?
- Easy Design Upgrades That Make It Look Better
- Final Thoughts
- Real-World DIY Experience: What Building a Paver Firepit Actually Feels Like
A backyard firepit is one of those projects that looks impressively “weekend magazine spread” but is actually very doable for an ordinary human with a shovel, a level, and the patience to fix one crooked block seventeen times. If you want a simple outdoor feature that makes your yard feel instantly cozier, a paver firepit is a smart place to start.
The beauty of this DIY project is that it doesn’t require advanced masonry skills or a truckload of mystery tools. With the right paver blocks, a solid base, and some basic fire-safety common sense, you can build an easy firepit from pavers that looks polished, lasts longer, and gives your patio or backyard a natural gathering spot. Add a few chairs, some marshmallows, and suddenly everyone acts like you own a resort.
This guide walks through how to make an easy firepit from pavers step by step, including the best location, what materials to use, how to build a stable base, mistakes to avoid, and how to make the finished project look more custom than cobbled together. Whether you want a simple round firepit or a clean square design, the principles are basically the same: keep it level, keep it safe, and don’t try to outsmart gravity.
Why a Paver Firepit Is Such a Great DIY Project
A paver firepit hits the sweet spot between easy and impressive. It is far more permanent and attractive than a flimsy portable bowl, but much easier for most homeowners than a full mortared stone structure. Concrete landscape blocks and firepit kits are widely available, budget-friendlier than custom masonry, and designed to stack neatly with minimal fuss.
Another plus is flexibility. You can build a round firepit for a classic campfire feel, or go square if your patio has a more modern layout. You can also keep the project very simple with just the pit itself, or dress it up later with surrounding pavers, gravel, seating, lighting, and planters. In other words, this is the kind of project that still looks good even if you start small and upgrade over time.
Before You Start: A Few Smart Things to Know
Check Local Rules First
Before you buy a single paver, check local codes, burn restrictions, HOA rules, and any permit requirements. Some areas regulate the size of a firepit, how close it can be to structures, and whether wood-burning fire features are allowed at all. This is not the glamorous part of the project, but it is much cheaper than building a beautiful firepit and then learning your city thinks it is illegal backyard drama.
Choose a Safe Location
Pick a flat, open spot away from your house, fences, sheds, overhanging branches, dry grass, and anything else that would prefer not to catch fire. A conservative approach is best here. You also want enough room for chairs and for people to walk around the pit without doing that awkward sideways shuffle with a plate of snacks.
Pay attention to wind direction too. A firepit is much more fun when smoke drifts into the sky instead of directly into your guests’ eyeballs, your open windows, or your neighbor’s dinner.
Use the Right Materials
For an easy firepit from pavers, the simplest route is to use retaining wall blocks or a firepit kit designed for outdoor fire features. A steel fire ring or firepit insert is a smart addition because it helps protect the surrounding masonry from direct heat. Many DIYers also line the inside with fire brick for extra durability.
Not every paver should live inside a firepit. Decorative patio pavers may look great, but the interior of the pit needs materials that can handle high heat. For the base, crushed gravel is a reliable choice because it helps create a stable, level, free-draining foundation.
Tools and Materials
For a straightforward build, gather these basics:
- Paver or retaining wall blocks for the firepit wall
- Steel fire ring or liner
- Fire bricks for the interior, if desired
- Crushed gravel or paver base
- Coarse leveling sand
- Construction or masonry adhesive rated for outdoor masonry use
- Shovel
- Hand tamper
- Level
- Rubber mallet
- Measuring tape
- Marking paint or chalk
- Work gloves and eye protection
If you need to cut blocks, you may also need a circular saw with a masonry blade, plus a dust mask. That part is less “relaxing backyard project” and more “dusty action movie montage,” so dress accordingly.
How to Make an Easy Firepit from Pavers: Step by Step
1. Decide on the Size and Shape
A round firepit with an inside diameter around 36 to 44 inches is a popular size for conversation, warmth, and manageable firewood use. It is big enough to feel substantial, but not so huge that people need to send text messages across the flames. If you are building for a smaller patio, stay closer to the lower end of that range.
Dry-lay your first course of blocks on the ground before digging. This lets you confirm the size, the shape, and the number of blocks you will need. It also helps you avoid the classic DIY moment of discovering your “perfect plan” is actually one-half block short.
2. Mark the Footprint
For a round firepit, drive a stake at the center and use a string with marking paint to trace the outline. For a square design, lay out the blocks, square the corners, and mark around the outside edge. Make the excavation area slightly larger than the finished pit so you have room to level the base properly.
3. Excavate the Site
Remove sod, roots, and loose soil from the marked area. For a simple above-ground firepit, dig enough to remove the soft top layer and make room for a compacted base. If your yard is uneven, take your time here. A firepit built on a crooked base will announce that fact forever.
Keep the area as level as possible while digging. Use a tamper to compact the soil once the loose material is removed.
4. Build the Base
This is the step that separates a firepit from a future headache. Add crushed gravel or paver base in layers, dampen if needed, and compact thoroughly. A basic DIY build may use a few inches of compacted gravel, while more built-in styles often use a deeper base. The exact depth can vary by product and site conditions, but the goal never changes: a firm, level, noncombustible foundation that will not shift every time the weather changes its mood.
If you are adding a paver surround or patio around the firepit, top the compacted gravel with a layer of coarse sand to help with leveling. Smooth it carefully. Your first row of blocks depends on this step being right.
5. Lay the First Course of Pavers
Set the first row of blocks on the prepared base, with the blocks touching firmly. Check level front to back, side to side, and across the full circle or square. Tap high spots down gently with a rubber mallet. Shim low spots by adjusting the base, not by pretending you did not notice them.
The first course is the whole project’s personality. If it is level, the rest of the build will go smoothly. If it is off, every row above it will become a frustrating architectural biography of that one bad decision.
6. Dry-Fit the Liner
Before stacking too high, test-fit the steel fire ring or insert. Make sure it sits correctly and that the dimensions of your paver wall allow the top lip to rest securely where intended. A liner helps protect the concrete from direct heat and usually gives the whole pit a more finished look.
If you are not using a metal ring, line the inside with fire brick. This extra layer helps shield the outer blocks and is especially useful if your firepit will see regular use.
7. Stack Additional Courses
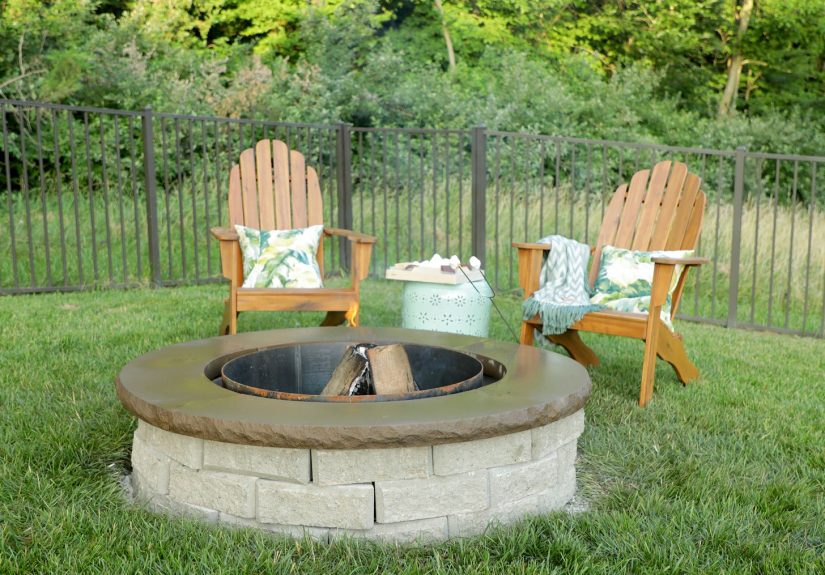
Add the second row of blocks, staggering the joints so each block bridges the seam below. This improves stability and gives the wall a more professional look. Continue with a third row if needed. Most simple paver firepits end up around 12 inches high, which is a comfortable height for warmth and conversation.
Once you are happy with the layout, use outdoor masonry adhesive between courses if recommended for your block type or kit. Apply the adhesive in beads, reset the blocks, and press them firmly into place. Then let the adhesive cure fully before lighting the first fire. Yes, waiting is annoying. No, impatience is not a building material.
8. Finish the Interior and Bottom
Line the inside walls with fire brick if you are using it. Then add a few inches of gravel or lava rock to the bottom. This helps stabilize the interior and creates a neat finished appearance. If your firepit sits on a paver patio, protecting the bottom layer becomes even more important so heat and debris do not damage the surface or joint material beneath.
9. Add Surrounding Pavers or Gravel
If you want the area around the firepit to look polished, extend the project with a simple ring of patio pavers or a gravel seating area. This step makes a big visual difference. It also cuts down on mud, keeps chairs steadier, and makes the whole space feel intentional instead of “we put a fire in the yard and hoped for the best.”
10. Test It Safely
Once everything has cured and the area is cleaned up, do a small first burn. Keep a hose or fire extinguisher nearby. Use seasoned hardwood instead of softwoods that tend to throw more sparks. Skip gasoline, lighter fluid, and all other terrible ideas in liquid form. Start small, watch the fire closely, and make sure the pit drafts well.
Common Mistakes to Avoid
- Skipping the base: The firepit may settle, shift, or crack over time.
- Building too close to structures: Cozy should never mean flammable.
- Using the wrong interior materials: The inside of the pit needs heat-tolerant protection.
- Ignoring level: A lopsided firepit always looks accidental, because it is.
- Lighting a fire before adhesive cures: Let the structure set before adding heat.
- Using liquid accelerants: This is a backyard gathering, not a cautionary tale.
How Much Does an Easy Firepit From Pavers Cost?
The cost depends on the size, style, and whether you are building only the pit or also a surrounding patio. A no-frills DIY paver firepit can often be done for a few hundred dollars in materials, especially if you keep the design simple. Full kits, upgraded capstones, large paver surrounds, and premium liners push the total higher.
If you already own basic tools, the project becomes even more budget-friendly. Time-wise, a very simple version can be built in a long afternoon, while a more refined setup with added pavers and detailing may take a full weekend.
Easy Design Upgrades That Make It Look Better
Once the basic structure is done, a few upgrades can make the firepit feel custom:
- Add capstones for a cleaner top edge
- Create a circular gravel pad with Adirondack chairs
- Install pavers around the pit for a mini patio effect
- Use low landscape lighting for safer nighttime use
- Add a metal spark screen for wood-burning fires
- Keep a wood rack nearby so the space looks finished and functional
You do not need an elaborate outdoor living room to make this work. Even a modest ring of chairs and a few string lights can make a simple paver firepit feel like the best seat in the yard.
Final Thoughts
If you have been putting off this project because it sounds complicated, here is the good news: learning how to make an easy firepit from pavers is mostly about careful setup, not advanced construction. The real secret is boring but effective. Check the rules. Choose a safe location. Build a solid base. Keep the first row level. Use a liner or fire brick where it matters. Let materials cure. Then enjoy the payoff.
Once it is finished, a paver firepit becomes more than a DIY project. It turns into the place where people gather on chilly evenings, where kids ask for one more marshmallow, where conversations last longer than expected, and where your backyard suddenly feels like it has a purpose. Not bad for a stack of blocks and some weekend ambition.
Real-World DIY Experience: What Building a Paver Firepit Actually Feels Like
One of the most relatable things about building a paver firepit is that the job usually starts with extreme confidence and ends with a healthy respect for levels, gravel, and your lower back. On paper, it sounds wonderfully simple: stack some blocks, toss in a fire ring, light a fire, become the outdoor-living hero of the neighborhood. In real life, the experience is a little messier, a little dustier, and honestly a lot more satisfying.
Most DIYers quickly discover that the hardest part is not stacking the pavers. It is getting the base right. The digging feels manageable at first, then you hit a stubborn root, a patch of compacted soil, or an area that looks level until you actually put a level on it. That is the moment when the project stops being decorative fantasy and becomes actual construction. Still, once the excavation is done and the gravel starts going in, the whole thing begins to feel real.
Another common experience is underestimating how much difference a tiny adjustment makes. A little more tamping here, a scoop of gravel there, one gentle tap with a rubber mallet, and suddenly the first course looks dramatically better. That is why so many people say the first row takes forever and the next rows go much faster. After all, the top rows are basically rewarding you for the patience you showed at the bottom.
There is also a funny emotional rhythm to this project. Early on, you may wonder whether a pile of blocks in the yard really counts as progress. Midway through, when the ring takes shape, your confidence shoots up and you start mentally arranging chairs that you have not even bought yet. By the time the liner is in and the final course is set, you are already planning snacks, blankets, and what your first firewood stack should look like. It escalates quickly, in the best way.
The first burn is usually the best part. Even a small test fire feels oddly ceremonial. You notice whether the smoke drifts where you expected, whether the seating distance feels comfortable, and whether the whole area needs one more paver, one more chair, or one less random garden object nearby. In other words, the firepit teaches you how the space wants to be used.
People also tend to remember the social side of the project just as much as the build itself. A paver firepit has a way of pulling people outside. Suddenly family members who ignored the yard all season want to sit out there “for just ten minutes.” Neighbors wander over. Kids become experts in marshmallow engineering. Adults start telling stories they absolutely did not plan to tell that night. The firepit becomes a low-tech magnet, which is rare and wonderful.
So yes, the experience includes sore muscles, dusty shoes, repeated level checks, and at least one moment where you stare at a crooked block like it insulted your family. But it also includes the kind of payoff that makes DIY projects addictive: a practical feature you built yourself, a backyard that feels warmer and more usable, and a finished result that keeps working long after the tools are put away. That is what makes a paver firepit worth it. It is not just something you build. It is something you end up using again and again.