
Table of Contents >> Show >> Hide
- Why a Painted Flower Basket Is Such a Great DIY
- What You’ll Need
- Choosing the Right Basket
- How to Prep Your Basket the Right Way
- Best Paint Options for a DIY Painted Flower Basket
- How to Paint the Basket
- Color Ideas That Always Look Good
- How to Seal and Protect Your Basket
- Adding the Flowers
- Creative Ways to Style a Painted Flower Basket
- Mistakes to Avoid
- DIY Painted Flower Basket Ideas by Style
- Experience: What It’s Really Like to Make a DIY Painted Flower Basket
- Conclusion
- SEO Tags
If your home is crying out for a little color, a little charm, and a little “look at me, I’m adorable” energy, a DIY painted flower basket is a pretty fabulous place to start. It’s part craft project, part home decor, and part excuse to buy more flowers than any one person reasonably needs. In other words: perfection.
This project is easy enough for a beginner, customizable enough for a seasoned crafter, and forgiving enough that even if your first brushstroke looks a bit like a startled squirrel did it, you can still end up with something beautiful. A painted flower basket can work as a spring centerpiece, porch accent, party decoration, handmade gift, or year-round cheerful catchall that just happens to be wearing flowers.
In this guide, you’ll learn how to choose the right basket, prep it properly, paint it without turning it into a crunchy mess, and style it with flowers so it looks intentional instead of “I panic-bought stems and hoped for the best.” Let’s make something cute.
Why a Painted Flower Basket Is Such a Great DIY
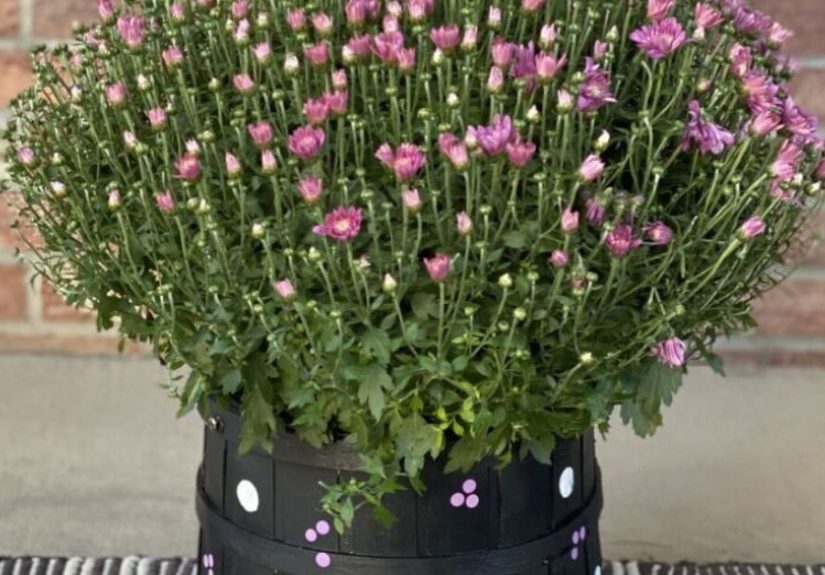
A flower basket already has charm built in. Add paint, and suddenly it has personality too. You can go soft and cottage-inspired with blush pink and cream, bold and modern with black and white stripes, or playful and whimsical with hand-painted blooms, dots, or color blocking.
Another reason this project works so well is that baskets are wonderfully flexible. You can repurpose a thrifted wicker basket, refresh an old storage basket that has seen better days, or dress up an inexpensive plain one from a craft store. The result can look high-end without requiring a high-end budget. Your wallet gets to breathe, and your decor gets a glow-up. Everybody wins.
What You’ll Need
Basic supplies
- A wicker, rattan, bamboo, or wood basket
- Acrylic craft paint, multi-surface craft paint, or spray paint
- Small and medium paintbrushes or foam brushes
- Painter’s tape for stripes or blocked designs
- Drop cloth or kraft paper
- Mild soap, water, and a soft brush or cloth for cleaning
- Clear sealer or spray acrylic finish
- Scissors or pruning shears
- Flowers or greenery
Optional extras
- Stencils for letters, petals, or geometric shapes
- Fine-tip paint pens for details
- Hot glue gun for ribbon or decorative accents
- Glass jar or liner if using fresh flowers
- Floral foam or chicken wire for arranging stems
- Ribbon, lace, fabric liner, or gift tag
Choosing the Right Basket
The best basket for this project is one with a stable shape and a surface that can take paint without collapsing into sadness. Wicker and rattan are classics because they hold paint beautifully and bring natural texture to the finished piece. Wood baskets also work well, especially if you want a smoother look.
If you’re using a woven basket, check for loose pieces, fraying edges, or broken handles. A basket with a little wear is fine; a basket that looks one sneeze away from retirement is not. The goal is charmingly vintage, not tragically fragile.
Think about function too. Will this basket hold faux flowers on a shelf? Fresh flowers on a dining table? Potted blooms on a porch? A shallow basket works well for low arrangements, while a taller basket can handle fuller stems and more dramatic height.
How to Prep Your Basket the Right Way
Skipping prep is the DIY version of saying, “I’m sure it’ll be fine,” right before everything becomes not fine. Good prep helps paint stick better, look smoother, and last longer.
Step 1: Clean it
Dust, dirt, and mystery crumbs have no place in your masterpiece. Wipe the basket with a damp cloth or use mild soap and water if it’s especially grimy. For woven baskets, a soft brush helps get into the nooks and crannies. Let it dry completely before painting. Completely means completely. Not “mostly dry.”
Step 2: Repair anything loose
If the basket has a popped weave, loose trim, or wobbly detail, secure it before painting. A dab of craft glue can solve minor issues. Structural disasters are another story, and at that point you may simply be painting a future regret.
Step 3: Plan your design
Before the paint comes out, decide on your look. Some easy ideas include:
- Solid color all over
- Striped lower half
- Ombre effect
- Painted flowers and leaves
- Polka dots or abstract brushstrokes
- Whitewashed rustic finish
- Two-tone basket with painted handle
If you want clean lines, use painter’s tape. If you’re going for hand-painted flowers, lightly sketch your design first with pencil or chalk.
Best Paint Options for a DIY Painted Flower Basket
Acrylic craft paint is the most beginner-friendly option. It’s easy to find, comes in about twelve million colors, and works well for decorative baskets used indoors. Multi-surface craft paint is another great pick if you want a little more durability.
Spray paint is excellent for all-over coverage on woven baskets because it can reach into the crevices more easily. It’s especially handy when you want one even color without visible brush marks. Brush-on paint, on the other hand, gives you more control for details, patterns, and custom artwork.
For outdoor display, choose paint labeled for outdoor or multi-surface use and finish with a protective sealer. If the basket will hold fresh flowers, don’t let standing water touch the painted surface directly. Use a jar, vase insert, or liner inside.
How to Paint the Basket
Option 1: Full-color painted basket
Start by applying a thin first coat. Thin coats are your best friend here. Thick coats are the clingy ex who ruins everything. On a woven basket, work the brush into the texture without overloading it. Let the first coat dry fully, then add a second coat for richer color and better coverage.
If you’re spray painting, work in a well-ventilated area, protect the surrounding surface, and spray in light passes rather than one heavy blast. Rotate the basket as you go so you don’t miss the sides or inner edges.
Option 2: Stripes, blocks, and patterns
Use painter’s tape to mark off the sections you want to paint. On woven baskets, following the natural lines of the basket often makes stripes look cleaner and more intentional. Paint inside the taped areas with a small or angled brush, then carefully remove the tape when the paint is dry to the touch.
Option 3: Hand-painted flowers
This is where the fun really starts. Paint simple daisy shapes, loose roses, tulips, wildflowers, or leafy vines around the basket. You do not need museum-level painting skills. Tiny imperfect flowers often look more charming than overly stiff ones.
A simple method is to paint petals first, then add a dot in the center, and finish with leaves or trailing stems. Mix larger blooms with smaller filler flowers so the design looks balanced and lively.
Color Ideas That Always Look Good
- Cottage garden: soft green, butter yellow, dusty pink, cream
- Modern farmhouse: matte white, black, muted sage
- Coastal: pale blue, sandy beige, white
- Boho: terracotta, rust, blush, mustard
- Spring party: lavender, coral, mint, sky blue
- Classic floral: ivory basket with painted red, pink, and peach blooms
If you want an ombre effect, choose colors from the same family so they blend more naturally. The result is softer and less “accidental art class emergency.”
How to Seal and Protect Your Basket
Once the paint is fully dry, sealing helps protect the finish from scratches, moisture, and fading. A clear acrylic sealer works well for many decorative baskets. Matte sealers keep the look soft and natural, while satin or gloss can make colors pop more.
If your basket will be displayed outdoors, a protective finish matters even more. Keep in mind that “outdoors” and “totally weatherproof forever” are not the same thing. A painted basket on a covered porch will usually last better than one left in full rain and sun like it has something to prove.
Adding the Flowers
Fresh flowers
If you want a real-flower arrangement, place a small jar or vase inside the basket first. This keeps water away from the basket and makes the arrangement easier to refresh. You can tuck moss, tissue paper, or greenery around the vase to hide it.
For a fuller look, use soaked floral foam inside a watertight container, or arrange stems through chicken wire for a more reusable option. Build your arrangement from the outside in, starting with greenery, then larger focal flowers, then smaller filler blooms.
Faux flowers
Faux flowers are fantastic if you want the basket to last all season. Bend the stems slightly so they don’t all stick up like they’re answering a question in class. Fluff petals, vary the heights, and mix flower sizes for a more natural appearance.
Dried flowers
Dried lavender, bunny tails, statice, and eucalyptus create a lovely textured basket with a more relaxed, earthy feel. These pair especially well with muted paint colors and rustic finishes.
Creative Ways to Style a Painted Flower Basket
- As a dining table centerpiece
- On a front porch bench or entry table
- As a handmade Mother’s Day or hostess gift
- For bridal showers, baby showers, or spring brunch decor
- As a seasonal shelf accent with faux stems
- As a flower-themed Easter or May basket
- As a planter sleeve around potted blooms
You can also personalize one with a monogram, a family name, or a phrase like “Bloom,” “Hello Spring,” or “Fresh Cut Flowers.” It is difficult to be in a bad mood while looking at a basket that says Bloom. Science probably supports that. Maybe.
Mistakes to Avoid
Using too much paint
Heavy coats can clog the weave and make the basket look stiff. Thin, even coats usually look better.
Painting a dirty basket
Paint and grime are not a dream team. Clean first, always.
Ignoring dry time
Touching half-dry paint is how fingerprints become design elements against your will.
Putting water directly inside the basket
Fresh flowers need water, but baskets do not enjoy surprise soaking sessions. Always use a liner, jar, or inner vase.
Overcrowding the flowers
Let stems breathe a little. A too-packed arrangement can look bulky instead of beautiful.
DIY Painted Flower Basket Ideas by Style
1. Vintage garden basket
Paint the basket soft white, distress the edges lightly, and fill it with dried lavender and pale pink roses.
2. Bright summer market basket
Use cheerful stripes in coral, turquoise, and yellow, then add sunflowers or faux daisies.
3. Minimalist monochrome basket
Paint the basket matte black or white and keep the flowers simple with one or two types of stems.
4. Hand-painted wildflower basket
Add tiny painted blooms all around the sides for a storybook look that feels sweet but not overly precious.
5. Porch-ready seasonal basket
Choose outdoor-friendly paint, seal it well, and fill the basket with faux greenery and flowers that can handle a little sun exposure.
Experience: What It’s Really Like to Make a DIY Painted Flower Basket
The first time I made a painted flower basket, I honestly thought it would be a quick little afternoon craft. You know, the kind where you casually sip coffee, dab on some paint, and emerge two hours later as a woodland decorating genius. What actually happened was much more human and much more entertaining.
I started with a plain thrifted basket that cost less than a fancy latte. It looked sturdy enough, though it had the kind of beige-brown color that whispered, “I have spent years holding absolutely nothing interesting.” I figured paint could fix that, and paint, as it turns out, is a wildly effective personality transplant.
The cleaning stage alone taught me something important: old baskets are basically tiny dust museums. Once I scrubbed it down and let it dry, I taped off the lower third for a painted stripe and chose a pale sage green because I wanted something fresh and garden-inspired. Naturally, I immediately got paint on my hand, my table, and somehow my elbow. A promising start.
But once the first coat dried, I understood why people get hooked on projects like this. The basket already looked better. By the second coat, it looked intentional. By the time I added a few hand-painted white flowers near the handle, it looked like something I would have absolutely tried to justify buying in a boutique for three times the price.
The flower styling part was even more fun. I tried fresh flowers first, which looked gorgeous but required a hidden jar and a little stem trimming strategy. The next time, I used faux stems and realized that for everyday decor, fake flowers are the low-maintenance best friends of the crafting world. No watering, no drooping, no emotional collapse when one rose gives up by Tuesday.
What surprised me most was how versatile the finished basket became. One week it sat on my dining table filled with faux peonies. The next week I moved it to an entry console with eucalyptus and a ribbon tied to the handle. It kept looking like a new project even though it was the same basket just wearing different accessories, which is honestly the dream for both decor and fashion.
I also learned that imperfect details often make a handmade basket look better, not worse. One tiny painted petal ended up a little wonky, and I nearly “fixed” it into oblivion. Good thing I stopped. That slightly uneven flower ended up being one of my favorite parts because it gave the basket character. Handmade decor should look handmade. Not messy, obviously, but alive.
Since then, I’ve made painted flower baskets in soft spring palettes, bold summer brights, and even a moody autumn version with rust-colored flowers and a dark charcoal base. Every time, the process feels satisfying in a different way. It’s calm without being boring, creative without being intimidating, and useful enough that the final result does more than just sit there looking pretty.
That’s probably my favorite thing about a DIY painted flower basket: it hits the sweet spot between craft and decor. You get the joy of making something with your own hands, but you also end up with an object you can actually use, gift, restyle, and enjoy every day. Not bad for a humble basket and a few coats of paint.
And yes, every single time I finish one, I immediately start eyeing another plain basket like I’m on a mission to redecorate the entire world one cheerful handle at a time.
Conclusion
A DIY painted flower basket is one of those rare projects that feels easy, looks impressive, and leaves plenty of room for personal style. Whether you paint it in soft pastels, bold modern tones, or cover it in hand-painted blooms, the final result can brighten a room, dress up a table, or make a thoughtful handmade gift.
The secret is simple: prep the basket well, use thin coats of paint, protect the finish, and style the flowers with a little intention. After that, the basket does the rest of the charming for you. And honestly, it works very hard in that role.
If you’ve been wanting a craft project that is practical, pretty, and just plain fun, this is your sign to grab a basket and start painting.


