Table of Contents >> Show >> Hide
- Before You Start: Check Whether the Dent Is DIY-Friendly
- Safety First: Heat Is Helpful, Overheating Is Expensive
- 1. The Hair Dryer and Compressed Air Method
- 2. The Hair Dryer and Plunger Method
- 3. The Hair Dryer and Suction Cup Dent Puller Method
- 4. The Hair Dryer and Hot Water Method for Plastic Bumpers
- 5. The Hair Dryer and Behind-the-Panel Push Method
- 6. The Hair Dryer and Glue Puller Kit Method
- 7. The Hair Dryer, Aluminum Foil, and Dry Ice Method
- 8. The Hair Dryer and “Warm, Pull, Tap Down” Finishing Method
- Common Mistakes When Removing a Dent With a Hair Dryer
- When to Call a Professional
- Experience Notes: What Real DIY Dent Removal Teaches You
- Conclusion
- SEO Tags
A small dent on your car can feel personal. One minute your vehicle looks proud in the driveway; the next, a shopping cart, runaway soccer ball, hailstone, or mystery parking-lot goblin has left a dimple in the panel. Before you panic, call a body shop, and start naming the dent “Carl,” there is a low-cost trick many drivers try first: using a hair dryer.
Yes, the same tool that rescues wet hair before work can sometimes help with minor car dent repair. The idea is simple: controlled heat can make plastic bumpers more flexible and may help thin metal panels expand slightly. When combined with suction, gentle pressure, or a quick cooling step, a shallow dent may pop back closer to its original shape.
But let’s be honest: a hair dryer is not a magic wand. It will not fix crushed panels, sharp creases, cracked paint, rusted areas, deep collision damage, or anything that looks like your car tried to hug a mailbox at highway speed. This method works best on small, shallow dents where the paint is still intact. If the paint is cracked, the dent sits on a body line, or the panel feels stretched, a professional paintless dent repair technician is usually the smarter move.
Below are eight practical, realistic ways to remove a dent in a car with a hair dryer, plus safety tips, examples, and experience-based advice so you do not turn a $75 ding into a $750 “well, that escalated quickly” repair.
Before You Start: Check Whether the Dent Is DIY-Friendly
Before plugging in the hair dryer, inspect the dent in good light. A DIY hair dryer dent repair method is most likely to help when the dent is shallow, round, smooth, and located on a plastic bumper or a broad metal panel. Door dings, small hail dents, and light bumper dimples are better candidates than creases or dents near edges.
Good candidates for hair dryer dent removal
Try this method only if the paint is not cracked, chipped, bubbling, or peeling. The dent should not have sharp folds. It should also be accessible enough that you can heat the area evenly and, ideally, apply pressure from behind or use suction from the front.
Dents you should not attack with heat
Avoid DIY heat repair on damaged paint, repainted panels, plastic with cracks, aluminum panels you are unsure about, or any area near sensors, lights, wiring, cameras, or trim that may be heat-sensitive. Also skip this method if the dent came from a crash. Structural damage deserves a professional inspection, not a bathroom appliance with ambition.
Safety First: Heat Is Helpful, Overheating Is Expensive
Use a standard household hair dryer, not a torch. A heat gun can become too hot quickly and may damage clear coat, paint, trim, or plastic if used carelessly. Keep the dryer moving, hold it several inches away from the panel, and warm the area gradually. The goal is warm and flexible, not “fresh pizza oven.”
Wear gloves if you use compressed air or dry ice. Liquefied gas from an upside-down air duster and dry ice can cause cold burns. Work in a ventilated area, keep products away from children and pets, and read labels before using anything pressurized or extremely cold. If that sounds serious, it is. DIY should save money, not create a medical side quest.
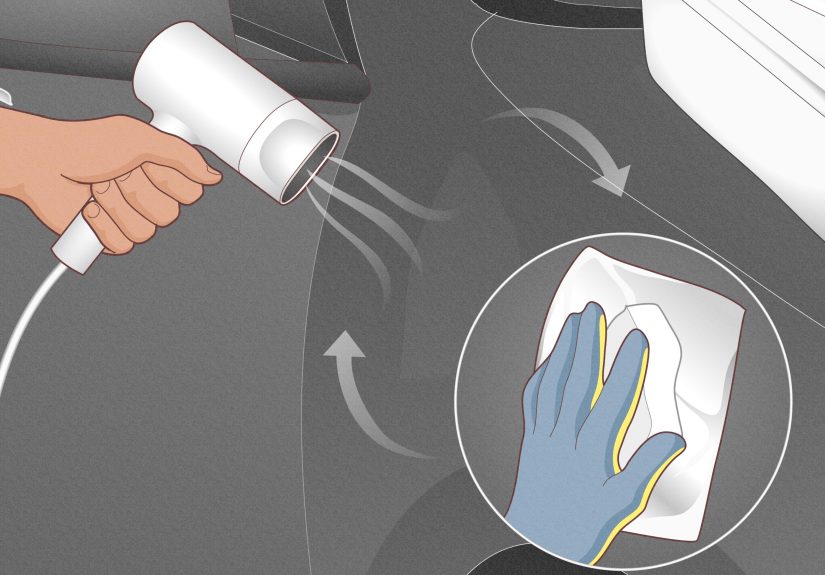
1. The Hair Dryer and Compressed Air Method
This is the classic internet-famous method for how to remove a dent in car with a hair dryer. It works by warming the dented area first, then cooling it rapidly with compressed air held upside down. The temperature change may cause the panel to contract, sometimes helping the dent pop outward.
How to do it
Clean the dented area with car-safe soap and water, then dry it with a microfiber towel. Set the hair dryer to high heat and warm the dent and a few inches around it for about one to three minutes. Keep the dryer moving so one spot does not overheat. When the panel feels warm to the touch, turn a can of compressed air upside down and spray the dent briefly so the cold liquid vapor hits the warm area.
Wait a moment and listen. Sometimes the dent pops with a tiny sound that feels weirdly satisfying, like the car just cracked its knuckles. If nothing happens, let the panel return to normal temperature before trying again. Do not repeat endlessly. Two or three careful attempts are plenty.
Best for
This method is best for shallow, rounded dents on flexible plastic bumpers or thin metal panels with intact paint. It is not great for creased dents, dents on edges, or damage where the metal has stretched.
2. The Hair Dryer and Plunger Method
A clean cup plunger can sometimes pull a dent outward after the hair dryer softens the area slightly. This method is especially useful for broad, shallow dents on bumpers or large panels. Do not use a toilet plunger from the bathroom unless you enjoy making questionable life choices. Buy a clean cup-style plunger and dedicate it to garage duty.
How to do it
Wash the panel and wet both the plunger cup and the dented surface. Heat the dent with the hair dryer for a few minutes, keeping the air moving. Press the plunger firmly over the dent to create suction, then pull straight outward with steady pressure. Avoid yanking at an angle, which can stress the paint or make the panel flex unevenly.
If the dent moves a little but does not fully pop out, repeat gently. Small improvements are still wins. A dent that becomes 60 percent less obvious is often better than a dent that becomes 100 percent more dramatic because someone got impatient.
Best for
Use this method on larger smooth dents where the plunger can seal around the damaged area. It will not work well on small sharp dings, narrow creases, or curved panels where suction cannot hold.
3. The Hair Dryer and Suction Cup Dent Puller Method
A suction cup dent puller is more controlled than a plunger and is often inexpensive. These tools are designed to grip smooth panels and pull outward. Heating the area first can make the panel more cooperative, especially on plastic bumpers.
How to do it
Clean and dry the surface completely. Warm the dent with the hair dryer for one to three minutes. Attach the suction cup puller in the center of the dent, lock the handle if your tool has one, and pull slowly. Use even pressure. Do not jerk the tool like you are starting a lawn mower from 1986.
For wider dents, try pulling from several points: center first, then the outer areas. This helps avoid creating a small high spot in the middle. After each pull, step back and inspect the reflection in the paint. Reflections reveal dents better than staring straight at the panel.
Best for
This approach is helpful for shallow door dents, hood dimples, and bumper dents where the paint is intact and the surface is smooth enough for suction.
4. The Hair Dryer and Hot Water Method for Plastic Bumpers
Plastic bumpers respond better to heat than many metal panels because warmth can make the plastic more flexible. The hair dryer starts the process gently, while hot water can add even heating. This method is common for bumper dents that can be pushed back from behind.
How to do it
Warm the dented bumper with the hair dryer first. Then pour hot, not boiling, water over the dented area. Reach behind the bumper if you can safely access it, and push the dent outward with a gloved hand or a soft tool. Apply broad pressure instead of poking one small spot.
Once the bumper returns closer to shape, cool the area with room-temperature water. Do not shock old brittle plastic with extreme temperatures. If the bumper has cracks, peeling paint, broken clips, or sensor damage, stop and get professional help.
Best for
This is one of the better DIY dent removal methods for plastic bumper covers, especially when the dent is broad and rounded.
5. The Hair Dryer and Behind-the-Panel Push Method
If you can safely reach the backside of the dent, gentle pressure from behind often works better than pulling from the front. Professional paintless dent repair relies on controlled pushing and shaping, though pros use specialized tools and years of practice. Your goal at home is modest: improve the dent, not audition for a collision-repair reality show.
How to do it
Warm the dented area with a hair dryer. If the dent is on a bumper, you may be able to reach behind it from underneath or through the wheel-well liner. Use a gloved hand, a soft rubber tool, or a wrapped object with a broad smooth surface. Push slowly from the deepest part of the dent outward.
Do not use screwdrivers, bare metal rods, or sharp tools. These can create bumps, scratches, or pressure points. If you feel resistance, stop. Forcing a panel is a great way to create a new dent next to the old dent, which is how cars collect “character.”
Best for
This method works well for plastic bumpers and some accessible body panels where the backside is open and the damage is shallow.
6. The Hair Dryer and Glue Puller Kit Method
Glue puller kits use small tabs, hot glue, and a pulling bridge or slide tool to lift dents from the outside. The hair dryer helps by warming the panel slightly before pulling and by softening leftover glue afterward. This method can be effective, but it requires patience and careful cleanup.
How to do it
Wash and dry the panel. Warm the area lightly with the hair dryer so the surface is not cold. Apply the kit’s glue to the pulling tab, place it in the center of the dent, and allow it to set according to the kit instructions. Use the bridge puller gently, tightening a little at a time.
After pulling, remove the tab with the recommended release solution or careful heat from the hair dryer. Never scrape glue with a hard blade. If the paint is old, cracked, repainted, or weak, avoid glue pulling because the adhesive may lift paint.
Best for
This method is useful for small to medium dents on smooth painted panels with strong original paint. It is risky on repainted panels or damaged finishes.
7. The Hair Dryer, Aluminum Foil, and Dry Ice Method
This method is similar to the compressed air trick but uses dry ice for cooling. It can sometimes help a shallow dent move because the heated panel cools quickly. However, dry ice requires more caution than compressed air. It is extremely cold, can injure skin, and must be handled with proper gloves and ventilation.
How to do it safely
Clean the dent first. Warm it evenly with the hair dryer. Place aluminum foil over the warmed area to help protect the paint from direct contact. Wearing insulated gloves and eye protection, briefly apply dry ice over the foil, then remove it and wait to see whether the dent reacts.
Do not touch dry ice with bare hands. Do not store it in a sealed container. Do not use it in a closed space. If you are unsure about handling it safely, skip this method. A dent is annoying; frostbite is a terrible plot twist.
Best for
This method is best reserved for adults who understand dry ice safety and for shallow dents with intact paint. For most everyday drivers, compressed air or a suction method is simpler and safer.
8. The Hair Dryer and “Warm, Pull, Tap Down” Finishing Method
Sometimes a dent does not disappear completely after the first repair attempt. Instead, it becomes smaller but leaves a slight high spot or uneven reflection. A finishing method can help refine the area. This is where you warm the panel, pull gently, and tap down only minor raised spots with a soft tap-down tool.
How to do it
Warm the dented area lightly with the hair dryer. Use a suction cup or glue puller to lift the low area gradually. If a small raised spot appears, use a soft plastic tap-down tool and a rubber mallet to tap extremely lightly. The word “lightly” is doing heroic work here. You are not framing a house.
Check reflections often. A flashlight, garage light, or striped reflection board can show whether the panel is becoming smoother. If the dent starts looking worse, stop. Professional PDR technicians spend years learning this part because metal has memory, tension, and a flair for drama.
Best for
This method is best for tiny finishing adjustments after a dent has already improved. It is not recommended for beginners on expensive panels, luxury vehicles, or visible body lines.
Common Mistakes When Removing a Dent With a Hair Dryer
The biggest mistake is overheating the paint. If the surface becomes too hot to touch, you are pushing your luck. Another mistake is expecting every dent to pop out perfectly. DIY methods are more about improvement than perfection.
People also damage paint by using dirty plungers, abrasive towels, metal tools, or harsh chemicals. Always clean first and use soft materials. Never mix aggressive pulling with cracked paint. Once paint breaks, moisture can reach the metal underneath and rust may follow.
Finally, do not keep repeating a failed method. If a dent does not respond after a few careful attempts, the panel may be stretched, creased, or too rigid. That is your cue to call a paintless dent repair specialist.
When to Call a Professional
Call a pro if the dent is on a sharp body line, near an edge, close to a sensor, or larger than your hand. Also call if the paint is damaged, the metal is creased, or the panel has been repaired before. Paintless dent repair can often preserve the original factory finish and avoid sanding, filler, and repainting when the dent qualifies.
Professional PDR is especially useful for hail damage, door dings, and clean dents where the paint is still intact. It may cost more than a DIY attempt, but it can be much cheaper than traditional bodywork. Plus, a good technician knows when not to touch a dent, which is an underrated superpower.
Experience Notes: What Real DIY Dent Removal Teaches You
After dealing with small dents, one lesson becomes clear fast: the shape of the dent matters more than the size. A wide, shallow dent the size of a saucer may respond better than a tiny dent with a sharp center. The shallow dent has room to flex back. The sharp dent often means the panel stretched or folded, and that is much harder to correct with heat and suction.
Another practical experience is that lighting changes everything. In normal daylight, a dent may look “almost gone.” Under garage lighting, it may reappear like it has been waiting for dramatic music. Before and after photos are useful, but reflections are even better. Look at the lines of a building, fence, or fluorescent light in the paint. If the reflection bends, the dent is still there. This is exactly why professional PDR technicians use reflection boards. They are not being fancy; they are reading the panel like a map.
Patience also beats force. A beginner’s instinct is to pull harder when nothing happens. That is usually a mistake. Strong pulling can create a high spot, and high spots can be more noticeable than the original low dent. Gentle repeated pressure is safer than one heroic yank. Think of it as persuading the panel, not interrogating it.
Plastic bumpers are usually the most forgiving place to learn. Warm plastic can become flexible enough to push back into place, especially if the dent is broad. Even then, old plastic can be brittle, and painted bumper covers can crack if they are already stressed. If you hear cracking or see paint lines spreading, stop immediately.
Metal panels are less forgiving. A hair dryer may warm the paint and metal slightly, but it will not reshape a stretched panel by itself. On doors, hoods, and quarter panels, suction tools may help with smooth shallow dents. However, dents on body lines often need professional work because the line itself gives the panel strength and shape. Once that line is bent, it takes skill to restore.
One underrated tip is to clean the area thoroughly before doing anything. Dirt acts like sandpaper when you press suction cups, towels, or tools against paint. A five-minute wash can prevent scratches that are more annoying than the dent. Use microfiber towels, not old bath towels that have been secretly promoted to “garage rag” after a mysterious bleach incident.
Temperature outside matters too. Working on a very cold day makes panels stiffer and adhesives less reliable. Working in direct summer sun can make paint and trim hotter than expected. A shaded, mild day is ideal. If the car has been sitting in the sun, let the panel cool slightly before adding more heat. The hair dryer is supposed to control temperature, not compete with July.
The best mindset is realistic optimism. A hair dryer dent removal method can improve a minor dent and sometimes make it nearly disappear. It can also do absolutely nothing, especially on creases or stretched metal. That does not mean you failed. It means the dent is not a good candidate for the trick. Knowing when to stop is part of good DIY.
In many cases, the smartest sequence is simple: inspect, clean, warm, try gentle suction or pressure, reassess, and stop before frustration takes over. If the dent improves, celebrate. If it does not, get a PDR estimate. A small dent is not worth damaging paint, trim, sensors, or your weekend mood.
Conclusion
Learning how to remove a dent in car with a hair dryer can save money when the damage is minor, shallow, and paint-safe. The hair dryer and compressed air method, suction cup method, plunger method, hot water bumper method, and gentle behind-the-panel push can all help in the right situation. Still, the best repair begins with judgment. Heat can help, but too much heat can hurt. Suction can pull, but too much force can create new problems.
If the dent is small and smooth, try one of these methods carefully. If it has cracked paint, sharp creases, body-line damage, sensor issues, or collision history, call a professional. Your car deserves confidence, not chaos with a cord.