
Table of Contents >> Show >> Hide
- What Is Modular Origami?
- Before You Start: Tools, Paper, and Setup
- Way 1: Make a Classic 6-Unit Sonobe Cube
- Way 2: Build a 12-Unit Stellated Octahedron
- Way 3: Fold a 30-Unit Modular Origami Ball
- Way 4: Create a Flat Modular Origami Star or Wreath
- How to Choose the Best Modular Origami Method
- Paper Selection Tips for Better Results
- Color Planning: The Secret Ingredient
- Troubleshooting Modular Origami Problems
- Creative Ways to Use Finished Modular Origami
- Experience Notes: What Making Modular Origami Teaches You
- Conclusion
- SEO Tags
Modular origami is what happens when paper folding stops being a quiet little hobby and starts behaving like architecture. Instead of folding one sheet into one crane, flower, or fox, you fold many small unitssometimes six, sometimes thirty, sometimes enough to make your dining table look like a confetti factoryand lock them together into a larger design. The result can be a cube, a star, a flower ball, a geometric sculpture, a hanging ornament, or a desk decoration that makes people ask, “Wait, you made that from paper?”
The magic is in the modules. Each unit is usually simple on its own, but when repeated and assembled carefully, those small pieces create surprisingly strong three-dimensional forms. Think of it as paper teamwork. One unit says, “I am just a folded square.” Thirty units reply, “Great, now we are a mathematical masterpiece.”
This guide explores four beginner-friendly and creative ways to make modular origami: the classic Sonobe cube, a 12-unit stellated octahedron, a 30-unit kusudama-style ball, and a flat modular star or wreath. Along the way, you will learn how to choose paper, fold cleaner units, assemble without panic, fix common mistakes, and build confidence before attempting larger modular origami models.
What Is Modular Origami?
Modular origami, also called unit origami, is a paper-folding method where multiple folded pieces are joined together to create one complete model. Unlike traditional single-sheet origami, modular origami depends on repetition. You fold the same unit again and again, then connect the units using pockets, flaps, tabs, or tension. Many designs require no glue, tape, or cutting, although some decorative kusudama projects may use glue depending on the style.
The most famous beginner unit is the Sonobe unit. It is popular because it is simple to fold, easy to repeat, and flexible enough to build cubes, octahedrons, icosahedrons, stars, and many other polyhedral forms. Once you understand how tabs slide into pockets, modular origami starts to feel less like a puzzle and more like a clever paper construction system.
Before You Start: Tools, Paper, and Setup
Choose the Right Paper
For most beginner modular origami projects, square origami paper between 3 inches and 6 inches works well. Standard kami paper is light, colorful, and easy to fold. If you are making a sturdy geometric model, slightly thicker paper can help the structure hold its shape, but very thick paper may make pockets bulky and difficult to lock.
For your first few projects, use paper that has color on one side and white on the other. The color contrast helps you see which flap belongs where. Once you feel comfortable, try double-sided paper, patterned paper, metallic paper, or recycled magazine pages. Modular origami is wonderfully forgiving about materials, as long as the paper folds crisply and all units are the same size.
Prepare a Clean Folding Area
A flat surface is essential. Modular origami does not require fancy tools, but it rewards neatness. A ruler or bone folder can help sharpen creases, though your fingernail works fine in a pinch. Keep finished units in small piles so they do not wander off like tiny paper socks in a laundry machine.
Follow the Golden Rule: Consistency Beats Speed
The secret to modular origami is not folding fast. It is folding consistently. If one unit is slightly loose, one is folded backward, and one has corners that look like they survived a windstorm, the final model may wobble or refuse to close. Fold slowly at first. Match edges carefully. Press creases firmly. Your future self, the one trying to assemble the final shape, will be very grateful.
Way 1: Make a Classic 6-Unit Sonobe Cube
The Sonobe cube is the perfect first modular origami project. It uses six identical units, comes together quickly, and teaches the most important modular origami skill: inserting a flap into a pocket without crushing the whole model like a paper sandwich.
What You Need
- 6 square sheets of origami paper
- 2 or 3 colors for easier assembly
- A flat surface
- Patience, preferably with snacks nearby
Basic Folding Idea
A Sonobe unit begins with a square folded into a long rectangle. The corners are folded diagonally to create triangular flaps, and the unit is collapsed into a parallelogram-like shape with two pockets. You will make six identical units. Each unit contributes one face or part of a face to the cube, and the flaps of neighboring units slide into the pockets.
Assembly Tips
Start by connecting three units around one corner. The structure should begin to form a little pyramid-like point. Add the remaining units one at a time, always checking that each flap is fully tucked into a pocket. The last unit is usually the trickiest. Do not force it. Gently loosen the nearby pockets, insert the tabs, then press the cube back into shape.
The Sonobe cube teaches you how modular origami holds together through friction and geometry. There is no magic glue elf. The model stays intact because every tab supports another unit. When assembled correctly, the cube feels surprisingly firm.
Best Uses for a Sonobe Cube
A finished Sonobe cube can be used as a desk ornament, classroom math model, gift-box topper, holiday decoration, or practice piece before moving into larger polyhedra. Make several in different colors and stack them for a playful geometric display.
Way 2: Build a 12-Unit Stellated Octahedron
After the cube, the 12-unit stellated octahedron is a satisfying next step. It looks more dramatic, with pointed peaks that make it resemble a paper crystal, starburst, or tiny spaceship designed by a very organized mathematician.
What You Need
- 12 square sheets of paper
- 3 colors, with 4 sheets of each color, for a balanced pattern
- A completed Sonobe cube for practice, if possible
How It Works
This model also uses Sonobe units, but the assembly pattern is different. Instead of forming a simple cube, the units create triangular points around an octahedral structure. Each point typically comes together from three units. The rhythm is similar to the cube, but you repeat the corner-building process more often.
Step-by-Step Assembly Strategy
Begin with three units and connect them into one sharp point. Then add units around that point, forming new triangular peaks as you go. Try to keep the color arrangement consistent. If you are using three colors, avoid placing the same color side by side too often unless that is your intended design.
As the model grows, it may feel floppy. This is normal. Many modular origami pieces go through an awkward teenage phase where they look like they are questioning their purpose. Keep adding units evenly around the structure. Once the final few tabs are tucked, the model will suddenly become stable.
Common Mistakes to Avoid
The biggest mistake is inserting a flap into the wrong pocket. If the model starts twisting strangely or refuses to form symmetrical points, stop and inspect the last few connections. Another common issue is shallow tabs. Make sure each flap goes all the way into the pocket, not just halfway. Half-tucked tabs are the drama queens of modular origami: they pop out at the worst possible moment.
Way 3: Fold a 30-Unit Modular Origami Ball
A 30-unit modular origami ball is where the hobby starts to look seriously impressive. This style often appears in Sonobe balls, kusudama-inspired ornaments, and decorative geometric sculptures. It takes longer than a cube, but the process is relaxing once you get into the rhythm.
What You Need
- 30 square sheets of paper
- 5 colors with 6 sheets of each color, or 3 colors with 10 sheets each
- A storage box or tray for finished units
- Optional string for hanging the finished model
Why 30 Units?
Many modular balls use 30 units because the number works beautifully with symmetrical polyhedral structures. The model often forms groups of three and five, creating a balanced pattern across the surface. Color planning becomes more important here. A thoughtful color layout can make the ball look professional, while a random layout can still look cheerful, chaotic, and proudly handmade.
Folding the Units
Fold all 30 units before beginning assembly. This is important. If you fold five units, assemble a bit, fold three more, assemble again, and continue that way, you may lose consistency. Batch folding helps your hands memorize the motion, producing cleaner modules.
To avoid boredom, fold in sets of five or ten. Put on music, a podcast, or a show you have already watched. Modular origami is not the best time for a complicated mystery thriller unless you want your detective to solve the case while you accidentally fold eight units backward.
Assembly Method
Start by creating a cluster of five units around a central point if your design calls for pentagonal symmetry, or begin with three-unit points if you are following a Sonobe-style pattern. Continue adding units evenly around the model. Do not build one side completely before starting the other side. That can create tension and make the final closing step harder.
As you assemble, look for repeating shapes. Modular origami is easier when you recognize the pattern: three units meet here, five points circle there, pockets face this direction, tabs tuck that way. Once the pattern clicks, the model becomes much less intimidating.
How to Close the Final Gap
The last few tabs are almost always the hardest. Keep your hands relaxed. Open the pocket slightly, guide the flap inside, then gently press the nearby creases back into place. If the model collapses, take a breath. Paper is dramatic, but it is also forgiving. Rebuild from the last stable section instead of starting over completely.
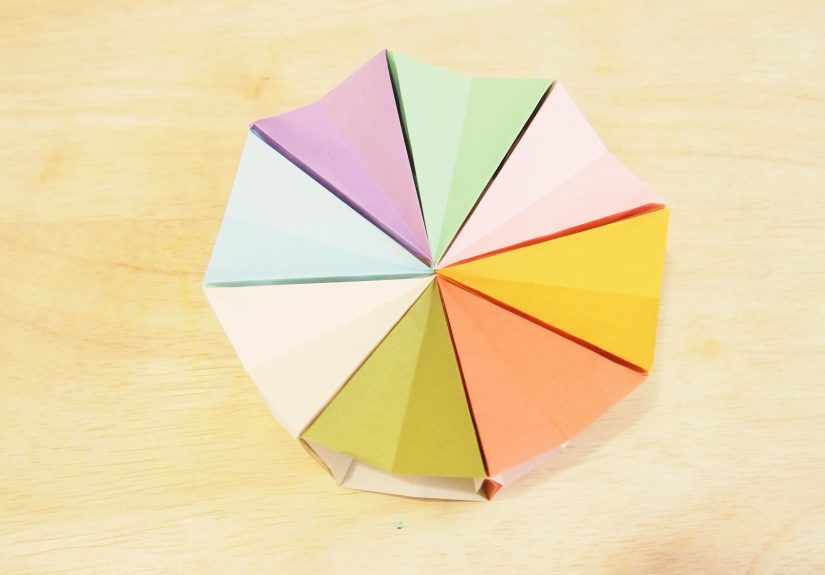
Way 4: Create a Flat Modular Origami Star or Wreath
Not every modular origami project needs to be a 3D polyhedron. Flat modular stars, rings, and wreaths are beautiful, beginner-friendly, and perfect for greeting cards, wall decor, gift wrapping, classroom projects, and holiday ornaments.
What You Need
- 6, 8, 10, or 12 square sheets of paper, depending on the design
- Lightweight paper for crisp layered folds
- Optional glue for display projects, though many designs lock without it
How Flat Modular Designs Work
Flat modular origami stars usually rely on repeated units arranged in a circle. Each unit overlaps or interlocks with the next. Instead of creating volume, the modules create rhythm, symmetry, and pattern. The finished model may look like a star, pinwheel, mandala, snowflake, or wreath.
Why This Method Is Great for Beginners
Flat modular designs are easier to inspect because all the connections are visible. If something goes wrong, you can usually spot it quickly. They also teach important skills like angle matching, color sequencing, and repeated folding without the extra challenge of three-dimensional assembly.
Design Ideas
Try alternating two colors for a classic starburst effect. Use gradient paper for a soft ombré wreath. Combine patterned and solid paper for a handmade greeting card. For seasonal decor, use red and green for winter holidays, pastels for spring, orange and gold for autumn, or blue and silver for a crisp snowflake look.
How to Choose the Best Modular Origami Method
If you are brand new, start with the 6-unit Sonobe cube. It is fast, sturdy, and teaches the essential tab-and-pocket system. If you want something more sculptural, move to the 12-unit stellated octahedron. If you enjoy longer craft sessions and want a showpiece, try the 30-unit ball. If you prefer decorative paper crafts that can be finished quickly, make a flat modular star or wreath.
The best method also depends on your patience level. A cube is a cup of coffee. A 30-unit ball is a full afternoon tea ceremony. Both are delightful, but you should know what kind of paper adventure you are signing up for.
Paper Selection Tips for Better Results
Paper size affects both folding comfort and final appearance. Larger paper is easier for beginners because pockets are easier to open and tabs are easier to insert. Smaller paper creates elegant finished models but requires more precision. For early projects, 4-inch or 6-inch squares are a good choice.
Paper thickness also matters. Thin paper folds easily but may produce a soft model. Thick paper holds shape but can make bulky joints. For Sonobe cubes and 12-unit models, regular origami paper is usually ideal. For large modular sculptures, experiment with slightly stronger paper once you understand the structure.
Color Planning: The Secret Ingredient
Color can turn a simple modular model into something eye-catching. For cubes, use three colors with two units of each color. For 12-unit models, use three colors with four units each. For 30-unit balls, try five colors with six units each. Repeating color patterns help reveal the geometry of the model.
If you want a calmer look, use shades from the same color family. If you want a bold design, use high contrast: navy and yellow, red and white, black and gold, or rainbow combinations. Modular origami is part math, part craft, and part “Does this color combination make me happy?” The answer should be yes.
Troubleshooting Modular Origami Problems
The Model Keeps Falling Apart
Check whether your tabs are fully inserted. Loose pockets can also cause slipping. Sharpen your creases and gently press the joined areas together. If the paper is too slippery, try standard kami or slightly textured paper.
The Shape Looks Uneven
One or more units may be folded inconsistently. Compare the suspicious unit with a clean one. Look for corners that do not align, reversed folds, or pockets facing the wrong direction.
The Last Piece Will Not Fit
This usually means the nearby units are too tight or one connection is misplaced. Loosen the surrounding pockets slightly and insert the final tabs one at a time. Avoid crushing the model in frustration. It did not insult your family; it is just paper.
The Paper Tears
You may be using paper that is too thin, too old, or too aggressively handled. Fold with lighter pressure when opening pockets, and avoid repeatedly unfolding the same crease.
Creative Ways to Use Finished Modular Origami
Finished modular origami models make excellent decorations. Hang 30-unit balls as ornaments, arrange cubes in a bowl, attach flat stars to cards, or use small polyhedra as party decor. Teachers can use modular origami to demonstrate symmetry, geometry, fractions, and spatial reasoning. Designers and crafters can use modular forms as inspiration for packaging, sculpture, lighting concepts, and display art.
Modular origami also makes a thoughtful handmade gift. A carefully folded paper ball or star carries time, attention, and personality. It says, “I made this for you,” but in a cooler, more geometric accent.
Experience Notes: What Making Modular Origami Teaches You
The first real lesson of modular origami is humility. A single unit may look easy, almost too easy. You fold one and think, “I have mastered paper engineering.” Then you fold twenty-nine more and discover that consistency is not automatic. The smallest difference in crease sharpness, paper alignment, or pocket depth can affect the final model. That is not a failure; it is the craft teaching you to slow down.
One useful experience is to fold a practice unit before committing to the full project. This test unit helps you understand the paper. Some paper behaves politely. Some paper acts like it has a personal grudge against clean corners. If the first unit feels too bulky or flimsy, change paper before folding the entire batch. There is no award for bravely finishing thirty units with paper you secretly hate.
Another practical lesson is to organize your units by color and orientation. When building a larger modular origami ball, place finished units in neat stacks. Keep all pockets facing the same way. This sounds fussy, but it saves time during assembly. Modular origami already has enough puzzles built in; you do not need to add “Where did I put the blue units?” to the challenge.
Assembly is where many beginners get nervous. The model may feel unstable until the final units are added. This is normal. A 30-unit ball often looks suspiciously floppy halfway through. Resist the urge to squeeze it into shape too early. Instead, keep adding modules according to the pattern. Stability arrives gradually, then suddenly. One moment you are holding a paper octopus; the next moment it becomes a beautiful sphere.
It also helps to learn the difference between pressure and force. Pressure means guiding a flap firmly into a pocket. Force means jamming paper until something bends, tears, or emotionally resigns. Good modular origami assembly uses gentle pressure. If a tab does not fit, the answer is usually not more strength. The answer is better alignment.
Color planning becomes more enjoyable with experience. At first, beginners often choose colors randomly, and that is perfectly fine. Later, you may start seeing how color can highlight the structure. A cube with three colors can show opposite faces clearly. A stellated octahedron with repeated color groups can emphasize its points. A 30-unit ball with five colors can create a woven look that feels intentional and polished.
One of the best personal strategies is to treat modular origami as a calm project rather than a race. Fold a few units during a break. Assemble the model when you have enough time and table space. If frustration appears, pause. Paper has a strange way of becoming easier after you step away for ten minutes. Many “impossible” final connections become obvious when your hands and brain are no longer arguing.
Finally, modular origami teaches that complex things are often built from simple repeated actions. A finished model may look intimidating, but it is only one fold, repeated carefully; one pocket, connected patiently; one unit, joined to another. That is why modular origami is so satisfying. It turns ordinary squares of paper into structure, pattern, and beautywithout batteries, screens, or a tiny instruction manual written in mysterious furniture-store language.
Conclusion
Learning how to make modular origami is a rewarding way to explore paper folding, geometry, color design, and patient craftsmanship. Start with a 6-unit Sonobe cube to understand the basic locking system. Move on to a 12-unit stellated octahedron when you want sharper structure. Try a 30-unit modular ball when you are ready for a longer, more impressive project. Make flat modular stars or wreaths when you want quick decorative results.
The beauty of modular origami is that every project begins the same humble way: one square of paper, one careful fold, and one small unit waiting to become part of something bigger. Fold neatly, assemble gently, and do not panic when the model looks strange halfway through. That awkward stage is just paper becoming art.


