Table of Contents >> Show >> Hide
- Why Measuring Peanut Butter Matters
- Quick Peanut Butter Measurement Chart
- Method 1: Measure Peanut Butter with Measuring Spoons or Dry Measuring Cups
- Method 2: Measure Peanut Butter by Weight with a Kitchen Scale
- Method 3: Use a Mess-Free Release Method, Adjustable Cup, or Water Displacement
- Which Method Should You Choose?
- How to Measure Different Types of Peanut Butter
- Common Peanut Butter Measuring Mistakes
- Practical Examples
- Peanut Butter Measuring Experience: What Actually Works in a Real Kitchen
- Conclusion
- SEO Tags
Peanut butter is one of life’s great kitchen joys: creamy, nutty, dependable, and somehow capable of sticking to a measuring spoon with the emotional intensity of a toddler refusing bedtime. Whether you are making peanut butter cookies, blending a protein smoothie, prepping overnight oats, or simply trying to keep snack portions honest, learning how to measure peanut butter correctly can save you mess, calories, recipe disasters, and at least three minutes of muttering at the sink.
The tricky part is that peanut butter behaves like a solid, a paste, and a tiny jar-shaped glue factory all at once. It is not pourable like milk, not scoopable like flour, and not conveniently wrapped in tablespoon markings like a stick of butter. That means the “right” method depends on what you are doing. A baker chasing consistent texture may prefer a kitchen scale. A busy parent making sandwiches may use a tablespoon. A home cook measuring a big scoop for sauce may reach for an adjustable cup or a clever no-mess trick.
This guide breaks down three practical ways to measure peanut butter: by volume, by weight, and by mess-reducing displacement or release methods. You will also find a quick conversion chart, common mistakes, portion-control tips, and real-life kitchen experience at the end. Apron optional. Sense of humor recommended.
Why Measuring Peanut Butter Matters
Peanut butter looks innocent, but it is a concentrated ingredient. A standard U.S. serving is commonly listed as 2 tablespoons, which is usually around 32 grams, depending on the brand and style. That serving often contains about 180 to 200 calories, roughly 7 to 8 grams of protein, and about 16 grams of fat. In other words, peanut butter is nutritious, satisfying, and very easy to over-scoop.
For recipes, measurement matters because peanut butter affects moisture, fat, sweetness, texture, and structure. Too little peanut butter in cookies may leave them bland and dry. Too much can make dough oily, dense, or overly soft. In sauces, one extra “generous spoonful” can turn a light peanut dressing into something closer to edible spackle. Delicious spackle, yes, but still spackle.
For nutrition tracking, measurement matters because peanut butter is calorie-dense. Eyeballing a tablespoon often turns into two tablespoons, and “just a little more” can become the surprise guest star of your daily calorie total. Measuring does not mean you cannot enjoy it. It simply means you know what you are eating, which is helpful whether your goal is baking success, balanced meals, or not accidentally turning breakfast into dessert with a side of toast.
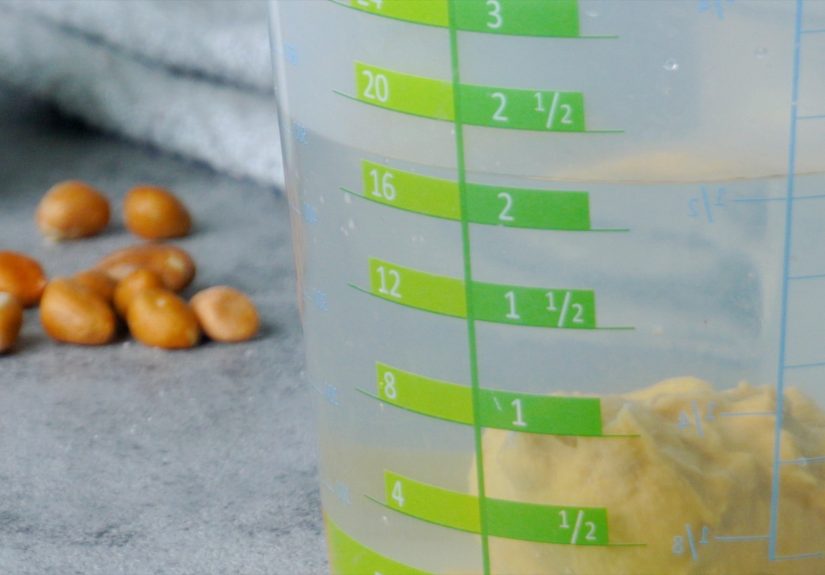
Quick Peanut Butter Measurement Chart
Use this chart as a practical starting point. Always check your jar label when precision matters, because natural, whipped, chunky, sweetened, and commercial creamy peanut butters may vary slightly in density.
| Amount | Approximate Weight | Best Use |
|---|---|---|
| 1 teaspoon | About 5 grams | Small snacks, sauces, tasting portions |
| 1 tablespoon | About 16 grams | Toast, oatmeal, smoothies, portion control |
| 2 tablespoons | About 32 grams | Common serving size, sandwiches, snacks |
| 1/4 cup | About 64 grams | Dressings, sauces, small baking batches |
| 1/2 cup | About 125 to 128 grams | Cookies, bars, frosting, larger recipes |
| 1 cup | About 250 to 256 grams | Big-batch baking or meal prep |
Method 1: Measure Peanut Butter with Measuring Spoons or Dry Measuring Cups
This is the classic method and the one most American recipes assume when they say “1 tablespoon peanut butter” or “1/2 cup peanut butter.” It is simple, familiar, and does not require special equipment beyond a measuring spoon or dry measuring cup. The catch is that peanut butter loves to cling to the utensil like it signed a lease.
Best for:
- Everyday snacks
- Sandwiches and toast
- Simple sauces
- Recipes where exact gram-level precision is not critical
- Small amounts such as 1 teaspoon, 1 tablespoon, or 2 tablespoons
How to do it correctly
Start with a clean, dry measuring spoon or dry measuring cup. Scoop peanut butter into the utensil, pressing lightly so there are no large air pockets. Level the top with the flat edge of a butter knife, spatula, or the back of another spoon. If the recipe calls for a “heaping tablespoon,” that means the top is rounded; if it simply says “tablespoon,” level it.
For sticky ingredients like peanut butter, many cooks lightly coat the measuring tool with neutral oil, melted butter, or nonstick cooking spray before scooping. This thin barrier helps the peanut butter slide out more cleanly. Use a very light coating; you are not deep-frying the tablespoon. If your recipe already includes oil, measure the oil first, then use the same cup for peanut butter. The leftover oil slick can make cleanup easier and may help the peanut butter release.
Dry cup or liquid cup?
For peanut butter, use dry measuring cups rather than liquid measuring cups when measuring by volume. A dry measuring cup lets you fill the ingredient all the way to the rim and level it off. A liquid measuring cup is better for pourable ingredients like milk, water, or oil because you read the line at eye level. Peanut butter does not politely settle into a neat line, so a dry cup gives you better control.
Common mistake: the giant spoon illusion
A regular dinner spoon is not the same as a measuring tablespoon. Depending on the spoon, one scoop may be less than, equal to, or much more than a true tablespoon. If you are measuring peanut butter for nutrition, do not trust the “close enough” spoon. Peanut butter has a way of turning close enough into “surprise, that was three servings.”
Method 2: Measure Peanut Butter by Weight with a Kitchen Scale
If accuracy matters, a kitchen scale is the best way to measure peanut butter. Weight removes the guesswork from sticky ingredients, eliminates the scrape-and-pray routine, and keeps recipes more consistent. It is especially helpful for baking, meal prep, calorie tracking, and any recipe where peanut butter plays a structural role.
Best for:
- Baking cookies, bars, cakes, and no-bake treats
- Nutrition tracking
- Meal prep
- Natural peanut butter that separates
- Reducing dishwashing drama
How to measure into a bowl
Place your mixing bowl on the kitchen scale. Press “tare” or “zero” so the scale ignores the bowl’s weight. Spoon peanut butter into the bowl until you reach the amount you need. For example, if your recipe calls for 2 tablespoons, aim for about 32 grams. If it calls for 1/2 cup, aim for about 125 to 128 grams, depending on the recipe and brand.
This method is beautifully low-mess because you measure directly into the bowl. No peanut butter gets abandoned in a measuring cup. No spatula rescue mission required. No sticky spoon sculpture left in the sink.
How to measure from the jar
Another clever approach is the reverse-scale method. Put the jar of peanut butter on the scale and press tare. Remove peanut butter from the jar until the scale shows a negative number matching the amount you need. For example, if you need 32 grams, remove peanut butter until the scale reads -32 grams. This method is excellent when adding peanut butter to toast, oatmeal, smoothies, or a saucepan.
Why weight is more consistent than volume
Volume can vary depending on how firmly you pack the peanut butter, whether it is creamy or chunky, and whether natural oil has separated. Weight stays more reliable. Sixteen grams is sixteen grams, whether the peanut butter is thick, runny, chunky, salted, unsalted, or having a natural-oil identity crisis.
Scale tip for natural peanut butter
Natural peanut butter often separates, with oil rising to the top. Stir the jar thoroughly before measuring. If you scoop mostly oil from the top or mostly dry peanut paste from the bottom, your recipe may behave differently. A well-stirred jar gives you a more balanced measurement and better texture.
Method 3: Use a Mess-Free Release Method, Adjustable Cup, or Water Displacement
The third way to measure peanut butter focuses on reducing mess when you need larger amounts. This is useful for recipes like peanut sauce, peanut butter frosting, energy balls, brownies, or big batches of cookies. You have three options here: a greased measuring cup, an adjustable plunger-style measuring cup, or water displacement. Each works a little differently.
Option A: Grease the measuring cup
Lightly coat the inside of a dry measuring cup with neutral oil, nonstick spray, or melted butter. Fill the cup with peanut butter, level it off, and then push or scrape it into your bowl. The peanut butter should release more easily than it would from an untreated cup. This is the simplest method and works well for 1/4 cup, 1/3 cup, 1/2 cup, or 1 cup measurements.
Option B: Use an adjustable measuring cup
An adjustable measuring cup, sometimes called a push-up or plunger measuring cup, is designed for sticky ingredients such as peanut butter, honey, molasses, shortening, and sour cream. You set the measurement, fill the chamber, level the top, and push the ingredient out from the bottom. It is oddly satisfying, like a tiny kitchen elevator for peanut butter.
This tool is not mandatory, but if you often bake with sticky ingredients, it can save time and reduce waste. It also keeps your measuring cups from becoming peanut-butter-coated monuments to regret.
Option C: Try water displacement for certain situations
The water displacement method can work when you need a larger volume and are not worried about a little water contact. For example, to measure 1/2 cup peanut butter, pour 1/2 cup cold water into a 2-cup liquid measuring cup. Add peanut butter until the water level rises to 1 cup. Drain the water carefully, and you should have about 1/2 cup peanut butter.
This method is old-school and can be useful in a pinch, but it is not always the best choice for baking. Peanut butter can trap water, and extra moisture may affect dough or batter. Use it for casual cooking, sauces, or recipes where a drop or two of water will not cause trouble. For precise baking, choose the scale instead.
Which Method Should You Choose?
The best method depends on your goal. If you are spreading peanut butter on toast and want a reasonable portion, a measuring tablespoon is enough. If you are baking peanut butter cookies for a bake sale, use a scale. If you are making a big batch of peanut sauce and want the peanut butter out of the cup without wrestling it like a raccoon in a hoodie, use a greased or adjustable measuring cup.
For portion control
Use a measuring tablespoon or kitchen scale. A level tablespoon is about 16 grams, and 2 tablespoons is about 32 grams. Measuring once or twice teaches your eye what a real serving looks like. After that, you may be better at estimating, though peanut butter is famously persuasive.
For baking
Use a kitchen scale whenever possible. Baking depends on ratios, and peanut butter contributes fat, protein, solids, salt, and sometimes sugar. A scale helps you repeat results from one batch to the next. If your cookies came out perfect once, grams help you invite that miracle back.
For sauces and smoothies
Use whatever is fastest and easiest. If the peanut butter is going straight into a blender, tare the blender jar on a scale and spoon it in. If you are whisking a sauce, a lightly oiled measuring cup works well. If you are adding peanut butter to hot noodles or curry sauce, a little extra may not ruin anything, but measuring still helps balance flavor.
How to Measure Different Types of Peanut Butter
Creamy peanut butter
Creamy peanut butter is the easiest to measure. It packs smoothly into measuring cups, levels cleanly, and works well with both volume and weight methods. Commercial creamy peanut butter is usually very consistent, which makes it friendly for recipes.
Chunky peanut butter
Chunky peanut butter can create tiny air pockets around peanut pieces. When measuring by volume, press it gently into the cup and level it off. Do not smash it aggressively unless your recipe calls for emotional support peanut paste. For accuracy, weigh it.
Natural peanut butter
Natural peanut butter needs a good stir before measuring. Oil separation can make the top of the jar runny and the bottom thick. Stir until the texture is even, then measure. If the jar is difficult to stir, store it upside down before opening or use a sturdy butter knife to combine the oil and solids slowly.
Powdered peanut butter
Powdered peanut butter is a different ingredient. Measure it like a dry powder, usually with dry measuring spoons or cups, and follow the package instructions for rehydrating. Do not substitute it one-for-one for regular peanut butter in baking unless the recipe is designed for it, because it has much less fat.
Common Peanut Butter Measuring Mistakes
Using a heaping spoon when the recipe calls for a tablespoon
A heaping spoon can be much larger than a level tablespoon. In casual cooking, that may be fine. In baking or nutrition tracking, it can throw off the result.
Not leveling the cup
When measuring by volume, level the top. A rounded mound may look friendly, but it changes the amount. Use a flat edge for a clean measurement.
Measuring separated natural peanut butter without stirring
This can give you too much oil or too much dry peanut solid. Stir first for better flavor, texture, and recipe performance.
Assuming every brand weighs exactly the same
Most peanut butters are close, but labels vary. Some list 2 tablespoons as 32 grams, while others may list 33 grams. Small differences rarely matter in casual cooking, but they can matter in strict nutrition tracking or precise baking.
Scraping poorly and leaving peanut butter behind
If a recipe needs 1/2 cup and two tablespoons stay stuck in the measuring cup, your recipe is no longer getting 1/2 cup. Use a flexible spatula, oil the cup first, or measure by weight directly into the bowl.
Practical Examples
Example 1: Measuring peanut butter for toast
Use a tablespoon and level it off. One tablespoon is about 16 grams. Spread it across warm toast so it melts slightly. Add banana slices, cinnamon, or a drizzle of honey if breakfast deserves a tiny standing ovation.
Example 2: Measuring peanut butter for cookies
Use a kitchen scale. Place the mixing bowl on the scale, tare it, and add the exact gram amount from the recipe. If your recipe says 1/2 cup, use about 125 to 128 grams unless the recipe provides its own weight.
Example 3: Measuring peanut butter for a smoothie
Place the blender jar on the scale, tare it, and add 16 to 32 grams of peanut butter. This avoids dirtying a measuring spoon and helps keep the smoothie balanced. Peanut butter, banana, milk, and cocoa powder are a classic combination for a reason.
Example 4: Measuring peanut butter for peanut sauce
Lightly oil a 1/4-cup measuring cup, add peanut butter, level it, and scrape it into a bowl with soy sauce, lime juice, garlic, ginger, and a little warm water. Whisk until smooth. If it gets too thick, add water one tablespoon at a time.
Peanut Butter Measuring Experience: What Actually Works in a Real Kitchen
After measuring peanut butter in many ordinary kitchen situations, one lesson becomes very clear: the best method is the one that matches the moment. There is no reason to pull out a digital scale just to make a quick sandwich before work, unless you enjoy turning lunch into a science fair project. But there is also no reason to fight a sticky measuring cup when a scale can measure peanut butter directly into a bowl with almost no cleanup.
For everyday eating, measuring spoons are surprisingly useful. The first time you level off a true tablespoon of peanut butter, you may experience a tiny personal crisis. It often looks smaller than the heroic scoop many people spread on toast. That does not mean the serving is bad; it means peanut butter is rich. A level tablespoon spread over warm toast can go farther than expected, especially if you add sliced fruit, chia seeds, or a sprinkle of cinnamon. The trick is to spread it thinly while the toast is warm, because melted peanut butter behaves more generously.
For baking, the kitchen scale wins every time. Peanut butter cookies are a perfect example. Too much peanut butter can make cookies greasy or heavy; too little can make them taste like sugar cookies that once heard a rumor about peanuts. Measuring by grams gives the dough a better chance of behaving. It also reduces cleanup because the peanut butter goes straight into the mixing bowl. Once you get used to pressing tare, it feels less like a fancy baking move and more like common sense.
Natural peanut butter deserves special mention because it can test your patience and your forearm strength. The oil rises, the bottom gets dense, and stirring the jar can feel like mixing cement with a butter knife. The experience improves if you stir the whole jar thoroughly when you first open it, then refrigerate it if the label recommends doing so. Once the texture is even, measuring becomes much easier. If you skip the stirring step, your first servings may be oily and your last servings may be dry enough to qualify as peanut gravel.
The greased measuring cup trick is the most satisfying for larger amounts. A quick swipe of neutral oil inside the cup makes peanut butter release cleanly, especially when measuring 1/4 cup or more. It is not perfect; you may still need a spatula. But compared with scraping a dry measuring cup for thirty sticky seconds, it feels like progress. If a recipe already uses oil, measuring the oil first and the peanut butter second is a small kitchen habit that pays off immediately.
The adjustable measuring cup is a nice tool if you use peanut butter, honey, molasses, or shortening often. It is not essential, and nobody should feel under-equipped without one. Still, pushing peanut butter neatly into a bowl is deeply pleasant. It also helps prevent waste because less ingredient clings to the cup. For frequent bakers, it can be worth the drawer space.
Water displacement is the most old-fashioned method, and it does work in some cases, but it is not my first choice for baking. Peanut butter and water are not enemies, but they are not best friends either. If you are making a sauce where water is already part of the recipe, displacement can be handy. If you are making cookies, use a scale or greased dry cup instead. The fewer surprise droplets in cookie dough, the better.
The biggest real-world tip is to stop guessing for a week. Measure your usual peanut butter portions with a spoon or scale just a few times. You will quickly learn what 1 tablespoon, 2 tablespoons, and 1/4 cup actually look like. After that, you can choose when to be precise and when to relax. Peanut butter should be enjoyed, not feared. Measuring simply gives you control over flavor, texture, nutrition, and mess. And if a little extra ends up on the knife? Well, the cook’s tax is a respected kitchen tradition.
Conclusion
Measuring peanut butter does not need to be complicated, but it does need the right approach. For quick snacks and simple meals, measuring spoons or dry measuring cups work well. For baking and nutrition accuracy, a kitchen scale is the most reliable choice. For larger amounts and sticky situations, a greased cup, adjustable measuring cup, or careful displacement method can reduce mess and waste.
The main idea is simple: peanut butter is dense, sticky, and easy to overestimate. A little measuring know-how helps you make better cookies, smoother sauces, more balanced smoothies, and more accurate portions. It also means less peanut butter left behind in the measuring cup, which is good because peanut butter belongs in your recipe, not clinging heroically to plastic.
Note: For the most accurate nutrition and recipe results, check the serving size and gram weight on your specific peanut butter label, especially when using natural, chunky, whipped, reduced-fat, or powdered peanut butter.